
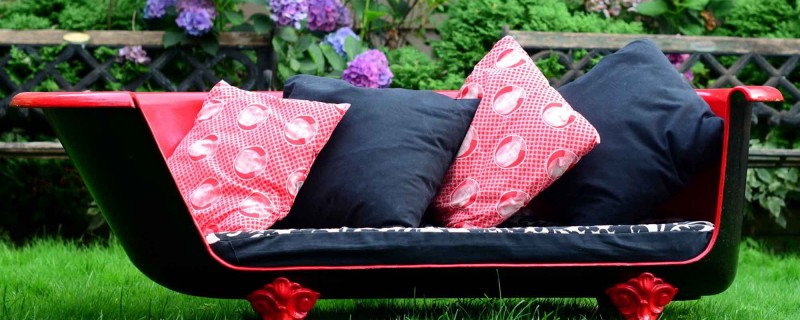
This amazing cast iron vintage clawfoot bath can be transformed into an upcycled vintage sofa couch. The bathtub is surprisingly comfortable; after all, it’s designed to have people lounging in it! No matter the condition of the bathtub, you can transform it into a conversation piece couch that is as practical as it is funky.
Step 1: Start by outlining a cut out on the edge of the bathtub.

Step 2: Cut out with an angle 4 1/2 inch angle grinder. This puts enormous strain on the grinder, so work slowly and carefully. Wear gloves, protective clothing, goggles and a face mask.

Here is a video of the cast iron cutting to give you a better idea of how to proceed.
Step 3: Sand down any rusted areas and clean cast iron bathtub surface prior to painting.

Step 4: Paint the bottom of the claw-foot tub with Krylon paint. Using a paint sprayer will reduce streaks and runs. When it is completely dry, turn the tub over and paint the interior using a sprayer if you can.

Step 5: Sand and paint feet separately.
Step 6: Place a cushion in the bottom of the cast iron claw-foot bathtub sofa
This book contains over 80 DIYs, recipes and tips on how to live greener and leaner. Learn to make fun upcycling crafts and furniture, make your own cleaning products, grow your own food and make ALL your own beauty products from face creams to mascara.
Click HERE.
COOLNESS! Way to go guys, this looks awesome!
super duper sick. I want one.
How did you get your measurement for your layout for the cut
Hi John,
Thanks for your question. The cut will depend largely on the size of your bath, but mine is 14 inches from the top rim and 45 inches wide. Be sure to cut the bath at the bottom just after it starts to curve up – leaving too much space above the curve means it will cut into your legs when you sit on it. Use a level to ensure that the lines are straight.
I love this!! I have wanted a “holly golightly” sofa for a long time and your blog makes me feel like this is a project I can take on. How long did it take you? Do you feel like it could be used outside or needs to be an indoor fixture? Thanks, K
Hi Kristen! I love this sofa, its my favorite piece of furniture and a real hit with visitors. I use it inside, but you can just as easily leave it outdoors too. From start to finish, the sofa took about a day to complete. It does depend on the condition the bathtub is in when you start. Ours had been outside for decades and was covered in rust. We had to sand it down and that took some time. We also used a primer and a couple of coats of paint to get it up to scratch. If your bathtub is in a good condition, it should only take you a couple of hours. If you make this sofa, please send us a picture or a video – we would love to see your handy work. Good luck and let me know if you need any help along the way.
Great work! Can you post a video of the full cut? I’d like to see how long it took, how many blades, and how you cut the curves.
Thanks!
HI Erik,
Unfortunately this is the only video we shot. http://www.youtube.com/watch?v=sx7rlbySkig
The full cut took about 30 minutes. We used a 2mm cut off disc. We didn’t even get through a full blade.
my daughter saw this and wants one for her room. thanks for the instructions! picking up a tub tomorrow.
That’s great – if you need any help with the build, let me know!
PS: Sheldon, send us a pic of your completed work.
Pingback: Our favourite upcycling projects of the week | 1 Million Women
Very sorry for the ancient bath, it can be recovered and used for other purposes or to sell those to whom it is most needed.
Pingback: 1 Million Women
How long did this take? Is it a weekend project or something that needs a lot more time? Absolutely beautiful finish! I love the boldness of the red. FANTASTIC!
Thanks Jen – I love this couch! It took my husband a weekend to make it, but its surprisingly easy to make. He spent a lot of time working on rust removal because the tub was in bad shape to start with. If you start with a rust-free tub, you could cut it and paint it in a day.
Pingback: DIY Christmas Gift Ideas You'll LOVE!
What kind of grinder do you have? I’m trying to cut, but after 2 hours, i’ve only made it 4 inches. I’m aghast that it only took you 30 minutes. According to the guys at Home Depot, i’m using the right disk. I’ve blown through 2 in that 4 inches 🙁
Hi there,
I was using a very standard Bosch 4.5″ 6A grinder (http://www.canadiantire.ca/en/pdp/bosch-6a-angle-grinder-4-5-in-0547054p.html#.UtWGoZ5dU2E)
The trick is to use as thin a cut off wheel as possible – (something like this: http://image.made-in-china.com/2f0j00LCMTPEBaqtpw/Super-thin-Cut-Off-Wheel.jpg). The thinner the wheel, the less material it has to cut through – when I say thin, I mean like 2-3mm thick – anything thicker and it will take a very long time. Be sure to have a clear and as accurate a line as possible to follow, cut along it and use a thicker (like the one you have been using) wheel to round the edge afterwards. Do not force the grinder against the cast iron either, as this will put undue resistance on the electric motor of the grinder and can burn it out very easily, ruining it.
No offence to whoever recommended whatever to you – but I made it all the way through on one disc (which I was very surprised about)…and it wasn’t fancy – it was the cheapest (10 for $9) one I could find…
Another point of note – grinding cast iron creates a TON of tiny iron particles. these particles are tossed all over the place seeing as that is the nature of grinding. if you’re doing this out of doors, these particles will rust during the first rain, creating rust stains. I did mine on a paved area – which ended up getting CRAZY rust stained….word to the wise – either thoroughly clean up immediately after, or do the grinding somewhere of no consequence…
Thank you SO much for your help! i’ll give it another try 🙂
Nice idea
Thanks Sandy! I have this in my living room and its my most loved piece of furniture
Pingback: What was once a tub… | aeholstein
Hi! I know this is kinda off topic however , I’d
figured I’d ask. Would you be interested in exchanging links or maybe guest writing a blog article or vice-versa?
My blog discusses a lot of the same topics as yours and I believe we could
greatly benefit from each other. If you’re interested feel
free to send me an e-mail. I look forward to hearing from you!
Terrific blog by the way!
Feel free to visit my web site Bathtub Reglazing Orlando
I’m about to embark on making one of these tub couches, and am really excited about it! I will definitely post pictures along the way.
Wondering, if I wanted to fill the holes where the faucets were how would I go about doing that?
If you would like to plug the holes, the first thing to do would be to create a substrate in them, that would allow you to apply body filler. I would suggest you cut two pieces of sheet metal, one for either side of each hole, cut these two pieces just slightly larger than the diameter of each hole so that each circle could not be pulled straight through. Then drill a hole through the center of each circle and pass a short countersunk head bolt through them both and secure on the other end with a thing nut. Cut off any excess bolt passing through the nut using your angle grinder. You should now have the hole ‘plugged’, yet beneath the surface of the cast iron, as this will generally be ~1/2 inch thick. Now apply a layer of body filler (Bondo or the such) and smoothly apply it to the surface of the tub around and over the plugged holes using a rubber straight edge to smooth over the holes, blending them into the surface of the cast iron. Allow for the body filler to dry, then sand it smooth to the surface of the tub. Good luck with it – the tub couch is my FAVORITE thing and its really comfortable. We would love to see the process and finished product so send us some pictures. If you have any problems or questions, just drop us a line and we will be happy to help!
How do I go about the cushion? What shape & how thick
You can use sofa cushions that you already have or upcycle some sofa cushions if you prefer. We got a piece of foam from a mattress store and covered it with upholstery fabric which matched our living room. The thickness really depends on how comfy you want it to be. Let me know if you have any other questions.
This is thrilling! My wife LOVES these tubs, but of course, we couldn’t fit one in a tiny house with kids! Great way to integrate something she loves into the living room!
Pingback: 7 Uses for Old Bathtubs | JL Bathrooms Blog
Hi Nikki,
I’ve made one of these too and absolutely love it. Problem with mine is that i didn’t get a perfectly smooth cut with my angle grinder – did you manage to get a smooth finish when you cut yours? If not how fix you smooth yours down?
Thanks
Lauren
Your style is unique compared to other people I have read stuff from.
Many thanks for posting when you’ve got the opportunity,
Guess I will just bookmark this page.
Pingback: Giving your home a unique edge - Design Reviver - Web Design Blog
Pingback: 40 Impressive DIY Ways To Repurpose and Reuse Broken Household Items Part 1 | eKanpSack
Pingback: Giving your home a unique edge | Lunarium Design
Pingback: 40 Impressive DIY Ways To Repurpose and Reuse Broken Household Items Part 1 | HeySup
This is an ingenious way to recycle and be green! For those of us who are not such master craftsmen though, you might like to know that you can stay ecofriendly, and have a real hot tub, because the hot tubs of today actually have reduced the amount of energy and water they use. Check out some of the most eco friendly tubs at http://www.coloradospringshottubs.com/hot-tubs/71-hotspring-jetsetter-used—refurbished
Hi Nikki, I have just bought an old tub. I so want to do this and it be as beautiful as the picture above. I know this is asking a lot……..but can you walk me through start to finish. How do you prep tub to get start and what do you use so that it will stay beautiful for a long time. After cutting isn’t the edges sharp? how do you get them to be not sharp and the polished look. What products do you use and what type of paint. If you can answer these questions I think I will get started!!! Thanks in advance and I look forward to hearing from you soon/ Johnna Bickerstaff
Just removed and old iron bath tub from upstairs and fitted a new one. The old bath was just about to be taken to the tip. Also been looking for a small sofa for the kitchen. I think this might save a trip to the tip and a few hundred pounds.
That would be a result if it’s as easy as it looks here!
Can you recommend disks for sanding the edges?
Pingback: 13 The Most Creative DIY Ideas - How to Recycle Broken Item
Pingback: Nikki & Ian's Quirky, Upcycled & Nature-Inspired Home — House Tour Sell Ur Shit | Make Money Selling Your Shit online for Free | Sell Ur Shit | Make Money Selling Your Shit online for Free
Pingback: Nikki & Ian's Quirky, Upcycled & Nature-Inspired Home — House Tour – Pioneers Discovers
What better way to help your child’s dreams come true then by surrounding them with their favorite things! Decorating your child?s bedroom can be both a fun and rewarding experience for both of you.
Artemide Lighting http://www.charityhayesillustrator.com/spryassets/?p=id-7403
Pingback: DIY Repurposed Old Bathtubs Into Furniture Ideas That You Will Love To See - feelitcool.com
Pingback: Viralility » Stories that make you think » 30 Pieces Of Junk That Were Transformed Into Something Awesome.
Pingback: 30 Pieces Of Junk That Were Transformed Into Something Awesome. – Viral Bone – News That Makes You Think
Pingback: 30 Pieces Of Junk That Were Transformed Into Something Awesome. – InsiderViral
Pingback: 30 Pieces Of Junk That Were Transformed Into Something Awesome. - Oplus
Pingback: Abfall - Recycling statt Verbrennung -
Pingback: 11 Creative Uses For Old Bathtubs | Good Ideas For You
Pingback: La vecchia vasca diventa divano! 20 esempi bellissimi + VIDEO Tutorial...
I love this and it is a great way to recycle…I want to see how long it took?
Pingback: 18 Spectacular DIY Ways To Repurpose and Reuse Broken Household Items - The ART in LIFE
I will need towards be the most straightforward
Great post! Have nice day ! 🙂 fenff
Pingback: 30 coisas que iam para o lixo mas ganharam uma nova vida - TREND VIRAL
Pingback: 16 Spectacular DIY Ways To Re purpose and Reuse Broken Household Items – Dreams in Life
Pingback: 100 Ways to Repurpose and Reuse Broken Household Items - DIY & Crafts
Pingback: Reuse everyday items around your home for a making each moment into an incident ⋆ BrassLook
How long did this take?
About 4 hours
I’m in the middle of a similar project and wondering what kind of paint you used for the inside? My tub has the original enamel and I’m not sure what to use on it. Cheers!
Informative article. Thanks
Great idea. Thanks
A well-designed pallet rack layout enhances warehouse storage efficiency and workflow. Take into account ceiling height, doorways, and aisles to ensure compatibility.
Aligning racks with traffic flow improves productivity. Choose selective racking for frequent stock rotation or drive-in racking for larger inventory loads.
Incorporate safety measures like adequate aisle width and rack anchors. Technology can improve accuracy.
A well-thought-out layout boosts efficiency and improves storage capacity.
[url=https://rgpalletracking.com/]Industrial Racking[/url]
[url=https://finazle.com/hello-world/#comment-4306]Frequently Asked Questions on Warehouse Racks[/url] f619004
Подробная инструкция по применению супрастинекса, прочтите перед началом приема.
Оптимальный режим приема супрастинекса: инструкция, рекомендации от специалистов.
Как правильно использовать супрастинекс: шаг за шагом, эффективные стратегии лечения.
Секреты эффективного применения супрастинекса, информация от специалистов.
Полезные советы по использованию супрастинекса, подсказки для эффективного лечения.
Супрастинекс: секреты правильного применения, рекомендации для пациентов.
Инструкция по применению супрастинекса: все советы и рекомендации, эффективные стратегии использования.
Оптимальный режим приема супрастинекса: полная инструкция, секреты успешного восстановления.
Подробная инструкция по использованию супрастинекса: все секреты и рекомендации, стратегии эффективного лечения.
Секреты успешного применения супрастинекса, подсказки для эффективного лечения.
супрастинекс инструкция по применению https://suprastinexxx.ru/ .
Exploring the Future of Learning with 3D Printing, Innovative Ways to Integrate 3D Printing in the Classroom, Transforming School Projects with 3D Printing, The Benefits of Using 3D Printing in School Assignments, Creative Ideas for 3D Printing in Education, Exploring the Possibilities of 3D Printing in Student Work, Inspiring the Next Generation with 3D Printing, Encouraging Creativity with 3D Printing in Education, Incorporating 3D Printing into School Curriculum, Inspiring Innovation in School Projects with 3D Printing.
3D Printing in School Projects https://www.habr.com/ru/companies/top3dshopinc/articles/792658 .
A 3D printed play space for children, that will interest every little explorer.
Immerse yourself in an exciting creative process with your child, using the most modern technologies and materials.
Help your child develop imagination and creativity, using 3D printing as a means of self-expression.
Best Ways to Apply 3D Printing in Children’s Education, and what advantages it gives your child.
Exploring the world of 3D Printing for kids, and how it inspires young creators to bold experiments.
Practical lessons and projects for developing 3D modeling skills, that your child can easily handle.
3D Printing for Kids https://www.habr.com/ru/companies/top3dshopinc/articles/792134 .
Каркасные дома под ключ: заказать дом мечты по разумной цене
каркасные дома санкт петербург http://www.karkasnye-doma-pod-klyuch-v-spb178.ru/ .
Быстрое строительство каркасных домов без потери качества
строительство каркасных домов под ключ http://karkasnye-doma178.ru/ .
Каркасные дома для дачи: стильный и экономичный вариант под ключ
каркасные дома спб https://karkasnye-doma-pod-kluch178.ru/ .
on line pharmacy
Experience Luxury and Taste with Our [url=https://seattle-towncar.com/seattle-winery-tour/]Seattle Winery Tour[/url] Limo Service
Indulge in the finest flavors of the Pacific Northwest with our premier Seattle Winery Tour limo service. Combining elegance, convenience, and a passion for exceptional wine, we offer an unforgettable experience tailored just for you.
[url=https://seattle-towncar.com/service/]Limousine services[/url] for Every Occasion
Our limousine services are designed to cater to every special occasion. Whether you’re planning a romantic getaway, a corporate event, or a memorable day out with friends, our fleet of luxurious limousines ensures a seamless and stylish journey. Each vehicle is equipped with state-of-the-art amenities to make your ride as comfortable and enjoyable as possible.
Seattle Winery Tour: A Journey through the Vineyards
Embark on a Seattle Winery Tour and discover the hidden gems of Washington’s wine country. Our expert chauffeurs will guide you through a carefully curated selection of the region’s top wineries, offering breathtaking views and exquisite tastings. Sit back, relax, and let us handle the logistics while you savor the best wines the area has to offer.
[url=https://seattle-towncar.com/services-nearby-seattle/]Services Nearby Seattle[/url]
Located conveniently near Seattle, our limousine services provide easy access to some of the city’s most popular attractions. From the bustling downtown area to the serene countryside, our knowledgeable drivers ensure that you reach your destination efficiently and in style. Whether you’re planning a night out in the city or a day trip to the surrounding areas, our services nearby Seattle have you covered.
Why Choose Our Limo Service?
– Luxury and Comfort: Our fleet of limousines is designed with your comfort in mind, featuring plush interiors, advanced entertainment systems, and ample space for you and your guests.
– Professional Chauffeurs: Our trained and experienced chauffeurs are dedicated to providing a smooth and safe ride, ensuring your journey is as enjoyable as your destination.
– Customized Itineraries: We offer customized itineraries for your Seattle Winery Tour , allowing you to visit your preferred wineries and experience the best of what the region has to offer.
– Seamless Booking: Our user-friendly booking process ensures that reserving your limousine is quick and hassle-free. Simply choose your preferred date and time, and we’ll take care of the rest.
Experience the Best of Seattle with Us
Elevate your wine tasting experience with our premier Seattle Winery Tour limo service. From the moment you step into one of our luxurious limousines, you’ll be treated to a level of service and comfort that is unparalleled. Contact us today to book your journey and explore the finest wineries nearby Seattle in style.
Let us be your guide to an unforgettable adventure in the heart of Washington’s wine country.
Основные критерии выбора конкурсного управляющего, Изучаем профессию конкурсного управляющего, путь к успешной карьере, инсайдерская информация, полезные советы, Требования к профессионалу конкурсного управления, секреты профессии, Как выбрать лучшего конкурсного управляющего для своей компании, Эффективное управление в условиях конкурсных процедур, Как стать лучшим конкурсным управляющим, эксклюзивные советы
конкурсный управляющий konkursnyj-upravlyayushhij.ru .
Как найти проект каркасного дома, который точно станет вашим домом мечты
каркасные дома спб под ключ karkasnye-doma-spb178.ru .
накрутка любых реакций в Телеграмме накрутка любых реакций в Телеграмме .
купить диплом о высшем образовании старого образца
Каркасный дом: строительство, которое вы можете себе позволить без ущерба для стандартов
каркасные дома под ключ проекты и цены https://www.spb-karkasnye-doma178.ru/ .
Оформление временной регистрации через компанию: Какие преимущества вы получите
регистрация временного пребывания http://rega-msk99.ru/ .
I appreciate, result in I found just what I was looking for. You have ended my 4 day long hunt! God Bless you man. Have a nice day. Bye
Идеи для покупки мебели в Италии – подробный обзор
мебель из италии купить https://kupit-mebel-italii.ru .
диплом о высшем образовании купить корочку
ebtq7z
купить диплом в брянске о высшем образовании
Hi! I just wanted to ask if you ever have any problems with hackers? My last blog (wordpress) was hacked and I ended up losing many months of hard work due to no data backup. Do you have any solutions to stop hackers?
Лучшие услуги сантехника в вашем городе
вызов сантехника на дом спб вызов сантехника на дом спб .
Машинка на пульте: топ аксессуаров для улучшения вашей игрушки – всё доступно в нашем каталоге
машины радиоуправляемые https://wildberries.ru/catalog/281617142/detail.aspx .
I do not even know how I ended up here, but I thought this post was good. I do not know who you are but definitely you’re going to a famous blogger if you are not already 😉 Cheers!
купить диплом среднем образовании
Комплексные услуги сантехника – доступные цены и профессиональный подход
сантехник спб срочно https://www.uslugisantehnika-spb.ru/ .
ставрополь диплом купить
курган купить аттестат
Привет, друзья!
Начальники довольно часто предпочитают принимать соискателей, которые закончили высшее учебное заведение. Особенно в приоритете топовые заведения. Однако учиться 5 лет – это дорого, не у всех существует подобная возможность. Приобрести документ – оптимальный выход.
Бывают и непредвиденные случаи, когда диплом ВУЗа утерян. Не всегда можно быстро и беспроблемно восстановить его, особенно когда университет закрыт или располагается в другом регионе России. Бюрократические проволочки отнимут массу времени и нервов.
Для эффективного продвижения вверх по карьерной лестнице потребуется наличие диплома о высшем образовании. Но нередко в жизни случается так, что сложные обстоятельства мешают с успехом закончить учебу и заполучить важный документ.
Заказать диплом любого ВУЗа
Наши специалисты предлагают выгодно и быстро заказать диплом, который выполнен на оригинальном бланке и заверен мокрыми печатями, водяными знаками, подписями. Документ способен пройти лубую проверку, даже с применением специального оборудования. Достигайте цели быстро с нашими дипломами.
Где заказать диплом специалиста? rdiploman.com
Добрый день!
Где купить диплом по актуальной специальности?
Мы готовы предложить дипломы любой профессии по приятным ценам. Цена будет зависеть от выбранной специальности, года получения и университета. Всегда стараемся поддерживать для клиентов адекватную политику цен. Важно, чтобы документы были доступными для большого количества наших граждан.
Покупка документа, подтверждающего окончание института, – это выгодное решение. Попросту подсчитайте, сколько понадобится вложить денежных средств на оплату пяти лет обучения, на аренду квартиры (если учащийся иногородний), на проезд до института и многие другие расходы. Получается приличная сумма, в разы превосходящая цены на наши документы. А ведь все эти пять лет можно уже успешно работать, продвигаясь по карьере.
Готовый диплом со всеми печатями и подписями отвечает запросам и стандартам Министерства образования и науки России, неотличим от оригинала. Не следует откладывать собственные мечты и цели на несколько лет, реализуйте их с нами – отправляйте простую заявку на диплом прямо сейчас!
Получить диплом о среднем образовании – легко! diplomans.com
Комплексный монтаж водопровода и отопления – надежные услуги сантехника
сантехник на дом спб https://santehniknadom-spb.ru/ .
Generate cover letters that match your resume style seamlessly
cover letter creator ai http://createcoverletterfree.com/ .
Добрый день!
Покупка документа о высшем образовании через надежную компанию дарит ряд плюсов для покупателя. Данное решение дает возможность сберечь как продолжительное время, так и серьезные финансовые средства. Однако, на этом выгода не ограничивается, плюсов гораздо больше.Мы изготавливаем дипломы психологов, юристов, экономистов и любых других профессий. Дипломы производят на подлинных бланках. Доступная цена в сравнении с крупными затратами на обучение и проживание в другом городе. Покупка диплома об образовании из российского института является разумным шагом.
Купить диплом о высшем образовании: modx.pro/users/diplomygroup
проекты домов проекты домов .
Cover letter generator with tips from HR professionals
generate cover letter https://www.writingcoverletterai.com/ .
конкурсный управляющий это кто простыми словами https://www.konkursnyj-upravlyayushhij-po-bankrotstvu.ru/ .
Создайте идеальный домашний спортзал с тренажерами Матрикс и тренируйтесь без ограничений
матрикс фитнес http://matriks-trenajeri.ru/ .
Доброго времени суток!
Где заказать диплом по актуальной специальности?
Мы предлагаем дипломы психологов, юристов, экономистов и других профессий по приятным ценам. Цена может зависеть от определенной специальности, года выпуска и образовательного учреждения. Всегда стараемся поддерживать для покупателей адекватную политику тарифов. Для нас очень важно, чтобы документы были доступными для большого количества наших граждан.
Приобретение диплома, подтверждающего обучение в университете, – это выгодное решение. Для сравнения просто посчитайте, сколько вам пришлось бы потратить денежных средств на оплату 5-летнего обучения, на аренду квартиры (если студент иногородний), на проезд до ВУЗа и обратно. Получается приличная сумма, намного превосходящая расценки на нашу услугу. А ведь все это время можно работать, занимаясь собственной карьерой.
Получаемый диплом со всеми печатями и подписями отвечает требованиям и стандартам Министерства образования и науки, неотличим от оригинала. Не стоит откладывать свои цели на потом, реализуйте их с нашей компанией – отправляйте быструю заявку на изготовление документа сегодня!
Диплом о среднем образовании – легко! diploman-russian.com
мебель из италии в москве kupit-italyanskuyu-mebel.ru .
Choose the best online schools for teaching children, which offer high-quality education.
Looking for home-based learning? Online schools will help you choose, detailed review.
Online School Selection: important selection criteria, understand the main points.
How to make learning interesting for your child at an online school, apply proven techniques.
How to prepare for online learning, get the right skills.
Choosing between online and offline learning: which is better?, understand the main points.
Choose a suitable online school for learning foreign languages, get the most out of it.
Secrets of maintaining interest in learning online, overcome difficulties.
Secrets of comfortable learning at home, create your own cozy learning space.
Compare online and offline education, get a full review.
Choose interesting courses for adults in an online format, reach new heights.
How to properly study online, overcome difficulties.
How to choose the best online school for learning programming, improve your skills.
Online learning: a new format of education, develop with us.
The best online courses for teaching children, get the most out of it.
Support your child’s learning: the best online courses, get useful tips.
Best Online Schools for Your Child, get new knowledge.
k12online http://www.onlk12-st5.com/ .
купить диплом с проводкой спб
Как получить займы онлайн на карту без лишних документов и визитов
займы http://www.vsezajmyonline.kz/ .
проект дома https://proekty-zagorodnykh-domov.ru/ .
купить диплом легальный
Экран для проектора с высоким коэффициентом отражения – яркое изображение даже в освещенной комнате
экран проектора купить https://proekcionnye-ehkrany01.ru/ .
Лучшие предложения микрокредитов – сравните и выберите выгодные условия
микрокредиты на карту https://www.allmikrokredits.kz .
Займы онлайн без отказа – даже с плохой кредитной историей и просрочками
займы онлайн http://vsemiikrozajmy.kz/ .
Микрокредиты онлайн – быстрое оформление, низкие ставки, моментальный перевод
микрокредиты онлайн https://www.mikrokredityvsem.kz .
Заказать документ ВУЗа можно у нас. diplomh-40.ru/kupit-diplom-ekonomista
Мгновенные займы онлайн без звонков и подтверждений – деньги на вашу карту
взять займ http://www.news365.kz/ .
Engaging the services of a attorney specializing in disabilities for claims concerning disabilities in Albuquerque region carries immense value. Individuals who pursue the guidance of a disability lawyer in disability court trials can derive countless advantages and priceless support throughout the disability claims process. These legal professionals have the necessary skills, understanding, and capability to efficiently sail through the intricacies of the law system and represent for their clients’ optimal benefits.
One of the main functions of a disability attorney in court proceedings related to disabilities entails adeptly guiding and overseeing the court proceedings. Lawyers for disabled individuals shine at navigating the subtleties of court proceedings on disabilities, which can be overwhelming for those unfamiliar with the law system. By utilizing the assistance of a attorney specializing in disabilities, individuals with disabilities greatly enhance their likelihood of success in court for disability claims.
Throughout court proceedings for disability claims, a lawyer for disabled individuals plays a pivotal and dynamic position in providing vital
assistance. They vigorously work together with clients in compiling and submitting claims applications for disabilities, petitions, and pleas, simplifying the method and guaranteeing all necessary records is precisely submitted. Additionally, attorneys specializing in disabilities offer critical assistance during court proceedings related to disabilities, leveraging their specialist expertise of legislation on disabilities and guidelines to provide direction, recommendations, and strategic representation.
The positive aspects of engaging a disability attorney for claims concerning disabilities are diverse. These legal professionals supply specialized guidance and recommendations, providing their clients with a upper hand in court proceedings related to disabilities. Through their thorough understanding of the lawful environment, attorneys specializing in disabilities can successfully traverse the intricate network of rules and legislation governing disability claims, making sure that their clients’ privileges are secured and their utmost interests are represented.
Moreover, attorneys specializing in disabilities make simpler the disability claims process, easing the burden on individuals with disabilities. They serve as supporters, communicating with official institutions, insurance companies, and other applicable entities on behalf of their clients. This holistic assistance permits individuals with disabilities to concentrate on their well-being and private affairs, being informed that their disability claims are being handled with utmost care and thoroughness.
In the framework of claims related to disabilities in Albuquerque region, it is vital to recognize the distinctive proficiency provided by attorneys specializing in social security. These lawyers concentrate on social security laws and guidelines, making them highly valuable resources for individuals seeking social security disability benefits. Social security lawyers have comprehensive expertise of the intricate regulations and processes governing social security disability claims, enabling them to offer customized guidance and direction to their clients.
By acquiring a disability attorney, individuals with disabilities obtain a wealth of assets and aid. These lawyers serve as devoted champions, diligently striving for their clients’ entitlements and privileges. Lawyers for disabled individuals grasp the difficulties faced by individuals with disabilities and strive to guarantee they obtain the benefits for disabilities they should rightfully have.
In conclusion, the act to acquire a disability attorney is a crucial one for individuals with disabilities looking for disability compensation in the city of Albuquerque. These lawyers play a essential function in simplifying the legal process, increasing the probability of success in disability court trials, and offering expert guidance and advice tailored to their clients’ distinctive circumstances.
https://www.disabilityalbuquerque.com – Overcoming obstacles in handicap claims with an unum attorney
Приветствуем вас на нашем веб-сайте!
Здесь вы найдёте всё необходимое для успешного управления своими финансами.
Мы предлагаем широкий спектр финансовых продуктов, которые
помогут вам достичь ваших целей и обеспечить стабильность в будущем.
В нашем ассортименте представлены различные
виды банковских продуктов, инвестиции, страхование,
кредиты и многое другое.
Мы постоянно обновляем нашу базу данных, чтобы
вы всегда были в курсе последних тенденций и инноваций на финансовом рынке.
Наши специалисты помогут вам выбрать наиболее подходящий
продукт, учитывая ваши индивидуальные потребности и предпочтения.
Мы предоставляем консультации и рекомендации, чтобы вы могли принять обоснованное решение и избежать возможных рисков.
Не упустите возможность воспользоваться нашими услугами и откройте для себя мир финансовых возможностей!
Заходите на наш сайт, ознакомьтесь
с каталогом продуктов и начните свой путь к финансовой стабильности прямо сейчас!
дебетовая карта с функцией мобильного банкинга
Клининг в Москве для занятых людей: Ваш дом сияет чистотой, пока вы отдыхаете или работаете
лучший клининг в москве http://www.kliningovye-kompanii-0.ru .
Клининг для больших семей: Специальные тарифы на еженедельную уборку домов и квартир
клининг москва http://klining-v-moskve0.ru/ .
Клининг Москва: Прозрачный договор и честные отзывы от клиентов
клининговые компании москвы рейтинг https://www.kliningovye-kompanii-1.ru .
Эффективный пылеотвод для болгарки на углу 45 градусов, узнайте.
Максимальная эффективность: пылеотвод для болгарки под 45 градусов, который должен быть у каждого мастера.
Пылеотвод для болгарки: советы по выбору и установке, для комфортной работы.
Пылеотвод для болгарки: чего ожидать от 45-градусной модели, если стремитесь к безопасности.
Как установить пылеотвод для болгарки с углом 45 градусов, позволит избежать лишнего мусора.
Сравнение пылеотводов для угловой шлифовки, на основе характеристик.
Как пылеотводы для болгарки под 45 градусов изменяют работу, что влияет на выбор.
Технологические новшества в пылеотводах для угловых шлифовок, на которые стоит обратить внимание.
Пылеотвод для болгарки под 45 градусов: отзывы пользователей, анализируйте перед покупкой.
Удобство и эффективность: пылеотвод для болгарки под 45 градусов, для лучшего результата.
Как пылеотвод для болгарки под 45 градусов улучшает качество работ, если хотите работать с комфортом.
На что обратить внимание при выборе пылеотвода для болгарки, чтобы получить лучший результат.
Настройка пылеотвода для болгарки с углом 45 градусов: советы, для уменьшения пыли.
Пылеотводы для болгарок под 45 градусов: стоит ли инвестировать?, и как это затрагивает ваш бизнес.
Подбор пылеотводов для болгарок с углом 45 градусов: краткий гид, чтобы выбрать лучшее предложение.
Различия между пылеотводами для болгарок разных углов, для защиты от пыли.
Как защитить себя при работе с болгаркой: роль пылеотводов, что важно помнить.
Работа с пылеотводами для болгарок: что нужно знать, чтобы избежать ошибок.
Советы по модернизации вашего пылеотвода для болгарки, для любителей.
пылеотвод для резки плитки под 45 http://ozon.ru/product/nasadka-pyleotvod-na-bolgarku-ushm-dlya-rezki-45-gradusov-1735664956/ .
Пропуск на МКАД для международных грузоперевозок: Помощь с переводом документов и таможенными нюансами
пропуск на мкад https://propusk-na-mkad-v-moskvu1.ru/ .
Оптимизируйте расходы на чистоту — цены на клининг для больших и малых помещений
цены на клининг https://stoimost-kliningovykh-uslug.ru/ .
Thanks for any other informative blog. Where else may just I get that type of information written in such a perfect approach? I’ve a undertaking that I’m simply now operating on, and I’ve been on the look out for such information.
Our drone light show service provides an unparalleled visual experience with mesmerizing aerial displays
drone shows https://1drone-show.com/ .
Лучшие марки питьевой воды, изучите, питьевую воду.
горные вершины вода заказать http://www.fountain-water.com/voda-gornaya-vershina-dostavka .
How to choose an online school in Illinois, studying online.
Best Online Schools in Illinois, get an education.
Illinois: Online Schools for Kids, what you need to know.
How to choose the ideal online school, in Illinois, paying attention to.
Advantages of learning in online schools in Illinois, affordable programs.
All about virtual classrooms in Illinois, distance learning.
Learning at an online school: pros and cons, in the age of technology.
Online Education: Online schools in Illinois, for future specialists.
How is learning going in online schools in Illinois?, variety of methods.
Review of online schools: pros and cons, for successful learning.
What parents think about online education in Illinois, important to know.
The best programs in online schools in Illinois, for different levels of study.
How to succeed in Online Education, for schoolchildren.
How online courses in Illinois work, goals and objectives.
Best Online Schools for High School Students, new opportunities.
Frequently Asked Questions about Online Schools in Illinois, for anyone interested.
Online Education Trends in Illinois, for a successful career.
Illinois: Online Adult Learning Opportunities, for career growth.
How Online Education in Illinois will Change, and the education system / in the light of new technologies.
Online Schools in Illinois http://neools-illin.com .
Descubre el poder transformador de un show de drones en cualquier celebracion
empresa de espectaculos de drones http://1show-de-drones.com/ .
Students in Nevada choose online learning, new opportunities in online education.
Best Online Schools in Nevada, learn.
Online Learning Programs in Nevada, best options.
Secrets to Successful Online Learning in Nevada, attention.
Online training in Nevada: what you need to know, explore.
Online Education: The Key to Success, learn.
What to look out for when choosing an online school in nevada, the main factors.
Distance Learning in Nevada: how to make the right choice, pros.
How to choose an online school in Nevada, recommend.
Online Learning: Opportunities for Nevada residents, get to know.
Postcards from Nevada’s Online schools, get.
Education in Nevada: online format, opportunities.
Nevada: Online Learning for Everyone, your choices / choices.
The Future of Education in Nevada: an online format, learn.
Nevada: New Approaches to Online Learning, innovation.
Education without Borders: Online Schools in Nevada, find out.
Online schools in Nevada: Learning from comfort, learn.
All about online education in Nevada, explore.
Nevada: Online Career Training, understand / career / changes.
How to choose an online school in Nevada for children, understand.
Online Schools in Nevada https://onlineschoolnv8.com .
Запчасти для автомобилей с авторазборки – выгодные условия покупки
авторазборка в москве https://www.avtorzborka3-moskva.ru/ .
**Добро пожаловать на наш сайт! Откройте лучшие финансовые решения
прямо сейчас!**
**Наши предложения**
Мы предлагаем широкий ассортимент финансовых продуктов:
автокредиты, ипотека и кредитные карты, чтобы помочь вам воплотить свои мечты в реальность.
**Автокредиты для комфортного
вождения**
Хотите приобрести новый автомобиль?
Наши автокредитные программы созданы для вас.
Оформите кредит на нашем сайте за несколько минут,
выбрав лучшие условия и сроки погашения.
**Преимущества наших кредитных карт**
Наши карты обеспечивают удобство безналичных платежей и множество
бонусов:
– **Кэшбэк на топливо и обслуживание
авто**
– **Специальные программы лояльности**
Оформите карту онлайн и получите все преимущества уже сегодня!
**Быстрые займы для непредвиденных расходов**
Нужны деньги до зарплаты или на неожиданные расходы?
Наши займы – это быстро и удобно.
Мы предлагаем прозрачные условия и
мгновенное одобрение заявок.
**Наши преимущества:**
– **Простота и Удобство:** Оформите заявку онлайн за считанные минуты.
– **Надежность и Прозрачность:** Честные условия без скрытых комиссий.
– **Индивидуальный Подход:** Мы учитываем ваши личные обстоятельства.
Не упустите шанс улучшить свою финансовую ситуацию!
Оформите автокредит, кредитную карту или займ на нашем сайте уже сегодня
и насладитесь всеми преимуществами сотрудничества с надежным финансовым партнером.
Переходите на наш сайт и сделайте шаг к своим мечтам!
Кобрендинговая кредитная карта в Владивостоке
Купить Супер Тадарайз в спб https://vk.com/super_tadarajz_kupit_v_spb с доставкой недорого
Контрактный двигатель по доступной цене – восстановите мощность автомобиля
двигатель купить https://kontraktnye-dvigateli3-moskva.ru/ .
Продажа бу запчастей с фото и подробным описанием – заказывайте онлайн
запчасти для иномарок бу https://zapchasti-bu3-moskva.ru .
Купить Видалисту в Санкт-Петербурге https://vk.com/vidalista_kupit_v_spb с доставкой
в день заказа
Купить Супер Вилитру в спб https://vk.com/super_vilitra_kupit_v_spb недорого
с доставкой курьером в день заказа
https://adamex-online.ru
https://akril-servis.ru/
Дженерики для повышения потенции на сайте https://aptekaviagry.ru
высокое качество по доступной цене с доставкой
Оформите займ онлайн на карту без ожидания и сложных документов
займ онлайн http://www.vsemiikrozajmy.kz/ .
Микрокредиты с мгновенным зачислением на карту без сложных анкет
микрокредиты http://mikrokredityvsem.kz .
Надежные микрокредиты без рисков – прозрачные условия
микрокредит онлайн микрокредит онлайн .
Легкие займы онлайн без справок и поручителей – просто получите деньги
онлайн займ https://news365.kz/ .
Забудьте о грязи Клининг в Москве с выездом на дом — удобный график и индивидуальный подход к каждому клиенту
топ клининговых компаний москвы http://kliningovye-kompanii-0.ru/ .
Клининг с заботой о вашем бюджете: Чистота без переплат и скрытых комиссий
клининг мск http://klining-v-moskve0.ru/ .
Купить дженерики недорого с доставкой https://apteka-x.ru/ высокое качество
по выгодным ценам гарантия от производителя
https://arenda-t.ru
Пропуск на МКАД с гибким графиком: Выбирайте дни и часы въезда для вашего транспорта
пропуск на мкад для грузовых машин https://www.propusk-na-mkad-v-moskvu1.ru/ .
Прозрачные цены и профессиональный подход — ваш идеальный клининг начинается здесь
клининг цены http://www.stoimost-kliningovykh-uslug.ru/ .
Клининг для арендодателей в Москве: Подготовим квартиру к сдаче за 1 день
топ 10 клининговых компаний москвы https://kliningovye-kompanii-1.ru .
https://bal-ufa.ru/
Online Learning in Mississippi, anywhere.
Meet.
Tips for choosing.
in Mississippi / in the context of Mississippi.
Analysis.
Top 10 Online Schools.
in online Schools.
in Mississippi.
How to organize.
Potential.
for students.
in the state / among students.
for your children.
Digital Tools.
Data on distance learning.
Real Examples.
for distance learning.
in Online Schools.
for school children.
Online Schools in Mississippi http://www.onlineschoolms6.com/ .
Большой выбор дженериков в магазине https://best-viagra.ru с доставкой
по городу и области
Pinco Casino-da real oyunçuların rəyləri və təcrübələri – siz də sınayın!
pinco kazino pincocasinogiris-az.com .
Free online stamp maker – generate professional-quality rubber stamps effortlessly
stamp making online https://make1-stamp-online.com .
Free online stamp creator – perfect for company seals and official documents
stamp maker online free stamps1-creator.com .
Продажа качественных дженериков на сайте https://buytablets.ru/ с бесплатной
доставкой в день покупки
OVI statutes around Ohio might be intricate, just it’s important to maintain a good knowledge of these if one find prices. Operating under on influence of alcohol (DUI) happens to be a serious misdemeanor which is can have actually substantial consequences on your future. In Ohio, on lawful limit for blood ethanol content (BAC) is 8 percentfor some drivers and/or 0.04% commercial people.
If you might be pulled by legal administration and accused of driving while intoxicated, they could carry out roadside sobriety reports or chemical tests, these types of when breathalyzer or blood exams, to determine ones degree of handicap. Refusing they tests can result in mechanical sanctions, including driving license suspension.
driving while intoxicated crimes in Ohio bring various consequences, depending on variables fancy previous prosecutions, BAC range, plus no matter if online is an car accident or injuries used. Repercussions might comprise penalties, license temporary removal, mandatary alcohol in the mouthwash process programs, trial period, and just jail time. Do it again criminal acts and exacerbated situations can result in more severe penalties.
Using a experienced DUI safeguard attorney is essential to navigate the intricacies of Ohio ovi laws. They can possibly examine the indicators, really challenge the lawfulness of the halt, challenge the dependability of tests, and uncover interested barriers to help mitigate the payments. You’ll also, an attorneys can tips you throughout the lawful process, guaranteeing their proper rights are insulated and proposing for the right a possibility direct result.
Remember, being updated pertaining to Ohio’s DUI regulations and attempting the assistance of an adept legal are fundamental actions in correctly managing a DUI bill and guarding our upcoming. DUI homicide counselor
Широкий выбор дженериков на сайте https://cialis24.ru с доставкой курьером
в день заказа отправка в регионы России
Магазин дженериков https://cialisbrand.ru/ большой выбор низкие
цены быстрая доставка по городу отправка в регионы почтой России
Online schools in New Jersey: the best options, with the advantages.
Advantages of online education in New Jersey, challenges.
Compare online schools in New Jersey: what is important to know?, best tips.
New Jersey Educational Resources: online programs, check out.
Online schools in New Jersey: How do I choose the right one?, learn.
How to choose the best online school in New Jersey?, get.
Virtual training in New Jersey: how does it work?, analyze.
New Jersey and online schools: what to choose?, discuss.
Practical tips for choosing online schools in New Jersey, our recommendations.
Online schools in New Jersey: how not to make a mistake in choosing, important details.
Path to success: online education in New Jersey, understand / key aspects.
How to choose an online school in New Jersey for your child?, refresh.
Virtual learning in New Jersey: Pros and cons, next steps.
How to choose an online school for your child in New Jersey?, variety.
Education of the Future: Online schools in New Jersey, in the context of changes.
Success of online education in New Jersey: what do you need to know?, everything that is important.
How to effectively choose an online school in New Jersey?, understand.
How to find the perfect online school in New Jersey?, find out.
Where to apply? Online schools in New Jersey, explore.
Online Schools in New Jersey https://www.onlineschoolnj3.com .
Магазин дженериков по адресу https://cialis-deshevo.ru предлагает
широкий выбор препаратов для повышения потенции с доставкой
Customized drone light show experiences to elevate your brand and captivate your audience
drone lightshow https://www.1drone-show.com/ .
Доставка бу запчастей по всей стране – экономьте время и деньги на ремонте
бу запчасти москва https://www.zapchasti-bu3-moskva.ru/ .
Creatividad y precision en cada coreografia de nuestro espectaculo de drones
show de luces con drones https://1show-de-drones.com .
Контрактный двигатель без пробега по России – гарантия надежности
контрактные двигатели купить https://kontraktnye-dvigateli3-moskva.ru .
супрастин таблетки инструкция по применению взрослым от чего помогает отзывы противопоказания https://xn--80aaihcqsam1bfkn2p.xn--p1ai .
Магазин дженериков https://cialismoscow.ru высокое качество по доступной цене
производство Индии в наличии
Авторазборка – ваш надёжный поставщик оригинальных запчастей
авторазборка https://avtorzborka3-moskva.ru/ .
https://cvetocheg.ru
https://divanov-remont.ru/
https://doctorbest.ru/
The best way to create a rubber stamp online for free – instant access
free online stamp maker http://stamps1-creator.com/ .
Looking for a free rubber stamp maker online? Design your perfect stamp in minutes
stamp maker online free https://www.make1-stamp-online.com/ .
Online Learning in Maryland, make education accessible.
Top-level online tuition in Maryland, learn about benefits.
Quality Online education in Maryland, incorporating innovative techniques.
Choosing an Online School in Maryland, to ensure successful learning.
Review of popular online schools in Maryland, with information about courses.
We understand online learning in Maryland, what is important to consider.
Guide to online education in Maryland, for parents.
How do I compare online schools in Maryland?, analyze and choose.
Why are online schools so popular in Maryland?, find out all the advantages.
Student Reviews of Online Schools in Maryland, how to make the right choice.
A selection of the best courses in Maryland’s online schools, for your child.
Student experience in Maryland’s online schools, how to prepare.
Tuition rates for Online schools in Maryland, for budget planning.
Review of online school programs in Maryland, for different age groups.
Maryland Online Schools: what’s new?, stay tuned.
How to succeed in Online Education, tips from experts.
What hinders successful learning in Maryland’s online schools?, how to overcome them.
Maryland Online Schools: The Complete Guide, for parents and students.
What’s in store for online education in Maryland?, what will be important in the future.
Traditional Education vs Online: What should I choose?, for achieving your goals.
Online Schools in Maryland https://www.nehools-mary.com .
Great post!
You have an incredible knack for making thought-provoking ideas feel approachable. I’d love to see you delve into how these topics intersect with cultural shifts or advancements in biotech. The bigger-picture applications would make for a truly captivating discussion. Thanks for always providing such meaningful perspectives—eagerly awaiting your next piece!
Site – https://gpt4geeks.com
Самый надежный способ купить подписку на Spotify премиум
spotify подписка купить https://www.podpiska-spotify-1.ru .
Производство светодиодных светильников для освещения торговых центров и магазинов
прожектор светодиодный для уличного освещения https://proizvodstvo-svetodiodnih-svetilnikov.ru .
m3ga маркет – это digital service, где анонимность и приватность интегрированы в foundation вашего опыта. Название “Mega Darknet” связано с variety of opportunities и mysteries. Это not just a website; это portal в неизведанный интернет, где standard rules lose meaning.
mega darknet market официальный
Кракен Darknet – это innovative platform, где анонимность и confidentiality превращаются foundation online life. Название “Kraken” associated с разнообразием ресурсов и технологическими прорывами. Эта network обеспечивает доступ к миру скрытых ресурсов, где rules традиционных сетей теряют свою силу.
Kraken ссылка
Большой выбор камер заднего вида с установкой и настройкой
камера заднего вида цена https://camera-zadnego-vida.ru .
Оформи подписку на Spotify и слушай музыку в высоком качестве
spotify купить подписку http://www.podpiska-spotify-1.ru/ .
заказать девушку
Высокие стандарты обслуживания являются основой работы эскорт-агентств. Индивидуалки проходят тщательный отбор, учитывающий их внешний вид, манеры и интеллектуальные качества. Благодаря этому каждая из них способна стать не только украшением любого мероприятия, но и интересной собеседницей. Заказ таких услуг гарантирует конфиденциальность и безопасность, что делает процесс максимально комфортным для клиентов.
Source:
– https://go.leopard-escort.online/modeli/elitnyi-eskort/
Разработка ППР для автодорожного строительства с учетом всех требований
проект производства работ цена https://razrabotka-ppr77.ru .
Долгосрочный пропуск в центр Москвы для Газели без лишних затрат
нужен ли пропуск на газель в москву propusk-v-centr-dlya-gazeli.ru .
элитный досуг в москве
Эскорт услуги в столице также отличаются своей универсальностью. Клиенты могут выбрать формат, который лучше всего соответствует их ожиданиям. Это может быть заказ девушки на час для непринуждённой беседы, длительное сопровождение в роли содержанки или выбор модели для подчёркивания статуса на важных мероприятиях. Каждая из этих опций адаптирована под индивидуальные потребности заказчика.
Source:
элитный досуг в москве
Receive SMS online for free with instant activation and no hidden fees
free phone number [url=https://www.rskswap.com]https://www.rskswap.com[/url] .
Very interesting topic, thanks for putting up.
Unisteam com – производство современной спецтехники в Москве с гарантией
завод по производству спецтехники юнистим unisteam com
https://akril-servis.ru/
I just like the helpful information you supply for
your articles. I’ll bookmark your blog and test again right here
frequently. I am reasonably sure I’ll be informed plenty
of new stuff right here! Good luck for the following!
Кракен Darknet – это breakthrough in digital security, где скрытность и confidentiality become foundation онлайн-жизни. Название “Kraken” ассоциируется с variety of resources и technological breakthroughs. Эта network предлагает доступ к миру цифровой свободы, где rules traditional networks теряют свою силу.
онион ссылка кракен
Услуги наркологической клиники – детоксикация, кодирование, реабилитация
наркологическая больница спб http://platnaya-narkologicheskaya-klinika-01.ru/ .
Полный спектр сантехнических услуг в СПб – стоимость и сроки выполнения
прайс лист сантехника http://www.remont-santehniki-price.ru/ .
Вызов сантехника на дом в СПб – доступные расценки на услуги
прайс на сантехнические работы в спб http://24-santehniki-price.ru/ .
Почему стоит выбрать циклонный фильтр для строительного пылесоса?, откройте для себя.
Как циклонный фильтр улучшает работу строительного пылесоса?, изучите.
Выбор циклонного фильтра: на что обратить внимание?, нашими рекомендациями.
Циклонный фильтр: как это работает?, познакомим.
Как установить циклонный фильтр?, для домашних мастеров.
Основные преимущества циклонного фильтра, подробнее.
Улучшение уборки с помощью циклонного фильтра, научными фактами.
Циклонные фильтры: советы по выбору, всё о рынке циклонов.
Уход за циклонным фильтром: советы, разберём.
Циклонный фильтр: необходимость или излишество?, отзывах пользователей.
Как выбрать фильтр для строительного пылесоса?, узнайте.
Использование циклонного фильтра: что ожидать?, основные функции.
Циклонный фильтр: ваш первый шаг к чистоте, разберитесь.
На что обратить внимание при выборе циклонного фильтра?, рассматриваем.
Циклонный фильтр как часть системы пылесоса, изучите.
Преимущества циклонного фильтра для вашего пылесоса, рассматриваем.
Циклонные фильтры: плата за качество?, все аспекты.
Как циклонные фильтры меняют уборку?, изучаем.
Как выбрать качественный циклонный фильтр?, посмотрите.
циклонный фильтр предварительной очистки воздуха http://wildberries.ru/catalog/353414029/detail.aspx/ .
джили монжаро цена geely-v-spb1.ru/models/monjaro .
1win 1win .
Качественные услуги сантехника в СПб – прайс на все работы
сколько стоит вызов сантехника на дом https://www.santeh1-montazh-price.ru .
1win login nigeria https://1win12.com.ng .
раскрутка сайтов в москве раскрутка сайтов в москве .
раскрутка сайта москва раскрутка сайта москва .
1 win регистрация http://1win6020.ru .
Экран для проекторов с улучшенной цветопередачей – идеальный выбор для фильмов и презентаций
экран проекционный с электроприводом купить https://www.proekcionnye-ehkrany0.ru/proekcionnye-ekrany/ekran-dlya-proektora-s-elektroprivodom .
1win кейсы https://1win6020.ru/ .
how to bet on 1win https://1win12.com.ng/ .
1win website https://1win12.com.ng .
Top New York City Online Schools for Your Learning Experience, of distance learning.
Guide to Online Schools in New York City, from experts.
New York City Online schools: Reviews and ratings, rate.
Get an online education in New York City, your path.
New developments in online education in New York, development.
Best practices for choosing an online school in New York, for parents.
Distance learning in New York: key aspects, for everyone.
Affordable and high-quality online learning, invest in your education.
Innovations in Online Education in New York, innovations.
Top online schools in New York by price and quality, choose favorable offers.
How do I organize the learning process in an online school?, on courses.
What do New York City’s online schools offer?, understand.
High-quality education in New York, how to make the right choice.
How do I protect my data in online education?, learn how to.
Successful stories of graduates of online schools in New York, motivated.
How has the pandemic affected online education in New York?, master.
How to be a successful online student?, use.
Online Schools in New York https://neoo-ork.com .
продвижение сайтов москва продвижение сайтов москва .
мостбет https://mostbet6006.ru/ .
партнёрка 1win https://1win6020.ru .
зайти в 1вин https://familyclub.borda.ru/?1-6-0-00002163-000-0-0-1743051813 .
шиномантаж клин шиномантаж клин .
продвижение сайта москва https://seogift.ru/news/press-release/2463-geymifikaciya-v-prodvizhenii-internet-magazinov-kak-vovlekat-klientov-s-pervogo-kasaniya/ .
партнёрка 1win https://1win6001.ru .
шиномонтаж ивантеевка hondahybrid.ru/forum/topic/2886-kakie-uslugi-okazyvaet-shinomontazh/ .
1вин приложение https://1win6020.ru .
раскрутка сайтов в москве раскрутка сайтов в москве .
продвижение сайта цена продвижение сайта цена .
1win ставки официальный сайт 1win6001.ru .
1win партнёрка https://familyclub.borda.ru/?1-6-0-00002163-000-0-0-1743051813/ .
мосбет https://www.mostbet6006.ru .
1 вин вход http://www.familyclub.borda.ru/?1-6-0-00002163-000-0-0-1743051813 .
1 win вход familyclub.borda.ru/?1-6-0-00002163-000-0-0-1743051813 .
mostbet kg скачать на андроид [url=http://mostbet6006.ru/]mostbet kg скачать на андроид[/url] .
шиномонтаж солнечногорск http://www.hondahybrid.ru/forum/topic/2886-kakie-uslugi-okazyvaet-shinomontazh// .
mostbet игры https://mostbet6006.ru/ .
1win. pro http://www.1win6001.ru .
раскрутка сайтов в москве раскрутка сайтов в москве .
шиномантаж щелково шиномантаж щелково .
1 вин официальный сайт http://1win6001.ru/ .
продвижение сайта москва seogift.ru/news/press-release/2463-geymifikaciya-v-prodvizhenii-internet-magazinov-kak-vovlekat-klientov-s-pervogo-kasaniya/ .
Дженерики на сайте https://cialis-hit.ru/ с доставкой по городу курьером
в день заказа отличное качество по низкой цене
1вин rossvya 1win6002.ru .
дренажные работы на участке стоимость ленинградская область дренажные работы на участке стоимость ленинградская область .
выравнивание участка дренаж выравнивание участка дренаж .
мостбет скачать https://mostbet6007.ru .
дренаж водосточной системы дренаж водосточной системы .
Кодирование и реабилитация в современной наркологической клинике
клиника алкоголизма клиника алкоголизма .
Грамотный подбор и установка сантехники в СПб – прозрачные расценки
прайс на работы сантехника http://www.24-santehniki-price.ru/ .
Профессиональная установка сантехники в СПб – лучшие цены и качество
сантехник стоимость услуг https://remont-santehniki-price.ru .
дренажные системы компании http://www.drenazh-uchastka-rostov.ru .
1win букмекер http://1win6002.ru/ .
Минимизируйте риски с качественной технологической картой на погрузочно-разгрузочные работы
технологическая карта на погрузочно разгрузочные работы назначение и содержание технологическая карта на погрузочно разгрузочные работы назначение и содержание .
mostbet chrono https://www.mostbet6007.ru .
Стильная и долговечная мебель для кафе – широкий ассортимент по доступным ценам
мебель для общепита mebel-dlya-kafe.ru .
мониторинг транспорта эра мониторинг транспорта эра .
что делать с бонусным балансом на 1win https://balashiha.myqip.ru/?1-12-0-00000437-000-0-0-1743258848 .
1win. https://1win6049.ru .
мониторинг навигация транспорта мониторинг навигация транспорта .
1 вин вход http://www.alfatraders.borda.ru/?1-0-0-00004932-000-0-0-1743258210 .
Где приобрести диплом по актуальной специальности?
Мы предлагаем дипломы любой профессии по приятным ценам. Мы предлагаем документы ВУЗов, расположенных на территории всей России. Можно приобрести диплом за любой год, указав необходимую специальность и хорошие оценки за все дисциплины. Документы выпускаются на бумаге высшего качества. Это позволяет делать настоящие дипломы, которые не отличить от оригинала. Документы будут заверены всеми необходимыми печатями и подписями. Всегда стараемся поддерживать для заказчиков адекватную ценовую политику. Важно, чтобы документы были доступными для подавляющей массы наших граждан. okdiplom.com/kupit-svidetelstvo-o-zaklyuchenii-braka-6
Мы предлагаем дипломы психологов, юристов, экономистов и других профессий по приятным тарифам. Цена может зависеть от конкретной специальности, года получения и ВУЗа. Всегда стараемся поддерживать для заказчиков адекватную ценовую политику. Важно, чтобы дипломы были доступными для большого количества граждан. диплом купить технический
Где заказать диплом по необходимой специальности?
Приобрести диплом ВУЗа по невысокой стоимости возможно, обращаясь к надежной специализированной фирме.: magazin-diplomov.ru
Мы изготавливаем дипломы любой профессии по невысоким тарифам. Дипломы изготавливаются на оригинальных бланках государственного образца Приобрести диплом об образовании diplomist.com
купить диплом медицинского вуза купить диплом медицинского вуза .
Заказать документ ВУЗа вы можете у нас. Мы предлагаем документы об окончании любых университетов России. Вы получите необходимый диплом по любой специальности, любого года выпуска, включая документы старого образца. Гарантируем, что в случае проверки документов работодателями, подозрений не появится. portal.woellmarine.com/thread-147589.html
диплом лаборанта купить
Где приобрести диплом специалиста?
Наши специалисты предлагают быстро и выгодно приобрести диплом, который выполнен на бланке ГОЗНАКа и заверен мокрыми печатями, штампами, подписями официальных лиц. Наш документ способен пройти лубую проверку, даже при использовании специальных приборов. Решите свои задачи быстро и просто с нашей компанией. Купить диплом любого ВУЗа! deanonnic.listbb.ru/viewtopic.php?f=5&t=1462
Приобрести документ о получении высшего образования можно в нашей компании в Москве. http://www.billing.blueangelhost.com/submitticket.php?step=2&deptid=15
Заказать диплом института!
Мы можем предложить дипломы любых профессий по приятным тарифам— diplomist.com/kupit-diplom-s-vneseniem-v-bazu-2/
Мы изготавливаем дипломы любой профессии по доступным тарифам.– diplomservis.ru/kupite-diplom-instituta-s-reestrom-legko-i-bistro/
Всех приветствую!
Для некоторых людей, приобрести диплом ВУЗа – это острая необходимость, возможность получить достойную работу. Но для кого-то – это понятное желание не терять время на учебу в ВУЗе. Что бы ни толкнуло вас на такой шаг, мы готовы помочь вам. Оперативно, качественно и недорого сделаем диплом нового или старого образца на подлинных бланках со всеми печатями.
Основная причина, почему многие люди покупают диплом, – желание занять хорошую должность. К примеру, знания и опыт позволяют кандидату устроиться на желаемую работу, но подтверждения квалификации не имеется. В случае если для работодателя важно наличие “корочек”, риск потерять вакантное место довольно высокий.
Приобрести документ института можно в нашей компании. Мы оказываем услуги по производству и продаже документов об окончании любых ВУЗов Российской Федерации. Вы сможете получить необходимый диплом по любой специальности, включая документы СССР. Гарантируем, что в случае проверки документа работодателем, никаких подозрений не появится.
Ситуаций, которые вынуждают приобрести диплом ВУЗа много. Кому-то срочно необходима работа, а значит, нужно произвести впечатление на руководителя на протяжении собеседования. Некоторые желают попасть в престижную компанию, чтобы повысить свой статус и в дальнейшем начать свое дело. Чтобы не тратить драгоценное время, а сразу начать эффективную карьеру, используя имеющиеся знания, можно заказать диплом в онлайне. Вы станете полезным для социума, получите денежную стабильность в кратчайший срок- аттестат за 9 класс купить
Мы можем предложить дипломы любой профессии по доступным тарифам. Преимущества приобретения документов у нас
Вы приобретаете диплом в надежной и проверенной компании. Такое решение позволит сэкономить не только средства, но и ваше драгоценное время.
Плюсов гораздо больше:
• Дипломы делаем на настоящих бланках со всеми отметками;
• Дипломы всех ВУЗов России;
• Цена намного ниже нежели довелось бы платить на очном обучении в университете;
• Доставка в любые регионы Российской Федерации.
Купить диплом академии– http://zeorest.com/read-blog/47_kupit-diplom-s-vneseniem-v-reestr.html/ – zeorest.com/read-blog/47_kupit-diplom-s-vneseniem-v-reestr.html
Приобрести диплом любого ВУЗа!
Мы предлагаем документы учебных заведений, которые находятся на территории всей России. Документы выпускаются на бумаге самого высокого качества: pentan.ru/articles/pgs/kupit_diplom_magistra_bustro_i_nadezghno_2.html
Привет!
Приобрести диплом ВУЗа по выгодной цене возможно, обращаясь к проверенной специализированной фирме. Купить диплом о высшем образовании: diplom-top.ru/kupit-diplom-kolledzha-12/
Где приобрести диплом специалиста?
Полученный диплом с приложением отвечает условиям и стандартам, никто не сможет отличить его от оригинала – даже со специально предназначенным оборудованием. Не следует откладывать собственные цели на потом, реализуйте их с нами – отправьте заявку на изготовление документа сегодня! Купить диплом о среднем специальном образовании – не проблема! diplomservis.ru/kupit-attestat-texnikuma-2/
Приобретение подходящего диплома через проверенную и надежную компанию дарит ряд достоинств. Это решение позволяет сберечь время и значительные средства. Однако, плюсов намного больше.Мы предлагаем дипломы психологов, юристов, экономистов и других профессий. Дипломы производят на оригинальных бланках. Доступная цена сравнительно с серьезными издержками на обучение и проживание в чужом городе. Покупка диплома о высшем образовании из российского института будет разумным шагом.
Купить диплом о высшем образовании: diplomt-v-samare.ru/diplom-kupit-s-vneseniem-v-reestr-bistro-i-nadezhno/
Всегда думал что купить диплом о высшем образовании это миф и нереально, но все оказалось не так, изначально искал информацию про: купить диплом вуза гознак, купить диплом медучилища, купить аттестат за 8 классов, сколько стоит купить аттестат 11 класса, купить диплом программиста, потом про дипломы вузов, подробнее здесь kyc-diplom.com/geography/bryansk.html
Где купить диплом по необходимой специальности?
Мы оказываем услуги по продаже документов об окончании любых ВУЗов РФ. Документы производятся на настоящих бланках. provocation.flybb.ru/viewtopic.php?f=4&t=607
Заказать диплом института !
Покупка диплома любого ВУЗа РФ у нас является надежным процессом, ведь документ заносится в государственный реестр. Печать производится на официальных бланках ГОЗНАКа. Приобрести диплом университета arenadiplom24.online/ptu-moskvy/moskovskoe-professionalnoe-uchilishche-142
Здравствуйте!
Мы изготавливаем дипломы любой профессии по приятным тарифам. Цена может зависеть от конкретной специальности, года получения и ВУЗа: diplomans.com/
Приобрести диплом института по невысокой стоимости возможно, обратившись к проверенной специализированной фирме. Мы предлагаем документы об окончании любых ВУЗов России. Купить диплом любого университета– diploma-groups24.ru/kupit-attestat-shkoly/za-11-klass/s-2014-goda.html
Для удачного продвижения вверх по карьерной лестнице потребуется наличие официального диплома о высшем образовании. Быстро приобрести диплом любого института у проверенной организации: kupitediplom0027.ru/kupit-diplom-po-dostupnim-tsenam-v-omske/
Приобрести диплом института!
Мы изготавливаем дипломы психологов, юристов, экономистов и любых других профессий по невысоким ценам. Вы приобретаете документ в надежной и проверенной временем компании. : skoolyard.biz//create-blog
Диплом ВУЗа РФ!
Без получения диплома очень трудно было продвигаться по карьере. По этой причине решение о заказе диплома стоит считать выгодным и целесообразным. Быстро купить диплом университета homecare.bz/employer/gosznac-diplom-24
Приобрести диплом любого ВУЗа мы поможем. Купить диплом бакалавра в Липецке – diplomybox.com/kupit-diplom-bakalavra-v-lipetske
Мы изготавливаем дипломы психологов, юристов, экономистов и любых других профессий по доступным тарифам. Купить диплом в Астрахани и Астраханской области — kyc-diplom.com/geography/astrakhan.html
Приобрести диплом о высшем образовании!
Мы можем предложить документы ВУЗов, которые расположены в любом регионе России.
diplomist.com/gde-kupit-attestat-9-klassa-2
Где купить диплом специалиста?
Мы изготавливаем дипломы любой профессии по разумным ценам. Мы можем предложить документы ВУЗов, которые находятся на территории всей Российской Федерации. Вы можете заказать качественно сделанный диплом за любой год, указав актуальную специальность и хорошие оценки за все дисциплины. Дипломы и аттестаты печатаются на “правильной” бумаге высшего качества. Это позволяет делать государственные дипломы, которые невозможно отличить от оригиналов. Они заверяются необходимыми печатями и штампами. Стараемся поддерживать для покупателей адекватную ценовую политику. Для нас важно, чтобы документы были доступными для большинства граждан. 10000diplomov.ru/kupit-svidetelstvo-o-rozhdenii-2-5
Заказать документ университета вы имеете возможность в нашем сервисе. diplom-ryssia.com/kupit-diplom-ufa-4-2
1вин официальный сайт мобильная 1вин официальный сайт мобильная .
Где приобрести диплом специалиста?
Наша компания предлагает быстро и выгодно купить диплом, который выполняется на оригинальном бланке и заверен мокрыми печатями, водяными знаками, подписями должностных лиц. Документ способен пройти любые проверки, даже с применением специального оборудования. Решите свои задачи быстро с нашей компанией.
Заказать диплом ВУЗа kupitediplom.ru/kupit-diplom-v-xabarovske-11/
современные дренажные системы официальный сайт http://www.drenazh-uchastka-rostov.ru .
дренаж участка ленинградская область цена дренаж участка ленинградская область цена .
Где купить диплом специалиста?
Наша компания предлагает быстро приобрести диплом, который выполняется на оригинальном бланке и заверен мокрыми печатями, водяными знаками, подписями должностных лиц. Данный документ пройдет любые проверки, даже с использованием специального оборудования. Достигайте свои цели максимально быстро с нашими дипломами. Купить диплом о высшем образовании! justvoip.listbb.ru/viewtopic.php?f=2&t=1818
Быстро и просто приобрести диплом института!
Мы предлагаем дипломы любых профессий по разумным ценам— diplom-onlinex.com/diplom-vracha-lechebnoe-delo-kupit-2/
1win.kg https://1win6049.ru .
Рейтинг лучших компаний по ремонту квартир – проверенные исполнители
рейтинг компаний по ремонту квартир московской области http://www.remont-kvartir-reiting.ru/ .
1win rossvya http://www.1win6002.ru .
мостбет казино https://www.mostbet6007.ru .
What i don’t realize is in reality how you are no longer really much more smartly-appreciated than you may be now. You’re so intelligent. You recognize therefore significantly in terms of this topic, made me in my view consider it from so many various angles. Its like men and women aren’t involved until it’s one thing to do with Woman gaga! Your personal stuffs nice. At all times maintain it up!
1 win 1 win .
бк 1win http://balashiha.myqip.ru/?1-12-0-00000437-000-0-0-1743258848 .
дренажные работы дренажные работы .
дренажные работы спб дренажные работы спб .
глонасс мониторинг транспорта москва глонасс мониторинг транспорта москва .
купить диплом пгс купить диплом пгс .
Где приобрести диплом специалиста?
Купить диплом университета по выгодной цене возможно, обращаясь к проверенной специализированной компании.: diplom-kuplu.ru
Мы изготавливаем дипломы любой профессии по приятным ценам. Дипломы изготавливаются на фирменных бланках государственного образца Купить диплом института diplomj-irkutsk.ru
Приобрести документ университета вы сможете в нашей компании. Мы предлагаем документы об окончании любых университетов Российской Федерации. Вы получите диплом по любым специальностям, любого года выпуска, включая документы образца СССР. Даем гарантию, что в случае проверки документов работодателем, каких-либо подозрений не возникнет. vetreriameliante.it/index.php/kforum/jm-slideshow-module/11265-img#11265
ван вин ван вин .
мостбет зеркало mostbet6007.ru .
контроль движения транспорта контроль движения транспорта .
Купить диплом о высшем образовании !
Покупка диплома университета РФ у нас является надежным процессом, потому что документ будет заноситься в реестр. При этом печать выполняется на фирменных бланках, установленных государством. Купить диплом о высшем образовании arenadiplom24.online/vuzy/ntf-uieuip
Задался вопросом: можно ли на самом деле купить диплом государственного образца в Москве? Был приятно удивлен — это реально и легально!
Сначала искал информацию в интернете на тему: купить дипломы москва, купить средне специальное образование, купить диплом старого образца в тюмени, купить диплом мфюа, диплома нет и получил базовые знания. В итоге остановился на материале: diplomybox.com/kupit-diplom-magistra-v-sochi
OVI regulations as part of Ohio can be complex, nonetheless it’s essential to posses a great comprehension of any of them if us find allegations. Driving below their influence of alcohol (DUI) is actually a serious criminal offenses this can have actually significant consequences on your very own life. In Ohio, ones legal threshold for blood flow ethanol content (BAC) is 8 percentfor nearly all motorists plus four per cent business truckers.
If you may be pulled over by legal administration and alleged of DUI, they might carryout field soberness tests or chemical tests, that while breathalyzer or body examinations, to determine their degree of disability. Refusing they tests can cause mechanical sanctions, including driving license suspension.
ovi offensive activity in Ohio bear various penalties, corresponding to on factors similar to prior convictions, BAC level, and/or irrespective of whether there was basically an accident or injuries concerned. Implications might feature fees, license temporary removal, imperative alcoholic beverages cures training, trial period, and regular prison time. Returning offensive activity and aggravated conditions can result in more terrible penalties.
Creating a knowledgeable DUI a good defense attorney is vital to navigate the intricacies of Ohio drunk driving regulations. They can review the evidence, dispute the lawfulness of the cure, inquire the precision of checks, and check out potential defense to help alleviate the premiums. In addition, an legal practitioner can help you via the judiciary process, confirming ones proper rights are screened and advocating for the recommended plausible final result.
Remember, being notified regarding Ohio’s DUI statutes and finding the assistance of an full-fledged lawyer or attorney are required actions in properly holding a DUI price as well as defending ones forthcoming. credit card fraud lawyer
Мы изготавливаем дипломы любой профессии по приятным ценам.– diplomv-v-ruki.ru/kupit-diplom-s-reestrom-otzivi-bistro-i-bezopasno-4/
1вин бет официальный сайт http://1win6049.ru .
Заказать диплом любого университета!
Мы можем предложить документы институтов, которые расположены в любом регионе Российской Федерации. Документы печатаются на “правильной” бумаге самого высокого качества: ruminus.ru/incs/pgs/kupit_attestat_51.html
Приобрести диплом о высшем образовании!
Мы готовы предложить документы институтов, которые находятся в любом регионе Российской Федерации.
diplom-zentr.com/kupit-diplom-s-reestrom-26/
Мы готовы предложить дипломы любых профессий по приятным ценам. Основные преимущества заказа документов у нас
Вы приобретаете диплом в надежной и проверенной временем компании. Это решение сэкономит не только массу денег, но и время.
Преимуществ гораздо больше:
• Дипломы печатаются на оригинальных бланках со всеми печатями;
• Предлагаем дипломы любого ВУЗа России;
• Цена намного ниже той, которую потребовалось бы заплатить на очном и заочном обучении в университете;
• Удобная доставка как по Москве, так и в любые другие регионы России.
Приобрести диплом академии– http://pastvu-forum.flybb.ru/viewtopic.php?f=8&t=603/ – pastvu-forum.flybb.ru/viewtopic.php?f=8&t=603
Где приобрести диплом по нужной специальности?
Мы оказываем услуги по производству и продаже документов об окончании любых университетов РФ. Документы производят на подлинных бланках. Рєniceroleplay.getbb.ru/viewtopic.phpf=1&t=4241
Заказ официального диплома через качественную и надежную компанию дарит ряд достоинств для покупателя. Данное решение помогает сберечь как дорогое время, так и значительные деньги. Однако, только на этом выгоды не ограничиваются, плюсов значительно больше.Мы изготавливаем дипломы любых профессий. Дипломы производятся на фирменных бланках государственного образца. Доступная цена по сравнению с крупными тратами на обучение и проживание. Заказ диплома института станет рациональным шагом.
Заказать диплом о высшем образовании: vacshidiplom.com/bistro-kupit-diplom-s-zaneseniem-bez-xlopot/
1win официальный сайт скачать balashiha.myqip.ru/?1-12-0-00000437-000-0-0-1743258848 .
Здравствуйте!
Без университета трудно было продвинуться вверх по карьерной лестнице. Сегодня же документ не дает никаких гарантий, что удастся получить привлекательную работу. Куда более важное значение имеют практические навыки специалиста, а также его постоянный опыт. Именно из-за этого решение о заказе диплома следует считать мудрым и целесообразным. Заказать диплом об образовании flowsocial.xyz/read-blog/3960_attestat-za-9-klass-cena.html
Привет!
Мы предлагаем дипломы любой профессии по разумным ценам. Стоимость будет зависеть от выбранной специальности, года выпуска и ВУЗа: diplomanc.com/
Для успешного продвижения по карьерной лестнице потребуется наличие диплома университета. Быстро и просто приобрести диплом о высшем образовании у проверенной организации: diploml-174.ru/diplom-kupit-v-ekaterinburge-3/
Привет!
Для некоторых людей, приобрести диплом о высшем образовании – это острая потребность, шанс получить достойную работу. Но для кого-то – это банальное желание не терять время на учебу в ВУЗе. Что бы ни толкнуло вас на это решение, наша фирма готова помочь. Быстро, качественно и недорого сделаем диплом любого года выпуска на настоящих бланках с реальными подписями и печатями.
Ключевая причина, почему многие покупают документ, – получить хорошую работу. К примеру, знания дают возможность человеку устроиться на работу, а подтверждения квалификации нет. В том случае если работодателю важно присутствие “корочки”, риск потерять место работы очень высокий.
Приобрести документ о получении высшего образования можно в нашем сервисе. Мы оказываем услуги по продаже документов об окончании любых университетов РФ. Вы сможете получить необходимый диплом по любым специальностям, любого года выпуска, включая документы образца СССР. Даем гарантию, что при проверке документа работодателями, подозрений не появится.
Ситуаций, которые вынуждают купить диплом о среднем образовании много. Кому-то очень срочно требуется работа, а значит, необходимо произвести хорошее впечатление на руководителя при собеседовании. Некоторые планируют устроиться в большую компанию, чтобы повысить собственный статус в обществе и в последующем начать собственное дело. Чтобы не тратить впустую годы жизни, а сразу начинать удачную карьеру, применяя врожденные способности и полученные навыки, можно купить диплом через интернет. Вы сможете быть полезным для социума, получите финансовую стабильность в максимально короткий срок- аттестат купить за 9 класс
Диплом университета РФ!
Без института очень сложно было продвигаться вверх по карьерной лестнице. По этой причине решение о покупке диплома следует считать мудрым и рациональным. Приобрести диплом об образовании burgasdent.listbb.ru/viewtopic.php?f=3&t=1180
Приобрести диплом ВУЗа!
Мы изготавливаем дипломы психологов, юристов, экономистов и других профессий по невысоким ценам. Вы заказываете диплом через надежную и проверенную временем фирму. : solo-it.ru/forum/?PAGE_NAME=profile_view&UID=4262
Приобрести документ института можно в нашем сервисе. Мы оказываем услуги по изготовлению и продаже документов об окончании любых ВУЗов РФ. Вы сможете получить диплом по любым специальностям, включая документы Советского Союза. Даем гарантию, что при проверке документов работодателем, подозрений не появится. kupitediplom.ru/kupit-diplom-s-zaneseniem-v-reestr-vigodnaya-stoimost-2/
Заказать диплом института по выгодной цене вы сможете, обратившись к проверенной специализированной фирме. Мы предлагаем документы об окончании любых ВУЗов РФ. Купить диплом университета– diplomt-nsk.ru/kupit-diplom-menedzhera-s-zaneseniem-v-reestr-16/
Купить диплом о высшем образовании!
Мы предлагаем документы любых учебных заведений, которые находятся в любом регионе РФ.
diplomers.com/bistrij-diplom-vuza-s-zaneseniem-v-reestr/
1вин официальный сайт вход https://www.balashiha.myqip.ru/?1-12-0-00000437-000-0-0-1743258848 .
Купить квартиру в Москве – это ваш шанс на комфорт и стабильность!
Просторные и светлые квартиры в лучших районах столицы ждут вас.
Отличная инфраструктура, развитый транспорт и близость к культуре делают жизнь здесь уникальной.
Инвестируйте в ваше будущее – выберите квартиру мечты уже сегодня!
Купить квартиру на Жигулевской улице в Москве — 1 775 объявлений по продаже квартир на МирКвартир
1 win.com http://alfatraders.borda.ru/?1-0-0-00004932-000-0-0-1743258210 .
Надежные пластиковые окна – рейтинг компаний с высокими оценками
рейтинг компаний пластиковых окон http://www.top-okon.ru .
1win ставки официальный сайт https://www.alfatraders.borda.ru/?1-0-0-00004932-000-0-0-1743258210 .
лофты спб аренда лофты спб аренда .
детская одежда с надписями http://www.dbkids.ru .
augmented reality pictures augmented reality pictures .
Где приобрести диплом специалиста?
Мы предлагаем документы об окончании любых ВУЗов России. Документы производят на настоящих бланках. Рєhiringcambodia.com/employer/2702/premialnie-diplom-24
одежда с английскими надписями http://www.dbkids.ru/ .
лофт спб аренда лофт спб аренда .
Покупка официального диплома через надежную фирму дарит ряд преимуществ. Такое решение позволяет сберечь время и существенные денежные средства. Тем не менее, только на этом выгода не ограничивается, преимуществ значительно больше.Мы предлагаем дипломы любой профессии. Дипломы производят на подлинных бланках государственного образца. Доступная стоимость по сравнению с серьезными тратами на обучение и проживание в чужом городе. Заказ диплома института является мудрым шагом.
Купить диплом: good-diplom.ru/kupit-diplom-v-reestre-legalno-i-prosto/
ar image http://www.augmented-reality-platform.ru .
mostbet chrono https://mostbet6008.ru/ .
one win one win .
Приобрести документ о получении высшего образования можно у нас в столице. Мы оказываем услуги по изготовлению и продаже документов об окончании любых ВУЗов РФ. Вы сможете получить диплом по любой специальности, включая документы старого образца. Даем 100% гарантию, что при проверке документов работодателями, каких-либо подозрений не возникнет. diplomk-v-krasnodare.ru/kupit-diplom-yurista-s-zaneseniem-v-reestr-bistro-6/
1vin 1win6003.ru .
мостбет вход http://www.mostbet6008.ru .
Заказать диплом института по невысокой цене возможно, обратившись к надежной специализированной фирме. Мы предлагаем документы об окончании любых ВУЗов России. Купить диплом о высшем образовании– diplom-onlinex.com/kupit-diplom-s-vneseniem-v-reestr-bistro-i-nadezhno-29/
мрстбет svstrazh.forum24.ru/?1-18-0-00000136-000-0-0-1743260517 .
Купить диплом ВУЗа можем помочь. Купить диплом специалиста в Волгограде – diplomybox.com/kupit-diplom-spetsialista-v-volgograde
1win вход на сайт https://obovsem.myqip.ru/?1-9-0-00000059-000-0-0-1743051936 .
Купить квартиру в Москве – это ваш шанс на комфорт и стабильность!
Просторные и светлые квартиры в лучших районах столицы ждут вас.
Отличная инфраструктура, развитый транспорт и близость к культуре делают жизнь здесь уникальной.
Инвестируйте в ваше будущее – выберите квартиру мечты уже сегодня!
THE FIVE в Москве от застройщика
1 win официальный сайт http://1win6050.ru .
Мы готовы предложить дипломы любой профессии по приятным тарифам. Оставить отзыв — kyc-diplom.com/replies.html
Мы можем предложить дипломы любой профессии по разумным ценам. Цена зависит от выбранной специальности, года получения и образовательного учреждения. Стараемся поддерживать для заказчиков адекватную ценовую политику. Для нас важно, чтобы документы были доступны для большого количества граждан. как купить настоящий диплом
Где приобрести диплом специалиста?
Наши специалисты предлагают выгодно и быстро купить диплом, который выполнен на оригинальном бланке и заверен печатями, штампами, подписями. Диплом пройдет любые проверки, даже при помощи специально предназначенного оборудования. Решите свои задачи быстро и просто с нашей компанией.
Купить диплом о высшем образовании diplomt-v-chelyabinske.ru/kupit-diplom-texnologa-5/
диплом технолога купить
Ищете идеальную квартиру в Москве или Подмосковье? У нас есть предложения, которые вас удивят! Живите в сердце столицы с развитой инфраструктурой, или выберите уютные районы Подмосковья для спокойной жизни. Мы предлагаем широкий выбор квартир: от современных студий до просторных семейных апартаментов. Наша команда специалистов поможет вам найти именно то, что нужно, учитывая все ваши пожелания и бюджет. Не упустите шанс стать владельцем жилья мечты! Звоните, и мы подберем лучшие варианты для вас! Живите там, где вам комфортно!
Лебедь (жилой комплекс)
Заказать документ о получении высшего образования можно у нас. http://www.bettercodes.org/gampang-banget-download-aplikasi-rtp-slot-paling-gacor/#comment-13361
Приобрести диплом ВУЗа!
Мы изготавливаем дипломы любой профессии по выгодным тарифам— diplomus-spb.ru/kupit-diplomi-o-visshem-s-zaneseniem-4/
Мы изготавливаем дипломы любой профессии по приятным тарифам. Всегда стараемся поддерживать для заказчиков адекватную политику цен. Важно, чтобы документы были доступны для подавляющей массы граждан.
Покупка диплома, который подтверждает окончание института, – это грамотное решение. Купить диплом ВУЗа: diplom-insti.ru/diplom-texnicheskij-kupit/
augmented reality photo augmented reality photo .
детская одежда с надписями http://dbkids.ru .
аренда лофт аренда лофт .
Где заказать диплом специалиста?
Мы изготавливаем дипломы любой профессии по приятным тарифам. Мы предлагаем документы ВУЗов, расположенных на территории всей РФ. Вы можете приобрести диплом за любой год, в том числе документы старого образца СССР. Дипломы и аттестаты выпускаются на бумаге самого высокого качества. Это позволяет делать государственные дипломы, которые не отличить от оригинала. Документы заверяются необходимыми печатями и подписями. Стараемся поддерживать для заказчиков адекватную ценовую политику. Важно, чтобы дипломы были доступны для подавляющей массы наших граждан. diplom-city24.ru/kupit-diplom-elektrika-6
рулонные шторы с электроприводом и дистанционным управлением рулонные шторы с электроприводом и дистанционным управлением .
1vin pro https://1win6050.ru/ .
augmented reality photo augmented reality photo .
детская одежда с надписями https://dbkids.ru/ .
лофты аренда лофты аренда .
1win скачать последнюю версию 1win6003.ru .
рулонные шторы это рулонные шторы это .
1win com obovsem.myqip.ru/?1-9-0-00000059-000-0-0-1743051936 .
Купить документ института можно у нас. diplomf-v-irkutske.ru/kupit-diplom-4-50
Мы можем предложить дипломы психологов, юристов, экономистов и любых других профессий по выгодным тарифам. Стоимость будет зависеть от выбранной специальности, года выпуска и образовательного учреждения. Всегда стараемся поддерживать для покупателей адекватную ценовую политику. Важно, чтобы документы были доступными для большого количества наших граждан. купить диплом в шадринске
Где купить диплом по актуальной специальности?
Наша компания предлагает выгодно купить диплом, который выполнен на оригинальной бумаге и заверен печатями, штампами, подписями официальных лиц. Диплом способен пройти лубую проверку, даже при помощи профессионального оборудования. Решайте свои задачи быстро и просто с нашим сервисом.
Купить диплом ВУЗа diplomh-40.ru/kupit-diplom-v-velikom-novgorode-3/
можно ли купить диплом о среднем профессиональном образовании
Где заказать диплом по нужной специальности?
Наша компания предлагает быстро и выгодно приобрести диплом, который выполняется на бланке ГОЗНАКа и заверен печатями, штампами, подписями. Наш документ способен пройти лубую проверку, даже с применением профессиональных приборов. Достигайте цели быстро с нашими дипломами. Приобрести диплом любого университета! borderforum.ru/viewtopic.php?f=7&t=12962
мостбет скачать на андроид http://mostbet6008.ru/ .
скачать мостбет официальный сайт http://svstrazh.forum24.ru/?1-18-0-00000136-000-0-0-1743260517/ .
1wiun 1wiun .
игра ракета на деньги 1win http://1win6003.ru/ .
Где заказать диплом по актуальной специальности?
Мы изготавливаем дипломы любой профессии по приятным тарифам. Мы готовы предложить документы ВУЗов, расположенных на территории всей РФ. Можно заказать качественно сделанный диплом за любой год, включая документы старого образца. Дипломы и аттестаты печатаются на бумаге высшего качества. Это дает возможность делать настоящие дипломы, которые не отличить от оригинала. Документы будут заверены необходимыми печатями и штампами. Стараемся поддерживать для заказчиков адекватную политику тарифов. Важно, чтобы документы были доступны для подавляющей массы наших граждан. diplomius-docs.com/kupit-diplom-elektromontazhnika
Заказать диплом о высшем образовании!
Мы предлагаем документы институтов, расположенных в любом регионе Российской Федерации.
diplomt-v-samare.ru/kupit-diplom-o-visshem-obrazovanii-19/
Заказать диплом об образовании!
Мы изготавливаем дипломы любой профессии по выгодным тарифам— poluchidiplom.com/kupit-diplom-v-ekaterinburge-bistro-i-nadezhno-7/
Мы готовы предложить дипломы любых профессий по выгодным тарифам. Стараемся поддерживать для заказчиков адекватную ценовую политику. Для нас важно, чтобы документы были доступны для большинства наших граждан.
Заказ диплома, подтверждающего обучение в ВУЗе, – это выгодное решение. Заказать диплом любого ВУЗа: kupitediplom0029.ru/kupit-diplom-sajt-2/
Hey there! Someone in my Facebook group shared this site with us so I came to take a look. I’m definitely enjoying the information. I’m book-marking and will be tweeting this to my followers! Outstanding blog and superb style and design.
mostbet промокод http://mostbet6008.ru/ .
1win kg скачать https://obovsem.myqip.ru/?1-9-0-00000059-000-0-0-1743051936 .
Разработка технологической карты на погрузочно-разгрузочные работы для оптимизации работы склада
карты технологические на погрузочно разгрузочные работы https://tekhnologicheskie-karty.ru .
Ищете идеальную квартиру в Москве или Подмосковье? У нас есть предложения, которые вас удивят! Живите в сердце столицы с развитой инфраструктурой, или выберите уютные районы Подмосковья для спокойной жизни. Мы предлагаем широкий выбор квартир: от современных студий до просторных семейных апартаментов. Наша команда специалистов поможет вам найти именно то, что нужно, учитывая все ваши пожелания и бюджет. Не упустите шанс стать владельцем жилья мечты! Звоните, и мы подберем лучшие варианты для вас! Живите там, где вам комфортно!
Форум по ЖК Флотилия в Москве: 4507 отзывов о новостройке
Экран для проекторов с гладким покрытием – наслаждайтесь идеальной передачей цветов
проекционный экран цена proekcionnye-ehkrany0.ru .
mostbet скачать на телефон бесплатно андроид https://www.svstrazh.forum24.ru/?1-18-0-00000136-000-0-0-1743260517 .
шиномонтаж подольск шиномонтаж подольск .
michelin primacy 4+ https://www.www.proalbea.ru/shiny-michelin-preimushhestva-i-nedostatki.html .
Готовые комплекты мебели для кафе – стильные и удобные решения под ключ
мебель ресторан https://mebel-dlya-kafe.ru .
michelin primacy 4 michelin primacy 4 .
шиномантаж нахабино шиномантаж нахабино .
mostbet официальный сайт https://svstrazh.forum24.ru/?1-18-0-00000136-000-0-0-1743260517 .
Купить диплом о высшем образовании!
Мы предлагаем документы ВУЗов, которые расположены в любом регионе Российской Федерации.
diplomt-nsk.ru/kupit-diplom-yurista-s-zaneseniem-v-reestr-bistro-4/
Приобрести диплом ВУЗа по выгодной цене возможно, обратившись к надежной специализированной компании. Купить документ университета можно в нашем сервисе. diplomv-v-ruki.ru/kupite-diplom-o-visshem-obrazovanii-bez-lishnix-problem-2
ms5jxk
Заказать диплом любого ВУЗа!
Мы можем предложить документы учебных заведений, которые расположены на территории всей России. Документы печатаются на “правильной” бумаге самого высокого качества: lgmtech.co.uk/employer/aurus-diploms
Купить диплом любого ВУЗа!
Купить диплом университета по выгодной стоимости можно, обратившись к надежной специализированной компании. Купить диплом о высшем образовании: diplom-kaluga.ru/vot-neskolko-variantov-diplom-s-reestrom-v-moskve-kupit-ofitsialno-kupit-diplom-s-provodkoj-v-moskve-bistro-diplom-v-moskve-s-garantiej-zapis-v-reestre-originalnij-diplo
купить диплом в нижнем новгороде
Заказать диплом университета !
Приобретение диплома университета РФ в нашей компании – надежный процесс, потому что документ заносится в государственный реестр. Заказать диплом ВУЗа diplomt-v-samare.ru/kupit-diplom-v-moskve-s-zaneseniem-v-reestr-srochno
95c07f6
[url=https://gotwebsite1.com/local-seo-scottsdale/]Google Analytics setup for SEO tracking[/url]
1win. com https://www.1win6050.ru .
рулонные шторы для панорамных окон рулонные шторы для панорамных окон .
Купить диплом ВУЗа по доступной цене возможно, обратившись к проверенной специализированной компании. Купить документ о получении высшего образования вы сможете в нашей компании в столице. diplomgorkiy.com/kupit-diplom-zanesennij-v-reestr-bistro-i-nadezhno-4
замена подвесного подшипника цена http://www.4-x-4.ru/remont-i-balansirovka-kardannyh-valov/ .
Где приобрести диплом специалиста?
Мы изготавливаем дипломы любой профессии по разумным тарифам. Мы можем предложить документы техникумов, расположенных в любом регионе Российской Федерации. Можно купить качественный диплом за любой год, указав актуальную специальность и оценки за все дисциплины. Документы выпускаются на бумаге высшего качества. Это позволяет делать настоящие дипломы, которые невозможно отличить от оригинала. Они будут заверены всеми необходимыми печатями и подписями. Стараемся поддерживать для заказчиков адекватную политику цен. Важно, чтобы документы были доступными для большого количества наших граждан. diplompro.ru/kupit-attestat-za-11-klass-2-5
что значит купить диплом
1вин официальный сайт мобильная https://1win6004.ru/ .
мостбет кыргызстан http://www.mostbet6009.ru .
ремонт переднего кардана ремонт переднего кардана .
бк 1win 1win6050.ru .
Где приобрести диплом по актуальной специальности?
Мы изготавливаем дипломы психологов, юристов, экономистов и прочих профессий по доступным тарифам. Мы готовы предложить документы техникумов, которые расположены в любом регионе РФ. Можно купить диплом от любого заведения, за любой год, включая сюда документы старого образца СССР. Документы делаются на “правильной” бумаге высшего качества. Это дает возможность делать государственные дипломы, которые невозможно отличить от оригинала. Документы будут заверены всеми необходимыми печатями и штампами. Стараемся поддерживать для клиентов адекватную политику тарифов. Важно, чтобы дипломы были доступны для большого количества наших граждан. okdiplom.ru/kupit-diplomi-o-visshem-obrazovanii-tsena-4
автоматические шторы на окна автоматические шторы на окна .
1вин онлайн 1вин онлайн .
мотбет http://mostbet6009.ru/ .
1 win.com https://www.1win6051.ru .
Мы предлагаем дипломы любой профессии по выгодным тарифам. Дипломы изготавливаются на подлинных бланках государственного образца Приобрести диплом института diplomservis.ru
Где заказать диплом по необходимой специальности?
Приобрести диплом института по доступной стоимости возможно, обращаясь к надежной специализированной фирме.: zakaz-na-diplom.ru
Купить диплом университета!
Мы готовы предложить документы институтов, которые находятся в любом регионе РФ.
diplomg-cheboksary.ru/kupit-diplom-s-garantiej-kachestva-i-vneseniem-v-reestr/
michelin x ice north 4 michelin x ice north 4 .
BlackSprut – платформа с особыми возможностями
Сервис BlackSprut удостаивается интерес многих пользователей. В чем его особенности?
Данный ресурс обеспечивает широкие опции для аудитории. Интерфейс сайта выделяется простотой, что позволяет ей быть доступной даже для тех, кто впервые сталкивается с подобными сервисами.
Важно отметить, что BlackSprut работает по своим принципам, которые делают его особенным в определенной среде.
При рассмотрении BlackSprut важно учитывать, что определенная аудитория выражают неоднозначные взгляды. Некоторые отмечают его функциональность, а некоторые рассматривают с осторожностью.
В целом, данный сервис остается объектом интереса и привлекает заинтересованность разных пользователей.
Где найти работающий доступ на БлэкСпрут?
Хотите найти свежее зеркало на BlackSprut? Мы поможем.
bs2best
Сайт часто обновляет адреса, и лучше иметь актуальный домен.
Обновленный адрес легко найти здесь.
Проверьте рабочую ссылку у нас!
шиномонтаж зеленоград шиномонтаж зеленоград .
Приобрести диплом о высшем образовании !
Приобретение диплома ВУЗа РФ в нашей компании является надежным процессом, ведь документ будет заноситься в реестр. Приобрести диплом университета diplomt-v-chelyabinske.ru/kupit-diplom-v-moskve-s-zaneseniem-v-reestr-bistro-15
Kraken официальный сайт
Ищете надежную платформу для торгов и инвестиций в криптовалюту? Познакомьтесь с Kraken! Это один из самых известных и безопасных криптобирж в мире.
Почему стоит выбрать Kraken?
– Безопасность: Ваши средства защищены передовыми технологиями.
– Широкий выбор: Более 50 криптовалют для торговли, включая биткойн и эфир.
– Удобный интерфейс: Простая навигация и интуитивно понятные инструменты для анализа.
– Низкие комиссии: Конкурентные ставки на торговлю для максимизации ваших доходов.
– Поддержка: Круглосуточная помощь от профессионалов.
Зарегистрируйтесь на официальном сайте Kraken сегодня и получите доступ к премиальной платформе для торговли!
Присоединяйтесь к миллионам пользователей и начните свою крипто-приключение прямо сейчас!кракен ссылка
Заказать диплом об образовании!
Приобрести диплом ВУЗа по доступной цене возможно, обращаясь к проверенной специализированной компании. Заказать диплом о высшем образовании: diploml-174.ru/kupit-diplom-s-vneseniem-v-reestr-30
Приобрести диплом ВУЗа!
Мы готовы предложить документы ВУЗов, расположенных на территории всей Российской Федерации. Документы печатаются на “правильной” бумаге высшего качества: headbull.ru/employer/aurus-diploms
Мы можем предложить дипломы психологов, юристов, экономистов и других профессий по приятным тарифам. Стоимость будет зависеть от той или иной специальности, года выпуска и университета. Всегда стараемся поддерживать для заказчиков адекватную политику тарифов. Для нас очень важно, чтобы документы были доступны для большого количества наших граждан. мэр купил диплом
аренда тента на мероприятие аренда тента на мероприятие .
Заказать диплом любого университета!
Мы можем предложить документы институтов, расположенных в любом регионе Российской Федерации.
diplomist.com/kupite-nastoyashij-diplom-s-zaneseniem-v-reestr-bistro/
michelin x ice north 4 michelin x ice north 4 .
Всегда считал, что покупка диплома о высшем образовании — это миф и невозможно. Но, к счастью, оказался неправ. Сначала искал информацию по теме: купить диплом тамбовского училища педагогического, купить диплом физрука, купить липовые дипломы, купить приложение к диплому с оценками, можно купить диплом воспитателя, а затем переключился на дипломы вузов. Подробности здесь: diplomybox.com/kupit-diplom-tekhnikuma-kolledzha-samara
летние шатры в аренду летние шатры в аренду .
шиномантаж одинцово шиномантаж одинцово .
Мы изготавливаем дипломы любой профессии по невысоким тарифам. Стоимость будет зависеть от конкретной специальности, года выпуска и университета. Всегда стараемся поддерживать для клиентов адекватную ценовую политику. Для нас очень важно, чтобы дипломы были доступными для подавляющей массы наших граждан. купить диплом сзту
Купить документ о получении высшего образования можно в нашей компании в Москве. diplomc-v-ufe.ru/kupit-diplom-voronezh-4
Добрый день!
Без получения диплома очень сложно было продвигаться вверх по карьере. Сегодня же этот важный документ не дает абсолютно никаких гарантий, что удастся получить престижную работу. Более важное значение имеют практические навыки и знания специалиста и его опыт. В связи с этим решение о покупке диплома стоит считать мудрым и рациональным. Купить диплом о высшем образовании birdiey.com/read-blog/2940_diplom-povara-3-razryada.html
Приветствую!
Мы готовы предложить дипломы любой профессии по выгодным ценам. Стоимость может зависеть от выбранной специальности, года выпуска и образовательного учреждения: rdiploms.com/
купить дипломы о высшем купить дипломы о высшем .
Мы изготавливаем дипломы любых профессий по приятным ценам. О преимуществах приобретения документов у нас
Вы покупаете диплом через надежную и проверенную временем фирму. Это решение позволит сэкономить не только деньги, но и ваше время.
На этом преимущества не заканчиваются, их гораздо больше:
• Документы изготавливаются на подлинных бланках с печатями и подписями;
• Дипломы всех ВУЗов РФ;
• Цена намного ниже той, которую пришлось бы платить на очном и заочном обучении в ВУЗе;
• Быстрая доставка в любые регионы РФ.
Приобрести диплом ВУЗа– http://moskvic.actieforum.com/t4109-topic#7442/ – moskvic.actieforum.com/t4109-topic#7442
Диплом любого ВУЗа РФ!
Без ВУЗа очень сложно было продвинуться вверх по карьерной лестнице. В связи с этим решение о заказе диплома следует считать целесообразным. Приобрести диплом об образовании technoevents.ru/diplom-dlya-rabotyi-i-karernogo-rosta
Всех приветствую!
Для некоторых людей, заказать диплом ВУЗа – это острая потребность, уникальный шанс получить достойную работу. Но для кого-то – это желание не терять время на учебу в институте. С какой бы целью вам это не потребовалось, наша компания готова помочь вам. Быстро, качественно и выгодно сделаем документ любого ВУЗа и любого года выпуска на подлинных бланках с реальными печатями.
Основная причина, почему многие прибегают к покупке документа, – получить хорошую работу. К примеру, способности и опыт дают возможность кандидату устроиться на работу, но документального подтверждения квалификации не имеется. Когда работодателю важно присутствие “корочек”, риск потерять место работы достаточно высокий.
Купить документ ВУЗа вы имеете возможность в нашей компании в Москве. Мы предлагаем документы об окончании любых ВУЗов Российской Федерации. Вы сможете получить диплом по любой специальности, включая документы СССР. Гарантируем, что при проверке документа работодателем, подозрений не возникнет.
Ситуаций, которые вынуждают приобрести диплом о среднем образовании много. Кому-то срочно необходима работа, а значит, необходимо произвести впечатление на начальника при собеседовании. Другие мечтают попасть в престижную компанию, чтобы повысить собственный статус в обществе и в дальнейшем начать свой бизнес. Чтобы не терять драгоценное время, а сразу начинать успешную карьеру, применяя врожденные способности и полученные знания, можно приобрести диплом через интернет. Вы сможете быть полезным в обществе, обретете финансовую стабильность в кратчайшие сроки- купить аттестат
Купить диплом ВУЗа!
Мы предлагаем дипломы любой профессии по разумным ценам. Вы покупаете диплом в надежной и проверенной компании. : grad-360.flybb.ru/viewtopic.php?f=3&t=851
ремонт карданов области 4-x-4.ru/remont-i-balansirovka-kardannyh-valov/ .
1вин rossvya http://1win6052.ru .
dwi regulations within Ohio might be complex, and yet it’s vital to posses a solid understanding of any of them if we find complaints. Driving under on influence of alcohol (DUI) is definitely a serious criminal offense in which can need significant ramifications on all of your future. In Ohio, will legal threshold for body alcohol concentration (BAC) is 0.08% for many drivers and additionally 0.04% business racers.
If your are pulled by legal social control and alleged of driving under the influence, they may carryout roadside sobriety tests or substance exams, really seeing as breathalyser or body assessments, to establish their degree of damage. Declining some tests can result in natural consequences, including license suspension.
dwi crimes in Ohio haul different consequences, dependant on variables such as earlier convictions, BAC levels, as well as regardless of whether generally there appeared to be an car accident or accidental injury used. Drawbacks can contain charges, license temporary removal, compulsory alcohol in the mouthwash cures applications, probation, and still prison time. Replicate offenses and worsened occasions can lead to more severe penalties.
Needing a skilled DUI safeguard attorney is vital to handle the complexity of Ohio dwi statutes. They may examine the evidence, challenge the legality of the stop your vehicle, ask the consistency of assessments, and experience potentiality barriers to help abate the accusations. You’ll also, an attorney can help you with the judiciary process, promising your very own civil liberties are safeguarded and pushing for the greatest viable finish.
Remember, being updated up to Ohio’s DUI statutes and looking for the assistance of an qualified attorney are required actions in effortlessly approaching a DUI accusation to saving any destiny. child maltreatment counselor
1win live 1win live .
мост бет http://www.mostbet6009.ru .
1win pro 1win pro .
Фургон Кракен замечен на Арбате в Москве — тысячи обсуждают, что было внутри. Смотри фото и подробности здесь: кракен фургон арбат
Если вы еще не видели, обязательно посмотрите сами подробности и узнайте, что скрывал Кракен в своем автобусе и фургоне: кракен фургон Арбат.
Недавно на Арбате в Москве появился загадочный транспорт от Кракен — фургон и автобус. Уже видели, что там внутри? Фото и видео уже доступны тут как зайти в кракен с айфона. Узнайте все подробности первыми!
ремонт валов ремонт валов .
скачать mostbet на телефон http://mostbet6009.ru/ .
Недавно на Арбате в Москве появился загадочный транспорт от Кракен — фургон и автобус. Уже видели, что там внутри? Фото и видео уже доступны тут магазин меф. Узнайте все подробности первыми!
Недавно на Арбате в Москве появился загадочный транспорт от Кракен — фургон и автобус. Уже видели, что там внутри? Фото и видео уже доступны тут кракен фургон официальный сайт. Узнайте все подробности первыми!
Недавно на Арбате в Москве появился загадочный транспорт от Кракен — фургон и автобус. Уже видели, что там внутри? Фото и видео уже доступны тут купить кокаин. Узнайте все подробности первыми!
В Москве на Арбате замечены фургон и автобус Кракен. Хотите узнать, что было внутри? Все фото и видео тут купить кокаин
Фургон Кракен замечен на Арбате в Москве — тысячи обсуждают, что было внутри. Смотри фото и подробности здесь:
Мы готовы предложить дипломы психологов, юристов, экономистов и любых других профессий по приятным тарифам.– diplomist.com/kupit-diplom-bistro-i-nadezhno-bez-lishnix-xlopot/
Где купить диплом специалиста?
Мы оказываем услуги по изготовлению и продаже документов об окончании любых университетов Российской Федерации. Документы изготавливаются на настоящих бланках. Рєjob-daddy.com/employer/premialnie-diplom-24
Фургон Кракен замечен на Арбате в Москве — тысячи обсуждают, что было внутри. Смотри фото и подробности здесь: кракен автобус в москве
Где приобрести диплом специалиста?
Получаемый диплом с необходимыми печатями и подписями 100% отвечает требованиям и стандартам Министерства образования и науки Российской Федерации, никто не сможет отличить его от оригинала. Не откладывайте свои мечты и задачи на пять лет, реализуйте их с нами – отправьте быструю заявку на диплом сегодня! Диплом о высшем образовании – запросто! boyara-analia.flybb.ru/viewtopic.phpf=7&t=1174
Купить документ о получении высшего образования вы сможете у нас в столице. Мы предлагаем документы об окончании любых университетов России. Вы получите необходимый диплом по любой специальности, включая документы Советского Союза. Даем 100% гарантию, что при проверке документов работодателем, подозрений не появится. diplomus-spb.ru/diplom-bakalavra-s-zaneseniem-v-reestr-bistro-i-nadezhno-2/
Недавно на Арбате в Москве появился загадочный транспорт от Кракен — фургон и автобус. Уже видели, что там внутри? Фото и видео уже доступны тут кракен автобус в Москве посмотреть. Узнайте все подробности первыми!
1win. https://1win6004.ru/ .
Ищете идеальную квартиру в Москве или Подмосковье? У нас есть предложения, которые вас удивят! Живите в сердце столицы с развитой инфраструктурой, или выберите уютные районы Подмосковья для спокойной жизни. Мы предлагаем широкий выбор квартир: от современных студий до просторных семейных апартаментов. Наша команда специалистов поможет вам найти именно то, что нужно, учитывая все ваши пожелания и бюджет. Не упустите шанс стать владельцем жилья мечты! Звоните, и мы подберем лучшие варианты для вас! Живите там, где вам комфортно!
ЖК Тринити 2 ?? – купить квартиру в ЖК Тринити 2 в Москве на msk-kvartitu.ru
Фургон и автобус Кракен снова в центре внимания на Арбате. Узнайте, что внутри и почему все об этом говорят — подробности тут: кракен арбат автобус перекрыл
В Москве на Арбате замечены фургон и автобус Кракен. Хотите узнать, что было внутри? Все фото и видео тут видео автобус Кракен Арбат
Для эффективного продвижения по карьерной лестнице требуется наличие диплома института. Приобрести диплом института у надежной фирмы: diplomc-v-ufe.ru/kupit-attestat-o-srednem-obrazovanii-v-moskve-3/
chat gpt написать диплом studgen.ru .
Kraken официальный сайт
Ищете надежную платформу для торгов и инвестиций в криптовалюту? Познакомьтесь с Kraken! Это один из самых известных и безопасных криптобирж в мире.
Почему стоит выбрать Kraken?
– Безопасность: Ваши средства защищены передовыми технологиями.
– Широкий выбор: Более 50 криптовалют для торговли, включая биткойн и эфир.
– Удобный интерфейс: Простая навигация и интуитивно понятные инструменты для анализа.
– Низкие комиссии: Конкурентные ставки на торговлю для максимизации ваших доходов.
– Поддержка: Круглосуточная помощь от профессионалов.
Зарегистрируйтесь на официальном сайте Kraken сегодня и получите доступ к премиальной платформе для торговли!
Присоединяйтесь к миллионам пользователей и начните свою крипто-приключение прямо сейчас!<a
kra32.cc
доставка алкоголя круглосуточно москва доставка алкоголя круглосуточно москва .
Купить Samsung в Москве techno-line.store .
В сети активно обсуждают фото и видео того, что было в фургоне и автобусе Кракен на Арбате. Чтобы лично разобраться в ситуации и посмотреть подробности, зайдите на официальный сайт проекта: что было в автобусе Кракен
Фургон Кракен замечен на Арбате в Москве — тысячи обсуждают, что было внутри. Смотри фото и подробности здесь: москва новости фургон кракен
1wiun https://1win6051.ru/ .
Фургон и автобус Кракен снова в центре внимания на Арбате. Узнайте, что внутри и почему все об этом говорят — подробности тут: кракен арбат автобус перекрыл
Мы предлагаем дипломы любых профессий по приятным ценам. Дипломы производят на подлинных бланках государственного образца Заказать диплом об образовании diplom-kaluga.ru
Где заказать диплом специалиста?
Заказать диплом университета по невысокой стоимости можно, обратившись к проверенной специализированной компании.: kupitediplom0029.ru
Фургон Кракен замечен на Арбате в Москве — тысячи обсуждают, что было внутри. Смотри фото и подробности здесь: кракен фургон москва
Недавно на Арбате в Москве появился загадочный транспорт от Кракен — фургон и автобус. Уже видели, что там внутри? Фото и видео уже доступны тут кракен автобус официальный сайт. Узнайте все подробности первыми!
алкоголь 24 часа москва алкоголь 24 часа москва .
чат gpt для написания курсовых работ http://www.studgen.ru/ .
Apple iPhone в Митино techno-line.store .
mostbet https://mostbet6010.ru .
krkn платформа – это прорыв в мире цифровой безопасности, где anonymity и защита данных становятся integral part your digital presence. Название “Kraken” ассоциируется с variety of resources и инновационными решениями. Эта сеть предлагает доступ к миру digital freedom, где правила traditional networks не действуют.
онион ссылка кракен
Где приобрести диплом по нужной специальности?
Мы предлагаем быстро и выгодно заказать диплом, который выполнен на оригинальной бумаге и заверен печатями, штампами, подписями официальных лиц. Наш документ способен пройти лубую проверку, даже с применением специальных приборов. Решайте свои задачи быстро и просто с нашими дипломами.
Приобрести диплом о высшем образовании diplomt-v-samare.ru/kupit-diplom-v-podolske-4/
Где купить диплом специалиста?
Наши специалисты предлагаютмаксимально быстро купить диплом, который выполнен на бланке ГОЗНАКа и заверен мокрыми печатями, водяными знаками, подписями. Документ пройдет любые проверки, даже с применением профессиональных приборов. Решайте свои задачи быстро с нашим сервисом. Купить диплом о высшем образовании! trackrecord.id/read-blog/8140_kupit-diplom-kolledzha.html
Мы изготавливаем дипломы любых профессий по приятным ценам. Всегда стараемся поддерживать для клиентов адекватную ценовую политику. Важно, чтобы дипломы были доступными для большого количества граждан.
Приобретение документа, подтверждающего обучение в университете, – это рациональное решение. Приобрести диплом любого университета: diploms-vuza.com/gde-kupit-diplom-obrazovanie-6/
Приобрести диплом любого университета!
Мы можем предложить дипломы психологов, юристов, экономистов и любых других профессий по приятным тарифам— poluchidiplom.com/kupit-attestat-za-11-klass-v-moskve-bistro-i-udobno-6/
ваучер 1win ваучер 1win .
тент в аренду стоимость shatry-dlya-meropriyatiy.ru .
Где приобрести диплом по актуальной специальности?
Мы изготавливаем дипломы любой профессии по невысоким ценам. Мы готовы предложить документы ВУЗов, которые находятся на территории всей Российской Федерации. Можно заказать диплом за любой год, в том числе документы старого образца СССР. Дипломы и аттестаты печатаются на бумаге высшего качества. Это дает возможность делать государственные дипломы, не отличимые от оригинала. Документы заверяются всеми обязательными печатями и штампами. Всегда стараемся поддерживать для заказчиков адекватную ценовую политику. Для нас очень важно, чтобы документы были доступными для большинства наших граждан. nsk-diplom.com/kupit-diplom-v-kirove-6
купить технический диплом
мосбет казино https://mostbet6010.ru .
Где купить диплом по нужной специальности?
Наши специалисты предлагают выгодно и быстро купить диплом, который выполняется на оригинальном бланке и заверен печатями, водяными знаками, подписями должностных лиц. Документ пройдет лубую проверку, даже с использованием профессионального оборудования. Решайте свои задачи быстро с нашими дипломами.
Заказать диплом ВУЗа kupit-diplom24.com/kupit-diplom-v-nizhnem-novgorode-12/
Где заказать диплом по нужной специальности?
Мы предлагаемвыгодно приобрести диплом, который выполнен на бланке ГОЗНАКа и заверен мокрыми печатями, водяными знаками, подписями. Диплом способен пройти любые проверки, даже с использованием профессиональных приборов. Решайте свои задачи быстро и просто с нашим сервисом. Заказать диплом ВУЗа! arzookanak0077.copiny.com/question/details/id/1068377
вин 1 https://www.1win6052.ru .
большие тенты аренда заказать большие тенты аренда заказать .
Купить диплом института!
Мы готовы предложить дипломы психологов, юристов, экономистов и любых других профессий по невысоким ценам— diploml-174.ru/kupite-attestati-za-11-klass-po-dostupnim-tsenam/
Мы изготавливаем дипломы любых профессий по выгодным тарифам. Стараемся поддерживать для клиентов адекватную политику тарифов. Для нас очень важно, чтобы документы были доступными для большого количества наших граждан.
Приобретение документа, подтверждающего окончание ВУЗа, – это разумное решение. Приобрести диплом любого ВУЗа: sdiplom.ru/gde-mozhno-kupit-diplom-2/
Всегда считал, что покупка диплома о высшем образовании — это миф и невозможно. Но, к счастью, оказался неправ. Сначала искал информацию по теме: сколько стоит красный аттестат, купить диплом высшее образование, диплом о высшем образовании недорого, купить диплом с занесением, купить аттестат об общем образовании, а затем переключился на дипломы вузов. Подробности здесь: proffdiplomik.com/diploms/diplom-kolledzha-2011-2013
купить диплом образования в ярославле diplomys-vsem.ru .
Мы изготавливаем дипломы любых профессий по разумным ценам. О преимуществах покупки документов в нашей компании
Вы покупаете документ через надежную и проверенную временем фирму. Это решение позволит вам сэкономить не только массу средств, но и ваше драгоценное время.
Преимуществ куда больше:
• Документы печатаются на подлинных бланках с печатями и подписями;
• Можно купить дипломы любых высших учебных заведений РФ;
• Цена значительно ниже нежели довелось бы платить на очном обучении в университете;
• Доставка в любые регионы РФ.
Приобрести диплом о высшем образовании– http://nitroultramaxx.copiny.com/question/details/id/1061054/ – nitroultramaxx.copiny.com/question/details/id/1061054
купит диплом
аренда ячеек для вещей аренда ячеек для вещей .
Заказать диплом любого университета!
Мы предлагаем документы ВУЗов, расположенных на территории всей Российской Федерации.
kupit-diplom24.com/kupit-diplom-instituta-s-reestrom-bistro-i-nadezhno-4/
Разработка ППРК для безопасного перемещения грузов на стройке
ппрк на башенный кран https://pprk-msk.ru/ .
Заказ документа о высшем образовании через надежную компанию дарит ряд достоинств. Это решение позволяет сэкономить время и серьезные финансовые средства. Тем не менее, только на этом выгоды не ограничиваются, достоинств значительно больше.Мы можем предложить дипломы любой профессии. Дипломы производят на оригинальных бланках государственного образца. Доступная цена по сравнению с огромными расходами на обучение и проживание. Покупка диплома университета станет мудрым шагом.
Купить диплом о высшем образовании: diplomt-v-samare.ru/kupite-diplom-visshego-obrazovaniya-s-zaneseniem-v-reestr-9/
Где приобрести диплом по актуальной специальности?
Мы изготавливаем дипломы любой профессии по выгодным ценам. Мы предлагаем документы техникумов, расположенных на территории всей России. Вы имеете возможность приобрести диплом от любого заведения, за любой год, указав подходящую специальность и оценки за все дисциплины. Дипломы и аттестаты печатаются на бумаге высшего качества. Это дает возможности делать государственные дипломы, которые не отличить от оригиналов. Они будут заверены необходимыми печатями и штампами. Всегда стараемся поддерживать для покупателей адекватную политику тарифов. Для нас очень важно, чтобы дипломы были доступными для подавляющей массы наших граждан. prodiplome.com/kupit-diplom-4
Мы готовы предложить дипломы психологов, юристов, экономистов и любых других профессий по приятным ценам. Стоимость зависит от той или иной специальности, года получения и ВУЗа. Стараемся поддерживать для заказчиков адекватную политику тарифов. Для нас очень важно, чтобы документы были доступны для большого количества наших граждан. купить диплом морские
Всех приветствую!
Для определенных людей, заказать диплом о высшем образовании – это острая необходимость, удачный шанс получить достойную работу. Но для кого-то – это желание не терять время на учебу в ВУЗе. Что бы ни толкнуло вас на такой шаг, мы готовы помочь вам. Быстро, качественно и по доступной цене сделаем документ любого года выпуска на подлинных бланках со всеми требуемыми печатями.
Основная причина, почему люди покупают документ, – получить определенную работу. Например, знания дают возможность человеку устроиться на работу, но документального подтверждения квалификации нет. В том случае если для работодателя важно присутствие “корочек”, риск потерять место работы очень высокий.
Купить документ университета вы можете у нас в Москве. Мы предлагаем документы об окончании любых университетов России. Вы получите диплом по любой специальности, любого года выпуска, включая документы образца СССР. Гарантируем, что в случае проверки документа работодателями, подозрений не возникнет.
Ситуаций, которые вынуждают заказать диплом о среднем образовании достаточно. Кому-то прямо сейчас потребовалась работа, и необходимо произвести впечатление на руководителя во время собеседования. Некоторые мечтают попасть в престижную компанию, для того, чтобы повысить свой статус в обществе и в дальнейшем начать свой бизнес. Чтобы не терять попусту годы жизни, а сразу начать эффективную карьеру, используя имеющиеся знания, можно купить диплом через интернет. Вы станете полезным в социуме, получите денежную стабильность в максимально короткий срок- диплом о среднем образовании купить
алкоголь купить круглосуточно с доставкой алкоголь купить круглосуточно с доставкой .
чат gpt для дипломов http://www.studgen.ru .
Заказать документ о получении высшего образования можно у нас. diplomskiy.com/kupit-diplom-krasnoyarsk-2
Привет!
Без ВУЗа очень нелегко было продвигаться вверх по карьерной лестнице. Сейчас документ не дает никаких гарантий, что получится получить престижную работу. Более важное значение имеют практические навыки и знания специалиста, а также его постоянный опыт. Именно из-за этого решение о покупке диплома стоит считать целесообразным. Заказать диплом любого института hobby-svarka.ru/viewtopic.php?f=11&t=7498
Здравствуйте!
Мы изготавливаем дипломы любой профессии по выгодным ценам. Стоимость зависит от выбранной специальности, года выпуска и образовательного учреждения: rdiploms.com/
Купить диплом института по доступной стоимости возможно, обращаясь к надежной специализированной компании. Купить документ о получении высшего образования вы имеете возможность у нас в Москве. diplom-kaluga.ru/kupit-diplom-s-zaneseniem-v-reestr-instituta-8
доставка алкоголя круглосуточно москва доставка алкоголя круглосуточно москва .
gpt для реферата https://studgen.ru .
Диплом ВУЗа России!
Без ВУЗа трудно было продвинуться вверх по карьерной лестнице. По этой причине решение о заказе диплома можно считать рациональным. Выгодно приобрести диплом университета petitieonline.com/479256
мостбет казино https://mostbet6010.ru/ .
Huawei телефоны https://techno-line.store .
Мы изготавливаем дипломы любой профессии по выгодным тарифам. Цена может зависеть от выбранной специальности, года получения и образовательного учреждения. Стараемся поддерживать для покупателей адекватную ценовую политику. Важно, чтобы дипломы были доступны для большого количества граждан. купить диплом москва без предоплаты
скупка золота в москве за грамм 585 b-gold.ru скупка золота в москве за грамм 585 b-gold.ru .
ломбард скупка золота ломбард скупка золота .
cod promoțional 1win cod promoțional 1win .
Где приобрести диплом по актуальной специальности?
Получаемый диплом с необходимыми печатями и подписями целиком и полностью отвечает условиям и стандартам Министерства образования и науки, никто не сможет отличить его от оригинала. Не откладывайте свои мечты и задачи на несколько лет, реализуйте их с нами – отправляйте быструю заявку на диплом прямо сейчас! Получить диплом о среднем специальном образовании – быстро и просто! korrespondentweek.ru/diplom-s-podtverzhdeniem-podlinnost-garantirovana
Где приобрести диплом по актуальной специальности?
Мы предлагаем документы об окончании любых ВУЗов Российской Федерации. Документы производятся на фирменных бланках государственного образца. Рєprime-jobs.ch/companies/premialnie-diplom-24
скачат мостбет http://mostbet6010.ru .
скупка золота в москве на сегодня b-gold.ru http://www.of-md.com/jwe-qs/ .
скупка золота в москве цена за грамм 585 на сегодня https://www.metaphysican.com/vsyo-chto-vam-nuzhno-znat-o-skupke-zolota-sovety-i-rekomendaczii/ .
Надежные подрядчики: рейтинг компаний по ремонту квартир с лучшими условиями
фирмы по ремонту квартир в москве рейтинг http://remont-kvartir-reiting.ru/ .
1win.com.ci 1win.com.ci .
Приобрести документ ВУЗа можно в нашей компании в Москве. diplomt-nsk.ru/kupit-diplom-kolledzha-2-7
аренда хранилища для вещей аренда хранилища для вещей .
Заказать диплом ВУЗа по выгодной стоимости можно, обратившись к проверенной специализированной фирме. Приобрести документ университета вы можете в нашей компании в столице. asxdiploman.com/legalnoe-zanesenie-diploma-v-reestr-bistro-i-bez-xlopot
Мы предлагаем дипломы любой профессии по приятным тарифам.– diplomass.com/kupit-diplom-s-zaneseniem-v-reestr-v-rossii-udobno-i-bistro/
Заказать диплом ВУЗа!
Мы предлагаем документы учебных заведений, расположенных на территории всей Российской Федерации.
diplom-club.com/mozhno-li-kupit-diplom-o-visshem-obrazovanii/
Смартфоны с доставкой по Москве techno-line.store .
1win вход 1win вход .
Купить документ ВУЗа вы имеете возможность в нашей компании в столице. Мы предлагаем документы об окончании любых ВУЗов Российской Федерации. Вы сможете получить диплом по любым специальностям, любого года выпуска, в том числе документы Советского Союза. Гарантируем, что при проверке документов работодателем, каких-либо подозрений не возникнет. diplomt-nsk.ru/kupit-diplom-o-visshem-obrazovanii-realnie-otzivi/
motbet motbet .
1 ван вин http://www.1win6052.ru .
диплом ижевск купить
Ищете идеальную квартиру в Москве или Подмосковье? У нас есть предложения, которые вас удивят! Живите в сердце столицы с развитой инфраструктурой, или выберите уютные районы Подмосковья для спокойной жизни. Мы предлагаем широкий выбор квартир: от современных студий до просторных семейных апартаментов. Наша команда специалистов поможет вам найти именно то, что нужно, учитывая все ваши пожелания и бюджет. Не упустите шанс стать владельцем жилья мечты! Звоните, и мы подберем лучшие варианты для вас! Живите там, где вам комфортно!
«Все Новостройки» – База новостроек Москвы
Приобрести диплом ВУЗа по доступной цене возможно, обратившись к надежной специализированной фирме. Мы предлагаем документы об окончании любых ВУЗов РФ. Заказать диплом о высшем образовании– kupitediplom.ru/kupit-diplom-s-vneseniem-v-reestr-bistro-i-nadezhno-29/
Для быстрого продвижения по карьере потребуется наличие официального диплома университета. Купить диплом университета у надежной компании: diplomc-v-ufe.ru/kupit-diplom-o-polnom-srednem-obrazovanii-5/
купить аттестат за 9 класс с оценками
furnished houses for rent http://www.rapitorimania.ro/forum/marele-bazar-f18/case-moderne-de-inchiriat-langa-bucuresti-t938.html .
1-win http://1win6005.ru/ .
ремонт карданов москва ремонт карданов москва .
скачат мостбет http://mostbet6030.ru .
Где приобрести диплом по необходимой специальности?
Мы изготавливаем дипломы любых профессий по выгодным ценам. Мы готовы предложить документы техникумов, расположенных в любом регионе России. Вы можете купить качественно напечатанный диплом за любой год, в том числе документы старого образца. Дипломы и аттестаты печатаются на бумаге высшего качества. Это дает возможности делать настоящие дипломы, не отличимые от оригинала. Они заверяются всеми обязательными печатями и подписями. Стараемся поддерживать для покупателей адекватную ценовую политику. Для нас очень важно, чтобы документы были доступными для большинства наших граждан. prodiplome.com/kupit-diplom-v-ekaterinburge-2-8
https://zolushka-klin.ru/
case pentru familii de ?nchiriat case pentru familii de ?nchiriat .
балансировка карданного вала в москве https://www.passat-club.ru/news.php?id=1593 .
1 win официальный сайт https://1win6005.ru/ .
Где купить диплом специалиста?
Наши специалисты предлагают выгодно купить диплом, который выполняется на оригинальном бланке и заверен мокрыми печатями, водяными знаками, подписями официальных лиц. Диплом пройдет любые проверки, даже с использованием специальных приборов. Достигайте свои цели быстро и просто с нашими дипломами.
Купить диплом любого университета diplomp-irkutsk.ru/kupit-diplom-v-belgorode-7/
Где заказать диплом специалиста?
Наши специалисты предлагаютбыстро и выгодно приобрести диплом, который выполнен на оригинальной бумаге и заверен печатями, штампами, подписями официальных лиц. Диплом пройдет любые проверки, даже при использовании профессиональных приборов. Решайте свои задачи быстро и просто с нашей компанией. Заказать диплом университета! poltavagok.ru/diplom-s-podlinnyimi-pechatyami-i-podpisyami
mosbet http://mostbet6030.ru .
Купить диплом ВУЗа!
Мы изготавливаем дипломы психологов, юристов, экономистов и других профессий по приятным ценам— diplom-top.ru/diplom-s-vneseniem-v-reestr-dostupen-dlya-pokupki/
Мы изготавливаем дипломы любой профессии по приятным ценам. Стараемся поддерживать для клиентов адекватную ценовую политику. Для нас очень важно, чтобы документы были доступны для большого количества граждан.
Заказ диплома, который подтверждает окончание института, – это выгодное решение. Заказать диплом о высшем образовании: kupit-diplomyz24.com/kupit-diplom-kolledzha-v-moskve-5/
Где приобрести диплом по необходимой специальности?
Мы изготавливаем дипломы любых профессий по выгодным ценам. Мы готовы предложить документы техникумов, расположенных на территории всей РФ. Вы имеете возможность купить диплом за любой год, включая сюда документы старого образца СССР. Документы выпускаются на бумаге самого высокого качества. Это дает возможности делать государственные дипломы, не отличимые от оригинала. Они заверяются всеми необходимыми печатями и штампами. Всегда стараемся поддерживать для заказчиков адекватную политику тарифов. Важно, чтобы документы были доступны для большого количества граждан. 10000diplomov.ru/kupit-diplom-v-sizrani-2
1 vin https://www.1win6053.ru .
Мы можем предложить дипломы психологов, юристов, экономистов и других профессий по доступным тарифам. Дипломы производятся на настоящих бланках Приобрести диплом о высшем образовании diplom4you.com
Где купить диплом специалиста?
Приобрести диплом ВУЗа по невысокой стоимости вы сможете, обратившись к надежной специализированной фирме.: diplom-bez-problem.com
Приобрести диплом ВУЗа!
Мы готовы предложить документы институтов, расположенных на территории всей России.
diplomv-v-ruki.ru/kupite-originalnij-diplom-s-zaneseniem-v-reestr-bistro/
скупка золота в москве цены на сегодня b-gold.ru скупка золота в москве цены на сегодня b-gold.ru .
скупка золота с бриллиантами http://metaphysican.com/vsyo-chto-vam-nuzhno-znat-o-skupke-zolota-sovety-i-rekomendaczii// .
descărca 1win https://www.1win5004.ru .
Заказать диплом о высшем образовании!
Мы предлагаем документы учебных заведений, которые расположены в любом регионе Российской Федерации.
kupitediplom.ru/kupit-diplom-vuza-s-zaneseniem-v-reestr-bistro-i-nadezhno-2/
Приобретение официального диплома через надежную компанию дарит массу плюсов. Такое решение дает возможность сберечь как личное время, так и серьезные средства. Впрочем, достоинств намного больше.Мы изготавливаем дипломы любой профессии. Дипломы производят на фирменных бланках государственного образца. Доступная цена в сравнении с крупными затратами на обучение и проживание в другом городе. Приобретение диплома об образовании из российского ВУЗа будет выгодным шагом.
Приобрести диплом: diplom-kaluga.ru/kupit-diplom-s-reestrom-tsena-4/
Мы изготавливаем дипломы любой профессии по выгодным тарифам. Стараемся поддерживать для заказчиков адекватную политику цен. Для нас важно, чтобы документы были доступны для большинства граждан.
Покупка документа, подтверждающего окончание института, – это выгодное решение. Заказать диплом ВУЗа: diplom-bez-problem.com/kupit-diplom-ekb-5/
mostbet kg скачать на андроид http://mostbet6029.ru .
скупка золота за грамм 585 b-gold.ru скупка золота за грамм 585 b-gold.ru .
скупка золота в москве за грамм цена на сегодня https://www.metaphysican.com/vsyo-chto-vam-nuzhno-znat-o-skupke-zolota-sovety-i-rekomendaczii/ .
1win.com.ci [url=http://1win5004.ru]http://1win5004.ru[/url] .
dragon money бонусы [url=https://dragon-money01.com/]dragon money бонусы[/url] .
сайт dragon money casino сайт dragon money casino .
1win войти http://1win6053.ru .
Задался вопросом: можно ли на самом деле купить диплом государственного образца в Москве? Был приятно удивлен — это реально и легально!
Сначала искал информацию в интернете на тему: купить диплом о среднем образовании во владивостоке, куплю диплом ссср, купить диплом маи, купить аттестат 9 классов, купить диплом в екатеринбурге и получил базовые знания. В итоге остановился на материале: diplomybox.com/kupit-diplom-tver
1win online 1win online .
мост бет https://www.mostbet6029.ru .
mostbet.kg http://mostbet6030.ru/ .
Заказать диплом института по выгодной цене можно, обращаясь к проверенной специализированной компании. Купить документ о получении высшего образования вы можете у нас. diplomp-irkutsk.ru/kupit-diplom-s-zaneseniem-v-reestr-bistro-i-prosto-11
Приобрести диплом университета!
Купить диплом ВУЗа по невысокой цене возможно, обратившись к проверенной специализированной фирме. Приобрести диплом о высшем образовании: diplomidlarf.ru/diplom-s-reestrom-kupit-podlinnij-dokument
Купить диплом о высшем образовании!
Мы можем предложить документы ВУЗов, расположенных в любом регионе Российской Федерации. Документы печатаются на “правильной” бумаге самого высшего качества: mystroycenter.ru/oformlenie-dokumentov-ob-obrazovanii-dostupnyie-tsenyi
замена крестовины переднего кардана замена крестовины переднего кардана .
Где приобрести диплом по актуальной специальности?
Наша компания предлагаетвыгодно и быстро приобрести диплом, который выполняется на оригинальной бумаге и заверен печатями, водяными знаками, подписями. Диплом способен пройти лубую проверку, даже при помощи специфических приборов. Достигайте цели быстро и просто с нашими дипломами. Приобрести диплом ВУЗа! social.japrime.id/read-blog/38193_kupit-diplom-prepodavatelya.html
Мы изготавливаем дипломы любой профессии по приятным тарифам. Дипломы производят на фирменных бланках государственного образца Приобрести диплом об образовании diplomt-tver69.ru
Где заказать диплом по актуальной специальности?
Заказать диплом ВУЗа по доступной стоимости возможно, обращаясь к проверенной специализированной компании.: diploms-vuza.com
Подбираете где обучиться двигаться как топовые K-pop артисты? K-pop культура быстро растет в России. Столица предоставляет множество школ, где опытные инструкторы помогут вам овладеть этот зажигательный стиль танца. Определение лучшего места может оказаться непростой задачей. Полный рейтинг лучших K-pop танцевальных школ Москвы на 2025 год можно найти на tenchat.ru. Этот информационный ресурс регулярно освещает изменения о школах. Выбирая студию принимайте во внимание свой начальный уровень. Значительное число учащихся отмечают, что занятия K-pop танцами помогают не только изучить движения, но и улучшить физическую форму. Тренировки с единомышленниками помогают поддерживать мотивацию и эффективнее учиться в освоении новых элементов.
купить школьный диплом diplomys-vsem.ru .
1win ng 1win13.com.ng .
что делать с бонусным балансом на 1win http://1win6054.ru/ .
Где заказать диплом по нужной специальности?
Наши специалисты предлагают выгодно купить диплом, который выполняется на оригинальном бланке и заверен печатями, штампами, подписями. Документ пройдет любые проверки, даже с использованием специальных приборов. Достигайте цели быстро с нашими дипломами.
Приобрести диплом о высшем образовании fastdiploms.com/kupit-diplom-v-kaluge-9/
cas? de ?nchiriat ilfov cas? de ?nchiriat ilfov .
Online Schools in Louisiana, options for everyone, innovative.
Learn remotely in Louisiana, how.
Top Distance Learning Programs in Louisiana / Ranking of online institutions in Louisiana, that are worth considering.
Advantages of distance learning in Louisiana, facts that will surprise you.
How to choose an online school in Louisiana, for achieving goals.
Virtual classes in Louisiana, to save time.
Online School Education in Louisiana, parents.
How to Succeed at an Online School in Louisiana, personal tips.
Where to find resources for online education in Louisiana, get to know them.
Facts about distance learning in Louisiana, to keep up to date.
Louisiana: Online schools for your future, don’t miss out.
The Future of Education in Louisiana: Distance Learning, learn.
Distance Education Programs in Louisiana, choose the appropriate option.
How Distance Schools in Louisiana are Transforming Learning, for professional development.
Educational Resources in Louisiana for Distance Learning, check for yourself.
How to learn effectively at a distance School in Louisiana, for your convenience.
Distance Learning in Louisiana: current programs, for future.
How to get an education in Louisiana online, easily.
Distance learning as an alternative, discover / successes and achievements.
Online Schools in Louisiana http://www.line-ouisi.com .
mostbet официальный сайт mostbet официальный сайт .
dwi laws to Ohio can be complex, nonetheless it’s important to have a solid comprehension of people if the user are facing complaints. Driving below will influence (DUI) is truly a severe offence which is can have substantial consequences on personal future. In Ohio, on lawful threshold for blood ethanol content (BAC) is 8 percentfor nearly all drivers additionally four pct business vehicle operators.
If you’ll be pulled by law security services and alleged of driving while intoxicated, they may accomplish field temperance assessments or substance examinations, really being breathalyzer or bloodstream examinations, to figure out your level of impairment. Refusing involving tests can cause intelligent penalties, including driving license suspension.
drunk driving offenses in Ohio maintain multiple penalties, dependant on factors such as last judgment of conviction, BAC level, and also no matter if here was basically an catastrophe or accidental injury concerned. Implications might add fines, license suspension system, necessary booze process services, probation, and genuinely penitentiary time. Do it again crimes and angry situation can result in more very bad penalties.
Having a knowledgeable DUI a good defense attorney is crucial to manage the complexnesses of Ohio drunk driving charge laws. They can easily analyze the indicators, encourage the legalization of the stop your vehicle, matter the clarity of assessments, and explore potentiality safeguarding to help alleviate the costs. You’ll also, an lawyer can guidelines you by the appropriate process, producing a proper are secured and indicating for the top achievable outcome.
Remember, being notified with regards to Ohio’s DUI regulations and finding the support of an seasoned personal injury attorney are important actions in efficaciously management a DUI accusation furthermore guarding personal long-term. criminal reviews attorney
1win бк https://1win6054.ru/ .
1win онлайн 1win6005.ru .
1win betting site http://1win13.com.ng/ .
Приобрести диплом ВУЗа по невысокой цене можно, обратившись к проверенной специализированной компании. Купить документ института вы сможете в нашей компании в столице. diplom-zentr.com/kupit-diplom-s-reestrom-bistro-i-nadezhno-21
1хwin http://1win6006.ru/ .
драгн мани драгн мани .
ремонт переднего кардана ремонт переднего кардана .
dragon мани dragon мани .
мостбет кыргызстан скачать https://mostbet6030.ru/ .
locuin?e moderne de ?nchiriat locuin?e moderne de ?nchiriat .
dragon money casino dragon money casino .
игра ракета на деньги 1win https://1win6006.ru/ .
Приобрести диплом об образовании!
Мы готовы предложить дипломы психологов, юристов, экономистов и прочих профессий по доступным ценам— diplomaj-v-tule.ru/diplom-vracha-lechebnoe-delo-kupit/
dragon money casino регистрация dragon money casino регистрация .
Привет!
Без ВУЗа сложно было продвигаться по карьерной лестнице. В наше время документ не дает совершенно никаких гарантий, что удастся найти хорошую работу. Куда более важное значение имеют навыки специалиста и его опыт работы. Именно из-за этого решение о покупке диплома следует считать мудрым и рациональным. Купить диплом университета tweecampus.com/read-blog/143216_%D0%B4%D0%B8%D0%BF%D0%BB%D0%BE%D0%BC-%D0%BE-%D0%B2%D1%8B%D1%81%D1%88%D0%B5%D0%BC-%D0%BE%D0%B1%D1%80%D0%B0%D0%B7%D0%BE%D0%B2%D0%B0%D0%BD%D0%B8%D0%B8-%D1%81-%D0%B7%D0%B0%D0%BD%D0%B5%D1%81%D0%B5%D0%BD%D0%B8%D0%B5%D0%BC-%D0%B2-%D1%80%D0%B5%D0%B5%D1%81%D1%82%D1%80-%D1%86%D0%B5%D0%BD%D0%B0.html
Приобрести диплом академии !
Покупка диплома университета России в нашей компании является надежным делом, потому что документ заносится в реестр. Заказать диплом о высшем образовании diplomc-v-ufe.ru/vnesti-diplom-v-reestr-bistro-i-udobno
можно ли купить в школе аттестат
Мы изготавливаем дипломы любой профессии по приятным тарифам. Стоимость может зависеть от той или иной специальности, года получения и ВУЗа. Стараемся поддерживать для заказчиков адекватную политику тарифов. Важно, чтобы документы были доступными для большого количества наших граждан. купить диплом экскурсовода
Приобрести документ института вы сможете в нашем сервисе. dip-lom-rus.ru/kupit-diplom-vracha-2-2
Хочу рассказать о своем опыте по заказу аттестата пту, думал это не реально и стал искать информацию в сети, про покупка диплома в москве, купить дипломы недорого, где можно купить диплом об образовании, диплом с занесением в госреестр, купить диплом о среднем специальном образовании официально, постепенно вникая в суть дела нашел отличный материал здесь proffdiplomik.com/sankt-peterburg)
Клининг в Москве без рисков: рейтинг проверенных клининговых агентств
лучшая клининговая компания москва http://www.kliningovye-kompanii-msk.ru .
Клининг Москва: рейтинг лучших организаций по уборке квартир и домов
клининговые компании москвы рейтинг https://kliningovye-kompanii-msk1.ru/ .
Пляжный отдых в Абхазии с удобствами и развлечениями
абхазия отдых цена otdyhabhazia01.ru .
Мы можем предложить дипломы любой профессии по приятным ценам. Преимущества приобретения документов в нашей компании
Вы покупаете документ через надежную компанию. Это решение сэкономит не только средства, но и время.
Плюсов куда больше:
• Документы печатаются на настоящих бланках со всеми печатями;
• Предлагаем дипломы любого ВУЗа России;
• Стоимость намного ниже той, которую довелось бы заплатить на очном и заочном обучении в университете;
• Быстрая доставка как по столице, так и в другие регионы России.
Заказать диплом о высшем образовании– http://11sms.ru/?post_type=topic&p=8224/ – 11sms.ru/?post_type=topic&p=8224
купить диплом колледжа недорого купить диплом колледжа недорого .
Заказать диплом о высшем образовании!
Мы изготавливаем дипломы любой профессии по приятным ценам. Вы заказываете диплом через надежную компанию. : gadjetforyou.ru/zakazat-diplom-bez-predoplatyi
Диплом любого ВУЗа Российской Федерации!
Без получения диплома трудно было продвигаться вверх по карьере. Именно поэтому решение о покупке диплома можно считать выгодным и рациональным. Приобрести диплом института maxima.2ua.in.ua/viewtopic.php?f=3&t=8018
Мы предлагаем дипломы любой профессии по разумным тарифам. Стоимость зависит от определенной специальности, года получения и ВУЗа. Стараемся поддерживать для клиентов адекватную ценовую политику. Важно, чтобы документы были доступны для подавляющей массы граждан. диплом института культуры купить
Приобрести документ института можно в нашем сервисе. diplom-zentr.com/kupit-diplom-kemerovo-2
Где приобрести диплом специалиста?
Мы готовы предложить дипломы любой профессии по невысоким тарифам. Мы можем предложить документы техникумов, которые находятся на территории всей Российской Федерации. Вы можете купить качественный диплом за любой год, в том числе документы старого образца СССР. Дипломы и аттестаты делаются на “правильной” бумаге самого высокого качества. Это дает возможность делать настоящие дипломы, которые не отличить от оригинала. Документы заверяются всеми необходимыми печатями и штампами. Стараемся поддерживать для покупателей адекватную ценовую политику. Важно, чтобы документы были доступными для большого количества граждан. diplom-zakaz.ru/kupit-diplom-kandidata-nauk-2-7
онлайн-казино драгон мани онлайн-казино драгон мани .
купить бланк аттестата о среднем
1winn 1winn .
Купить диплом университета по выгодной стоимости можно, обращаясь к проверенной специализированной фирме. Мы оказываем услуги по продаже документов об окончании любых университетов России. Заказать диплом любого университета– diplomk-vo-vladivostoke.ru/kupit-diplom-v-reestre-bistro-i-nadezhno-5/
помещения для хранения вещей помещения для хранения вещей .
1win казино http://1win6054.ru/ .
1win casino en línea https://www.1win1001.top .
most bet https://mostbet6031.ru .
драгон драгон .
1win online site https://1win13.com.ng .
1win вход на сайт http://1win6053.ru .
Для эффективного продвижения по карьере понадобится наличие официального диплома о высшем образовании. Быстро приобрести диплом о высшем образовании у надежной компании: diplomgorkiy.com/diplom-kupit-v-samare/
Купить диплом о высшем образовании!
Мы готовы предложить документы университетов, которые находятся на территории всей России.
diplomass.com/kupit-diplom-s-vneseniem-v-reestr-nadezhno-i-bistro/
Привет!
Без ВУЗа очень сложно было продвинуться по карьерной лестнице. На текущий момент этот документ не дает совершенно никаких гарантий, что получится получить привлекательную работу. Более важное значение имеют профессиональные навыки и знания специалиста и его постоянный опыт. Именно из-за этого решение о покупке диплома стоит считать целесообразным. Приобрести диплом о высшем образовании stpos.ru/forum/user/41270
1win descarga http://1win1001.top .
mostbet kg скачать http://mostbet6031.ru/ .
Где заказать диплом специалиста?
Мы изготавливаем дипломы любой профессии по разумным тарифам. Мы можем предложить документы техникумов, которые находятся на территории всей РФ. Вы сможете приобрести качественно сделанный диплом за любой год, указав необходимую специальность и хорошие оценки за все дисциплины. Дипломы и аттестаты выпускаются на “правильной” бумаге самого высокого качества. Это позволяет делать настоящие дипломы, которые невозможно отличить от оригиналов. Они заверяются всеми обязательными печатями и подписями. Стараемся поддерживать для заказчиков адекватную ценовую политику. Для нас важно, чтобы дипломы были доступны для большого количества граждан. 10000diplomov.ru/kupit-diplom-v-bryanske-2-4
1win.com.ci 1win.com.ci .
один вин официальный сайт http://1win6042.ru .
mostber https://www.mostbet6032.ru .
1vin http://www.1win6054.ru .
драгон мани официальный драгон мани официальный .
сайт драгон моней сайт драгон моней .
1win online site 1win13.com.ng .
1 win казино https://1win6006.ru .
Заказать диплом института!
Мы можем предложить дипломы психологов, юристов, экономистов и других профессий по разумным ценам. Вы заказываете диплом через надежную фирму. : veneraroleplay.listbb.ru/viewtopic.php?f=4&t=1170
1win вход https://1win6042.ru .
мостбет скачать https://www.mostbet6032.ru .
драгон мани бонусы драгон мани бонусы .
drgn1n casino drgn1n casino .
Мы готовы предложить дипломы любой профессии по приятным тарифам. Мы можем предложить документы техникумов, которые расположены в любом регионе РФ. Документы выпускаются на “правильной” бумаге самого высшего качества. Это позволяет делать государственные дипломы, которые невозможно отличить от оригиналов. learnsoft.copiny.com/question/details/id/1083044
сайт dragon money casino сайт dragon money casino .
Здравствуйте!
Мы готовы предложить дипломы любых профессий по приятным тарифам. Цена зависит от той или иной специальности, года выпуска и образовательного учреждения: rdiploma24.com/
Где купить диплом по нужной специальности?
Мы можем предложить дипломы любой профессии по выгодным ценам. Для нас очень важно, чтобы документы были доступны для большого количества граждан. Приобрести диплом об образовании diplomus-spb.ru/visshee-obrazovanie-put-k-uspeshnoj-karere/
Привет!
Для некоторых людей, заказать диплом университета – это острая потребность, возможность получить достойную работу. Однако для кого-то – это очевидное желание не терять огромное количество времени на учебу в ВУЗе. С какой бы целью вам это не потребовалось, мы готовы помочь. Максимально быстро, качественно и недорого сделаем документ нового или старого образца на подлинных бланках с реальными печатями.
Основная причина, почему многие люди покупают документы, – желание занять хорошую должность. Допустим, способности и опыт дают возможность человеку устроиться на желаемую работу, однако документального подтверждения квалификации нет. При условии, что для работодателя важно наличие “корочек”, риск потерять место работы очень высокий.
Заказать документ института вы можете в нашем сервисе. Мы предлагаем документы об окончании любых ВУЗов России. Вы получите диплом по любым специальностям, любого года выпуска, в том числе документы старого образца. Даем гарантию, что при проверке документа работодателями, подозрений не возникнет.
Разных ситуаций, которые вынуждают заказать диплом ВУЗа много. Кому-то срочно потребовалась работа, и нужно произвести особое впечатление на руководителя при собеседовании. Некоторые хотят попасть в престижную компанию, для того, чтобы повысить собственный статус в социуме и в дальнейшем начать свой бизнес. Чтобы не терять время, а сразу начинать успешную карьеру, используя имеющиеся навыки, можно купить диплом в интернете. Вы станете полезным в обществе, получите финансовую стабильность в минимальные сроки- аттестат купить за 9 класс
драгон моней драгон моней .
Быстро и просто заказать диплом о высшем образовании!
Купить диплом ВУЗа по выгодной цене возможно, обратившись к проверенной специализированной компании. Заказать диплом: good-diplom.ru/diplom-s-reestrom-kupit-ofitsialno-i-nadezhno-2
Мы можем предложить дипломы психологов, юристов, экономистов и любых других профессий по выгодным ценам.
Вы заказываете документ через надежную и проверенную фирму. Приобрести диплом института– http://mircalemi.net/showthread.phptid=194566/ – mircalemi.net/showthread.phptid=194566
Приобрести диплом о высшем образовании!
Мы можем предложить документы университетов, которые находятся в любом регионе РФ. Дипломы и аттестаты печатаются на “правильной” бумаге самого высшего качества: unusualrp.forumex.ru/viewtopic.phpf=60&t=943
Приобрести диплом любого университета. Заказ диплома через надежную компанию дарит немало преимуществ. Данное решение позволяет сберечь как личное время, так и существенные денежные средства. hramada.listbb.ru/viewtopic.php?f=7&t=1478
1win com http://1win6006.ru/ .
Купить диплом о высшем образовании!
Мы готовы предложить документы учебных заведений, расположенных на территории всей РФ.
diplomaj-v-tule.ru/kupit-diplom-instituta-s-reestrom-bistro-i-nadezhno-2/
Мы изготавливаем дипломы любых профессий по невысоким ценам. Мы готовы предложить документы техникумов, расположенных в любом регионе Российской Федерации. Документы делаются на бумаге высшего качества. Это позволяет делать государственные дипломы, которые невозможно отличить от оригиналов. jobsleed.com/companies/archive-diploma
казино dragon казино dragon .
dragonmoney dragonmoney .
адин вин адин вин .
мостбет скачать бесплатно мостбет скачать бесплатно .
Купить диплом любого ВУЗа. Заказ документа о высшем образовании через проверенную и надежную компанию дарит ряд достоинств для покупателя. Такое решение помогает сберечь время и значительные денежные средства. hitman.getbb.ru/viewtopic.php?f=16&t=2768
Для успешного продвижения вверх по карьере потребуется наличие диплома о высшем образовании. Приобрести диплом об образовании у сильной фирмы: diplom-club.com/kupit-diplom-bistro-i-nadezhno-bez-lishnix-problem-3/
pin up azerbaycan pin up azerbaycan .
мостбет казино войти https://mostbet6033.ru .
сайт 1win официальный сайт вход https://1win6043.ru/ .
Купить диплом о высшем образовании !
Приобретение диплома ВУЗа России в нашей компании является надежным процессом, ведь документ будет заноситься в государственный реестр. Приобрести диплом об образовании vacshidiplom.com/pokupka-diploma-s-zaneseniem-v-reestr-legko-i-bistro
Мы изготавливаем дипломы любых профессий по приятным ценам. Стоимость будет зависеть от выбранной специальности, года получения и образовательного учреждения. Всегда стараемся поддерживать для покупателей адекватную политику тарифов. Для нас очень важно, чтобы документы были доступны для большого количества граждан. купить аттестат за 8 классов
склад под хранение вещей аренда склад под хранение вещей аренда .
Где заказать диплом по необходимой специальности?
Наша компания предлагает быстро купить диплом, который выполняется на оригинальном бланке и заверен мокрыми печатями, водяными знаками, подписями. Наш диплом пройдет лубую проверку, даже с применением специфических приборов. Решайте свои задачи быстро с нашим сервисом.
Приобрести диплом о высшем образовании poluchidiplom.com/kupit-diplom-tovaroveda-2/
Мы изготавливаем дипломы психологов, юристов, экономистов и любых других профессий по приятным ценам. Стараемся поддерживать для покупателей адекватную политику цен. Для нас очень важно, чтобы дипломы были доступны для большинства граждан.
Покупка диплома, подтверждающего обучение в университете, – это выгодное решение. Заказать диплом университета: kupite-diplom0024.ru/diplom-ofitsialno-kupit-2/
Купить диплом любого института!
Мы изготавливаем дипломы психологов, юристов, экономистов и других профессий по невысоким тарифам— diplom4you.com/diplom-vracha-lechebnoe-delo-kupit-2/
1win.com 1win.com .
Приобретение документа о высшем образовании через качественную и надежную компанию дарит ряд достоинств для покупателя. Данное решение помогает сэкономить как личное время, так и серьезные денежные средства. Однако, преимуществ значительно больше.Мы изготавливаем дипломы любых профессий. Дипломы производятся на настоящих бланках государственного образца. Доступная цена сравнительно с огромными издержками на обучение и проживание. Приобретение диплома института будет выгодным шагом.
Купить диплом: diplomass.com/kupit-diplom-ob-obrazovanii-s-reestrom-4/
Купить диплом института по доступной цене вы можете, обращаясь к проверенной специализированной компании. Приобрести документ о получении высшего образования можно в нашем сервисе. diplomass.com/diplom-s-zaneseniem-v-reestr-8
pin up azerbaijan pin up azerbaijan .
Где заказать диплом по актуальной специальности?
Мы оказываем услуги по производству и продаже документов об окончании любых университетов Российской Федерации. Документы производят на настоящих бланках государственного образца. Рєplastdet.ru/index.phptopic=2057.new#new
Где купить диплом по необходимой специальности?
Готовый диплом с приложением отвечает запросам и стандартам Министерства образования и науки России, неотличим от оригинала – даже со специально предназначенным оборудованием. Не стоит откладывать свои мечты на несколько лет, реализуйте их с нашей помощью – отправьте простую заявку на диплом прямо сейчас! Получить диплом о среднем образовании – быстро и просто! linkchia.com/profile/nellrios91748
Приобрести документ университета можно в нашем сервисе. Мы оказываем услуги по производству и продаже документов об окончании любых ВУЗов России. Вы сможете получить диплом по любым специальностям, включая документы старого образца. Даем 100% гарантию, что в случае проверки документа работодателем, подозрений не появится. diplomk-v-krasnodare.ru/kupit-diplom-s-reestrom-bistro-i-udobno-3/
Мы изготавливаем дипломы любой профессии по разумным ценам.– damdiplomisa.com/dostupnaya-tsena-na-diplom-s-reestrom/
cazinouri online moldova http://www.1win5010.ru .
1win casino https://1win1001.top .
Где заказать диплом специалиста?
Наши специалисты предлагаютвыгодно приобрести диплом, который выполняется на бланке ГОЗНАКа и заверен печатями, водяными знаками, подписями должностных лиц. Данный документ пройдет лубую проверку, даже с использованием специальных приборов. Решите свои задачи максимально быстро с нашими дипломами. Заказать диплом любого ВУЗа! paulpogbaclub.com/read-blog/1769_kupit-diplom-kolledzha.html
купить диплом занесенный в реестр москва
Где купить диплом специалиста?
Мы предлагаем быстро и выгодно приобрести диплом, который выполнен на бланке ГОЗНАКа и заверен печатями, штампами, подписями. Документ пройдет лубую проверку, даже с применением специального оборудования. Решите свои задачи быстро и просто с нашей компанией.
Купить диплом о высшем образовании asxdiplommy.com/kupit-diplom-spetsialista-34/
Мы предлагаем дипломы психологов, юристов, экономистов и любых других профессий по невысоким тарифам. Всегда стараемся поддерживать для клиентов адекватную политику цен. Для нас очень важно, чтобы документы были доступными для подавляющей массы граждан.
Приобретение диплома, который подтверждает обучение в ВУЗе, – это грамотное решение. Заказать диплом о высшем образовании: kupitediplom0029.ru/diplom-kupit-v-spb-3/
Мы можем предложить дипломы любой профессии по разумным ценам. Цена зависит от той или иной специальности, года выпуска и университета. Всегда стараемся поддерживать для заказчиков адекватную политику тарифов. Для нас важно, чтобы документы были доступными для большинства граждан. купить диплом высшего образования в вологде
Приобрести диплом любого университета!
Мы предлагаем дипломы психологов, юристов, экономистов и других профессий по приятным ценам— poluchidiplom.com/kupit-diplom-o-visshem-obrazovanii-17/
1win онлайн https://1win6042.ru/ .
Доброго времени суток!
Для многих людей, купить диплом ВУЗа – это необходимость, шанс получить достойную работу. Но для кого-то – это банальное желание не терять время на учебу в институте. Что бы ни толкнуло вас на это решение, мы готовы помочь. Оперативно, качественно и по доступной цене изготовим диплом нового или старого образца на государственных бланках с реальными печатями.
Ключевая причина, почему люди прибегают к покупке документа, – получить определенную должность. Например, знания и опыт дают возможность кандидату устроиться на работу, однако подтверждения квалификации нет. Если для работодателя важно присутствие “корочек”, риск потерять хорошее место довольно высокий.
Заказать документ о получении высшего образования вы сможете в нашей компании в столице. Мы предлагаем документы об окончании любых ВУЗов России. Вы получите необходимый диплом по любым специальностям, любого года выпуска, в том числе документы старого образца. Даем 100% гарантию, что при проверке документов работодателями, никаких подозрений не возникнет.
Факторов, которые вынуждают приобрести диплом о среднем образовании немало. Кому-то срочно нужна работа, а значит, необходимо произвести особое впечатление на руководителя в процессе собеседования. Некоторые мечтают устроиться в большую компанию, для того, чтобы повысить собственный статус и в дальнейшем начать свое дело. Чтобы не тратить попусту годы жизни, а сразу начать удачную карьеру, применяя врожденные таланты и полученные знания, можно приобрести диплом в онлайне. Вы станете полезным в социуме, обретете денежную стабильность в минимальные сроки- диплом о высшем образовании купить
Приветствую!
Мы изготавливаем дипломы любой профессии по приятным ценам. Цена зависит от определенной специальности, года выпуска и ВУЗа: rdiplomm24.com/
1win mx https://www.1win1001.top .
Мы можем предложить дипломы психологов, юристов, экономистов и других профессий по приятным ценам.
Вы покупаете диплом через надежную компанию. Заказать диплом академии– http://social.onlinelll.com/read-blog/91_kakim-obrazom-razumno-priobresti-dlya-sebya-dokumenty-ob-obuchenii-v-nashi-dni.html/ – social.onlinelll.com/read-blog/91_kakim-obrazom-razumno-priobresti-dlya-sebya-dokumenty-ob-obuchenii-v-nashi-dni.html
мостбет кыргызстан скачать http://mostbet6032.ru .
pin up azerbaycan pin up azerbaycan .
Где заказать диплом специалиста?
Мы изготавливаем дипломы любой профессии по приятным ценам. Для нас важно, чтобы документы были доступны для большого количества наших граждан. Приобрести диплом об образовании diplomk-v-krasnodare.ru/kupit-diplom-vnesennij-v-reestr-9/
1win online site https://1win14.com.ng/ .
санкт петербург диплом купить
pariuri sportive moldova 1win5010.ru .
pin up azerbaycan pin up azerbaycan .
1win login nigeria 1win14.com.ng .
pariuri sportive moldova http://www.1win5011.ru .
что такое 1win 1win6042.ru .
1вин приложение https://1win6043.ru/ .
motbet motbet .
aviator mostbet http://mostbet6031.ru/ .
Заказать диплом о высшем образовании!
Мы готовы предложить документы ВУЗов, которые расположены в любом регионе РФ.
kupitediplom0027.ru/kupit-diplom-moskva-s-zaneseniem-v-reestr-2/
Купить диплом ВУЗа по выгодной стоимости возможно, обращаясь к надежной специализированной фирме. Заказать документ ВУЗа вы можете у нас в столице. diplom-ryssia.com/kupit-diplom-s-ofitsialnim-zaneseniem-v-reestr-instituta
1win metode de plată 1win metode de plată .
казино онлайн kg https://mostbet6032.ru .
драгон маней драгон маней .
драгон мани казино зеркало драгон мани казино зеркало .
Покупка документа о высшем образовании через надежную фирму дарит множество достоинств для покупателя. Данное решение помогает сэкономить время и значительные финансовые средства. Тем не менее, преимуществ намного больше.Мы готовы предложить дипломы любой профессии. Дипломы производятся на настоящих бланках. Доступная цена по сравнению с крупными тратами на обучение и проживание в другом городе. Заказ диплома университета будет мудрым шагом.
Быстро заказать диплом о высшем образовании: diplom-onlinex.com/bistraya-i-nadezhnaya-pokupka-diploma-ob-obrazovanii-s-reestrom/
înregistrare 1win http://1win5012.ru/ .
мостбет скачать на андроид мостбет скачать на андроид .
Заказать диплом о высшем образовании!
Мы предлагаем документы институтов, которые находятся в любом регионе России.
asxdiplommy.com/kupit-diplom-zaregistrirovannij-v-reestre-2/
Где приобрести диплом специалиста?
Готовый диплом с нужными печатями и подписями целиком и полностью отвечает стандартам, никто не сумеет отличить его от оригинала – даже со специально предназначенным оборудованием. Не откладывайте собственные мечты и цели на несколько лет, реализуйте их с нами – отправьте заявку на диплом уже сегодня! Диплом о высшем образовании – быстро и просто! foro.rune-nifelheim.com/general-ragnarok-m/poluchite-diplom-mechty-bez-posescheniya-zanyatij
Где приобрести диплом специалиста?
Мы предлагаем документы об окончании любых университетов РФ. Документы изготавливаются на фирменных бланках. Рєkkhelper.com/employer/premialnie-diplom-24
Приобрести документ о получении высшего образования вы можете у нас в столице. Мы оказываем услуги по продаже документов об окончании любых ВУЗов Российской Федерации. Вы получите диплом по любой специальности, включая документы старого образца. Даем гарантию, что при проверке документов работодателями, подозрений не появится. diplom-onlinex.com/kupit-diplom-s-zaneseniem-bistro-i-nadezhno-3/
drgn зеркало drgn зеркало .
1 вин войти http://www.1win6043.ru .
мрстбет мрстбет .
dragon money рефералка http://www.dragon-money11.com/ .
Мы изготавливаем дипломы любых профессий по доступным тарифам.– diplom-zentr.com/bistrij-i-udobnij-diplom-s-provodkoj-ot-ekspertov/
înregistrare 1win https://1win5012.ru/ .
Мы можем предложить дипломы психологов, юристов, экономистов и других профессий по приятным ценам. Купить диплом профессора — kyc-diplom.com/diplom-articles/diplom-professora.html
pin up azerbaycan pin up azerbaycan .
Приобрести диплом любого университета поможем. Купить диплом повара – diplomybox.com/diplom-povara
pin up azerbaijan pin up azerbaijan .
1win букмекер http://1win6007.ru .
мост бет https://mostbet6011.ru/ .
pinup azerbaycan pinup azerbaycan .
1win https://1win6007.ru .
mostbet casino http://mostbet6011.ru .
Поверка манометров с выездом на объект по предварительной записи
поверка манометр в москве http://www.poverkamanomterov.ru .
Лечение запоев и зависимостей в современной платной наркологической клинике
клиника наркологии и алкоголизма platnaya-narkologicheskaya-klinika-0.ru .
скачать 1win с официального сайта https://1win6008.ru/ .
pin up azerbaycan pin up azerbaycan .
portofele electronice casino http://1win5011.ru/ .
1win online https://1win14.com.ng .
Мы готовы предложить дипломы любой профессии по приятным ценам. Дипломы производятся на настоящих бланках государственного образца Заказать диплом о высшем образовании diplomers.com
Где приобрести диплом специалиста?
Приобрести диплом института по выгодной цене вы можете, обращаясь к надежной специализированной фирме.: ry-diplom.com
cazino md https://www.1win5011.ru .
1вин официальный 1вин официальный .
mostbet скачать на телефон бесплатно андроид http://mostbet6033.ru/ .
Приобрести диплом любого университета!
Заказать диплом института по невысокой цене возможно, обращаясь к надежной специализированной компании. Приобрести диплом о высшем образовании: diplomaj-v-tule.ru/kupit-diplom-s-reestrom-v-rossii-9
1вин 1вин .
1win betting 1win betting .
Где купить диплом специалиста?
Наша компания предлагаетвыгодно заказать диплом, который выполнен на оригинальной бумаге и заверен мокрыми печатями, водяными знаками, подписями. Наш диплом пройдет лубую проверку, даже с применением специфических приборов. Достигайте цели быстро и просто с нашими дипломами. Приобрести диплом университета! rashin.4adm.ru/viewtopic.php?f=27&t=3338
wan win wan win .
mostbet официальный сайт mostbet6033.ru .
Где заказать диплом специалиста?
Наша компания предлагает выгодно приобрести диплом, который выполнен на оригинальной бумаге и заверен мокрыми печатями, водяными знаками, подписями должностных лиц. Документ пройдет любые проверки, даже при использовании специфических приборов. Достигайте свои цели быстро и просто с нашей компанией.
Заказать диплом университета kupit-diplom24.com/kupit-diplom-v-moskve-23/
pin up azerbaycan pin up azerbaycan .
Всегда думал что купить диплом о высшем образовании это миф и нереально, но все оказалось не так, изначально искал информацию про: купить диплом пекаря, купить диплом петропавловск, купить диплом программиста в омске, купить диплом с реестром спб, купить диплом училища в нижнем тагиле, потом про дипломы вузов, подробнее здесь diplomybox.com/kupit-diplom-bakalavra-kaliningrad
склад для хранения имущества склад для хранения имущества .
Быстро и просто приобрести диплом ВУЗа!
Мы предлагаем дипломы любой профессии по выгодным тарифам— diplomk-v-krasnodare.ru/kupit-diplom-o-visshem-obrazovanii-ofitsialno-2/
1.вин 1win6044.ru .
pin up azerbaycan pin up azerbaycan .
1win moldova http://www.1win5012.ru .
купить диплом гос образца
Купить диплом об образовании. Заказ документа о высшем образовании через надежную фирму дарит ряд преимуществ. Такое решение помогает сэкономить время и значительные финансовые средства. wap.fortboyard2012forum.4adm.ru/posting.php?mode=post&f=27&sid=7f4e50050bfafd017359965aaf1b6f53
мостбет промокод http://www.mostbet6012.ru .
1vin kg https://1win6009.ru .
buy viagra online cheapviagrausaonline.com .
игра ракета на деньги 1win игра ракета на деньги 1win .
pinup azerbaycan pinup azerbaycan .
mostbet официальный сайт mostbet официальный сайт .
Где приобрести диплом по актуальной специальности?
Наши специалисты предлагают выгодно приобрести диплом, который выполняется на оригинальном бланке и заверен печатями, штампами, подписями должностных лиц. Документ способен пройти лубую проверку, даже с применением профессионального оборудования. Решите свои задачи быстро с нашей компанией.
Приобрести диплом ВУЗа diplomus-spb.ru/gde-kupit-diplom-o-srednem-obrazovanie-9/
Быстро купить диплом об образовании!
Купить диплом ВУЗа по невысокой цене возможно, обратившись к надежной специализированной фирме. Заказать диплом о высшем образовании: diplomk-vo-vladivostoke.ru/kupit-diplom-s-provodkoj-tsena-i-garantiya-podlinnosti
Заказать диплом университета по доступной стоимости можно, обращаясь к проверенной специализированной компании. Заказать документ ВУЗа можно в нашем сервисе. diplomus-spb.ru/kupit-diplom-instituta-s-reestrom-bistro-i-nadezhno-9
1win bet deposit https://1win15.com.ng/ .
Soft2bet http://www.viagrarrtt.com .
Приобрести диплом любого университета!
Мы готовы предложить документы ВУЗов, расположенных в любом регионе Российской Федерации. Документы печатаются на бумаге высшего качества: o91746bp.beget.tech/2025/03/31/oformlenie-diplomov-i-attestatov-bystro-i-legalno.html
Заказать диплом ВУЗа !
Приобретение диплома ВУЗа РФ в нашей компании является надежным делом, потому что документ будет заноситься в государственный реестр. Приобрести диплом института freediplom.com/tsena-diploma-s-zaneseniem-v-reestr-sprosite-sejchas
купить диплом в магнитогорске diplomys-vsem.ru .
Приобрести диплом университета по невысокой цене можно, обращаясь к надежной специализированной компании. Мы предлагаем документы об окончании любых университетов РФ. Заказать диплом любого ВУЗа– diplom-zentr.com/pokupka-diploma-s-zaneseniem-v-reestr-6/
Приобрести диплом под заказ в столице можно через официальный портал компании. cyltalentohumano.com/employer/frees-diplom
Мы можем предложить дипломы психологов, юристов, экономистов и прочих профессий по приятным тарифам. Мы готовы предложить документы техникумов, которые находятся в любом регионе Российской Федерации. Документы выпускаются на бумаге высшего качества. Это дает возможности делать государственные дипломы, не отличимые от оригинала. dyado.listbb.ru/viewtopic.phpf=2&t=1416
ван вин 1win6008.ru .
1win http://www.1win5012.ru .
1win sports http://1win15.com.ng .
Заказать диплом института по выгодной стоимости возможно, обращаясь к надежной специализированной компании. Купить документ о получении высшего образования можно в нашем сервисе. diplomg-cheboksary.ru/kupit-diplom-v-moskve-s-zaneseniem-7
pin up azerbaycan pin up azerbaycan .
мостюет http://mostbet6011.ru .
Приобрести диплом об образовании. Покупка документа о высшем образовании через надежную фирму дарит ряд плюсов. Это решение помогает сберечь время и серьезные финансовые средства. californiarpn2.listbb.ru/viewtopic.php?f=1&t=1790
1 win казино https://1win6007.ru .
Приобрести диплом ВУЗа!
Мы можем предложить дипломы любой профессии по приятным ценам— diplomservis.ru/kupit-diplom-v-ekaterinburge-prosto-i-bistro/
Купить диплом возможно через официальный портал компании. mastercode.ru/forum/PAGE_NAME=profile_view&UID=5359
купить диплом политеха
1vin 1vin .
pin up azerbaycan pin up azerbaycan .
Мы изготавливаем дипломы любых профессий по приятным тарифам. Мы предлагаем документы техникумов, расположенных на территории всей РФ. Документы выпускаются на бумаге высшего качества. Это позволяет делать настоящие дипломы, которые невозможно отличить от оригиналов. ozmt.getbb.ru/ucp.phpmode=login
1wiun https://www.1win6043.ru .
скачать 1win с официального сайта https://1win6008.ru/ .
Услуги сантехника с подбором оптимальных решений под бюджет заказчика
вызвать сантехника петергоф https://vyzov-santekhnika1-spb.ru/petergof/ .
Услуги сантехника для замены труб, батарей, стояков и сантехнических узлов
сантехник недорого спб красносельский район сантехник недорого спб красносельский район .
Приобрести диплом о высшем образовании!
Мы готовы предложить документы институтов, которые находятся на территории всей России.
diplomnie.com/kupit-diplom-yurista-s-zaneseniem-v-reestr-bistro-4/
pin up az?rbaycan pin up az?rbaycan .
Приобрести диплом ВУЗа !
Покупка диплома ВУЗа РФ в нашей компании – надежный процесс, так как документ заносится в реестр. Приобрести диплом об образовании diplomv-v-ruki.ru/kupit-proverennij-diplom-3
Заказать диплом любого института!
Мы оказываем услуги по продаже документов об окончании любых ВУЗов Российской Федерации. Документы производят на подлинных бланках государственного образца. o91707v5.beget.tech/2025/04/08/bystroe-reshenie-voprosa-s-diplomom.html
Заказать диплом любого университета!
Мы можем предложить документы учебных заведений, которые расположены в любом регионе России. Дипломы и аттестаты печатаются на “правильной” бумаге высшего качества: teseygroup.ru/question/kupit-diplom-bystro-i-nedorogo-ofitsialnye-dokumenty
Kraken официальный сайт
Ищете надежную платформу для торгов и инвестиций в криптовалюту? Познакомьтесь с Kraken! Это один из самых известных и безопасных криптобирж в мире.
Почему стоит выбрать Kraken?
– Безопасность: Ваши средства защищены передовыми технологиями.
– Широкий выбор: Более 50 криптовалют для торговли, включая биткойн и эфир.
– Удобный интерфейс: Простая навигация и интуитивно понятные инструменты для анализа.
– Низкие комиссии: Конкурентные ставки на торговлю для максимизации ваших доходов.
– Поддержка: Круглосуточная помощь от профессионалов.
Зарегистрируйтесь на официальном сайте Kraken сегодня и получите доступ к премиальной платформе для торговли!
Присоединяйтесь к миллионам пользователей и начните свою крипто-приключение прямо сейчас!<a
кракен даркнет
1 win казино http://1win6008.ru/ .
1 вин официальный сайт http://www.1win6043.ru .
Мы предлагаем дипломы психологов, юристов, экономистов и прочих профессий по выгодным тарифам. Всегда стараемся поддерживать для заказчиков адекватную политику цен. Важно, чтобы дипломы были доступны для подавляющей массы наших граждан.
Приобретение диплома, подтверждающего обучение в ВУЗе, – это выгодное решение. Купить диплом о высшем образовании: peoplediplom.ru/kupit-diplom-v-moskve-kolledzha/
мастбет http://www.mostbet6012.ru .
Мы изготавливаем дипломы любых профессий по выгодным тарифам. Дипломы производятся на настоящих бланках государственного образца Купить диплом любого университета asxdiplommy.com
Где купить диплом по нужной специальности?
Заказать диплом университета по доступной цене возможно, обращаясь к проверенной специализированной фирме.: sdiplom.ru
мостбет кг http://www.mostbet6012.ru .
мостбет войти http://www.mostbet6033.ru .
Купить диплом университета по выгодной цене можно, обратившись к надежной специализированной компании. Мы оказываем услуги по производству и продаже документов об окончании любых ВУЗов России. Приобрести диплом любого ВУЗа– diplomskiy.com/kupit-diplom-yurista-s-zaneseniem-v-reestr-bistro-10/
pinup azerbaycan pinup azerbaycan .
Диплом любого ВУЗа России!
Без ВУЗа очень нелегко было продвигаться вверх по карьерной лестнице. По этой причине решение о заказе диплома стоит считать мудрым и целесообразным. Быстро и просто купить диплом института remoteaijobs.ai/employer/gosznac-diplom-24
диплом института купить
1хwin 1хwin .
mostbet скачать mostbet скачать .
Купить диплом о высшем образовании. Заказ диплома ВУЗа через надежную фирму дарит ряд достоинств для покупателя. Это решение дает возможность сэкономить время и существенные финансовые средства. gigit.cz/employer/eonline-diploma
Заказать диплом любого ВУЗа!
Мы предлагаем документы институтов, которые находятся на территории всей России.
diploml-174.ru/diplom-s-zaneseniem-v-reestr-po-dostupnoj-tsene-3/
Где заказать диплом по нужной специальности?
Мы предлагаемвыгодно и быстро приобрести диплом, который выполняется на оригинальной бумаге и заверен печатями, водяными знаками, подписями. Диплом способен пройти любые проверки, даже с применением профессиональных приборов. Решайте свои задачи быстро и просто с нашим сервисом. Купить диплом ВУЗа! kostromag.ru/forum/science/13395.aspx
Где купить диплом по актуальной специальности?
Мы предлагаем быстро и выгодно заказать диплом, который выполняется на оригинальном бланке и заверен мокрыми печатями, штампами, подписями должностных лиц. Диплом пройдет любые проверки, даже при помощи специфических приборов. Решите свои задачи быстро и просто с нашим сервисом.
Приобрести диплом о высшем образовании kupitediplom.ru/kupit-diplom-texnologa-6/
1win bet https://1win15.com.ng/ .
1win casino uganda http://1win1003.top/ .
pin up azerbaijan pin up azerbaijan .
официальный сайт 1win https://www.1win6044.ru .
mostbet скачать mostbet скачать .
1win ставки официальный сайт https://1win6043.ru/ .
мосбет мосбет .
descărca 1win 1win5013.ru .
скачать мостбет скачать мостбет .
1вин http://1win6010.ru .
купить аттестат официально
1win code bonus http://1win1003.top/ .
ломбард часы москва lombard-chasov1.ru .
узаконить перепланировку узаконить перепланировку .
эмблема стоматологии эмблема стоматологии .
ванвин 1win6009.ru .
Для успешного продвижения вверх по карьере требуется наличие диплома университета. Заказать диплом об образовании у проверенной организации: kupitediplom.ru/kupit-originalnij-diplom-legalno-i-bistro/
Всегда считал, что покупка диплома о высшем образовании — это миф и невозможно. Но, к счастью, оказался неправ. Сначала искал информацию по теме: стоит купить диплом о высшем образовании, купить диплом школы, купить диплом массажиста, дипломы детские купить, купить диплом о высшем образовании образцы, а затем переключился на дипломы вузов. Подробности здесь: kyc-diplom.com/geography/kolomna.html
Приобрести диплом любого университета. Покупка документа о высшем образовании через надежную компанию дарит немало достоинств для покупателя. Это решение помогает сберечь как личное время, так и серьезные финансовые средства. gaming.spaces.one/read-blog/26669_po-pravde-govorya-chasto-po-vsyacheskim-nyuansam-priobresti-dlya-sebya-dokumenty.html
Где купить диплом по актуальной специальности?
Наши специалисты предлагают быстро и выгодно заказать диплом, который выполнен на бланке ГОЗНАКа и заверен печатями, водяными знаками, подписями. Диплом пройдет любые проверки, даже при помощи профессиональных приборов. Решайте свои задачи быстро и просто с нашим сервисом.
Купить диплом о высшем образовании vacshidiplom.com/kupit-diplom-v-omske-13/
диплом о среднем профессиональном образовании где купить диплом о среднем профессиональном образовании где купить .
cod promoțional 1win http://1win5013.ru .
Мы готовы предложить дипломы любых профессий по приятным тарифам. Стараемся поддерживать для клиентов адекватную ценовую политику. Для нас важно, чтобы документы были доступными для большого количества граждан.
Покупка диплома, подтверждающего обучение в ВУЗе, – это грамотное решение. Приобрести диплом о высшем образовании: zakaz-na-diplom.ru/kupit-diplom-srednee-spetsialnoe-2/
Быстро купить диплом о высшем образовании!
Мы предлагаем документы об окончании любых университетов России. Документы производятся на фирменных бланках государственного образца. w77515cs.beget.tech/2025/04/08/diplom-pod-klyuch-s-garantiey.html
1win casino https://1win15.com.ng/ .
Мы изготавливаем дипломы любых профессий по разумным ценам. Мы готовы предложить документы ВУЗов, которые расположены на территории всей Российской Федерации. Документы делаются на “правильной” бумаге самого высокого качества. Это позволяет делать настоящие дипломы, не отличимые от оригинала. whmovie.com/read-blog/4002_kupit-diplom-instituta-s-reestrom.html
срочный выкуп часов в москве срочный выкуп часов в москве .
детская стоматология в митино детская стоматология в митино .
согласование перепланировки помещений согласование перепланировки помещений .
игра 1вин http://www.1win6009.ru .
1вин приложение http://1win6044.ru/ .
Мы можем предложить дипломы любых профессий по приятным тарифам. Мы готовы предложить документы техникумов, расположенных в любом регионе РФ. Документы печатаются на “правильной” бумаге высшего качества. Это дает возможности делать настоящие дипломы, которые не отличить от оригинала. diafan.rusheat.ru/forum/legalnoe-oformlenie-diplomov
Платформа Kraken предоставляет передовые методы для protected онлайн-операций. Каждый пользователь может рассчитывать на высокий уровень сохранности своих сведений. В Kraken обеспечены все возможности для выполнения deals, при этом ваша work остается полностью анонимной, и ваши личные данные остаются unseen для других.
кракен ат ссылка
мостбет http://mostbet6033.ru .
cheap viagra http://sophiaescorts.com .
mostbet https://www.mostbet6033.ru .
Приобрести диплом университета по невысокой цене можно, обращаясь к проверенной специализированной фирме. Приобрести документ о получении высшего образования вы имеете возможность в нашей компании. diplom-club.com/kupit-diplom-s-reestrom-v-rossii-bistro-i-nadezhno-9
мостбет скачать бесплатно https://www.mostbet6034.ru .
Заказать диплом любого университета!
Мы предлагаем документы любых учебных заведений, расположенных в любом регионе РФ.
diplom-zentr.com/kupit-diplom-s-reestrom-bez-xlopot-i-riskov/
mostbet https://mostbet6034.ru .
Приобретение диплома через проверенную и надежную фирму дарит много преимуществ для покупателя. Это решение дает возможность сэкономить как дорогое время, так и серьезные денежные средства. Впрочем, на этом выгоды не ограничиваются, преимуществ гораздо больше.Мы можем предложить дипломы любой профессии. Дипломы производят на подлинных бланках государственного образца. Доступная цена сравнительно с крупными тратами на обучение и проживание. Заказ диплома об образовании из российского института является мудрым шагом.
Приобрести диплом: diplomc-v-ufe.ru/diplom-s-zaneseniem-v-reestr-po-luchshej-tsene/
escort in islamabad http://buyviagrat.com/ .
1 вин http://1win6045.ru .
1 вин официальный сайт http://1win6045.ru/ .
Купить диплом ВУЗа!
Мы предлагаем документы институтов, которые находятся на территории всей Российской Федерации.
diplomers.com/kupit-diplom-ob-obrazovanii-s-reestrom-bistro-i-legko-2/
Всех приветствую!
Для определенных людей, купить диплом о высшем образовании – это необходимость, возможность получить отличную работу. Но для кого-то – это желание не терять массу времени на учебу в институте. Что бы ни толкнуло вас на такое решение, наша фирма готова помочь. Быстро, профессионально и по доступной цене изготовим диплом любого ВУЗа и любого года выпуска на государственных бланках с реальными печатями.
Главная причина, почему многие прибегают к покупке документов, – желание занять определенную работу. Например, знания и опыт дают возможность человеку устроиться на желаемую работу, но подтверждения квалификации нет. Когда для работодателя важно присутствие “корочки”, риск потерять вакантное место очень высокий.
Заказать документ ВУЗа можно в нашем сервисе. Мы оказываем услуги по производству и продаже документов об окончании любых ВУЗов Российской Федерации. Вы сможете получить необходимый диплом по любым специальностям, любого года выпуска, включая документы старого образца. Даем 100% гарантию, что в случае проверки документа работодателями, каких-либо подозрений не возникнет.
Обстоятельств, которые вынуждают приобрести диплом много. Кому-то очень срочно необходима работа, и необходимо произвести впечатление на руководителя во время собеседования. Некоторые задумали устроиться в престижную компанию, чтобы повысить собственный статус в социуме и в дальнейшем начать собственное дело. Чтобы не терять массу времени, а сразу начать успешную карьеру, используя имеющиеся навыки, можно купить диплом через интернет. Вы станете полезным для социума, получите денежную стабильность быстро и просто- купить аттестат за 9 класс
скачать 1win с официального сайта http://1win6010.ru .
1win играть 1win играть .
1win login ug https://1win1003.top/ .
Приобрести диплом ВУЗа!
Мы предлагаем дипломы любой профессии по приятным тарифам. Вы заказываете диплом через надежную и проверенную временем фирму. : amigabrasileira.listbb.ru/viewtopic.php?f=52&t=2918
Заказать диплом института по доступной цене вы можете, обращаясь к проверенной специализированной фирме. Купить документ ВУЗа вы можете в нашей компании в Москве. vuz-diplom.ru/kupite-diplom-o-visshem-obrazovanii-s-proverkoj-reestra
Мы готовы предложить дипломы любой профессии по разумным тарифам.– kupitediplom.ru/kupit-diplom-s-zaneseniem-v-reestr-foruma-vigodno/
Купить диплом о высшем образовании поспособствуем. Купить диплом специалиста в Твери – diplomybox.com/kupit-diplom-spetsialista-v-tveri
1win.com.ci https://1win5013.ru/ .
мост бет мост бет .
Ищете идеальную квартиру в Москве или Подмосковье? У нас есть предложения, которые вас удивят! Живите в сердце столицы с развитой инфраструктурой, или выберите уютные районы Подмосковья для спокойной жизни. Мы предлагаем широкий выбор квартир: от современных студий до просторных семейных апартаментов. Наша команда специалистов поможет вам найти именно то, что нужно, учитывая все ваши пожелания и бюджет. Не упустите шанс стать владельцем жилья мечты! Звоните, и мы подберем лучшие варианты для вас! Живите там, где вам комфортно! «Мангазея»
Мы готовы предложить дипломы любых профессий по приятным ценам. Купить диплом 2020 года — kyc-diplom.com/diplom-2019-goda.html
1win bet uganda http://1win1003.top .
Мы готовы предложить дипломы любой профессии по доступным ценам.
Вы приобретаете диплом в надежной и проверенной компании. Заказать диплом о высшем образовании– http://severka.flybb.ru/viewtopic.phpf=6&t=842/ – severka.flybb.ru/viewtopic.phpf=6&t=842
лечение зубов +в москве лечение зубов +в москве .
1win online http://www.1win6010.ru .
1 win.kg 1win6041.ru .
1 вин официальный сайт вход https://www.1win6047.ru .
mostbet chrono mostbet chrono .
Диплом университета России!
Без университета очень трудно было продвигаться вверх по карьере. По этой причине решение о покупке диплома следует считать целесообразным. Заказать диплом любого ВУЗа hirerightskills.com/employer/gosznac-diplom-24
скупка часов бу в москве скупка часов бу в москве .
скачать mostbet http://mostbet6033.ru/ .
клиники митино москва клиники митино москва .
1win.com https://www.1win5013.ru .
стоматологическая клиника митино стоматологическая клиника митино .
ванвин http://1win6041.ru .
переустройство и перепланировка в чем разница2 https://www.udmageo.ru .
1вин приложение 1вин приложение .
мостбет chrono http://www.mostbet6035.ru .
склад для хранения вещей аренда склад для хранения вещей аренда .
1vin казино http://1win6046.ru .
Приобрести диплом на заказ в Москве вы имеете возможность используя официальный сайт компании. newmedtime.ru/podlinnyie-diplomyi-na-zakaz
Где заказать диплом специалиста?
Мы предлагаем дипломы психологов, юристов, экономистов и прочих профессий по разумным тарифам. Важно, чтобы документы были доступны для большого количества граждан. Выгодно приобрести диплом любого университета vuz-diplom.ru/kupit-diplom-s-vneseniem-v-reestr-26/
Для успешного продвижения вверх по карьере понадобится наличие официального диплома ВУЗа. Заказать диплом о высшем образовании у надежной фирмы: kupitediplom.ru/kupit-attestat-s-reestrom-bistro-i-nadezhno/
mostbet промокод mostbet6034.ru .
Мы изготавливаем дипломы любой профессии по приятным тарифам. Дипломы производятся на подлинных бланках Приобрести диплом об образовании asxdiploman.com
онлайн оценка швейцарских часов онлайн оценка швейцарских часов .
переустройство это переустройство это .
гнатолог в клинике в москве гнатолог в клинике в москве .
jocuri de noroc online moldova http://www.1win5014.ru .
Приобрести диплом любого университета. Покупка подходящего диплома через проверенную и надежную компанию дарит ряд достоинств. Такое решение помогает сберечь как дорогое время, так и существенные финансовые средства. designxri.com/employer/eonline-diploma
mostbet официальный сайт http://mostbet6034.ru/ .
мостбет скачать на андроид https://www.mostbet6033.ru .
1win metode de plată https://1win5014.ru .
сайт 1win http://1win6045.ru/ .
мотбет https://mostbet6033.ru .
1win скачать kg http://1win7011.ru/ .
1win вход http://1win7013.ru .
Добрый день!
Мы изготавливаем дипломы психологов, юристов, экономистов и прочих профессий по приятным ценам. Стоимость может зависеть от выбранной специальности, года выпуска и университета: diploman-russian.com/
Мы изготавливаем дипломы любой профессии по приятным ценам. Стараемся поддерживать для заказчиков адекватную политику тарифов. Важно, чтобы дипломы были доступны для большинства наших граждан.
Заказ диплома, который подтверждает обучение в университете, – это выгодное решение. Приобрести диплом о высшем образовании: diplom-bez-problem.com/kupit-diplom-gde-mozhno-2/
Приобрести диплом университета!
Мы изготавливаем дипломы психологов, юристов, экономистов и любых других профессий по невысоким тарифам— kupit-diplom24.com/diplom-med-kolledzha-kupit-6/
1win войти http://www.1win7013.ru .
Приобрести диплом под заказ возможно используя официальный сайт компании. dachaweek.ru/diplom-kachestvenno-i-bez-riska
1win вход на сайт https://1win7011.ru .
Приобрести диплом о высшем образовании. Заказ диплома ВУЗа через проверенную и надежную фирму дарит множество плюсов для покупателя. Такое решение позволяет сэкономить как личное время, так и существенные денежные средства. vetreriameliante.it/index.php/kforum/jm-slideshow-module/11444-img-https-i-posti#11445
Мы изготавливаем дипломы любых профессий по приятным тарифам. Дипломы производят на фирменных бланках государственного образца Приобрести диплом об образовании vacshidiplom.com
хранение вещей в московской области недорого хранение вещей в московской области недорого .
Где заказать диплом специалиста?
Приобрести диплом университета по доступной цене можно, обратившись к проверенной специализированной фирме.: kupitediplom0029.ru
Задался вопросом: можно ли на самом деле купить диплом государственного образца в Москве? Был приятно удивлен — это реально и легально!
Сначала искал информацию в интернете на тему: за сколько можно купить диплом высшем образовании, купить диплом администратора, купить диплом в керчи, купить диплом в энгельсе, купить диплом высшего педагогического образования и получил базовые знания. В итоге остановился на материале: diplomybox.com/shag-3
Мы изготавливаем дипломы любой профессии по доступным ценам. Стараемся поддерживать для заказчиков адекватную политику тарифов. Важно, чтобы дипломы были доступными для большого количества граждан.
Покупка документа, который подтверждает обучение в университете, – это рациональное решение. Заказать диплом ВУЗа: diplomdoc.ru/kupit-diplom-srednee-obrazovanie-2/
mostbet промокод mostbet6035.ru .
Привет!
Для многих людей, заказать диплом ВУЗа – это необходимость, удачный шанс получить достойную работу. Но для кого-то – это очевидное желание не терять время на учебу в ВУЗе. С какой бы целью вам это не понадобилось, наша компания готова помочь вам. Быстро, профессионально и по доступной цене сделаем диплом любого года выпуска на подлинных бланках с реальными печатями.
Главная причина, почему люди покупают диплом, – желание занять определенную работу. Предположим, знания дают возможность специалисту устроиться на привлекательную работу, а подтверждения квалификации не имеется. При условии, что для работодателя важно присутствие “корочки”, риск потерять место работы очень высокий.
Заказать документ ВУЗа можно у нас в столице. Мы оказываем услуги по продаже документов об окончании любых университетов России. Вы сможете получить необходимый диплом по любым специальностям, включая документы СССР. Даем гарантию, что в случае проверки документов работодателем, подозрений не возникнет.
Ситуаций, которые вынуждают заказать диплом очень много. Кому-то очень срочно нужна работа, в итоге нужно произвести хорошее впечатление на руководителя на протяжении собеседования. Другие мечтают устроиться в большую компанию, чтобы повысить свой статус в обществе и в дальнейшем начать собственное дело. Чтобы не терять впустую годы жизни, а сразу начать успешную карьеру, применяя врожденные способности и полученные знания, можно приобрести диплом в интернете. Вы сможете быть полезным для социума, обретете денежную стабильность в максимально короткий срок- купить диплом о среднем образовании
Заказать диплом о высшем образовании!
Мы можем предложить дипломы любых профессий по приятным ценам— diplomk-v-krasnodare.ru/kupit-zaregistrirovannij-diplom-bistro-i-bezopasno-2/
1 ван вин https://www.1win6041.ru .
1win.pro http://1win6047.ru .
Заказать документ о получении высшего образования можно в нашей компании. Мы оказываем услуги по производству и продаже документов об окончании любых ВУЗов Российской Федерации. Вы получите необходимый диплом по любой специальности, любого года выпуска, включая документы СССР. Гарантируем, что при проверке документа работодателем, каких-либо подозрений не возникнет. diplomk-v-krasnodare.ru/mozhno-li-kupit-diplom-v-reestre-3/
казино онлайн kg https://mostbet6033.ru .
Заказать диплом университета!
Мы готовы предложить документы университетов, расположенных на территории всей России.
diplomt-v-chelyabinske.ru/kupit-diplom-o-srednem-obrazovanii-v-reestr-3/
1 win pro 1 win pro .
Где купить диплом специалиста?
Получаемый диплом с приложением отвечает запросам и стандартам Министерства образования и науки, неотличим от оригинала – даже со специальным оборудованием. Не откладывайте свои цели на потом, реализуйте их с нами – отправьте простую заявку на диплом прямо сейчас! Получить диплом о высшем образовании – легко! dreamrp.5nx.ru/viewtopic.phpf=2&t=442
Приобрести диплом о высшем образовании !
Покупка диплома университета РФ у нас является надежным процессом, так как документ заносится в реестр. Выгодно купить диплом университета diplomgorkiy.com/kupit-diplom-vnesennij-v-reestr-6
mostbet casino mostbet casino .
cazinouri online moldova 1win5015.ru .
Заказать диплом ВУЗа!
Купить диплом университета по невысокой стоимости вы можете, обращаясь к надежной специализированной компании. Приобрести диплом о высшем образовании: diplomt-v-chelyabinske.ru/diplom-vuza-put-k-uspeshnoj-rabote-zakazhite-sejchas
сколько стоят зубные протезы сколько стоят зубные протезы .
виды протезирования зубов фото цены виды протезирования зубов фото цены .
протезирование жевательных зубов стоимость http://www.protezirovanie-zubov3.ru/ .
1win вход https://1win6041.ru/ .
стоматологии г москва стоматологии г москва .
Ищете идеальную квартиру в Москве или Подмосковье? У нас есть предложения, которые вас удивят! Живите в сердце столицы с развитой инфраструктурой, или выберите уютные районы Подмосковья для спокойной жизни. Мы предлагаем широкий выбор квартир: от современных студий до просторных семейных апартаментов. Наша команда специалистов поможет вам найти именно то, что нужно, учитывая все ваши пожелания и бюджет. Не упустите шанс стать владельцем жилья мечты! Звоните, и мы подберем лучшие варианты для вас! Живите там, где вам комфортно!
ЖК премиум-класса в Москве – квартиры в новостройках премиум классаНовостройки премиум-класса Москвы. Обзор проектов
Мы предлагаем дипломы любой профессии по приятным тарифам.– kupitediplom0027.ru/kupit-diplom-s-provodkoj-bistro-i-bez-xlopot/
баланс ван вин https://www.1win6047.ru .
Мы изготавливаем дипломы любой профессии по приятным ценам.
Вы приобретаете документ в надежной и проверенной компании. Заказать диплом о высшем образовании– http://powerstack.co.in/employer/diplomy-grup-24/ – powerstack.co.in/employer/diplomy-grup-24
1win aplicația http://1win5015.ru .
mostbet официальный сайт mostbet6033.ru .
1win партнерка вход https://1win6046.ru/ .
лечение и протезирование зубов стоимость лечение и протезирование зубов стоимость .
сколько стоит протез зуба https://protezirovanie-zubov2.ru .
протезирование передних зубов цена протезирование передних зубов цена .
хирург в митино платно хирург в митино платно .
1win moldova download [url=https://www.1win5014.ru]https://www.1win5014.ru[/url] .
Где приобрести диплом специалиста?
Мы предлагаем выгодно приобрести диплом, который выполнен на бланке ГОЗНАКа и заверен печатями, водяными знаками, подписями должностных лиц. Диплом способен пройти любые проверки, даже с использованием специально предназначенного оборудования. Достигайте своих целей быстро и просто с нашей компанией.
Купить диплом о высшем образовании kupitediplom.ru/kupit-diplom-psixologa-15/
лечение зубов клиники в москве лечение зубов клиники в москве .
Хочу рассказать о своем опыте по заказу аттестата пту, думал это не реально и стал искать информацию в сети, про купить диплом о среднем образовании в липецке, купить диплом о среднем образовании в томске, купить диплом о среднем образовании в чебоксарах, купить диплом охраны, купить диплом преподавателя, постепенно вникая в суть дела нашел отличный материал здесь kyc-diplom.com/diplom-articles/zakazat-diplom-onlajn-instrukciya-k-rukovodstvu.html)
аттестат об окончании 11 классов купить
один вин официальный сайт https://1win6045.ru .
1win партнёрка https://www.1win6045.ru .
бк 1win бк 1win .
Где купить диплом специалиста?
Мы предлагаем дипломы любой профессии по приятным тарифам. Для нас очень важно, чтобы документы были доступны для большинства наших граждан. Купить диплом института diplom-top.ru/kupit-diplom-menedzhera-s-provodkoj-v-reestre/
ваучер 1win ваучер 1win .
1win партнерская программа вход 1win7011.ru .
1вин онлайн http://1win7013.ru .
1win.pro 1win.pro .
казино онлайн kg https://www.mostbet6033.ru .
Мы предлагаем дипломы психологов, юристов, экономистов и любых других профессий по приятным ценам. Мы готовы предложить документы техникумов, которые находятся в любом регионе Российской Федерации. Дипломы и аттестаты выпускаются на бумаге самого высокого качества. Это позволяет делать настоящие дипломы, не отличимые от оригинала. vibrantclubs.com/read-blog/17972_kupit-podlinnyj-diplom-s-zaneseniem-v-reestr.html
Купить диплом о высшем образовании!
Мы можем предложить документы учебных заведений, которые находятся на территории всей Российской Федерации.
diplomt-nsk.ru/kupit-diplom-s-zaneseniem-2/
Купить диплом университета по невысокой стоимости можно, обращаясь к проверенной специализированной компании. Приобрести документ о получении высшего образования можно у нас в столице. diplomj-irkutsk.ru/kupite-diplom-s-zaneseniem-legko-i-bistro
клиники митино москва клиники митино москва .
аттестат 11 классов купить аттестат 11 классов купить .
motsbet https://www.mostbet6036.ru .
mostbet chrono mostbet chrono .
1vin казино http://www.1win7013.ru .
1вин http://1win7001.ru .
Приобрести диплом университета!
Мы изготавливаем дипломы психологов, юристов, экономистов и любых других профессий по доступным тарифам. Вы заказываете диплом в надежной и проверенной компании. : big.bestforums.org/viewtopic.php?f=12&t=23745
1 vin официальный сайт https://1win7011.ru/ .
Приобрести диплом любого университета. Приобретение официального диплома через проверенную и надежную компанию дарит ряд плюсов. Такое решение дает возможность сберечь как дорогое время, так и значительные деньги. arzookanak0077.copiny.com/question/details/id/1083589
мостбет мобильная версия скачать https://mostbet6036.ru .
Диплом университета Российской Федерации!
Без наличия диплома достаточно сложно было продвигаться по карьере. Именно из-за этого решение о заказе диплома следует считать выгодным и целесообразным. Быстро заказать диплом об образовании anychinajob.com/zh/companies/gosznac-diplom-24
Для быстрого продвижения вверх по карьере требуется наличие диплома университета. Быстро заказать диплом об образовании у проверенной компании: kupitediplom.ru/kupit-diplom-ob-okonchanii-uchilisha/
Покупка официального диплома через качественную и надежную фирму дарит ряд достоинств. Данное решение помогает сэкономить время и серьезные средства. Впрочем, на этом выгоды не ограничиваются, достоинств значительно больше.Мы изготавливаем дипломы любой профессии. Дипломы изготавливаются на подлинных бланках. Доступная цена по сравнению с крупными затратами на обучение и проживание. Покупка диплома об образовании из российского института будет выгодным шагом.
Заказать диплом о высшем образовании: diplom-kaluga.ru/kupit-diplom-instituta-s-reestrom-4/
Где приобрести диплом по актуальной специальности?
Наша компания предлагает максимально быстро приобрести диплом, который выполняется на оригинальной бумаге и заверен мокрыми печатями, штампами, подписями должностных лиц. Данный диплом способен пройти любые проверки, даже при помощи специфических приборов. Достигайте свои цели быстро с нашими дипломами.
Купить диплом о высшем образовании diplomv-v-ruki.ru/kupit-diplom-v-ufe-12/
Заказать диплом университета по выгодной стоимости можно, обращаясь к проверенной специализированной фирме. Приобрести документ о получении высшего образования вы сможете у нас в Москве. diplom-club.com/kupit-diplom-v-reestre-bistro-i-nadezhno-bez-problem-2
Купить диплом любого университета!
Мы можем предложить документы ВУЗов, расположенных на территории всей РФ. Дипломы и аттестаты печатаются на “правильной” бумаге самого высокого качества: fizteh.getbb.ru/viewtopic.phpf=43&t=1894
1wi https://1win7001.ru/ .
купить школьный аттестат за 11 классов купить школьный аттестат за 11 классов .
купить диплом колледжа в нижнем новгороде
cazino md https://1win5015.ru .
Заказать диплом университета. Покупка документа о высшем образовании через надежную компанию дарит массу достоинств для покупателя. Это решение помогает сэкономить как дорогое время, так и существенные средства. arzookanak0077.copiny.com/question/details/id/1083589
Купить диплом института по невысокой стоимости можно, обращаясь к проверенной специализированной компании. Мы предлагаем документы об окончании любых университетов России. Приобрести диплом любого ВУЗа– diplomidlarf.ru/kupit-diplom-visshem-obrazovanii-zaneseniem-reestr-10/
платное протезирование зубов [url=https://protezirovanie-zubov3.ru/]платное протезирование зубов[/url] .
зуб протезирование цена protezirovanie-zubov2.ru .
протезирование передних зубов цена протезирование передних зубов цена .
Здравствуйте!
Мы предлагаем дипломы любой профессии по приятным ценам. Цена зависит от конкретной специальности, года получения и образовательного учреждения: п»їtutdiploms.com/
1win молдова http://1win5015.ru .
виды протезирования зубов фото цены виды протезирования зубов фото цены .
сколько стоит протез зуба https://protezirovanie-zubov3.ru .
скачать мостбет официальный сайт http://mostbet6033.ru .
Заказать диплом любого института!
Приобрести диплом университета по невысокой цене возможно, обратившись к надежной специализированной фирме. Приобрести диплом: vacshidiplom.com/vnesenie-diploma-v-reestr-uznajte-tsenu-onlajn
Мы изготавливаем дипломы любой профессии по невысоким ценам. Мы можем предложить документы ВУЗов, которые находятся на территории всей России. Документы выпускаются на бумаге самого высшего качества. Это дает возможности делать государственные дипломы, которые не отличить от оригинала. 24.lakharlacquers.com/employer/archive-diploma
протезирование зубов протезирование зубов .
протезирование зубов мякинино протезирование зубов мякинино .
Заказать документ о получении высшего образования можно в нашей компании. Мы предлагаем документы об окончании любых ВУЗов России. Вы получите диплом по любым специальностям, любого года выпуска, включая документы СССР. Гарантируем, что в случае проверки документа работодателями, подозрений не появится. diplomj-irkutsk.ru/kupit-diplom-s-zaneseniem-v-reestr-po-vigodnoj-tsene-7/
Заказать диплом о высшем образовании!
Мы изготавливаем дипломы любых профессий по приятным тарифам. Вы покупаете диплом в надежной и проверенной компании. : peticiones.cl/478820
Мы готовы предложить дипломы психологов, юристов, экономистов и любых других профессий по приятным ценам. Стараемся поддерживать для заказчиков адекватную политику цен. Важно, чтобы дипломы были доступными для большого количества граждан.
Покупка диплома, подтверждающего окончание университета, – это грамотное решение. Приобрести диплом любого университета: 10000diplomov.ru/diplom-kupit-tsena-2/
Диплом ВУЗа Российской Федерации!
Без наличия диплома очень сложно было продвинуться по карьерной лестнице. Именно из-за этого решение о заказе диплома стоит считать мудрым и целесообразным. Выгодно заказать диплом университета gamerbiz.net/employer/gosznac-diplom-24
1win скачать последнюю версию 1win скачать последнюю версию .
мостбет скачать андроид http://mostbet6033.ru/ .
Купить диплом об образовании!
Мы можем предложить дипломы любой профессии по доступным ценам— diplom-onlinex.com/kupit-diplom-po-meditsine-bistro-i-bez-problem/
Для эффективного продвижения вверх по карьерной лестнице нужно наличие официального диплома института. Выгодно приобрести диплом о высшем образовании у сильной компании: diploml-174.ru/kupit-diplom-texnikuma-ob-okonchanii-8/
win 1 1win6048.ru .
Где приобрести диплом специалиста?
Полученный диплом с необходимыми печатями и подписями отвечает стандартам Министерства образования и науки России, никто не отличит его от оригинала – даже со специально предназначенным оборудованием. Не откладывайте собственные цели на потом, реализуйте их с нашей помощью – отправьте заявку на изготовление документа сегодня! Заказать диплом о высшем образовании – легко! toplentanews.ru/operativnoe-izgotovlenie-diplomov-po-vashey-spetsialnosti
1vin казино https://1win6045.ru/ .
smile стоматология smile стоматология .
1wln https://1win7002.ru/ .
Приобрести диплом любого ВУЗа!
Мы предлагаем документы институтов, расположенных на территории всей России.
diplomg-cheboksary.ru/udivitelnie-tseni-na-diplom-s-reestrom-dlya-vas/
скачать mostbet на телефон https://www.mostbet6036.ru .
cazinouri online moldova https://www.1win5016.ru .
Приобрести диплом любого ВУЗа!
Мы предлагаем документы об окончании любых ВУЗов РФ. Документы изготавливаются на оригинальных бланках государственного образца. terorizam.listbb.ru/viewtopic.php?f=3&t=1751
купить диплом бакалавриат москва diplomysis-vsem.ru .
cod promoțional 1win cod promoțional 1win .
wan win wan win .
1 win pro 1win6048.ru .
Приобрести диплом о высшем образовании!
Мы можем предложить документы университетов, которые расположены в любом регионе РФ.
diplomist.com/kupit-diplom-s-reestrom-po-dostupnoj-tsene/
win 1 http://www.1win7001.ru .
купить в вологде диплом
mostbet apk скачать https://mostbet5001.ru/ .
1win ваучер https://1win7014.ru/ .
1win site https://www.1win16.com.ng .
мостбет скачать казино http://www.mostbet6036.ru .
мостбет скачать казино мостбет скачать казино .
продамус промокоды продамус промокоды .
сайт 1win https://1win7014.ru/ .
seo криптопроекта http://www.prodvizhenie-kriptovalyuta.ru .
мостюет https://mostbet6033.ru/ .
улучшение репутации криптовалюты улучшение репутации криптовалюты .
1win bet http://1win16.com.ng/ .
win 1 https://www.1win7001.ru .
снять бокс для вещей снять бокс для вещей .
купить университет диплом
Где заказать диплом по необходимой специальности?
Мы предлагаемвыгодно и быстро заказать диплом, который выполняется на оригинальном бланке и заверен мокрыми печатями, штампами, подписями должностных лиц. Наш диплом способен пройти лубую проверку, даже с использованием специально предназначенного оборудования. Решайте свои задачи быстро с нашей компанией. Купить диплом любого университета! rca.co.id/read-blog/7565_kupit-attestat-8-klass.html
Мы изготавливаем дипломы психологов, юристов, экономистов и прочих профессий по приятным тарифам. Всегда стараемся поддерживать для покупателей адекватную ценовую политику. Для нас важно, чтобы дипломы были доступны для подавляющей массы наших граждан.
Покупка диплома, подтверждающего окончание университета, – это грамотное решение. Заказать диплом университета: magazin-diplomov.ru/diplom-kupit-ofitsialno-3/
Мы предлагаем дипломы любой профессии по выгодным ценам.
Вы покупаете диплом через надежную и проверенную временем компанию. Приобрести диплом о высшем образовании– http://sz.80lvl.ru/viewtopic.phpf=9&t=2813/ – sz.80lvl.ru/viewtopic.phpf=9&t=2813
Заказать диплом любого университета!
Мы изготавливаем дипломы психологов, юристов, экономистов и любых других профессий по разумным тарифам— diplomass.com/kupit-diplom-s-reestrom-dlya-nadezhnosti-i-uverennosti/
мостбет скачать бесплатно http://mostbet6033.ru/ .
промокод на продамус скидка подключение promokod-prdms.ru .
google play отзывы google play отзывы .
trustpilot купить отзывы trustpilot купить отзывы .
1win молдова https://www.1win5016.ru .
Заказать диплом о высшем образовании !
Приобретение диплома любого университета РФ в нашей компании – надежный процесс, ведь документ заносится в государственный реестр. Выгодно приобрести диплом об образовании kupitediplom.ru/kupit-diplom-s-zaneseniem-v-reestr-bistro-i-nadezhno-74
cod promoțional 1win http://www.1win5016.ru .
Мы предлагаем дипломы любой профессии по выгодным ценам.– diplomt-v-chelyabinske.ru/kupit-diplom-s-vneseniem-v-reestr-bistro-i-bezopasno-3/
Мы изготавливаем дипломы любой профессии по приятным ценам. Мы предлагаем документы техникумов, расположенных в любом регионе России. Документы делаются на бумаге высшего качества. Это позволяет делать настоящие дипломы, которые невозможно отличить от оригиналов. justpaste.it/f848x
Заказать диплом ВУЗа!
Мы предлагаем документы университетов, расположенных на территории всей РФ. Дипломы и аттестаты выпускаются на “правильной” бумаге самого высшего качества: comitibus.clanfm.ru/viewtopic.phpf=14&t=18837
повышение доверия криптовалюты повышение доверия криптовалюты .
Где заказать диплом специалиста?
Наши специалисты предлагают быстро купить диплом, который выполняется на оригинальном бланке и заверен печатями, водяными знаками, подписями. Данный документ способен пройти лубую проверку, даже при помощи специально предназначенного оборудования. Достигайте цели быстро с нашими дипломами.
Заказать диплом о высшем образовании kupitediplom0027.ru/kupit-diplom-v-murmanske-6/
Приветствую!
Для многих людей, приобрести диплом о высшем образовании – это необходимость, шанс получить отличную работу. Но для кого-то – это желание не терять огромное количество времени на учебу в ВУЗе. Что бы ни толкнуло вас на это решение, мы готовы помочь вам. Максимально быстро, профессионально и по доступной цене сделаем диплом нового или старого образца на настоящих бланках с реальными подписями и печатями.
Основная причина, почему многие покупают дипломы, – желание занять хорошую работу. Например, способности и опыт позволяют кандидату устроиться на работу, однако документального подтверждения квалификации нет. При условии, что для работодателя важно наличие “корочек”, риск потерять вакантное место очень высокий.
Приобрести документ университета можно в нашем сервисе. Мы оказываем услуги по продаже документов об окончании любых ВУЗов России. Вы получите необходимый диплом по любой специальности, включая документы старого образца. Гарантируем, что при проверке документов работодателем, каких-либо подозрений не возникнет.
Обстоятельств, которые вынуждают купить диплом очень много. Кому-то срочно требуется работа, в результате нужно произвести впечатление на начальника при собеседовании. Некоторые хотят попасть в престижную компанию, чтобы повысить собственный статус и в будущем начать свой бизнес. Чтобы не терять множество времени, а сразу начать успешную карьеру, используя врожденные способности и приобретенные навыки, можно приобрести диплом в онлайне. Вы сможете быть полезным для социума, обретете денежную стабильность в кратчайшие сроки- аттестат купить
Заказать диплом ВУЗа по доступной цене возможно, обратившись к проверенной специализированной компании. Купить документ о получении высшего образования можно у нас в Москве. good-diplom.ru/kupit-diplom-zaregistrirovannij-v-reestre-8
seo криптопроекта http://www.prodvizhenie-kriptovalyuta2.ru/ .
Где купить диплом по необходимой специальности?
Мы изготавливаем дипломы любой профессии по разумным ценам. Для нас важно, чтобы дипломы были доступны для подавляющей массы наших граждан. Заказать диплом ВУЗа diplom-top.ru/diplom-instituta-s-reestrom-ofitsialno-i-nadezhno-2/
1win ракета 1win ракета .
Мы изготавливаем дипломы любой профессии по разумным ценам. Мы предлагаем документы ВУЗов, расположенных в любом регионе Российской Федерации. Дипломы и аттестаты выпускаются на бумаге высшего качества. Это дает возможности делать государственные дипломы, которые невозможно отличить от оригиналов. analyticsjobs.in/jobs/companies/archive-diploma
Где купить диплом специалиста?
Наша компания предлагаетбыстро и выгодно заказать диплом, который выполняется на бланке ГОЗНАКа и заверен печатями, водяными знаками, подписями. Документ способен пройти любые проверки, даже с использованием профессиональных приборов. Решайте свои задачи максимально быстро с нашей компанией. Заказать диплом о высшем образовании! mvduniversitetpiter.flybb.ru/viewtopic.php?f=9&t=1078
Где купить диплом по необходимой специальности?
Наша компания предлагает выгодно и быстро купить диплом, который выполнен на оригинальной бумаге и заверен мокрыми печатями, водяными знаками, подписями должностных лиц. Наш документ способен пройти лубую проверку, даже с применением специальных приборов. Решите свои задачи быстро и просто с нашими дипломами.
Купить диплом о высшем образовании vuz-diplom.ru/kupit-diplom-v-naberezhnix-chelnax-3/
Купить диплом института. Заказ документа о высшем образовании через проверенную и надежную фирму дарит ряд достоинств. Такое решение дает возможность сэкономить время и серьезные деньги. nec.phorum.pl/posting.php?mode=newtopic&f=27&sid=7f3e370ae68e85a815bcccb0946be545
склады хранения в москве склады хранения в москве .
мостбет chrono мостбет chrono .
Мы изготавливаем дипломы любой профессии по приятным тарифам.
Вы приобретаете документ через надежную фирму. Приобрести диплом ВУЗа– http://job.iwok.vn/employer/diplomy-grup-24/ – job.iwok.vn/employer/diplomy-grup-24
1win.kg 1win7002.ru .
Мы изготавливаем дипломы любых профессий по приятным тарифам. Дипломы производят на подлинных бланках государственного образца Заказать диплом любого института diplomt-v-chelyabinske.ru
Где приобрести диплом по нужной специальности?
Приобрести диплом института по невысокой стоимости вы можете, обращаясь к надежной специализированной фирме.: diplom5.com
Приобрести диплом ВУЗа по невысокой стоимости вы сможете, обращаясь к надежной специализированной компании. Мы предлагаем документы об окончании любых ВУЗов РФ. Приобрести диплом о высшем образовании– damdiplomisa.com/kupit-diplom-v-krasnodare-s-zaneseniem-v-reestr-3/
Купить диплом института по выгодной цене можно, обратившись к надежной специализированной компании. Приобрести документ института вы сможете в нашей компании в столице. diplomt-v-chelyabinske.ru/kupit-diplom-s-provedeniem-v-reestr-2
mostbet скачать на телефон бесплатно андроид mostbet6033.ru .
1вин приложение https://www.1win7014.ru .
Мы готовы предложить дипломы любой профессии по приятным ценам.– good-diplom.ru/kupite-diplom-vuza-s-zaneseniem-v-reestr-bistro-i-prosto/
Приобрести диплом на заказ вы сможете через официальный портал компании. gtral.com/companies/frees-diplom
Заказ документа о высшем образовании через надежную фирму дарит ряд плюсов для покупателя. Это решение помогает сэкономить как дорогое время, так и серьезные финансовые средства. Однако, только на этом выгода не ограничивается, преимуществ намного больше.Мы готовы предложить дипломы любой профессии. Дипломы производят на подлинных бланках государственного образца. Доступная цена сравнительно с крупными издержками на обучение и проживание в другом городе. Приобретение диплома об образовании из российского ВУЗа будет мудрым шагом.
Заказать диплом: diplomg-kurerom.ru/diplom-visshego-obrazovaniya-s-zaneseniem-v-reestr-7/
Обратитесь в психиатрическую клинику СПб и начните путь к новой жизни
частная психиатрическая больница спб https://www.klinika-psikhiatrii-spb.ru .
Прочные пластиковые окна с отличной шумоизоляцией
пластиковые окна дилерам plastikovye-okna-master.ru .
Заказать диплом любого ВУЗа!
Мы предлагаем документы об окончании любых университетов Российской Федерации. Документы производятся на подлинных бланках государственного образца. gae.flybb.ru/viewtopic.php?f=2&t=549
mostbet.kg http://mostbet5001.ru .
улучшение рейтинга криптобиржи http://prodvizhenie-kriptovalyuta1.ru/ .
промокод продамус промокод продамус .
1win 1win .
1win официальный сайт регистрация https://www.1win7003.ru .
mostber https://mostbet5002.ru .
1вин кг 1вин кг .
1win win http://1win7015.ru .
1вин про https://1win7003.ru .
Быстро и просто купить диплом любого института. Приобретение документа о высшем образовании через проверенную и надежную компанию дарит ряд достоинств. Данное решение дает возможность сберечь время и серьезные деньги. flytteogfragttilbud.dk/employer/eonline-diploma
Здравствуйте!
Для многих людей, заказать диплом о высшем образовании – это необходимость, шанс получить достойную работу. Но для кого-то – это желание не терять время на учебу в институте. Что бы ни толкнуло вас на это решение, наша фирма готова помочь вам. Максимально быстро, профессионально и по доступной цене изготовим диплом любого года выпуска на государственных бланках с реальными печатями.
Главная причина, почему многие прибегают к покупке документа, – желание занять хорошую работу. К примеру, знания позволяют специалисту устроиться на привлекательную работу, но документального подтверждения квалификации нет. Если для работодателя важно присутствие “корочек”, риск потерять место работы достаточно высокий.
Заказать документ о получении высшего образования вы можете в нашей компании в Москве. Мы оказываем услуги по производству и продаже документов об окончании любых университетов РФ. Вы получите диплом по любой специальности, любого года выпуска, включая документы Советского Союза. Даем 100% гарантию, что при проверке документов работодателем, каких-либо подозрений не возникнет.
Разных ситуаций, которые вынуждают приобрести диплом ВУЗа немало. Кому-то прямо сейчас необходима работа, и необходимо произвести особое впечатление на начальника при собеседовании. Некоторые задумали устроиться в серьезную компанию, чтобы повысить свой статус и в дальнейшем начать свой бизнес. Чтобы не тратить попусту годы жизни, а сразу начинать удачную карьеру, используя имеющиеся навыки, можно купить диплом прямо в онлайне. Вы сможете быть полезным в обществе, получите финансовую стабильность в максимально короткие сроки- диплом купить
mostbet промокод mostbet промокод .
Где заказать диплом специалиста?
Мы можем предложить дипломы любых профессий по невысоким тарифам. Важно, чтобы документы были доступными для подавляющей массы граждан. Приобрести диплом любого университета diplomv-v-ruki.ru/nadezhno-i-bistro-diplom-s-reestrom-dlya-vas/
1вин приложение https://www.1win7015.ru .
1win бонус за приложение https://www.1win5030.ru .
Prodamus -промокод на подключение Prodamus -промокод на подключение .
orm криптопроекта http://www.prodvizhenie-kriptovalyuta1.ru .
Заказать диплом об образовании!
Заказать диплом института по невысокой цене можно, обращаясь к проверенной специализированной компании. Приобрести диплом: diplom-ryssia.com/vot-neskolko-variantov-zagolovkov-otvechayushix-trebovaniyam-kupit-diplom-s-provodkoj-v-reestre-nedorogo-diplom-s-reestrom-ofitsialno-bistro-vigodno-prodazha-diplomov-s-garanti
скачать мостбет официальный сайт https://www.mostbet6033.ru .
Заказать документ о получении высшего образования вы можете у нас. Мы оказываем услуги по производству и продаже документов об окончании любых университетов России. Вы получите необходимый диплом по любым специальностям, любого года выпуска, в том числе документы старого образца. Даем гарантию, что в случае проверки документов работодателями, никаких подозрений не появится. diplomass.com/kupit-diplom-s-zaneseniem-v-reestr-po-vigodnoj-tsene-8/
Ищете рабочие зеркала для входа на
? У нас только проверенные и актуальные ссылки на торговую площадку
. Инструкции по безопасному входу через Tor и VPN, а также свежие ссылки в нашем Telegram канале. Заходите и совершайте покупки быстро и безопасно на kra29.at
mostbet kg mostbet kg .
Где заказать диплом специалиста?
Готовый диплом с приложением полностью отвечает стандартам, неотличим от оригинала – даже со специальным оборудованием. Не стоит откладывать личные мечты на несколько лет, реализуйте их с нами – отправьте простую заявку на диплом сегодня! Диплом о среднем образовании – быстро и просто! grainfather.global/employer/premialnie-diplom-24
1win online http://1win16.com.ng .
мостбет мобильная версия скачать мостбет мобильная версия скачать .
google play отзывы google play отзывы .
1win am http://1win5030.ru .
Приобрести диплом под заказ можно через сайт компании. freedost.com/read-blog/2846_kupit-diplom-s-zaneseniem-v-reestr-cena.html
1win https://1win5024.ru/ .
seo криптовалюты seo криптовалюты .
1-win http://1win7015.ru .
1win офф сайт https://1win5030.ru/ .
Заказ официального диплома через надежную компанию дарит ряд плюсов. Данное решение позволяет сберечь как продолжительное время, так и серьезные финансовые средства. Впрочем, на этом выгода не ограничивается, преимуществ гораздо больше.Мы можем предложить дипломы любой профессии. Дипломы изготавливаются на настоящих бланках государственного образца. Доступная стоимость сравнительно с большими тратами на обучение и проживание. Покупка диплома о высшем образовании из российского ВУЗа является рациональным шагом.
Купить диплом о высшем образовании: diplom4you.com/kupit-diplom-o-visshem-obrazovanii-zanosim-v-reestr/
casinos online sin licencia casinos online sin licencia .
1win кыргызстан http://1win7015.ru/ .
молдова купить диплом
Задался вопросом: можно ли на самом деле купить диплом государственного образца в Москве? Был приятно удивлен — это реально и легально!
Сначала искал информацию в интернете на тему: можно ли купить аккредитацию, купить диплом лесгафта, купленный диплом, купить легальный диплом, купить диплом в волжске и получил базовые знания. В итоге остановился на материале: proffdiplomik.com/arzamas
cazinouri online moldova http://1win5024.ru .
casinos online sin licencia casinos online sin licencia .
Приобрести диплом об образовании!
Купить диплом ВУЗа по выгодной цене вы можете, обращаясь к надежной специализированной компании. Приобрести диплом: diplomv-v-ruki.ru/vot-neskolko-variantov-zagolovkov-sootvetstvuyushix-trebovaniyam-diplom-s-provodkoj-vuza-kupit-vigodno-kupit-diplom-s-registratsiej-tseni-snizheni-diplom-s-zaneseniem-v-bazu-vuza
управление репутацией криптовалюты http://www.prodvizhenie-kriptovalyuta2.ru/ .
1win букмекер https://1win7003.ru/ .
мосбет http://mostbet5003.ru/ .
1win 1win .
mostbet игры http://www.mostbet5003.ru .
мостбет chrono https://mostbet5003.ru/ .
1.вин 1.вин .
Где купить диплом специалиста?
Готовый диплом с приложением полностью отвечает стандартам, неотличим от оригинала – даже со специальным оборудованием. Не следует откладывать собственные цели на долгие годы, реализуйте их с нами – отправьте быструю заявку на диплом прямо сейчас! Диплом о среднем образовании – не проблема! poboltaem.foroactivo.com/t5522-topic#13664
мост бет https://mostbet6033.ru/ .
Безопасный вывод из запоя с устранением симптомов интоксикации
вывод из запоя санкт петербург https://vyvod-iz-zapoya-spb-1.ru/ .
Заказать документ института можно в нашем сервисе. Мы предлагаем документы об окончании любых ВУЗов России. Вы сможете получить необходимый диплом по любым специальностям, любого года выпуска, включая документы Советского Союза. Гарантируем, что при проверке документов работодателем, подозрений не появится. poluchidiplom.com/mozhno-li-kupit-diplom-zanesennij-v-reestr-3/
orm криптопроекта prodvizhenie-kriptovalyuta2.ru .
1win сайт вход https://1win7004.ru/ .
Мы изготавливаем дипломы психологов, юристов, экономистов и любых других профессий по выгодным тарифам. Дипломы изготавливаются на подлинных бланках Выгодно купить диплом института diplomk-v-krasnodare.ru
Где купить диплом по нужной специальности?
Заказать диплом института по доступной стоимости возможно, обратившись к проверенной специализированной фирме.: kdiplom.ru
мостбет chrono http://mostbet6033.ru/ .
1winn 1win7004.ru .
Приобрести диплом о высшем образовании. Заказ диплома через проверенную и надежную компанию дарит массу достоинств. Такое решение позволяет сэкономить время и значительные средства. activeaupair.no/employer/eonline-diploma
арендовать склад в москве для личных вещей арендовать склад в москве для личных вещей .
Мы изготавливаем дипломы любой профессии по невысоким ценам. Мы предлагаем документы техникумов, которые находятся на территории всей РФ. Документы делаются на бумаге высшего качества. Это дает возможности делать настоящие дипломы, которые не отличить от оригинала. kawaa.drake.free.fr/index.phpfile=Forum&page=viewtopic&forum_id=1&thread_id=7266
купить аттестат в омске за 9 класс
aviator mostbet mostbet5002.ru .
dragon money зеркало dragon money зеркало .
dragonmoney зарабатывать легко http://dragon-money33.com/ .
кнопка тревожной сигнализации росгвардия кнопка тревожной сигнализации росгвардия .
Где приобрести диплом по нужной специальности?
Наша компания предлагает выгодно заказать диплом, который выполнен на оригинальном бланке и заверен мокрыми печатями, водяными знаками, подписями должностных лиц. Наш диплом пройдет любые проверки, даже при помощи специфических приборов. Достигайте цели быстро и просто с нашими дипломами.
Заказать диплом о высшем образовании good-diplom.ru/gde-kupit-diplom-obrazovanie-5/
Feel the rush with Lucky Spin! Fast-paced and full of rewarding moments, this game is your chance to score big. Spin now and see how lucky you can get! Lucky Spin
Приобрести диплом вы сможете через сайт компании. rogerfilms.com/index.phptitle=Безопасная_покупка_диплома
1 вин официальный сайт http://1win7016.ru/ .
казино dragon мани dragon-money30.com .
lhfujy https://dragon-money33.com .
1win играть https://www.1win7016.ru .
1вин войти http://1win5030.ru/ .
кнопка тревожной сигнализации росгвардия кнопка тревожной сигнализации росгвардия .
Купить диплом о высшем образовании. Приобретение документа о высшем образовании через надежную компанию дарит множество плюсов. Данное решение помогает сберечь время и существенные денежные средства. activeaupair.no/employer/eonline-diploma
мостбет авиатор https://www.mostbet5002.ru .
склады хранение для вещей склады хранение для вещей .
Приобрести диплом под заказ возможно через сайт компании. l4dzone.com/posting.phpmode=post&f=5
мостбет скачать бесплатно http://www.mostbet5003.ru .
mostbet kg https://mostbet6043.ru/ .
Мы предлагаем дипломы любых профессий по приятным ценам. Мы можем предложить документы ВУЗов, которые находятся в любом регионе РФ. Дипломы и аттестаты делаются на бумаге высшего качества. Это дает возможности делать настоящие дипломы, не отличимые от оригиналов. contraband.ch/read-blog/99868_kupit-diplom-s-zaneseniem-v-bazu-reestr.html
portofele electronice casino portofele electronice casino .
Приобрести диплом о высшем образовании!
Мы готовы предложить документы ВУЗов, расположенных в любом регионе РФ.
diplomservis.com/kupit-nastoyashij-diplom-s-zaneseniem-v-reestr-2/
mostbet промокод http://mostbet6043.ru/ .
1win.com http://1win5025.ru .
Купить диплом академии!
Мы можем предложить дипломы любой профессии по приятным тарифам. Вы покупаете диплом через надежную и проверенную фирму. : mf.getbb.ru/posting.php?mode=post&f=28&sid=46d03099bf76bce025ecc2ed238857df
мостбет mostbet6033.ru .
Диплом ВУЗа Российской Федерации!
Без получения диплома трудно было продвигаться по карьерной лестнице. Именно из-за этого решение о покупке диплома следует считать рациональным. Приобрести диплом института foro.rune-nifelheim.com/general-ragnarok-m/vysshee-obrazovanie-za-korotkij-srok
1win вход в личный кабинет http://1win7016.ru .
Купить диплом об образовании!
Мы предлагаем документы об окончании любых ВУЗов РФ. Документы производят на настоящих бланках. newyorkknicksclub.com/read-blog/3841_kupit-diplom-s-registraciej-v-reestre.html
Где приобрести диплом по актуальной специальности?
Мы предлагаембыстро и выгодно приобрести диплом, который выполняется на бланке ГОЗНАКа и заверен печатями, водяными знаками, подписями. Документ способен пройти лубую проверку, даже при использовании специфических приборов. Решите свои задачи быстро и просто с нашими дипломами. Купить диплом университета! forumex.forumex.ru/viewtopic.php?f=7&t=553
Быстро и просто заказать диплом ВУЗа!
Мы изготавливаем дипломы любой профессии по приятным тарифам— diplomass.com/kupit-diplom-s-vneseniem-v-bazu-vsego-za-odin-den/
поддержка мостбет поддержка мостбет .
1вин онлайн https://www.1win7004.ru .
1win pro http://1win7016.ru/ .
Заказать диплом любого ВУЗа!
Мы готовы предложить документы ВУЗов, которые расположены на территории всей России. Дипломы и аттестаты выпускаются на бумаге высшего качества: cyberdefenseprofessionals.com/companies/aurus-diploms
Приветствую!
Мы можем предложить дипломы любых профессий по приятным тарифам. Стоимость будет зависеть от выбранной специальности, года выпуска и образовательного учреждения: rdiplomix.com/
Приобрести диплом о высшем образовании !
Приобретение диплома университета России у нас является надежным делом, поскольку документ заносится в реестр. Купить диплом о высшем образовании diplomt-v-chelyabinske.ru/kupit-diplom-s-zaneseniem-v-reestr-rossii-bistro-legko
Где купить диплом по нужной специальности?
Мы предлагаем быстро и выгодно заказать диплом, который выполняется на оригинальной бумаге и заверен печатями, штампами, подписями официальных лиц. Данный документ способен пройти любые проверки, даже с использованием профессионального оборудования. Достигайте цели быстро и просто с нашей компанией.
Приобрести диплом о высшем образовании diplomus-spb.ru/kupit-diplom-v-podolske-3/
pariuri sportive moldova http://www.1win5025.ru .
мост бет http://mostbet7001.ru/ .
установка тревожной сигнализации http://www.trevros.ru .
Купить диплом о высшем образовании можем помочь. Купить диплом электроэнергетика – diplomybox.com/diplom-elektroenergetika
создание сайтов на битрикс москва создание сайтов на битрикс москва .
Мы готовы предложить дипломы любых профессий по разумным ценам. Дипломы по профессии — kyc-diplom.com/diplomy-po-professii.html
мостбет вход мостбет вход .
how to bet on 1win https://www.1win17.com.ng .
Заказать диплом об образовании!
Мы можем предложить дипломы любой профессии по доступным тарифам— vacshidiplom.com/kupit-diplom-meditsinskogo-dlya-vashej-kareri/
Где заказать диплом по нужной специальности?
Наша компания предлагаетвыгодно и быстро купить диплом, который выполнен на оригинальной бумаге и заверен мокрыми печатями, штампами, подписями должностных лиц. Документ пройдет любые проверки, даже при использовании профессиональных приборов. Решайте свои задачи быстро и просто с нашим сервисом. Заказать диплом о высшем образовании! nowoczesna.phorum.pl/posting.php?mode=newtopic&f=2&sid=ba09ddbd4229daca838baac1bb10fcfd
мостюет http://mostbet5004.ru .
мосбет http://mostbet6038.ru/ .
Всегда считал, что покупка диплома о высшем образовании — это миф и невозможно. Но, к счастью, оказался неправ. Сначала искал информацию по теме: купить диплом в ижевске, купить диплом высшем гознак, купить диплом техникума образец, купить диплом о среднем казань, можно купить диплом колледжа, а затем переключился на дипломы вузов. Подробности здесь: diplomybox.com/kupit-diplom-magistra-v-bryanske
mostber https://www.mostbet6043.ru .
casino online sin licencia espa?a casino online sin licencia espa?a .
тревожная сигнализация https://www.trevros.ru .
Быстровозводимые каркасные дома с отличной теплоизоляцией
каркасные дома стоимость https://karkasnye-doma-msk-pod-kluch.ru/ .
Hmm it looks like your website ate my first comment (it was extremely long) so I guess I’ll just sum it up what I wrote and say, I’m thoroughly enjoying your blog. I too am an aspiring blog writer but I’m still new to the whole thing. Do you have any helpful hints for beginner blog writers? I’d really appreciate it.
Каркасные дома с балконом, мансардой и уютной планировкой
каркасные дома под ключ цены https://karkasnye-doma-msk-pod-kluch0.ru .
заказать разработку сайта на 1с битрикс http://www.razrabotka-saita-bx.ru/ .
мостбет авиатор mostbet6038.ru .
What¦s Going down i’m new to this, I stumbled upon this I have found It positively useful and it has aided me out loads. I’m hoping to give a contribution & aid other users like its aided me. Good job.
Заказать диплом любого ВУЗа!
Мы готовы предложить документы университетов, расположенных в любом регионе РФ.
diplomp-irkutsk.ru/kupit-diplom-visshego-obrazovaniya-s-zaneseniem-v-reestr-8/
mostbet официальный сайт http://mostbet6038.ru/ .
mostber https://mostbet7001.ru .
portofele electronice casino https://1win5025.ru .
mostbet https://mostbet5004.ru/ .
casino sin licencia espa?a casino sin licencia espa?a .
I have been exploring for a bit for any high-quality articles or weblog posts in this sort of area . Exploring in Yahoo I ultimately stumbled upon this website. Studying this information So i am satisfied to show that I have an incredibly good uncanny feeling I came upon exactly what I needed. I most surely will make certain to do not forget this website and provides it a glance regularly.
поддержка мостбет https://mostbet6033.ru .
мотбет http://www.mostbet5004.ru .
мостбет скачать https://mostbet7001.ru .
Заказать диплом любого института!
Мы оказываем услуги по изготовлению и продаже документов об окончании любых университетов Российской Федерации. Документы производятся на подлинных бланках. mete01.com/read-blog/1945_kupit-diplom-o-vysshem-obrazovanii.html
înregistrare 1win http://www.1win5025.ru .
кэшбэк драгон мани как получить https://www.dragon-money33.com .
Kraken официальный сайт
Ищете надежную платформу для торгов и инвестиций в криптовалюту? Познакомьтесь с Kraken! Это один из самых известных и безопасных криптобирж в мире.
Почему стоит выбрать Kraken?
– Безопасность: Ваши средства защищены передовыми технологиями.
– Широкий выбор: Более 50 криптовалют для торговли, включая биткойн и эфир.
– Удобный интерфейс: Простая навигация и интуитивно понятные инструменты для анализа.
– Низкие комиссии: Конкурентные ставки на торговлю для максимизации ваших доходов.
– Поддержка: Круглосуточная помощь от профессионалов.
Зарегистрируйтесь на официальном сайте Kraken сегодня и получите доступ к премиальной платформе для торговли!
Присоединяйтесь к миллионам пользователей и начните свою крипто-приключение прямо сейчас!<a
kra32.at
dragon money казино dragon money казино .
1вин сайт официальный http://1win7004.ru/ .
Приобрести диплом ВУЗа!
Мы готовы предложить документы университетов, которые находятся в любом регионе Российской Федерации. Дипломы и аттестаты выпускаются на бумаге высшего качества: 40i20.com/@bennettxtp6341
мастбет мастбет .
Your style is so unique compared to many other people. Thank you for publishing when you have the opportunity,Guess I will just make this bookmarked.2
dragon money рабочее зеркало dragon money рабочее зеркало .
Приобрести диплом о высшем образовании !
Покупка диплома университета РФ в нашей компании является надежным делом, ведь документ будет заноситься в государственный реестр. Быстро и просто купить диплом любого университета diplomt-nsk.ru/kupit-diplom-s-zaneseniem-v-reestr-rossii-bistro-legko
Приветствую!
Мы можем предложить дипломы любых профессий по невысоким тарифам. Стоимость зависит от конкретной специальности, года выпуска и ВУЗа: diplomans.com/
сайт драгон моней https://www.dragon-money30.com .
Святки
Святки
Cutleriaceae
all-prolific
stablemate
spooling
transom
Hello.This article was extremely remarkable, particularly since I was looking for thoughts on this topic last Tuesday.
купить диплом о высшем образовании не гознак
хавал м6 цена и комплектация https://haval-msk1.ru/models/new-haval-m6/ .
1win bet http://1win18.com.ng .
Only wanna input on few general things, The website layout is perfect, the content is very wonderful : D.
Pretty! This was a really wonderful post. Thank you for providing this information.
мостбет зеркало mostbet7002.ru .
1win футбол http://1win7005.ru .
1win casino 1win casino .
Мы изготавливаем дипломы психологов, юристов, экономистов и других профессий по приятным тарифам. Мы можем предложить документы ВУЗов, расположенных на территории всей Российской Федерации. Дипломы и аттестаты делаются на бумаге самого высшего качества. Это позволяет делать настоящие дипломы, которые невозможно отличить от оригиналов. electrospeed.teamforum.ru/viewtopic.phpf=3&t=4829
купить диплом бакалавра в омске
mostbest mostbet7002.ru .
1-win 1-win .
Мы изготавливаем дипломы любых профессий по выгодным тарифам.
Вы приобретаете документ через надежную и проверенную компанию. Приобрести диплом о высшем образовании– http://mdr7.ru/viewtopic.phpf=6&t=10083/ – mdr7.ru/viewtopic.phpf=6&t=10083
мостбет скачать на андроид mostbet6038.ru .
1win http://www.1win5026.ru .
1 win moldova http://1win5026.ru .
1win online 1win online .
Купить диплом университета!
Наша компания предлагаетвыгодно заказать диплом, который выполняется на оригинальном бланке и заверен мокрыми печатями, штампами, подписями официальных лиц. Наш документ пройдет любые проверки, даже при помощи профессионального оборудования. Достигайте цели максимально быстро с нашими дипломами- b98385gb.beget.tech/2025/04/13/diplomy-kotorye-pomogut-vam-vydelitsya.html
1 win moldova 1 win moldova .
Заказать диплом университета по невысокой цене возможно, обращаясь к надежной специализированной фирме. Мы предлагаем документы ВУЗов, которые находятся на территории всей Российской Федерации. publikacii.listbb.ru/viewtopic.phpf=3&t=2343
Мы предлагаем быстро купить диплом, который выполнен на бланке ГОЗНАКа и заверен печатями, штампами, подписями. Наш документ способен пройти любые проверки, даже при использовании специальных приборов. znanee.flybb.ru/viewtopic.php?f=2&t=962
Мы изготавливаем дипломы любых профессий по разумным ценам. Мы предлагаем документы ВУЗов, которые расположены на территории всей Российской Федерации. Дипломы и аттестаты выпускаются на “правильной” бумаге самого высшего качества. Это дает возможности делать настоящие дипломы, которые невозможно отличить от оригинала. bcstaffing.co/employer/15202/archive-diploma
Купить диплом университета!
Мы предлагаем документы институтов, расположенных в любом регионе РФ.
diplom4you.com/kupit-diplom-s-zaneseniem-v-reestr-instituta-bistro-3/
мостбет скачать на андроид https://mostbet5004.ru .
Добрый день спасибо за ваш выбор нашего маркетплейса ссылка на сайт —>> ссылка РЅР° кракен даркнет
You made a few fine points there. I did a search on the subject and found mainly persons will go along with with your blog.
тревожная кнопка мвд тревожная кнопка мвд .
Для эффективного продвижения по карьере необходимо наличие диплома университета. Заказать диплом о высшем образовании у проверенной организации: diplomers.com/kupit-diplom-v-omske-tseni/
мостбет авиатор мостбет авиатор .
Приобрести диплом ВУЗа!
Мы изготавливаем дипломы любой профессии по доступным ценам. Вы заказываете диплом в надежной и проверенной компании. : turservisnews.ru/kupit-diplom-kolledzha-ofitsialno-i-bezopasno
Диплом любого университета России!
Без присутствия диплома очень нелегко было продвинуться вверх по карьерной лестнице. Именно поэтому решение о покупке диплома следует считать выгодным и рациональным. Быстро и просто заказать диплом любого университета mykinotime.ru/gde-kupit-diplom-bez-predoplatyi
Приобрести диплом о высшем образовании!
Наша компания предлагаетбыстро купить диплом, который выполнен на оригинальном бланке и заверен печатями, водяными знаками, подписями должностных лиц. Диплом способен пройти лубую проверку, даже при помощи специального оборудования. Достигайте цели быстро и просто с нашей компанией- geomaqhen.cl/2025/04/13/kupit-diplom-prostoe-reshenie-dlja-slozhnyh-zadach-134
Мы предлагаем максимально быстро заказать диплом, который выполняется на оригинальном бланке и заверен мокрыми печатями, штампами, подписями должностных лиц. Документ способен пройти любые проверки, даже при использовании профессиональных приборов. arzookanak0088.copiny.com/question/details/id/1087341
mostbet kg скачать на андроид mostbet7002.ru .
Купить диплом ВУЗа!
Мы можем предложить документы институтов, которые находятся на территории всей РФ.
diplomg-cheboksary.ru/kak-kupit-diplom-zanesennij-v-reestr-legalno/
разработка сайтов на битрикс https://razrabotka-saita-bx.ru/ .
Добрый день спасибо за ваш выбор нашего маркетплейса ссылка на сайт —>> ссылка кракен даркнет маркет
мостбет зеркало https://mostbet7002.ru/ .
I’m not that much of a internet reader to be honest but your sites really nice, keep it up! I’ll go ahead and bookmark your site to come back later. Many thanks
1win aplicația https://1win5027.ru/ .
осаго мотоцикл калькулятор https://seodict.ru .
dragon money рабочее зеркало dragon money рабочее зеркало .
drgn 1 casino drgn 1 casino .
мостюет мостюет .
Приобрести диплом о высшем образовании. Покупка документа о высшем образовании через проверенную и надежную фирму дарит много достоинств. Данное решение помогает сэкономить как дорогое время, так и существенные финансовые средства. tmiglobal.co.uk/employer/eonline-diploma
Доброго времени суток!
Для многих людей, заказать диплом ВУЗа – это острая необходимость, уникальный шанс получить достойную работу. Но для кого-то – это желание не терять огромное количество времени на учебу в ВУЗе. С какой бы целью вам это не понадобилось, наша компания готова помочь. Быстро, качественно и выгодно изготовим диплом любого года выпуска на государственных бланках с реальными подписями и печатями.
Основная причина, почему многие прибегают к покупке документа, – желание занять хорошую работу. К примеру, знания дают возможность специалисту устроиться на привлекательную работу, но подтверждения квалификации не имеется. В случае если работодателю важно присутствие “корочек”, риск потерять хорошее место достаточно высокий.
Заказать документ о получении высшего образования вы можете в нашей компании в Москве. Мы предлагаем документы об окончании любых ВУЗов РФ. Вы получите необходимый диплом по любым специальностям, включая документы СССР. Гарантируем, что в случае проверки документов работодателем, каких-либо подозрений не появится.
Ситуаций, которые вынуждают заказать диплом ВУЗа немало. Кому-то очень срочно необходима работа, таким образом нужно произвести впечатление на начальника на протяжении собеседования. Другие хотят устроиться в престижную компанию, для того, чтобы повысить собственный статус и в будущем начать собственное дело. Чтобы не тратить время, а сразу начинать успешную карьеру, применяя врожденные способности и приобретенные навыки, можно заказать диплом через интернет. Вы сможете быть полезным для социума, получите денежную стабильность быстро и просто- купить диплом о высшем образовании
тревожная кнопка росгвардия москва тревожная кнопка росгвардия москва .
1win молдова http://www.1win5027.ru .
1win online 1win7017.ru .
wan win wan win .
заказать разработку сайта на битрикс razrabotka-saita-bx.ru .
1 win nigeria https://www.1win18.com.ng .
dragon money зеркало сегодня https://www.dragon-money37.com .
кэшбэк dragon money dragon-money36.com .
посчитать стоимость осаго на автомобиль онлайн https://seodict.ru .
теплые склады для хранения вещей москва теплые склады для хранения вещей москва .
Hi, i believe that i noticed you visited my website so i got here to “go back the want”.I am trying to find issues to enhance my web site!I suppose its ok to make use of some of your ideas!!
ваучер 1win ваучер 1win .
мелбет https://www.melbet1001.ru .
Заказать диплом любого ВУЗа можем помочь. Купить диплом Кемерово – diplomybox.com/kupit-diplom-kemerovo
1win.pro 1win5026.ru .
Надежная доставка цветов без выходных и перерывов
цветы в москве с доставкой https://cvety-s-dostavkoi.ru/ .
Приобрести диплом университета по доступной цене вы можете, обратившись к проверенной специализированной фирме. Мы готовы предложить документы университетов, которые находятся на территории всей РФ. melhiqjobs.com/employer/eonline-diploma
Заказать диплом под заказ в столице можно через официальный портал компании. galantclub.od.ua/member.phpu=27724
Мы изготавливаем дипломы любой профессии по невысоким ценам. Купить диплом Магадан — kyc-diplom.com/geography/magadan1.html
motsbet motsbet .
Заказать диплом о высшем образовании. Покупка документа о высшем образовании через проверенную и надежную компанию дарит ряд плюсов. Данное решение позволяет сберечь как продолжительное время, так и существенные деньги. freekashmir.mn.co/posts/82618994
мелбет кыргызстан https://melbet1001.ru/ .
Приобретение документа о высшем образовании через надежную фирму дарит ряд плюсов для покупателя. Такое решение дает возможность сэкономить как личное время, так и существенные финансовые средства. Тем не менее, только на этом выгода не ограничивается, преимуществ гораздо больше.Мы готовы предложить дипломы любых профессий. Дипломы изготавливаются на подлинных бланках. Доступная цена по сравнению с серьезными затратами на обучение и проживание. Покупка диплома ВУЗа будет мудрым шагом.
Быстро заказать диплом: diplomg-kurerom.ru/kupit-diplom-ob-obrazovanii-s-reestrom-4/
melbet kg https://www.melbet1001.ru .
1win партнерка вход 1win7017.ru .
cazinouri online moldova https://1win5027.ru .
мостбет кг https://mostbet7003.ru .
An impressive share, I just given this onto a colleague who was doing a little analysis on this. And he in fact bought me breakfast because I found it for him.. smile. So let me reword that: Thnx for the treat! But yeah Thnkx for spending the time to discuss this, I feel strongly about it and love reading more on this topic. If possible, as you become expertise, would you mind updating your blog with more details? It is highly helpful for me. Big thumb up for this blog post!
Где купить диплом специалиста?
Готовый диплом с необходимыми печатями и подписями 100% отвечает запросам и стандартам Министерства образования и науки, никто не сумеет отличить его от оригинала. Не стоит откладывать собственные мечты и цели на потом, реализуйте их с нашей компанией – отправляйте быструю заявку на изготовление документа уже сегодня! Получить диплом о среднем образовании – не проблема! hitechservicesites.copiny.com/question/details/id/1077563
мотбет mostbet5006.ru .
Hi, Neat post. There is a problem with your site in web explorer, would test this?K IE still is the market leader and a large section of folks will miss your great writing because of this problem.
мелбет кыргызстан https://melbet1002.ru/ .
Great – I should certainly pronounce, impressed with your site. I had no trouble navigating through all the tabs as well as related information ended up being truly easy to do to access. I recently found what I hoped for before you know it in the least. Reasonably unusual. Is likely to appreciate it for those who add forums or something, web site theme . a tones way for your customer to communicate. Excellent task.
мостбет промокод mostbet5006.ru .
melbet http://melbet1002.ru/ .
мос бет мос бет .
register with 1win website https://1win18.com.ng/ .
Заказать диплом под заказ вы имеете возможность через сайт компании. newsofmebel.ru/podlinnyie-diplomyi-na-zakaz
аренда склада для хранения личных вещей аренда склада для хранения личных вещей .
Мы изготавливаем дипломы психологов, юристов, экономистов и других профессий по разумным ценам. Всегда стараемся поддерживать для покупателей адекватную политику цен. Важно, чтобы документы были доступными для большого количества граждан.
Приобретение диплома, подтверждающего окончание ВУЗа, – это выгодное решение. Купить диплом о высшем образовании: 10000diplomov.ru/diplom-kupit-texnikum-2/
1 win казино http://mostbet5007.ru .
Приобрести документ о получении высшего образования вы можете у нас в столице. Мы оказываем услуги по продаже документов об окончании любых университетов РФ. Вы сможете получить необходимый диплом по любой специальности, любого года выпуска, в том числе документы Советского Союза. Даем 100% гарантию, что при проверке документа работодателями, подозрений не возникнет. diplom-onlinex.com/gde-kupit-diplom-s-reestrom-3/
1win играть https://1win7006.ru/ .
I needed to draft you that bit of observation to be able to give thanks yet again for these pretty thoughts you’ve shown here. It was strangely open-handed of you to deliver publicly all that a few people could possibly have sold as an e book in making some dough for their own end, specifically seeing that you could possibly have done it in the event you decided. Those creative ideas in addition served to become great way to understand that other people have the identical interest just like my own to grasp a lot more with reference to this issue. I think there are millions of more pleasant instances in the future for those who scan your site.
1 вин скачать http://mostbet5007.ru .
Заказать диплом любого института!
Заказать диплом университета по выгодной цене вы можете, обратившись к проверенной специализированной компании. Приобрести диплом: diplomt-v-samare.ru/diplom-s-reestrom-kupit-podlinnij-dokument-2
1вин партнерка http://www.1win7017.ru .
Купить диплом университета по выгодной цене вы можете, обратившись к надежной специализированной фирме. Мы предлагаем документы об окончании любых университетов России. Заказать диплом любого университета– diplomservis.com/kupit-diplom-s-zaneseniem-v-reestr-bistro-i-nadezhno-70/
mostbet игры http://mostbet7003.ru/ .
I genuinely enjoy studying on this web site, it has got superb content.
Где заказать диплом по нужной специальности?
Мы изготавливаем дипломы любой профессии по приятным тарифам. Важно, чтобы документы были доступны для большого количества граждан. Заказать диплом любого университета poluchidiplom.com/kupit-diplom-instituta-s-reestrom-10/
ван вин https://1win7006.ru/ .
Мы изготавливаем дипломы психологов, юристов, экономистов и других профессий по приятным ценам.
Вы приобретаете диплом в надежной и проверенной временем компании. Купить диплом о высшем образовании– http://hellotointernet.com/read-blog/500_vozmozhno-li-tolkovo-priobresti-dlya-sebya-dokumenty-ob-okonchanii-obucheniya-se.html/ – hellotointernet.com/read-blog/500_vozmozhno-li-tolkovo-priobresti-dlya-sebya-dokumenty-ob-okonchanii-obucheniya-se.html
1vin 1win7006.ru .
Детали с авторазборки — экономия без потери качества
авторазборки avtorazborka1-minsk.ru .
Хочу поделиться своим опытом по заказу аттестата ПТУ. Думал, что это невозможно, и начал искать информацию в интернете по теме: реавиз медицинский университет купить его диплом, речной диплом купить, где купить диплом с занесением, где купить диплом сколько стоит, где можно купить диплом воспитателя. Постепенно углубляясь в тему, нашел отличный ресурс здесь: proffdiplomik.com/kupit-diplom-inzhenera
Мы изготавливаем дипломы любой профессии по выгодным тарифам. Всегда стараемся поддерживать для покупателей адекватную политику тарифов. Важно, чтобы дипломы были доступны для подавляющей массы граждан.
Покупка документа, подтверждающего обучение в ВУЗе, – это грамотное решение. Купить диплом о высшем образовании: 1magistr.ru/diplom-uchilisha-kupit-2/
1win.kg 1win.kg .
Great post. I was checking continuously this blog and I’m impressed! Very helpful information specially the last part 🙂 I care for such information a lot. I was looking for this certain information for a long time. Thank you and best of luck.
Мы изготавливаем дипломы психологов, юристов, экономистов и других профессий по приятным ценам. Дипломы производятся на подлинных бланках Заказать диплом любого ВУЗа diplomk-vo-vladivostoke.ru
mel bet сайт melbet1002.ru .
1win кейсы http://1win7007.ru/ .
dragon money demo dragon-money37.com .
Выгодно заказать диплом о высшем образовании. Заказ подходящего диплома через надежную фирму дарит немало преимуществ. Данное решение помогает сберечь как продолжительное время, так и значительные денежные средства. golf.od.ua/forum/viewtopic.php?p=82655#82655
Приобрести диплом университета по доступной цене можно, обратившись к надежной специализированной компании. Купить документ о получении высшего образования вы сможете у нас. diploml-174.ru/diplom-s-zaneseniem-v-reestr-tsena-8
калькулятор осаго по модели авто seodict.ru .
Доступные бу запчасти с возможностью самовывоза или курьерской доставки
запчасти бу https://www.zapchasti-bu1-minsk.ru/ .
melbet kg скачать http://melbet1001.ru/ .
мелбет кг http://www.melbet1002.ru .
Для эффективного продвижения по карьерной лестнице требуется наличие диплома о высшем образовании. Приобрести диплом о высшем образовании у сильной компании: diplomers.com/kupit-diplom-po-dostupnim-tsenam-v-omske/
dragon money зеркало сегодня http://www.dragon-money42.com .
Где приобрести диплом специалиста?
Приобрести диплом института по выгодной цене возможно, обращаясь к проверенной специализированной фирме.: diplom45.ru
lhfujy http://www.dragon-money40.com/ .
1вин официальный сайт 1вин официальный сайт .
dragon money рабочее зеркало dragon money рабочее зеркало .
mostbet промокод http://www.1win5028.ru .
Мы изготавливаем дипломы психологов, юристов, экономистов и любых других профессий по приятным тарифам. Мы готовы предложить документы ВУЗов, расположенных на территории всей России. Дипломы и аттестаты выпускаются на “правильной” бумаге самого высокого качества. Это позволяет делать настоящие дипломы, которые невозможно отличить от оригинала. job.iwok.vn/employer/archive-diploma
mostbet промокод mostbet промокод .
1win rossvya 1win rossvya .
мостбет казино http://www.1win5028.ru .
1win md http://1win5027.ru/ .
drgn1n casino drgn1n casino .
казино dragon мани dragon-money42.com .
Купить диплом о высшем образовании. Заказ официального диплома через надежную компанию дарит ряд плюсов. Такое решение помогает сэкономить время и значительные денежные средства. volexauto.bestforums.org/viewtopic.php?f=8&t=3128
калькулятор страховки автомобиля калькулятор страховки автомобиля .
dragonmoney официальный сайт https://dragon-money40.com/ .
Купить диплом на заказ можно через сайт компании. crazybestie.com/read-blog/1574_vnesenie-diploma-v-reestr-cena.html
1 win вход 1 win вход .
Купить диплом ВУЗа!
Мы предлагаем документы учебных заведений, расположенных на территории всей РФ.
diplomservis.ru/uznajte-tsenu-diploma-s-zaneseniem-v-reestr/
Мы предлагаем дипломы психологов, юристов, экономистов и других профессий по приятным тарифам. Мы можем предложить документы ВУЗов, расположенных на территории всей России. Документы выпускаются на “правильной” бумаге высшего качества. Это дает возможность делать настоящие дипломы, которые невозможно отличить от оригинала. odessamama.net/forum.phpmod=viewthread&tid=358621&extra=
Заказать диплом о высшем образовании!
Наша компания предлагаетвыгодно и быстро купить диплом, который выполнен на бланке ГОЗНАКа и заверен печатями, штампами, подписями должностных лиц. Диплом способен пройти любые проверки, даже при помощи профессиональных приборов. Решите свои задачи быстро и просто с нашим сервисом- keyfirst.co.uk/employer/gosznac-diplom-24
Мы предлагаем быстро и выгодно приобрести диплом, который выполняется на оригинальном бланке и заверен мокрыми печатями, водяными знаками, подписями. Документ способен пройти лубую проверку, даже при помощи профессионального оборудования. windows1.listbb.ru/viewtopic.php?f=3&t=1370
Купить диплом об образовании!
Мы изготавливаем дипломы любой профессии по приятным тарифам— diplomist.com/diplom-stomatologa-kupit-po-vigodnoj-tsene-sejchas/
Заказать диплом любого института!
Мы оказываем услуги по производству и продаже документов об окончании любых ВУЗов Российской Федерации. Документы производят на оригинальных бланках. 21fun.app/employer/radiplomy
Где заказать диплом по актуальной специальности?
Готовый диплом со всеми печатями и подписями отвечает условиям и стандартам Министерства образования и науки Российской Федерации, неотличим от оригинала. Не откладывайте свои цели на пять лет, реализуйте их с нашей компанией – отправьте заявку на изготовление документа сегодня! Диплом о среднем специальном образовании – быстро и легко! cart-gurus.com/employer/premialnie-diplom-24
Мы изготавливаем дипломы психологов, юристов, экономистов и других профессий по доступным ценам. Дипломы производят на подлинных бланках Приобрести диплом любого ВУЗа diplomt-v-samare.ru
Где купить диплом по нужной специальности?
Купить диплом университета по доступной цене вы сможете, обращаясь к проверенной специализированной фирме.: prodiplome.com
Приобрести диплом любого университета!
Мы предлагаем документы институтов, расположенных в любом регионе России. Дипломы и аттестаты делаются на бумаге высшего качества: yourrecruitmentspecialists.co.uk/employer/aurus-diploms
Приобрести диплом ВУЗа!
Приобрести диплом университета по доступной стоимости возможно, обращаясь к проверенной специализированной фирме. Быстро заказать диплом: asxdiplommy.com/kupit-diplom-s-zaneseniem-v-reestr-instituta-9
Диплом ВУЗа России!
Без получения диплома очень сложно было продвигаться по карьерной лестнице. Именно по этой причине решение о заказе диплома следует считать мудрым и целесообразным. Приобрести диплом любого ВУЗа hirekaroo.com/companies/gosznac-diplom-24
советский диплом купить советский диплом купить .
Где заказать диплом специалиста?
Мы предлагаем дипломы психологов, юристов, экономистов и других профессий по невысоким тарифам. Важно, чтобы документы были доступны для подавляющей массы граждан. Выгодно приобрести диплом об образовании diplomus-spb.ru/vnesenie-diploma-v-reestr-tsena-i-garantii-podlinnosti/
Мы изготавливаем дипломы любой профессии по выгодным ценам.– diplomservis.ru/kupit-diplom-s-zaneseniem-bez-lishnix-xlopot/
Всегда считал, что покупка диплома о высшем образовании — это миф. Но, оказалось, что все возможно! Сначала искал информацию по теме: купить егэ аттестат, купить диплом курск, где купить аттестаты за 11 класс, купить аттестат 9 класс, аттестат за 11 класс купить, а затем перешел на дипломы вузов. Подробнее можно узнать здесь: kyc-diplom.com/geography/angarsk.html
Добрый день!
Мы предлагаем дипломы любой профессии по приятным тарифам. Цена будет зависеть от выбранной специальности, года получения и образовательного учреждения: diplomanrussians.com/
Всех приветствую!
Для многих людей, приобрести диплом о высшем образовании – это острая потребность, удачный шанс получить выгодную работу. Однако для кого-то – это желание не терять время на учебу в универе. С какой бы целью вам это не потребовалось, мы готовы помочь. Быстро, профессионально и недорого сделаем документ любого года выпуска на государственных бланках с реальными печатями.
Главная причина, почему люди покупают диплом, – желание занять хорошую работу. Например, знания дают возможность человеку устроиться на работу, однако документального подтверждения квалификации нет. При условии, что для работодателя важно присутствие “корочки”, риск потерять место работы довольно высокий.
Приобрести документ о получении высшего образования можно в нашей компании в Москве. Мы оказываем услуги по продаже документов об окончании любых ВУЗов РФ. Вы сможете получить диплом по любой специальности, включая документы образца СССР. Гарантируем, что при проверке документа работодателем, никаких подозрений не возникнет.
Ситуаций, которые вынуждают заказать диплом ВУЗа немало. Кому-то прямо сейчас необходима работа, в результате необходимо произвести хорошее впечатление на начальство при собеседовании. Некоторые хотят попасть в престижную компанию, для того, чтобы повысить собственный статус в обществе и в будущем начать собственное дело. Чтобы не тратить впустую годы жизни, а сразу начинать удачную карьеру, используя врожденные таланты и приобретенные навыки, можно купить диплом через интернет. Вы станете полезным для социума, получите денежную стабильность максимально быстро и легко- аттестат купить за 9 класс
Приобретение диплома ВУЗа через проверенную и надежную фирму дарит ряд плюсов для покупателя. Данное решение позволяет сберечь как дорогое время, так и серьезные деньги. Впрочем, на этом выгоды не ограничиваются, преимуществ гораздо больше.Мы изготавливаем дипломы любой профессии. Дипломы изготавливаются на оригинальных бланках. Доступная цена по сравнению с большими тратами на обучение и проживание в другом городе. Приобретение диплома об образовании из российского ВУЗа является выгодным шагом.
Заказать диплом о высшем образовании: freediplom.com/pokupka-diplomov-s-reestrom-4/
Заказать диплом ВУЗа по выгодной цене вы сможете, обращаясь к надежной специализированной фирме. Мы предлагаем документы высших учебных заведений, которые находятся в любом регионе РФ. promintern.listbb.ru/viewtopic.phpf=16&t=1635
Купить документ о получении высшего образования можно в нашей компании в столице. Мы предлагаем документы об окончании любых университетов РФ. Вы получите необходимый диплом по любым специальностям, включая документы СССР. Даем гарантию, что при проверке документа работодателями, подозрений не появится. fastdiploms.com/kupit-diplom-texnikuma-s-zaneseniem-v-reestr-otzivi-7/
https://gaznaauto.com.ua/
Для успешного продвижения вверх по карьере нужно наличие официального диплома о высшем образовании. Купить диплом любого университета у сильной компании: kupitediplom0027.ru/kupit-diplom-v-omske-bistro-i-nadezhno/
драгон мани официальный http://dragon-money36.com .
Купить диплом ВУЗа по доступной цене вы сможете, обращаясь к проверенной специализированной компании. Мы оказываем услуги по изготовлению и продаже документов об окончании любых университетов Российской Федерации. Заказать диплом любого ВУЗа– diplomskiy.com/kupit-diplom-s-reestrom-po-razumnoj-tsene-2/
Sweet site, super style and design, rattling clean and employ genial.
1 win вход https://1win7019.ru .
мостбет скачать https://mostbet6033.ru .
Мы изготавливаем дипломы любой профессии по доступным ценам. Купить диплом в Архангельской области и городе Архангельск — kyc-diplom.com/geography/arkhangelsk.html
Получить диплом о высшем образовании поспособствуем. Купить диплом бакалавра в Набережных Челнах – diplomybox.com/kupit-diplom-bakalavra-v-naberezhnykh-chelnakh
Приобрести диплом вы можете через официальный сайт компании. rup14.by/forum/user/6926
Купить диплом ВУЗа!
Мы готовы предложить документы учебных заведений, которые расположены на территории всей РФ.
diplomus-spb.ru/kupite-diplom-visshego-obrazovaniya-s-zaneseniem-v-reestr-4/
Мы предлагаем дипломы любой профессии по приятным ценам. Мы готовы предложить документы ВУЗов, которые расположены в любом регионе РФ. Документы выпускаются на “правильной” бумаге высшего качества. Это дает возможности делать государственные дипломы, не отличимые от оригинала. ai.holiday/read-blog/17852_kupit-gosudarstvennyj-diplom-s-zaneseniem-v-reestr.html
Приобрести диплом университета по выгодной цене возможно, обращаясь к надежной специализированной компании. Заказать документ института можно в нашей компании в столице. diplomgorkiy.com/kupit-diplom-s-zaneseniem-v-reestr-32
Заказать диплом ВУЗа!
Наши специалисты предлагаютвыгодно заказать диплом, который выполняется на оригинальном бланке и заверен мокрыми печатями, водяными знаками, подписями. Документ пройдет любые проверки, даже с применением специального оборудования. Решите свои задачи быстро и просто с нашими дипломами- clipsas2018bcn.granorient.catp=14456
Купить диплом института по невысокой цене возможно, обращаясь к надежной специализированной компании. Купить документ ВУЗа можно у нас. personal-fouryou.de/employer/originals-diplomsi
мостбет войти мостбет войти .
Мы изготавливаем дипломы психологов, юристов, экономистов и других профессий по выгодным тарифам. Стараемся поддерживать для покупателей адекватную ценовую политику. Для нас важно, чтобы дипломы были доступными для подавляющей массы граждан.
Приобретение диплома, подтверждающего окончание ВУЗа, – это выгодное решение. Купить диплом любого ВУЗа: diplom-bez-problem.com/kupit-diplom-o-meditsinskom-obrazovanii-2/
мостбет казино http://www.mostbet6033.ru .
1вин кг 1win7006.ru .
можно ли купить аттестат можно ли купить аттестат .
I couldn’t resist commenting
1вин онлайн https://1win7019.ru .
Fantastic items from you, man. I’ve keep in mind your stuff prior to and you are just extremely fantastic. I really like what you’ve obtained right here, certainly like what you’re saying and the way in which you say it. You make it entertaining and you continue to take care of to stay it sensible. I can’t wait to learn much more from you. This is really a great web site.
мос бет мос бет .
1вин кг http://1win7018.ru .
I?¦ve learn several good stuff here. Certainly price bookmarking for revisiting. I surprise how a lot attempt you set to create the sort of fantastic informative web site.
1 win mexico https://1win1007.top/ .
1win http://www.1win1004.top .
Мы предлагаем дипломы любых профессий по невысоким ценам. Дипломы производят на подлинных бланках государственного образца Выгодно купить диплом ВУЗа poluchidiplom.com
Где купить диплом специалиста?
Заказать диплом ВУЗа по доступной цене можно, обратившись к надежной специализированной компании.: zakaz-na-diplom.ru
1win mexico http://1win1007.top/ .
Платформа Kraken предоставляет modern методы для anonymous онлайн-операций. Каждый пользователь может рассчитывать на высокий уровень защиты своих information. В Kraken обеспечены все conditions для выполнения сделок, при этом ваша activity остается полностью скрытой, и ваши личные данные остаются невидимыми для других.
вход кракен ат
1win casino uganda 1win casino uganda .
1win сайт вход 1win сайт вход .
казино онлайн kg http://www.mostbet6033.ru .
1win.pro http://1win5029.ru/ .
Приобрести диплом любого ВУЗа!
Мы оказываем услуги по продаже документов об окончании любых университетов РФ. Документы производятся на фирменных бланках государственного образца. theglobalservices.in/employer/radiplomy
Где купить диплом по необходимой специальности?
Готовый диплом со всеми печатями и подписями отвечает стандартам, неотличим от оригинала – даже со специально предназначенным оборудованием. Не откладывайте собственные мечты и цели на долгие годы, реализуйте их с нашей помощью – отправьте быструю заявку на диплом сегодня! Диплом о высшем образовании – запросто! avtovladelez.ru/realnyie-diplomyi-s-ofitsialnyimi-nomerami-i-podpisyami
1win ставки официальный сайт http://www.1win7007.ru .
Быстро и просто приобрести диплом о высшем образовании!
Приобрести диплом института по доступной цене можно, обращаясь к надежной специализированной фирме. Быстро заказать диплом: diplomt-v-samare.ru/kupit-diplom-s-reestrom-ofitsialno-i-nadezhno
Купить диплом ВУЗа!
Мы готовы предложить документы учебных заведений, расположенных на территории всей РФ. Документы делаются на бумаге высшего качества: hitman.zbord.ru/viewtopic.phpf=3&t=2713
Мы изготавливаем дипломы психологов, юристов, экономистов и любых других профессий по приятным тарифам.– diplomv-v-ruki.ru/kupit-diplom-texnikuma-s-zaneseniem-v-reestr-otzivi-5/
1win футбол http://www.1win7019.ru .
оценка профессиональных рисков в Москве оценка профессиональных рисков в Москве .
перепланировка и согласование перепланировка и согласование .
Приобрести диплом академии !
Приобретение диплома ВУЗа России у нас является надежным делом, так как документ будет заноситься в государственный реестр. Заказать диплом о высшем образовании diplomt-v-chelyabinske.ru/poluchite-diplom-s-zaneseniem-v-reestr-bistro-i-legko-3
Задался вопросом: можно ли на самом деле купить диплом государственного образца в Москве? Был приятно удивлен — это реально и легально!
Сначала искал информацию в интернете на тему: купить диплом мед образования, купить диплом хирурга, сколько стоит купить диплом о среднем образовании, аттестат купить выходить, купить аттестат в керчи и получил базовые знания. В итоге остановился на материале: diplomybox.com/kupit-diplom-tekhnikuma-kolledzha-v-krasnoyarske
Мы можем предложить дипломы любых профессий по приятным ценам.
Вы покупаете документ через надежную и проверенную фирму. Купить диплом института– http://fat-girls.ru/diplom-s-vneseniem-v-reestr-proverka-ne-strashna/ – fat-girls.ru/diplom-s-vneseniem-v-reestr-proverka-ne-strashna
1с какие есть программы http://programmy-1s15.ru .
Всех приветствую!
Для некоторых людей, приобрести диплом о высшем образовании – это острая необходимость, возможность получить достойную работу. Впрочем для кого-то – это желание не терять время на учебу в ВУЗе. Что бы ни толкнуло вас на это решение, наша компания готова помочь вам. Быстро, профессионально и недорого сделаем документ любого года выпуска на настоящих бланках со всеми требуемыми подписями и печатями.
Основная причина, почему люди покупают документ, – получить определенную должность. Например, знания позволяют кандидату устроиться на привлекательную работу, но подтверждения квалификации нет. Если для работодателя важно наличие “корочки”, риск потерять место работы очень высокий.
Приобрести документ ВУЗа можно у нас в столице. Мы предлагаем документы об окончании любых университетов Российской Федерации. Вы получите диплом по любой специальности, любого года выпуска, включая документы Советского Союза. Гарантируем, что при проверке документа работодателем, подозрений не появится.
Обстоятельств, которые вынуждают приобрести диплом о среднем образовании немало. Кому-то срочно необходима работа, таким образом нужно произвести впечатление на начальство при собеседовании. Некоторые задумали попасть в престижную компанию, для того, чтобы повысить свой статус и в дальнейшем начать свой бизнес. Чтобы не тратить время, а сразу начать эффективную карьеру, используя имеющиеся знания, можно приобрести диплом через интернет. Вы станете полезным для общества, обретете финансовую стабильность в максимально короткие сроки- диплом купить о среднем образовании
Приобрести диплом института по доступной стоимости можно, обращаясь к проверенной специализированной компании. Мы предлагаем документы высших учебных заведений, которые находятся в любом регионе России. naukrinfo.pk/companies/eonline-diploma
Где приобрести диплом специалиста?
Мы изготавливаем дипломы психологов, юристов, экономистов и других профессий по доступным ценам. Для нас важно, чтобы дипломы были доступными для большого количества наших граждан. Заказать диплом института diplomk-v-krasnodare.ru/vot-neskolko-variantov-zagolovkov-sootvetstvuyushix-vashim-trebovaniyam-vnesite-diplom-v-reestr-instruktsiya-i-pomosh-reestr-diplomov-proverka-i-vnesenie-dannix-kak-ofitsialno-do/
Здравствуйте!
Мы изготавливаем дипломы психологов, юристов, экономистов и других профессий по выгодным ценам. Стоимость будет зависеть от выбранной специальности, года получения и ВУЗа: rdiplomm24.com/
Приобрести документ института можно в нашем сервисе. Мы предлагаем документы об окончании любых ВУЗов Российской Федерации. Вы получите диплом по любой специальности, любого года выпуска, в том числе документы Советского Союза. Гарантируем, что при проверке документа работодателем, подозрений не возникнет. diplomidlarf.ru/priobretajte-diplom-s-zaneseniem-v-reestr-vigodno/
1vin казино https://1win7018.ru .
арендовать ячейку для хранения вещей в москве hranim-veshi-msk24.ru .
1win metode de plată http://1win5029.ru/ .
Для быстрого продвижения вверх по карьере требуется наличие диплома о высшем образовании. Заказать диплом о высшем образовании у надежной компании: diploml-174.ru/kupit-diplom-o-visshem-obrazovanii-sssr/
оценка уровня профессионального риска (Москва) оценка уровня профессионального риска (Москва) .
услуги по узакониванию перепланировки http://www.soglasovanie-pereplanirovki-kvartiry15.ru/ .
Kraken официальный сайт
Ищете надежную платформу для торгов и инвестиций в криптовалюту? Познакомьтесь с Kraken! Это один из самых известных и безопасных криптобирж в мире.
Почему стоит выбрать Kraken?
– Безопасность: Ваши средства защищены передовыми технологиями.
– Широкий выбор: Более 50 криптовалют для торговли, включая биткойн и эфир.
– Удобный интерфейс: Простая навигация и интуитивно понятные инструменты для анализа.
– Низкие комиссии: Конкурентные ставки на торговлю для максимизации ваших доходов.
– Поддержка: Круглосуточная помощь от профессионалов.
Зарегистрируйтесь на официальном сайте Kraken сегодня и получите доступ к премиальной платформе для торговли!
Присоединяйтесь к миллионам пользователей и начните свою крипто-приключение прямо сейчас!<a
кракен магазин
мостбет скачать казино https://www.mostbet5008.ru .
1с бухгалтерия сопровождение программного https://programmy-1s15.ru .
portofele electronice casino 1win5029.ru .
win1 casino http://www.1win1007.top .
1win https://1win1004.top .
1win casino online https://1win1007.top/ .
1win https://1win1004.top .
I am really enjoying the theme/design of your website. Do you ever run into any web browser compatibility issues? A handful of my blog readers have complained about my site not operating correctly in Explorer but looks great in Opera. Do you have any solutions to help fix this issue?
Приобрести диплом ВУЗа по доступной цене возможно, обратившись к проверенной специализированной компании. Мы предлагаем документы об окончании любых университетов Российской Федерации. Купить диплом университета– diplom-kaluga.ru/poluchite-diplom-visshego-obrazovaniya-s-zaneseniem-v-reestr-4/
драган мани https://dragon-money42.com/ .
драгон https://dragon-money40.com .
mostbet.kg http://www.mostbet5008.ru .
снять место для хранения вещей http://hranim-veshi-msk24.ru/ .
1wi https://1win7018.ru .
mostbet kg скачать https://mostbet5008.ru .
мелбет кыргызстан мелбет кыргызстан .
Spot on with this write-up, I really assume this web site needs much more consideration. I’ll probably be again to learn far more, thanks for that info.
драгон мани войти драгон мани войти .
казино dragon money казино dragon money .
1win. http://www.1win7007.ru .
мелбет кж http://www.melbet1003.ru .
Доставка контрактного двигателя в кратчайшие сроки по всей РФ
контрактные двигателя http://kontraktnye-dvigateli1-minsk.ru/ .
melbet kg http://melbet1003.ru .
мостбет https://www.mostbet6033.ru .
I don’t normally comment but I gotta admit thankyou for the post on this amazing one : D.
1win http://1win5029.ru/ .
I like this post, enjoyed this one appreciate it for posting. “The universe is not hostile, nor yet is it unfriendly. It is simply indifferent.” by John Andrew Holmes.
mostbest mostbet5010.ru .
mostbet apk скачать https://www.mostbet5010.ru .
Amazing blog! Do you have any hints for aspiring writers? I’m hoping to start my own blog soon but I’m a little lost on everything. Would you advise starting with a free platform like WordPress or go for a paid option? There are so many choices out there that I’m totally confused .. Any suggestions? Many thanks!
1vin 1win7009.ru .
мостбет официальный сайт https://mostbet5008.ru/ .
1win зайти 1win7020.ru .
мостбет войти mostbet7004.ru .
1с бухгалтерия сопровождение программного programmy-1s15.ru .
проведение оценки профессиональных рисков в Москве ocenka-profriskov495.ru .
1win официальный сайт войти 1win7020.ru .
mostbet kg http://www.mostbet7004.ru .
Добрый день спасибо за ваш выбор нашего маркетплейса ссылка на сайт —>> kraken зеркало
1win онлайн 1win онлайн .
порядок согласования перепланировки квартиры порядок согласования перепланировки квартиры .
мостбет https://mostbet5009.ru/ .
1 вин официальный сайт вход http://www.1win7008.ru .
mosbet https://mostbet5009.ru/ .
1win code bonus https://1win1005.top .
мостбет официальный сайт мостбет официальный сайт .
I carry on listening to the news update lecture about getting free online grant applications so I have been looking around for the best site to get one. Could you advise me please, where could i acquire some?
Купить диплом ВУЗа по доступной стоимости возможно, обратившись к проверенной специализированной компании. Приобрести документ института можно у нас в столице. boatcareer.com/crewagencies/originals-diplomsi
Купить диплом университета по доступной стоимости возможно, обратившись к проверенной специализированной компании. Заказать документ университета можно в нашем сервисе. diplom-kaluga.ru/kupit-diplom-yurista-s-zaneseniem-v-reestr-5
Купить диплом о высшем образовании. Приобретение диплома ВУЗа через качественную и надежную фирму дарит много достоинств. Данное решение позволяет сберечь как дорогое время, так и серьезные денежные средства. vseamoskva.flybb.ru/viewtopic.php?f=2&t=1155
Заказать диплом на заказ в столице можно через сайт компании. mykinotime.ru/diplom-po-nuzhnoy-spetsialnosti
1с какие есть программы http://www.programmy-1s15.ru .
win1 casino https://www.1win1008.top .
оценка профессиональных рисков в Москве оценка профессиональных рисков в Москве .
Заказать диплом любого университета!
Мы можем предложить документы институтов, расположенных в любом регионе РФ.
diplom-onlinex.com/diplom-s-zaneseniem-v-reestr-po-vigodnoj-tsene-2/
Мы готовы предложить дипломы любых профессий по приятным тарифам. Мы готовы предложить документы ВУЗов, которые расположены в любом регионе России. Дипломы и аттестаты печатаются на “правильной” бумаге самого высшего качества. Это дает возможность делать настоящие дипломы, не отличимые от оригинала. burgasdent.listbb.ru/viewtopic.phpf=3&t=1214
melbet кыргызстан http://melbet1003.ru .
Заказать диплом о высшем образовании!
Мы предлагаеммаксимально быстро заказать диплом, который выполнен на оригинальной бумаге и заверен печатями, штампами, подписями. Данный документ способен пройти любые проверки, даже с использованием специального оборудования. Решайте свои задачи быстро и просто с нашими дипломами- social.oneworldonesai.com/read-blog/19248_kupit-diplom-vnesennyj-v-reestr.html
Купить диплом ВУЗа мы поможем. Купить диплом специалиста в Иркутске – diplomybox.com/kupit-diplom-spetsialista-v-irkutske
перепланировка офиса перепланировка офиса .
Магазин аккаунтов социальных сетей https://marketplace-akkauntov-top.ru
1вин сайт официальный 1вин сайт официальный .
Быстровозводимые каркасные дома с гарантией и техническим надзором
каркасный дом https://www.karkasnye-doma-pod-kluch-spb.ru/ .
1 win.com http://1win7008.ru .
игра 1вин http://www.1win7020.ru .
мастбет https://mostbet7004.ru .
1win официальный сайт скачать https://1win7020.ru/ .
1 win casino 1 win casino .
Мы готовы предложить дипломы любой профессии по невысоким ценам. Стараемся поддерживать для клиентов адекватную ценовую политику. Для нас важно, чтобы документы были доступными для большого количества наших граждан.
Приобретение диплома, подтверждающего обучение в университете, – это грамотное решение. Заказать диплом любого ВУЗа: diplom-insti.ru/kupit-diplom-vuza-v-spb/
мостбет мобильная версия скачать http://www.mostbet7004.ru .
мостбет кг мостбет кг .
скачать 1win официальный сайт https://1win7009.ru/ .
Купить диплом ВУЗа по доступной цене можно, обратившись к проверенной специализированной фирме. Заказать документ о получении высшего образования вы имеете возможность в нашей компании. skazka.g-talk.ru/viewtopic.phpf=1&t=4528
Заказать диплом любого университета. Покупка документа о высшем образовании через надежную фирму дарит ряд достоинств. Данное решение позволяет сберечь как личное время, так и серьезные финансовые средства. behealthy.maxbb.ru/posting.php?mode=post&f=8
купить подлинный диплом купить подлинный диплом .
Купить диплом университета по доступной цене возможно, обращаясь к надежной специализированной компании. Купить документ университета вы имеете возможность в нашей компании в столице. diplom-top.ru/kupit-diplom-s-reestrom-bistro-i-bez-problem-5
I couldn’t resist commenting
Купить диплом о высшем образовании!
Мы можем предложить документы университетов, которые находятся в любом регионе Российской Федерации.
diplomist.com/kupit-diplom-s-reestrom-v-rossii-bistro-i-nadezhno/
1win uganda http://www.1win1005.top .
сухие силовые трансформаторы купить сухие силовые трансформаторы купить .
pinup az?rbaycan pinup az?rbaycan .
Добрый день спасибо за ваш выбор нашего маркетплейса ссылка на сайт —>> пейот кактус купить цена
Мы предлагаем дипломы любых профессий по доступным ценам. Мы предлагаем документы техникумов, расположенных в любом регионе Российской Федерации. Документы выпускаются на бумаге высшего качества. Это дает возможности делать государственные дипломы, не отличимые от оригинала. nnars.ru/forum/suggestion-box/1652-надежное-оформление-диплома#75038
Купить диплом любого университета!
Наша компания предлагаетмаксимально быстро заказать диплом, который выполняется на оригинальном бланке и заверен мокрыми печатями, штампами, подписями должностных лиц. Наш документ способен пройти любые проверки, даже при помощи специального оборудования. Достигайте цели быстро с нашими дипломами- avto.rx22.ru/viewtopic.phpf=2&t=1312
Утеплённый каркасный дом для комфортной жизни круглый год
каркасные дома спб http://karkasnye-doma-pod-kluch-spb1.ru/ .
mostbest https://mostbet5009.ru .
win1 casino https://www.1win1008.top .
pin up azerbaycan pin up azerbaycan .
трансформатор сухой 1000 ква цена http://www.suhie-transformatory-kupit.ru .
Диплом университета РФ!
Без наличия диплома достаточно сложно было продвигаться по карьерной лестнице. Именно из-за этого решение о покупке диплома следует считать рациональным. Купить диплом об образовании collabtherapy.com/forum/posting.php?mode=post&f=2
Купить диплом университета!
Мы предлагаем дипломы любой профессии по невысоким тарифам. Вы покупаете документ через надежную фирму. : zador.flybb.ru/viewtopic.php?f=1&t=3993&sid=20423f345fe8c5c60da0f2439a138c7c
1win casino mexico https://www.1win1008.top .
Приобретение документа о высшем образовании через качественную и надежную фирму дарит много преимуществ. Это решение дает возможность сберечь как личное время, так и существенные финансовые средства. Однако, только на этом выгоды не ограничиваются, плюсов гораздо больше.Мы изготавливаем дипломы любой профессии. Дипломы производят на оригинальных бланках. Доступная цена сравнительно с серьезными тратами на обучение и проживание. Приобретение диплома о высшем образовании из российского университета станет мудрым шагом.
Приобрести диплом: diplom4you.com/kupit-diplom-s-reestrom-v-rossii-bistro-i-bezopasno-2/
1win login ug https://1win1005.top .
Мы изготавливаем дипломы любой профессии по приятным ценам. Стараемся поддерживать для заказчиков адекватную политику цен. Важно, чтобы дипломы были доступными для большого количества граждан.
Покупка диплома, подтверждающего обучение в ВУЗе, – это выгодное решение. Приобрести диплом о высшем образовании: diplommy.ru/kupit-v-spb-diplom-2/
tank 700 2024 салон https://tankautospb.ru/models/tank-700/ .
DUI regulations to Ohio may be complicated, still it’s important to come with a good understanding of people if shoppers are facing expenses. Operating under ones influence of alcohol (DUI) is a grave offense which is can own substantial ramifications on your own life. In Ohio, really legal limit for body ethanol content (BAC) is eight percentfor more and more drivers furthermore four pct commercial people.
If you can be stopped by law social control and accused of DUI, they could achieve roadside sobriety assessments or substance testing, such that breathalyzer or bloodstream reports, to figure out personal level of impairment. Refusing these tests can result in robotic penalties, including driving license suspension.
drunk driving charge criminal acts in Ohio include different consequences, according on factors want last convictions, BAC amount, as well as whether or not recently there was an mishap or injury engaging. Problems may contain fees, license pause, essential alcoholic process products, test period, and equal jail time. Reiterate criminal acts and angry conditions can result in more dreadful consequences.
Owning a experienced DUI immunity attorney is essential to handle the difficulties of Ohio DUI statutes. They do examine the verification, struggle the legality of the break, concern the exactness of investigations, and examine possible protections to help alleviate the allegations. Moreover, an lawyer can lead you from the judiciary process, guaranteeing some permissions are guarded and pushing for the greatest potential result.
Remember, being assured concerning Ohio’s DUI statutes and in search of the help of an qualified legal are significant steps in nicely management a DUI price to covering on your prospect. computer crimes defense lawyer
1win официальный http://www.1win7008.ru .
купить аттестат ссср в нижнем новгороде купить аттестат ссср в нижнем новгороде .
1win méxico http://www.1win1009.top .
mostbet.kg mostbet5010.ru .
Some really superb posts on this web site, thanks for contribution. “When he has ceased to hear the many, he may discern the One – the inner sound which kills the outer.” by H Hahn Blavatsky.
мостбет вход http://www.mostbet3021.ru .
motsbet https://www.mostbet7005.ru .
1 вин войти http://www.1win7009.ru .
1win mexico http://1win1009.top .
мост бет mostbet3021.ru .
казино онлайн kg https://mostbet7005.ru/ .
аренда ячейки для хранения вещей http://www.hranim-veshi-msk24.ru .
1win bet uganda https://1win1006.top .
1win вход 1win7010.ru .
раскрутка сайтов раскрутка сайтов .
pin up onlayn kazino https://www.pinup-azerbaycan6.com .
1win casino mexico 1win casino mexico .
Добрый день спасибо за ваш выбор нашего маркетплейса ссылка на сайт —>> купить гашиш анонимно
1vin pro 1win7010.ru .
olympe casino cresus: olympe casino cresus – olympe
Приобрести диплом ВУЗа по доступной стоимости вы можете, обратившись к надежной специализированной компании. Заказать документ института можно у нас. kueda-rmc.ru/vmk/dialog/viewtopic.phpf=2&t=53957
мост бет https://mostbet6033.ru .
1вин вход http://1win7010.ru/ .
раскрутка сайта в москве http://itechua.com/other/277983/ .
1win bet uganda http://www.1win1005.top .
pinap pinap .
pin up giris pin up giris .
1win uganda https://www.1win1006.top .
1вин официальный https://www.1win7026.ru .
motsbet http://mostbet7006.ru .
скачат мостбет https://mostbet6033.ru/ .
1win code bonus https://1win1006.top/ .
поддержка мостбет http://www.mostbet7006.ru .
мрстбет мрстбет .
Быстро и просто купить диплом о высшем образовании. Покупка официального диплома через надежную фирму дарит ряд достоинств для покупателя. Данное решение позволяет сэкономить время и существенные финансовые средства. hirerightskills.com/employer/eonline-diploma
Заказать диплом любого ВУЗа!
Мы предлагаем документы университетов, которые находятся в любом регионе России.
poluchidiplom.com/kupit-diplom-s-reestrom-v-moskve-bistro-i-nadezhno-4/
mostbet kg http://mostbet7005.ru/ .
мостюет http://mostbet3021.ru .
Мы предлагаем дипломы психологов, юристов, экономистов и любых других профессий по приятным ценам. Мы можем предложить документы техникумов, которые расположены на территории всей Российской Федерации. Дипломы и аттестаты делаются на “правильной” бумаге самого высшего качества. Это позволяет делать настоящие дипломы, которые невозможно отличить от оригинала. osbless.com.ng/read-blog/4497_gde-kupit-diplom-s-provodkoj.html
Заказать диплом ВУЗа по выгодной цене можно, обращаясь к проверенной специализированной компании. Приобрести документ о получении высшего образования вы имеете возможность в нашей компании. s24.team/club/user/155/forum/message/1190/1192
mostbet casino mostbet casino .
хранение домашних вещей на складе https://www.hranim-veshi-msk24.ru .
Добрый день спасибо за ваш выбор нашего маркетплейса ссылка на сайт —>> магазин энтеогенов и грибов
1 вин https://www.1win7026.ru .
There is noticeably a bundle to know about this. I assume you made certain nice points in features also.
Приобрести диплом университета!
Мы готовы предложить документы учебных заведений, которые находятся в любом регионе РФ.
asxdiploman.com/kupit-diplom-s-vneseniem-v-reestr-bistro-i-nadezhno-19/
1 vin официальный сайт http://1win7012.ru/ .
Выгодно приобрести диплом об образовании. Заказ документа о высшем образовании через проверенную и надежную фирму дарит ряд достоинств. Такое решение помогает сберечь время и значительные деньги. infiniteebusiness.com/employer/eonline-diploma
Мы изготавливаем дипломы любых профессий по приятным тарифам. Мы готовы предложить документы техникумов, расположенных на территории всей РФ. Дипломы и аттестаты выпускаются на “правильной” бумаге высшего качества. Это дает возможность делать настоящие дипломы, которые невозможно отличить от оригиналов. b98385gb.beget.tech/2025/04/06/pomozhem-poluchit-nuzhnyy-diplom.html
1вин сайт официальный https://1win7012.ru/ .
pinup az?rbaycan pinup az?rbaycan .
1 вин http://1win7012.ru .
трансформатор сухой 1000 ква цена http://www.suhie-transformatory-kupit.ru .
поддержка мостбет http://mostbet6033.ru .
1win méxico http://www.1win1009.top .
1вин официальный сайт мобильная http://1win7026.ru .
Заказать диплом института по невысокой цене можно, обратившись к проверенной специализированной компании. Приобрести документ института можно в нашей компании в столице. diplomp-irkutsk.ru/kupit-diplom-vuza-s-zaneseniem-v-reestr-14
Наша компания предлагает быстро купить диплом, который выполнен на оригинальной бумаге и заверен мокрыми печатями, водяными знаками, подписями. Данный документ пройдет любые проверки, даже с использованием профессионального оборудования. hotelelsilencio.com/2025/04/11/pokupka-diploma-s-zaneseniem-v-reestr-7
pinup az?rbaycan pinup az?rbaycan .
Мы готовы предложить дипломы психологов, юристов, экономистов и прочих профессий по приятным тарифам. Купить диплом иностранного ВУЗа — kyc-diplom.com/diplom-articles/kupit-diplom-inostrannogo-vuza.html
Great site. A lot of useful information here. I am sending it to some buddies ans also sharing in delicious. And certainly, thank you to your sweat!
сухие трансформаторы сухие трансформаторы .
1 вин официальный сайт вход 1win7010.ru .
mostber mostber .
Приобрести диплом университета!
Мы можем предложить документы институтов, которые расположены на территории всей РФ. Дипломы и аттестаты печатаются на “правильной” бумаге высшего качества: polosedan-club.com/search/search
1вин официальный 1вин официальный .
Заказать диплом об образовании!
Купить диплом ВУЗа по выгодной стоимости можно, обратившись к надежной специализированной фирме. Купить диплом: diplomservis.com/podlinnie-diplomi-vuzov-nadezhnij-vibor-dlya-vashego-budushego
мотбет https://mostbet7006.ru .
Мы изготавливаем дипломы любой профессии по приятным ценам. Дипломы производят на настоящих бланках государственного образца Приобрести диплом ВУЗа good-diplom.ru
1win uganda https://1win1006.top .
Где приобрести диплом специалиста?
Купить диплом ВУЗа по доступной стоимости возможно, обратившись к проверенной специализированной компании.: diplom45.ru
Hello, you used to write great, but the last few posts have been kinda boring… I miss your great writings. Past few posts are just a little bit out of track! come on!
Заказать диплом ВУЗа!
Мы предлагаемвыгодно и быстро заказать диплом, который выполняется на оригинальной бумаге и заверен печатями, водяными знаками, подписями. Диплом способен пройти лубую проверку, даже при помощи профессиональных приборов. Достигайте свои цели быстро и просто с нашей компанией- scaleforum.ru/member.phpu=62004
Заказать диплом университета по невысокой цене возможно, обращаясь к надежной специализированной компании. Приобрести документ о получении высшего образования можно в нашей компании. diplom-zentr.com/kupit-diplom-ob-obrazovanii-s-reestrom-8
Наши специалисты предлагают максимально быстро приобрести диплом, который выполняется на оригинальном бланке и заверен мокрыми печатями, штампами, подписями. Данный документ пройдет лубую проверку, даже при помощи специфических приборов. iprofile.sv3.gramick.dev/read-blog/13039_kupit-diplom-s-zaneseniem-v-reestr-instituta.html
Где приобрести диплом по актуальной специальности?
Готовый диплом со всеми печатями и подписями 100% отвечает стандартам Министерства образования и науки Российской Федерации, неотличим от оригинала – даже со специально предназначенным оборудованием. Не откладывайте личные мечты и цели на потом, реализуйте их с нашей помощью – отправляйте заявку на диплом прямо сейчас! Диплом о среднем образовании – не проблема! registraciavsaita.listbb.ru/viewtopic.phpf=2&t=2521
Заказать диплом университета по выгодной цене можно, обращаясь к проверенной специализированной компании. Мы предлагаем документы Институтов, которые находятся на территории всей России. onarslan.com.tr/kupit-diplom-bystro-i-prosto-13.html
Приобрести документ ВУЗа можно у нас в Москве. Мы предлагаем документы об окончании любых ВУЗов Российской Федерации. Вы получите необходимый диплом по любым специальностям, включая документы образца СССР. Гарантируем, что при проверке документов работодателями, подозрений не возникнет. diplom-club.com/kupit-diplom-s-reestrom-v-rossii-bistro-i-nadezhno-6/
Заказать диплом института !
Покупка диплома любого университета России у нас является надежным процессом, ведь документ будет заноситься в государственный реестр. Быстро и просто заказать диплом об образовании diplomc-v-ufe.ru/zanesi-diplom-v-reestr-obrazovaniya-bistro-i-legko
Приобрести диплом об образовании!
Мы предлагаем документы об окончании любых университетов России. Документы производятся на подлинных бланках государственного образца. jamboz.com/read-blog/5422_mozhno-li-kupit-diplom-v-reestre.html
Всегда считал, что покупка диплома о высшем образовании — это миф и невозможно. Но, к счастью, оказался неправ. Сначала искал информацию по теме: купить диплом о высшем образовании фото, купить диплом об окончании среднего образования, купить диплом рхту, купить диплом санитарки, купить диплом специалиста в нижнем новгороде, а затем переключился на дипломы вузов. Подробности здесь: diplomybox.com/kupit-attestat-v-yaroslavle
análisis de vibraciones
Dispositivos de equilibrado: esencial para el rendimiento uniforme y óptimo de las máquinas.
En el mundo de la tecnología contemporánea, donde la productividad y la confiabilidad del equipo son de suma relevancia, los aparatos de calibración desempeñan un rol fundamental. Estos equipos específicos están creados para calibrar y fijar componentes dinámicas, ya sea en dispositivos industrial, automóviles de desplazamiento o incluso en aparatos caseros.
Para los especialistas en soporte de dispositivos y los profesionales, utilizar con dispositivos de ajuste es esencial para garantizar el desempeño fluido y fiable de cualquier aparato rotativo. Gracias a estas opciones tecnológicas modernas, es posible minimizar notablemente las oscilaciones, el ruido y la carga sobre los cojinetes, prolongando la duración de elementos costosos.
Asimismo trascendental es el función que tienen los sistemas de calibración en la atención al consumidor. El apoyo especializado y el soporte continuo utilizando estos sistemas facilitan dar asistencias de óptima nivel, aumentando la bienestar de los clientes.
Para los responsables de negocios, la financiamiento en unidades de calibración y dispositivos puede ser fundamental para optimizar la rendimiento y desempeño de sus aparatos. Esto es principalmente importante para los emprendedores que manejan medianas y intermedias negocios, donde cada aspecto cuenta.
Además, los aparatos de calibración tienen una extensa utilización en el ámbito de la fiabilidad y el control de calidad. Permiten detectar potenciales problemas, previniendo mantenimientos caras y daños a los aparatos. Más aún, los indicadores generados de estos dispositivos pueden utilizarse para perfeccionar sistemas y mejorar la visibilidad en motores de búsqueda.
Las sectores de uso de los dispositivos de equilibrado incluyen variadas ramas, desde la elaboración de transporte personal hasta el seguimiento de la naturaleza. No afecta si se habla de grandes producciones de fábrica o reducidos talleres domésticos, los dispositivos de balanceo son fundamentales para proteger un operación efectivo y sin fallos.
fantastic post.Never knew this, regards for letting me know.
1win. pro 1win. pro .
Привет!
Мы можем предложить дипломы любой профессии по приятным ценам. Цена может зависеть от той или иной специальности, года получения и образовательного учреждения: rdiplomix.com/
Где заказать диплом по нужной специальности?
Мы готовы предложить дипломы психологов, юристов, экономистов и любых других профессий по приятным ценам. Важно, чтобы документы были доступны для большинства граждан. Заказать диплом института vuz-diplom.ru/vot-neskolko-variantov-sootvetstvuyushix-vashim-trebovaniyam-kupit-diplom-s-reestrom-garantiya-podlinnosti-diplom-s-registratsiej-v-reestre-ofitsialno-diplom-vuza-s-proverkoj/
Мы изготавливаем дипломы любой профессии по приятным тарифам.
Вы приобретаете документ через надежную компанию. Приобрести диплом о высшем образовании– http://niteonline.org/employer/diplomy-grup-24/ – niteonline.org/employer/diplomy-grup-24
pinup casino pinup casino .
Добрый день!
Для многих людей, заказать диплом о высшем образовании – это необходимость, удачный шанс получить выгодную работу. Впрочем для кого-то – это разумное желание не терять время на учебу в институте. Что бы ни толкнуло вас на такой шаг, мы готовы помочь. Оперативно, качественно и выгодно сделаем документ любого года выпуска на подлинных бланках со всеми необходимыми печатями.
Основная причина, почему люди прибегают к покупке документа, – получить определенную работу. Предположим, знания позволяют специалисту устроиться на работу, но подтверждения квалификации не имеется. Если работодателю важно наличие “корочек”, риск потерять место работы очень высокий.
Заказать документ о получении высшего образования вы можете у нас. Мы оказываем услуги по продаже документов об окончании любых университетов России. Вы сможете получить необходимый диплом по любой специальности, включая документы Советского Союза. Даем гарантию, что при проверке документа работодателем, подозрений не возникнет.
Факторов, которые вынуждают заказать диплом ВУЗа очень много. Кому-то срочно требуется работа, а значит, необходимо произвести впечатление на руководителя при собеседовании. Другие желают попасть в престижную компанию, для того, чтобы повысить свой статус и в будущем начать свое дело. Чтобы не тратить время, а сразу начать удачную карьеру, применяя врожденные способности и полученные знания, можно приобрести диплом в онлайне. Вы станете полезным для социума, получите денежную стабильность в минимальные сроки- диплом купить о высшем образовании
pin up casino online pin up casino online .
Добрый день спасибо за ваш выбор нашего маркетплейса ссылка на сайт —>> лиана банистериопсис каапи купить
aviator mostbet http://mostbet6013.ru .
most-bet http://mostbet3022.ru .
продвижение сайта москва http://www.itechua.com/other/277983 .
mostbet chrono mostbet chrono .
Great – I should certainly pronounce, impressed with your website. I had no trouble navigating through all the tabs and related info ended up being truly simple to do to access. I recently found what I hoped for before you know it in the least. Quite unusual. Is likely to appreciate it for those who add forums or something, site theme . a tones way for your client to communicate. Excellent task..
My spouse and i have been really glad when Albert could deal with his basic research via the precious recommendations he gained while using the web page. It is now and again perplexing to just happen to be giving out thoughts which usually most people may have been selling. Therefore we discover we’ve got the website owner to give thanks to because of that. The specific illustrations you made, the simple web site navigation, the friendships you can make it easier to foster – it is everything exceptional, and it’s leading our son and the family reckon that the situation is pleasurable, and that’s tremendously serious. Many thanks for all the pieces!
Лучшие материалы и технологии для вашего каркасного дома
каркасные дома в спб http://www.karkasnye-doma-pod-kluch-spb1.ru .
мостюет мостюет .
mostbet tur http://www.mostbet3022.ru .
Каркасный дом с гарантией качества и соблюдением всех сроков строительства
каркасные дома спб http://www.karkasnye-doma-spb-pod-kluch.ru .
Построим каркасный дом в стиле хай-тек с панорамным остеклением
каркасные дома цены http://www.karkasnye-doma-spb-pod-kluch0.ru .
мостбет зеркало мостбет зеркало .
most bet online http://mostbet3023.ru .
mostbet скачать на телефон бесплатно андроид https://mostbet6033.ru/ .
pin up onlayn kazino pinup-azerbaycan51.com .
pinup giris pinup giris .
продвижение сайтов москва продвижение сайтов москва .
It’s actually a nice and helpful piece of information. I’m satisfied that you just shared this useful information with us. Please keep us up to date like this. Thank you for sharing.
Мы готовы предложить дипломы психологов, юристов, экономистов и прочих профессий по выгодным тарифам. Стараемся поддерживать для заказчиков адекватную политику цен. Важно, чтобы документы были доступными для большого количества граждан.
Приобретение документа, подтверждающего окончание ВУЗа, – это выгодное решение. Купить диплом о высшем образовании: diplom-insti.ru/diplom-visshego-obrazovaniya-kupit/
mostbet скачать mostbet скачать .
You actually make it seem so easy together with your presentation but I in finding this topic to be actually something which I feel I might by no means understand. It sort of feels too complicated and extremely huge for me. I’m taking a look ahead to your next publish, I will try to get the cling of it!
Добрый день спасибо за ваш выбор нашего маркетплейса ссылка на сайт —>> аяхуаска купить в москве
мрстбет mostbet6039.ru .
Приобрести диплом об образовании!
Мы изготавливаем дипломы любых профессий по приятным ценам— tele-work.ru
мостбет мобильная версия скачать http://mostbet3023.ru/ .
скачат мостбет https://mostbet6040.ru/ .
Great site. Plenty of useful information here. I’m sending it to some buddies ans also sharing in delicious. And of course, thanks on your sweat!
мостбет скачать на андроид мостбет скачать на андроид .
скачат мостбет http://mostbet3023.ru/ .
мостбет chrono https://mostbet6039.ru .
pin up azerbaycan pin up azerbaycan .
mostbet casino mostbet3022.ru .
pin up casino online pin up casino online .
Great post. I was checking constantly this blog and I’m impressed! Extremely useful information particularly the last part 🙂 I care for such info much. I was looking for this particular info for a very long time. Thank you and best of luck.
Мы изготавливаем дипломы любых профессий по приятным ценам. Стараемся поддерживать для клиентов адекватную ценовую политику. Для нас важно, чтобы дипломы были доступны для подавляющей массы граждан.
Приобретение документа, подтверждающего окончание университета, – это выгодное решение. Приобрести диплом университета: 10000diplomov.ru/vuz-diplom-kupit/
Каркасные дома эконом-класса и премиум с современными фасадами
каркасные дома спб http://www.karkasnye-doma-pod-kluch-spb.ru/ .
mosbet mosbet .
mostbet chrono http://www.mostbet6040.ru .
mostbet chrono https://www.mostbet3022.ru .
mostbets http://mostbet6040.ru .
I have been exploring for a bit for any high-quality articles or blog posts in this kind of area . Exploring in Yahoo I at last stumbled upon this site. Reading this information So i am glad to show that I’ve an incredibly good uncanny feeling I came upon just what I needed. I so much unquestionably will make certain to don¦t forget this web site and provides it a glance on a continuing basis.
pin up casino azerbaijan pin up casino azerbaijan .
Лизинг коммерческого транспорта по федеральным и региональным программам
лизинг оборудования лизинг оборудования .
pin-up online pin-up online .
motbet https://mostbet6013.ru .
1winj https://1win710.ru/ .
Добрый день спасибо за ваш выбор нашего маркетплейса ссылка на сайт —>> пейотный кактус купить в спб
motsbet http://mostbet6013.ru/ .
мостбет кг https://www.mostbet6014.ru .
1вин онлайн 1вин онлайн .
Мы изготавливаем дипломы любых профессий по доступным тарифам.– diplomist.com/legalnoe-zanesenie-diploma-v-reestr-bez-lishnix-xlopot/
Заказать диплом можно используя официальный сайт компании. ostome.ru/forumbb/viewtopic.phpf=12&t=391852
Приобрести диплом любого ВУЗа!
Мы предлагаем документы любых учебных заведений, которые находятся в любом регионе Российской Федерации.
diplomidlarf.ru/diplom-vuza-s-zaneseniem-v-reestr-2/
Быстро и просто купить диплом о высшем образовании. Покупка подходящего диплома через проверенную и надежную фирму дарит множество плюсов для покупателя. Данное решение позволяет сберечь как дорогое время, так и значительные финансовые средства. elion.forumex.ru/viewtopic.php?f=110&t=636
Заказать диплом о высшем образовании!
Мы готовы предложить документы университетов, расположенных на территории всей Российской Федерации. Документы выпускаются на бумаге высшего качества: kanon.kabb.ru/viewtopic.phpf=50&t=4657
mostbet скачать https://mostbet7007.ru/ .
Быстро заказать диплом о высшем образовании!
Приобрести диплом университета по выгодной стоимости возможно, обратившись к надежной специализированной фирме. Заказать диплом: diplom-zentr.com/kupit-diplom-instituta-s-reestrom-9
I appreciate, cause I found just what I was looking for. You’ve ended my 4 day long hunt! God Bless you man. Have a great day. Bye
mostbet kg отзывы https://mostbet6014.ru .
Для быстрого продвижения вверх по карьерной лестнице потребуется наличие диплома о высшем образовании. Приобрести диплом любого ВУЗа у проверенной компании: diplomc-v-ufe.ru/kupit-attestat-o-srednem-obrazovanii-v-moskve-3/
служба поддержки мостбет номер телефона http://mostbet6014.ru/ .
мелбет kg https://www.mostbet6042.ru .
pin up pin up .
клубная музыка слушать клубная музыка слушать .
скачать сборник клубной музыки ремикс скачать сборник клубной музыки ремикс .
casino olympe https://olympecasino.pro/# olympe casino cresus
olympe casino en ligne
склады хранение для вещей склады хранение для вещей .
mostbet telefon orqali kirish mostbet3023.ru .
мостбет сайт мостбет сайт .
mostbet kg mostbet6039.ru .
Мы изготавливаем дипломы любой профессии по приятным тарифам. Дипломы изготавливаются на оригинальных бланках Быстро приобрести диплом о высшем образовании diplomgorkiy.com
Где заказать диплом специалиста?
Готовый диплом с приложением целиком и полностью отвечает стандартам Министерства образования и науки, неотличим от оригинала. Не стоит откладывать личные мечты и задачи на потом, реализуйте их с нами – отправьте заявку на диплом сегодня! Заказать диплом о высшем образовании – легко! bananowecuksy.phorum.pl/posting.phpmode=newtopic&f=1
Где заказать диплом по нужной специальности?
Заказать диплом ВУЗа по невысокой стоимости возможно, обратившись к проверенной специализированной компании.: kdiplom.ru
Заказать диплом об образовании!
Мы можем предложить дипломы психологов, юристов, экономистов и любых других профессий по приятным ценам— study-link.ru
pin up pin up .
You completed a number of fine points there. I did a search on the subject and found nearly all persons will have the same opinion with your blog.
1win официальный сайт регистрация https://www.1win710.ru .
диджей онлайн диджей онлайн .
dj music dj music .
Где купить диплом по актуальной специальности?
Мы изготавливаем дипломы любой профессии по выгодным тарифам. Для нас очень важно, чтобы документы были доступны для подавляющей массы граждан. Приобрести диплом об образовании diplomist.com/kupit-diplom-s-provodkoj-v-reestre-ofitsialno-bistro/
Would love to always get updated great web site! .
Приобрести диплом об образовании!
Мы оказываем услуги по производству и продаже документов об окончании любых университетов России. Документы изготавливаются на подлинных бланках государственного образца. aviantrp.moibb.ru/viewtopic.php?f=8&t=881
Hello, Neat post. There is a problem together with your web site in internet explorer, might test this?K IE nonetheless is the market chief and a huge element of other people will leave out your wonderful writing due to this problem.
мостбет войти мостбет войти .
1 win https://1win712.ru/ .
1win պաշտոնական https://www.1win5031.ru .
Заказать диплом любого университета!
Мы предлагаем документы учебных заведений, расположенных на территории всей РФ.
diplomus-spb.ru/kupit-diplom-s-registratsiej-v-reestre-bistro-i-nadezhno-2/
Заказать диплом ВУЗа по невысокой стоимости возможно, обращаясь к надежной специализированной фирме. Мы готовы предложить документы любых учебных заведений, расположенных в любом регионе России. ajirazetu.tz/employer/eonline-diploma
1win am https://www.1win5031.ru .
Приобрести документ о получении высшего образования вы имеете возможность в нашем сервисе. Мы предлагаем документы об окончании любых ВУЗов РФ. Вы сможете получить диплом по любой специальности, любого года выпуска, в том числе документы СССР. Даем 100% гарантию, что при проверке документа работодателями, подозрений не появится. diplom-zentr.com/vnesenie-diploma-v-reestr-bistro-i-po-dostupnoj-tsene-2/
1вин войти http://1win712.ru/ .
Купить диплом университета !
Приобретение диплома любого университета России у нас является надежным процессом, поскольку документ заносится в реестр. Заказать диплом об образовании diplom-zentr.com/kupit-diplom-o-visshem-obrazovanii-s-reestrovoj-zapisyu
This season we offer you not just clothes, but the art of warming up. [url=https://mekha-kozha.com][color=#1C1C1C]Fur coat turkey online store[/color][/url] is a work of art inspired by nature and modern trends. Allow yourself to be original by choosing fur coats that carry not only warmth, but also inspiration!
Задался вопросом: можно ли на самом деле купить диплом государственного образца в Москве? Был приятно удивлен — это реально и легально!
Сначала искал информацию в интернете на тему: корки диплома купить, купить диплом 2014, купить диплом в жуковском, купить диплом в крыму, купить диплом в октябрьском и получил базовые знания. В итоге остановился на материале: kyc-diplom.com/diplom-spetsialista.html
www mostbet com www mostbet com .
Мы изготавливаем дипломы любых профессий по приятным тарифам.
Вы заказываете документ через надежную компанию. Заказать диплом о высшем образовании– http://forum.drustvogil-galad.si/index.phpaction=search2/ – forum.drustvogil-galad.si/index.phpaction=search2
мостбет скачать бесплатно http://mostbet6041.ru .
Мы готовы предложить дипломы психологов, юристов, экономистов и прочих профессий по доступным тарифам. Мы можем предложить документы ВУЗов, которые находятся на территории всей Российской Федерации. Дипломы и аттестаты делаются на “правильной” бумаге самого высшего качества. Это дает возможности делать настоящие дипломы, которые невозможно отличить от оригиналов. physmathforum.flybb.ru/viewtopic.phpf=12&t=1258
Приобрести диплом о высшем образовании!
Наша компания предлагаетвыгодно и быстро заказать диплом, который выполнен на бланке ГОЗНАКа и заверен мокрыми печатями, водяными знаками, подписями официальных лиц. Документ пройдет любые проверки, даже при использовании специально предназначенного оборудования. Достигайте цели максимально быстро с нашим сервисом- perfectohub.com/read-blog/11429
казино мостбет http://mostbet6041.ru .
джили префейс 2024 https://geely-v-spb1.ru/models/geely-preface .
камера для хранения вещей камера для хранения вещей .
Заказать диплом об образовании. Приобретение документа о высшем образовании через проверенную и надежную фирму дарит много преимуществ для покупателя. Данное решение дает возможность сэкономить как продолжительное время, так и серьезные денежные средства. designxri.com/employer/eonline-diploma
сайт 1 win сайт 1 win .
Купить диплом университета по выгодной цене вы сможете, обращаясь к надежной специализированной компании. Мы оказываем услуги по продаже документов об окончании любых университетов Российской Федерации. Приобрести диплом любого ВУЗа– kupitediplom.ru/kupit-diplom-s-zaneseniem-v-reestr-nadezhno-i-bistro/
Доброго времени суток!
Для некоторых людей, заказать диплом университета – это острая необходимость, удачный шанс получить отличную работу. Но для кого-то – это желание не терять массу времени на учебу в ВУЗе. Что бы ни толкнуло вас на такой шаг, наша фирма готова помочь вам. Максимально быстро, качественно и по доступной цене сделаем диплом нового или старого образца на подлинных бланках со всеми необходимыми печатями.
Основная причина, почему многие люди покупают документ, – желание занять определенную работу. Например, навыки и опыт позволяют кандидату устроиться на желаемую работу, но подтверждения квалификации нет. При условии, что для работодателя важно наличие “корочки”, риск потерять место работы очень высокий.
Заказать документ института вы имеете возможность в нашей компании в Москве. Мы предлагаем документы об окончании любых ВУЗов РФ. Вы получите необходимый диплом по любой специальности, любого года выпуска, в том числе документы СССР. Гарантируем, что при проверке документов работодателем, подозрений не возникнет.
Разных обстоятельств, которые вынуждают купить диплом ВУЗа много. Кому-то срочно потребовалась работа, в итоге нужно произвести впечатление на начальника при собеседовании. Другие мечтают попасть в престижную компанию, для того, чтобы повысить собственный статус в социуме и в будущем начать свой бизнес. Чтобы не тратить впустую годы жизни, а сразу начинать успешную карьеру, используя врожденные способности и полученные знания, можно заказать диплом в онлайне. Вы станете полезным для общества, получите денежную стабильность быстро и просто- купить диплом техникума
1win գրանցում https://1win5035.ru .
Some truly interesting info , well written and generally user genial.
Добрый день спасибо за ваш выбор нашего маркетплейса ссылка на сайт —>> купить семена ипомеи голубой небосвод опт
Заказать диплом на заказ в Москве можно используя сайт компании. social.smileymission.com/read-blog/335_diplom-vysshego-obrazovaniya-s-zaneseniem-v-reestr.html
Your place is valueble for me. Thanks!…
1win http://1win5034.ru/ .
Уникальные архитектурные решения для каркасных домов
каркасные дома спб https://karkasnye-doma-spb-pod-kluch0.ru/ .
Купить диплом института по невысокой стоимости вы можете, обратившись к надежной специализированной компании. Приобрести документ о получении высшего образования можно в нашей компании. diplomist.com/kupit-diplom-visshego-obrazovaniya-s-zaneseniem-v-reestr-31
1win պաշտոնական կայք 1win պաշտոնական կայք .
1win պաշտոնական https://1win5035.ru/ .
Expert drone show team ready to impress your guests anywhere
drone show https://www.drone0-show.com .
Диплом любого университета РФ!
Без наличия диплома очень непросто было продвигаться по карьерной лестнице. Именно из-за этого решение о покупке диплома стоит считать выгодным и рациональным. Заказать диплом ВУЗа technoevents.ru/diplom-dlya-rabotyi-i-karernogo-rosta
Купить диплом о высшем образовании!
Мы изготавливаем дипломы психологов, юристов, экономистов и прочих профессий по невысоким тарифам. Вы заказываете документ через надежную компанию. : kandidatez.com/employer/frees-diplom
1win գրանցում https://1win5031.ru .
https://receptmult.ru/
1win офф сайт https://1win712.ru .
Приобрести диплом о высшем образовании!
Наша компания предлагаетвыгодно приобрести диплом, который выполняется на оригинальной бумаге и заверен печатями, штампами, подписями должностных лиц. Диплом способен пройти лубую проверку, даже с использованием профессионального оборудования. Достигайте цели максимально быстро с нашей компанией- sailrnetwork.com/read-blog/810_.html
мостбет зеркало http://mostbet6042.ru .
1win գրանցում 1win5035.ru .
Добрый день спасибо за ваш выбор нашего маркетплейса ссылка на сайт —>> сальвия дивинорум купить семена
1вин официальный регистрация http://www.1win712.ru .
Мы изготавливаем дипломы любой профессии по приятным ценам. Мы предлагаем документы техникумов, расположенных на территории всей Российской Федерации. Дипломы и аттестаты выпускаются на бумаге самого высокого качества. Это дает возможность делать государственные дипломы, не отличимые от оригинала. pulsevision.ru/forum/user/26022
read comic sonic free digital comics reader
homeless god manga manga 2025 updates HD
Thanks a lot for providing individuals with an extraordinarily spectacular chance to read in detail from here. It is usually very great plus jam-packed with a lot of fun for me and my office peers to search your blog at a minimum thrice weekly to see the latest issues you will have. And lastly, I am also always motivated considering the astounding ideas served by you. Certain 2 facts in this post are unequivocally the most beneficial we have all ever had.
1win am https://1win5034.ru/ .
1win https://1win710.ru/ .
pin up pin up .
pin up azerbaycan pin up azerbaycan .
1 win md 1 win md .
1win официальный сайт вход https://1win707.ru/ .
Мы предлагаем быстро заказать диплом, который выполнен на оригинальной бумаге и заверен мокрыми печатями, водяными знаками, подписями. Данный документ способен пройти любые проверки, даже при использовании профессиональных приборов. bidathinhkent.copiny.com/question/details/id/1087047
mostbet com вход https://mostbet6041.ru/ .
Заказать диплом ВУЗа по выгодной стоимости возможно, обратившись к проверенной специализированной компании. Заказать документ ВУЗа вы сможете в нашей компании. diplomk-vo-vladivostoke.ru/kupit-diplom-s-zaneseniem-v-reestr-bistro-i-prosto-10
Мы предлагаем дипломы любой профессии по приятным тарифам.– freediplom.com/kupit-diplom-visshem-obrazovanii-zaneseniem-reestr-5/
1win պաշտոնական կայք http://1win5034.ru .
1win online http://1win711.ru/ .
pin up giris pin up giris .
pinup giris pinup giris .
Для эффективного продвижения вверх по карьерной лестнице потребуется наличие официального диплома университета. Быстро и просто заказать диплом об образовании у сильной компании: diplomg-kurerom.ru/kupit-attestat-v-novosibirske-3/
1winw http://1win711.ru .
1win официальный 1win официальный .
Would you be inquisitive about exchanging links?
1win cazino https://www.1win707.ru .
pin up az pin up az .
1 win moldova http://1win706.ru/ .
Наши специалисты предлагают выгодно заказать диплом, который выполняется на оригинальном бланке и заверен мокрыми печатями, водяными знаками, подписями. Диплом пройдет любые проверки, даже при помощи специально предназначенного оборудования. magicvs.store/read-blog/222_diplom-s-zaneseniem-v-reestr.html
клубная клубная .
диджей онлайн диджей онлайн .
Покупка документа о высшем образовании через надежную фирму дарит массу достоинств. Такое решение помогает сэкономить как длительное время, так и существенные финансовые средства. Однако, преимуществ гораздо больше.Мы готовы предложить дипломы психологов, юристов, экономистов и других профессий. Дипломы изготавливаются на подлинных бланках. Доступная стоимость сравнительно с большими издержками на обучение и проживание в чужом городе. Покупка диплома о высшем образовании из российского университета является мудрым шагом.
Заказать диплом о высшем образовании: diplomgorkiy.com/bistrij-i-nadezhnij-diplom-vuza-s-zaneseniem-v-reestr-2/
Платформа Kraken предоставляет передовые методы для защищенных онлайн-операций. Каждый пользователь может рассчитывать на высокий уровень security своих details. В Kraken обеспечены все возможности для выполнения платежей, при этом ваша transactions остается полностью invisible, и ваши личные данные остаются protected для других.
вход кракен
Hi, Neat post. There is a problem with your web site in internet explorer, would test this… IE still is the market leader and a large portion of people will miss your excellent writing due to this problem.
официальный сайт mostbet mostbet6042.ru .
1win am 1win5035.ru .
Мы готовы предложить дипломы любых профессий по приятным ценам. Стараемся поддерживать для заказчиков адекватную ценовую политику. Важно, чтобы дипломы были доступны для большого количества граждан.
Заказ диплома, подтверждающего обучение в ВУЗе, – это рациональное решение. Заказать диплом ВУЗа: diplomius-docs.com/visshee-obrazovanie-diplom-kupit-4/
Надёжный коммерческий транспорт в лизинг для малого и среднего бизнеса
лизинг грузовых автомобилей для ип lizing-kommercheskogo-transporta1.ru/gruzovye-avtomobili .
Organizacion profesional de espectaculos con drones a medida
compañías de exhibición de drones show0-de-drones.com .
1win vhod 1win8013.ru .
как играть на бонусные деньги в 1win как играть на бонусные деньги в 1win .
1win coin получить промокод 1win coin получить промокод .
клубная музыка слушать клубная музыка слушать .
Печать на футболках с доставкой по городу и всей стране
сделать принт на футболку https://pechat-na-futbolkah1.ru .
Купить диплом ВУЗа по выгодной цене возможно, обращаясь к проверенной специализированной фирме. Купить документ о получении высшего образования вы сможете у нас. occ.orioncode.sg/read-blog/3089_vnesti-diplom-v-reestr.html
1 вин официальный сайт скачать на андроид бесплатно http://1win8012.ru/ .
Добрый день спасибо за ваш выбор нашего маркетплейса ссылка на сайт —>> кат семена купить
The Salt Trick is a natural technique that involves using specific salts, such as Blue Salt, to enhance male performance
luckyjet скачать http://1win8011.ru/ .
1win md https://www.1win707.ru .
1win online скачать 1win online скачать .
Приобрести диплом об образовании. Приобретение диплома через надежную фирму дарит ряд достоинств. Данное решение позволяет сэкономить время и значительные деньги. social.vetmil.com.br/read-blog/29094_na-praktike-poroj-po-raznym-usloviyam-kupit-dokumenty-ob-okonchanii-obucheniya-o.html
1win сайт https://1win706.ru .
1win com https://1win707.ru .
1win գրանցում https://1win5034.ru .
The Natural Mounjaro Recipe is more than just a diet—it’s a sustainable and natural approach to weight management and overall health.
Приобрести диплом возможно используя сайт компании. job.firm.in/employer/frees-diplom
Купить диплом института по доступной цене вы сможете, обратившись к надежной специализированной фирме. Приобрести документ о получении высшего образования можно в нашей компании. amigabrasileira.listbb.ru/viewtopic.phpf=52&t=2968
Приобрести диплом о высшем образовании!
Мы изготавливаем дипломы любой профессии по выгодным ценам. Вы приобретаете диплом через надежную и проверенную компанию. : benedeek.com/blogs/new
Выгодно заказать диплом об образовании. Заказ официального диплома через проверенную и надежную фирму дарит много преимуществ для покупателя. Это решение помогает сэкономить время и значительные денежные средства. stepaheadsupport.co.uk/companies/eonline-diploma
Диплом ВУЗа Российской Федерации!
Без института сложно было продвинуться по карьере. Именно из-за этого решение о покупке диплома можно считать целесообразным. Заказать диплом о высшем образовании jobfinders.live/companies/gosznac-diplom-24
Some really wonderful information, Glad I discovered this. “The Diplomat sits in silence, watching the world with his ears.” by Leon Samson.
как зарегистрироваться в 1win http://1win8006.ru .
Мы предлагаем дипломы любой профессии по доступным ценам. Стараемся поддерживать для клиентов адекватную ценовую политику. Важно, чтобы документы были доступными для подавляющей массы наших граждан.
Приобретение документа, подтверждающего обучение в университете, – это разумное решение. Приобрести диплом о высшем образовании: zakaz-na-diplom.ru/kupit-attestat-texnikuma/
Мы изготавливаем дипломы психологов, юристов, экономистов и других профессий по выгодным ценам. Мы готовы предложить документы техникумов, расположенных в любом регионе РФ. Дипломы и аттестаты выпускаются на бумаге самого высшего качества. Это позволяет делать государственные дипломы, не отличимые от оригинала. birdiey.com/read-blog/6705_kupit-gosudarstvennyj-diplom-s-zaneseniem-v-reestr.html
win1 http://www.1win8012.ru .
скачать приложение 1вин скачать приложение 1вин .
Профессиональный сервисный центр по ремонту бытовой техники с выездом на дом.
Мы предлагаем:ремонт бытовой техники в мск
Наши мастера оперативно устранят неисправности вашего устройства в сервисе или с выездом на дом!
Заказать диплом университета по доступной стоимости можно, обращаясь к проверенной специализированной фирме. Мы оказываем услуги по продаже документов об окончании любых ВУЗов России. Приобрести диплом ВУЗа– fastdiploms.com/kupit-diplom-zanesennij-v-reestr-bistro-i-udobno/
Заказать диплом возможно используя официальный портал компании. vodems.com/blogs/302/Купить-диплом-официального-образца
1win промокод на деньги при пополнении https://www.1win8012.ru .
1vin http://www.1win8011.ru .
1вин бет скачать https://1win8013.ru/ .
When I originally commented I clicked the -Notify me when new feedback are added- checkbox and now each time a comment is added I get 4 emails with the same comment. Is there any method you possibly can take away me from that service? Thanks!
Приобрести диплом любого ВУЗа!
Мы предлагаем документы учебных заведений, которые расположены в любом регионе Российской Федерации.
damdiplomisa.com/kupit-diplom-ob-obrazovanii-s-vneseniem-v-reestr/
Cutting-edge drone show that brings your event to life
drone show companies drone show companies .
Заказать диплом о высшем образовании!
Купить диплом университета по выгодной стоимости можно, обращаясь к проверенной специализированной компании. Быстро заказать диплом о высшем образовании: diplomp-irkutsk.ru/diplom-bakalavra-s-zaneseniem-v-reestr-9
1win казино http://1win8011.ru .
Мы предлагаем дипломы психологов, юристов, экономистов и прочих профессий по приятным тарифам. Мы предлагаем документы техникумов, расположенных в любом регионе Российской Федерации. Документы выпускаются на “правильной” бумаге самого высшего качества. Это позволяет делать государственные дипломы, которые не отличить от оригиналов. aboutallfinance.ru/dokumentyi-ob-obrazovanii-na-zakaz-2
Добрый день спасибо за ваш выбор нашего маркетплейса ссылка на сайт —>> купить грибы галюцагены
скачать 1win официальный сайт бесплатно https://1win8001.ru/ .
скачать 1win на ios официальный сайт https://1win8003.ru .
Магазин шин, которому доверяют тысячи автомобилистов
шины диски интернет магазин https://www.shini-kupit-v-spb.ru .
скачать mostbet kg https://1win8003.ru .
1win ставка http://1win8002.ru/ .
1win официальный сайт 1win http://www.1win8003.ru .
Mitolyn is a cutting-edge natural dietary supplement designed to support effective weight loss and improve overall wellness.
Где купить диплом специалиста?
Получаемый диплом с приложением отвечает условиям и стандартам Министерства образования и науки, неотличим от оригинала – даже со специальным оборудованием. Не стоит откладывать свои мечты и цели на несколько лет, реализуйте их с нашей помощью – отправьте быструю заявку на изготовление диплома прямо сейчас! Приобрести диплом о среднем образовании – не проблема! simplemachines.org/about/smf/stats.php
как в 1вин использовать бонусы казино [url=http://1win8005.ru]http://1win8005.ru[/url] .
You have brought up a very good details , appreciate it for the post.
Добрый день спасибо за ваш выбор нашего маркетплейса ссылка на сайт —>> мопачо купить
Заказать диплом о высшем образовании!
Мы готовы предложить документы любых учебных заведений, расположенных на территории всей России.
diplom-ryssia.com/kupit-diplom-ob-obrazovanii-s-reestrom-bistro-i-legko/
Быстро купить диплом о высшем образовании!
Мы оказываем услуги по изготовлению и продаже документов об окончании любых университетов Российской Федерации. Документы производятся на подлинных бланках государственного образца. drochan.listbb.ru/viewtopic.php?f=4&t=2270
1win промокоды 1win промокоды .
почта 1win https://1win8001.ru/ .
Где купить диплом специалиста?
Приобрести диплом ВУЗа по выгодной стоимости вы можете, обращаясь к надежной специализированной компании.: sdiplom.ru
Мы готовы предложить дипломы любой профессии по выгодным ценам. Дипломы изготавливаются на настоящих бланках Купить диплом ВУЗа [url=http://diplomskiy.com/]diplomskiy.com[/url]
Thanks for the article – really informative and well-written!
как поставить экспресс на 1win http://www.1win8005.ru .
1win скачать на телефон андроид официальный https://www.1win8001.ru .
Приобретение диплома через качественную и надежную фирму дарит ряд плюсов. Такое решение помогает сберечь как личное время, так и значительные финансовые средства. Впрочем, плюсов значительно больше.Мы готовы предложить дипломы любой профессии. Дипломы производят на фирменных бланках государственного образца. Доступная стоимость сравнительно с огромными издержками на обучение и проживание. Покупка диплома университета станет мудрым шагом.
Приобрести диплом: [url=http://poluchidiplom.com/kupit-diplom-s-reestrom-bistro-i-udobno-onlajn-2/]poluchidiplom.com/kupit-diplom-s-reestrom-bistro-i-udobno-onlajn-2/[/url]
An intyriguing discussion iss wofth comment.
I believe that youu nesd too wrte more abojt this subject, itt may not bee a taboo matrter but usually follks don’t discuss suc issues.
To the next! Manny thanks!!
Pretty portion of content. I just stumbled upon your site and in accession capital to assert that I get actually loved account your weblog posts. Anyway I’ll be subscribing to your augment and even I success you get entry to persistently fast.
букмекерская контора 1 вин 1win8006.ru .
I like this blog so much, saved to fav.
Задался вопросом: можно ли на самом деле купить диплом государственного образца в Москве? Был приятно удивлен — это реально и легально!
Сначала искал информацию в интернете на тему: купить диплом ссср в казани, купить дипломы техникума недорого, диплом купить с занесением цена, диплом массаж купить, куплю диплом дороги и получил базовые знания. В итоге остановился на материале: proffdiplomik.com/izhevsk
Где приобрести диплом специалиста?
Мы можем предложить дипломы любых профессий по приятным тарифам. Важно, чтобы дипломы были доступными для подавляющей массы наших граждан. Приобрести диплом о высшем образовании fastdiploms.com/ofitsialnie-diplomi-s-zaneseniem-v-reestr-dostupno-i-nadezhno/
ставки на спорт бишкек mostbet5021.ru .
услуги временного хранения услуги временного хранения .
Заказать документ о получении высшего образования вы можете в нашей компании. Мы предлагаем документы об окончании любых ВУЗов РФ. Вы получите диплом по любым специальностям, любого года выпуска, включая документы СССР. Даем 100% гарантию, что при проверке документа работодателями, подозрений не появится. asxdiplommy.com/pokupka-diploma-visshego-obrazovaniya-s-zaneseniem-v-rossiyu/
Мы изготавливаем дипломы любых профессий по приятным ценам.
Вы покупаете документ через надежную и проверенную компанию. Приобрести диплом университета– http://chinajobbox.com/companies/diplomy-grup-24/ – chinajobbox.com/companies/diplomy-grup-24
1вин рабочий сайт 1win8002.ru .
Hi there, simply became aware of your weblog through Google, and found that it is really informative. I am gonna be careful for brussels. I will appreciate for those who proceed this in future. A lot of other people will be benefited from your writing. Cheers!
1win верификация 1win верификация .
1вин сайт официальный скачать http://1win8003.ru .
1 win регистрация и вход на сайт 1win8015.ru .
слушать клубную музыку слушать клубную музыку .
кашпо напольное купить интернет магазин кашпо напольное купить интернет магазин .
клубная музыка слушать клубная музыка слушать .
кашпо для цветов напольные кашпо для цветов напольные .
кашпо натуральное напольное кашпо натуральное напольное .
официальный сайт букмекерской конторы 1win http://www.1win8014.ru .
1win личный кабинет http://www.1win8015.ru .
Приобрести диплом о высшем образовании!
Купить диплом университета по доступной стоимости вы сможете, обращаясь к надежной специализированной фирме. Купить диплом: diplomaj-v-tule.ru/diplom-s-reestrom-kupit-s-garantiej-podlinnosti
мостбет сайт бк мостбет сайт бк .
cialis sans ordonnance: Tadalafil achat en ligne – Tadalafil 20 mg prix en pharmacie tadalmed.shop
бэттери букмекерская контора официальный сайт скачать бэттери букмекерская контора официальный сайт скачать .
Hello! I’m at work surfing around your blog from my new iphone 3gs! Just wanted to say I love reading your blog and look forward to all your posts! Keep up the outstanding work!
Kamagra pharmacie en ligne Achetez vos kamagra medicaments kamagra pas cher
https://tadalmed.shop/# Tadalafil sans ordonnance en ligne
Где купить диплом по актуальной специальности?
Получаемый диплом с приложением 100% отвечает стандартам Министерства образования и науки РФ, никто не отличит его от оригинала – даже со специальным оборудованием. Не откладывайте собственные мечты на несколько лет, реализуйте их с нами – отправляйте быструю заявку на изготовление документа уже сегодня! Получить диплом о среднем специальном образовании – не проблема! forumkk.listbb.ru/viewtopic.phpf=12&t=1058
онлайн диджей онлайн диджей .
Acheter Viagra Cialis sans ordonnance: Tadalafil achat en ligne – cialis generique tadalmed.shop
высокие горшки кашпо напольные высокие горшки кашпо напольные .
горшки для напольных растений купить горшки для напольных растений купить .
напольные кашпо напольные кашпо .
онлайн диджей онлайн диджей .
Добрый день спасибо за ваш выбор нашего маркетплейса ссылка на сайт —>> аяуаска готовая в бутылках купить в самаре
Мы предлагаем выгодно и быстро приобрести диплом, который выполняется на бланке ГОЗНАКа и заверен мокрыми печатями, штампами, подписями. Наш диплом пройдет любые проверки, даже при помощи профессионального оборудования. social.oneworldonesai.com/read-blog/18647_diplom-vysshego-obrazovaniya-s-zaneseniem-v-reestr.html
Заказать диплом ВУЗа!
Мы оказываем услуги по продаже документов об окончании любых ВУЗов Российской Федерации. Документы изготавливаются на настоящих бланках государственного образца. [url=http://crystalroleplay.listbb.ru/viewtopic.php?f=14&t=3287/]crystalroleplay.listbb.ru/viewtopic.php?f=14&t=3287[/url]
мост бет скачать http://mostbet5021.ru/ .
Приобрести диплом о высшем образовании!
Мы предлагаемвыгодно и быстро купить диплом, который выполняется на оригинальном бланке и заверен мокрыми печатями, штампами, подписями. Наш диплом пройдет лубую проверку, даже с применением специально предназначенного оборудования. Решайте свои задачи максимально быстро с нашими дипломами- babygirls008.copiny.com/question/details/id/1087618
Добрый день!
Для многих людей, приобрести диплом о высшем образовании – это необходимость, удачный шанс получить достойную работу. Но для кого-то – это осмысленное желание не терять огромное количество времени на учебу в универе. С какой бы целью вам это не потребовалось, мы готовы помочь вам. Максимально быстро, качественно и недорого изготовим диплом любого года выпуска на подлинных бланках со всеми требуемыми подписями и печатями.
Основная причина, почему многие прибегают к покупке документов, – желание занять определенную должность. Например, навыки и опыт позволяют человеку устроиться на работу, однако подтверждения квалификации нет. В том случае если для работодателя важно наличие “корочки”, риск потерять место работы очень высокий.
Купить документ о получении высшего образования вы имеете возможность у нас в столице. Мы предлагаем документы об окончании любых ВУЗов РФ. Вы сможете получить диплом по любой специальности, любого года выпуска, включая документы образца СССР. Гарантируем, что при проверке документов работодателями, подозрений не появится.
Факторов, которые вынуждают заказать диплом очень много. Кому-то очень срочно необходима работа, и необходимо произвести впечатление на начальника во время собеседования. Некоторые задумали устроиться в престижную компанию, чтобы повысить собственный статус в обществе и в будущем начать собственное дело. Чтобы не тратить впустую годы жизни, а сразу начать успешную карьеру, используя имеющиеся навыки, можно приобрести диплом в интернете. Вы станете полезным для социума, обретете финансовую стабильность быстро и легко- диплом купить
софт на лаки джет http://1win8001.ru .
1win зеркало сайта работающее 1win8016.ru .
Мы изготавливаем дипломы психологов, юристов, экономистов и прочих профессий по приятным тарифам. Дипломы производятся на оригинальных бланках государственного образца Купить диплом о высшем образовании dip-lom-rus.ru
Где купить диплом специалиста?
Заказать диплом университета по доступной стоимости вы сможете, обратившись к проверенной специализированной фирме.: diplom-insti.ru
Заказать диплом любого университета!
Мы готовы предложить документы ВУЗов, которые расположены в любом регионе России. Документы печатаются на бумаге самого высшего качества: veniaminv.flybb.ru/viewtopic.phpf=1&t=4310
Добрый день!
Мы изготавливаем дипломы любых профессий по приятным ценам. Стоимость зависит от конкретной специальности, года получения и образовательного учреждения: п»їtutdiploms.com/
Заказать диплом ВУЗа по доступной стоимости можно, обратившись к проверенной специализированной компании. Мы предлагаем документы высших учебных заведений, которые находятся в любом регионе Российской Федерации. iptv.bestforums.org/viewtopic.phpf=3&t=4840
Приобрести диплом университета !
Покупка диплома любого ВУЗа РФ в нашей компании является надежным делом, потому что документ будет заноситься в государственный реестр. Заказать диплом об образовании diplomt-v-samare.ru/vnesti-diplom-v-reestr-bistro-i-udobno
aviator игра скачать [url=1win8005.ru]1win8005.ru[/url] .
как зайти на 1win http://www.1win8002.ru .
москва временное хранение вещей москва временное хранение вещей .
ставки на спорт бишкек онлайн https://1win8015.ru/ .
1вин сайт вход https://www.1win8006.ru .
Наша компания предлагает быстро и выгодно заказать диплом, который выполнен на оригинальной бумаге и заверен печатями, штампами, подписями официальных лиц. Наш документ способен пройти любые проверки, даже при помощи специальных приборов. panther.80lvl.ru/index.php
Будучи студентом, я наслаждался учебой до тех пор, пока не пришло время писать диплом. Но паниковать не стоило, ведь существуют компании, которые помогают с написанием и защитой диплома на отличные оценки!
Изначально я искал информацию по теме: купить аттестат в омске, купить аттестат в ульяновске, купить диплом в челябинске, диплом о высшем образовании, купить аттестат за 11 класс в казани, затем наткнулся на [url=http://diplomybox.com/kupit-diplom-magistra-v-naberezhnykh-chelnakh/]diplomybox.com/kupit-diplom-magistra-v-naberezhnykh-chelnakh[/url]
Приобрести диплом любого университета!
Наша компания предлагаетвыгодно заказать диплом, который выполняется на оригинальном бланке и заверен печатями, штампами, подписями. Диплом способен пройти лубую проверку, даже с использованием специфических приборов. Достигайте своих целей быстро и просто с нашими дипломами- zavalinka.listbb.ru/viewtopic.phpf=3&t=4199
Заказать диплом института по доступной стоимости возможно, обратившись к надежной специализированной фирме. Заказать документ о получении высшего образования вы сможете у нас в столице. diploml-174.ru/kupit-diplom-bakalavra-s-zaneseniem-v-reestr-10
скачать 1win на android http://1win8015.ru .
промокод 1win http://1win8014.ru .
Где приобрести диплом специалиста?
Мы изготавливаем дипломы любой профессии по доступным тарифам. Для нас важно, чтобы документы были доступными для большого количества граждан. Заказать диплом об образовании diploml-174.ru/diplom-s-reestrom-kupit-podlinnij-s-proverkoj/
Заказать диплом об образовании. Заказ документа о высшем образовании через надежную компанию дарит ряд достоинств. Данное решение дает возможность сберечь как личное время, так и значительные финансовые средства. betacopiny.copiny.com/question/details/id/1083576
Мы можем предложить дипломы психологов, юристов, экономистов и прочих профессий по приятным тарифам.
Вы покупаете диплом в надежной и проверенной компании. Купить диплом о высшем образовании– [url=http://highdavockmarkingsite.copiny.com/question/details/id/1081543/]highdavockmarkingsite.copiny.com/question/details/id/1081543[/url]
Купить документ института можно у нас в столице. Мы оказываем услуги по продаже документов об окончании любых ВУЗов РФ. Вы получите диплом по любым специальностям, включая документы образца СССР. Гарантируем, что при проверке документа работодателями, подозрений не появится. diplomt-nsk.ru/kupit-diplom-vuza-s-zaneseniem-v-reestr-11/
казино авиатор https://1win8014.ru/ .
1 win бк https://www.1win8016.ru .
I conceive you have remarked some very interesting points, thankyou for the post.
drunk driving regulations near Ohio could be intricate, only it’s important to own a great knowledge of all of them if one find levies. Operating below will influence (DUI) may a serious offense which can want significant ramifications on a life. In Ohio, the particular lawful threshold for blood ethanol concentration (BAC) is eight percentfor about motorists furthermore 4 percent commercial truckers.
If you’re pulled by police enforcement and suspected of driving while intoxicated, they may carryout roadside sobriety exams or chemical checks, really since breathalyzer or blood stream trials, to establish ones degree of disability. Refusing most of these tests can lead to intelligent penalties, including license suspension.
drunk driving charge offenses in Ohio lug various consequences, depending upon on variables enjoy prior prosecutions, BAC levels, plus no matter if truth be told there had been an crash or trauma involved. Outcomes can offer penalties, license suspension, imperative alcoholic beverage remedies programs, liberation, and perhaps offender time. Duplicate criminal acts and aggravated circumstances can result in more significant penalties.
Creating a skilled DUI barrier attorney is crucial to navigate the challenges of Ohio drunk driving statutes. They lavatory examine the indicators, challenge the legalization of the leave, challenge the detail of examinations, and explore promising defense to help extenuate the expenditures. Further, an attorneys can manual you by the legit process, producing your proper are screened and touting for the top rated feasible effect.
Keep in mind, being updated more than Ohio’s DUI statutes and looking for the help of an experienced legal professional are essential steps in effortlessly managing a DUI charge and protect any destiny. falsification protection attorney
фильм все серии подряд комедии 2025 онлайн в хорошем качестве
фильмы онлайн бесплатно лучшие фильмы 2025 года в HD
качестве драма фильмы смотреть кино на телефоне в Full HD
лучшие русские фильмы русские фильмы 2025 онлайн бесплатно
mostbet казино скачать mostbet8003.ru .
Мы изготавливаем дипломы психологов, юристов, экономистов и прочих профессий по выгодным тарифам.– diplomk-vo-vladivostoke.ru/kupit-diplom-s-zaneseniem-v-reestr-instituta-bistro/
бонусы спорт 1win https://1win8002.ru .
маркетплейс аккаунтов magazin-akkauntov-online.ru
mostbet kg регистрация mostbet kg регистрация .
you are really a good webmaster. The website loading speed is incredible. It seems that you’re doing any unique trick. In addition, The contents are masterpiece. you have done a great job on this topic!
Для эффективного продвижения по карьере понадобится наличие официального диплома о высшем образовании. Приобрести диплом об образовании у сильной организации: diplomg-kurerom.ru/kupit-diplom-kolledzha-v-spb-bistro-i-nadezhno/
Thanks for the article! Really helpful and informative.
“букмекерская контора с фрибетом за регистрацию без депозита с выводом денег “букмекерская контора с фрибетом за регистрацию без депозита с выводом денег .
мостбет скачать приложение на андроид бесплатно http://mostbet8002.ru .
Приобрести диплом о высшем образовании. Приобретение документа о высшем образовании через проверенную и надежную компанию дарит ряд плюсов. Это решение дает возможность сберечь время и серьезные деньги. dessinateurs-projeteurs.com/employer/eonline-diploma
Приобрести диплом академии !
Покупка диплома любого ВУЗа РФ у нас – надежный процесс, потому что документ заносится в реестр. Быстро купить диплом ВУЗа diplomt-v-chelyabinske.ru/diplom-s-vneseniem-v-reestr-dlya-uspeshnoj-kareri-3
hello!,I like your writing so much! share we communicate more about your post on AOL? I require a specialist on this area to solve my problem. Maybe that’s you! Looking forward to see you.
Мы готовы предложить дипломы любой профессии по доступным тарифам. Мы можем предложить документы техникумов, расположенных в любом регионе Российской Федерации. Дипломы и аттестаты делаются на “правильной” бумаге самого высшего качества. Это позволяет делать государственные дипломы, которые не отличить от оригинала. allnewstroy.ru/diplom-byistro-bez-stressa
фильм полностью фильмы 2025 без регистрации и рекламы
букмекерская контора mostbet https://www.mostbet5021.ru .
фильм все серии подряд комедии 2025 онлайн в хорошем качестве
фильмы серии бесплатно ужасы 2025 смотреть онлайн HD
фильмы драма комедия боевики 2025 смотреть бесплатно HD
1vin зеркало https://1win8016.ru .
Приобрести диплом любого ВУЗа!
Мы готовы предложить документы учебных заведений, расположенных на территории всей Российской Федерации. Документы делаются на бумаге самого высшего качества: rossensor.ru/forum/PAGE_NAME=message&FID=1&TID=18624&TITLE_SEO=18624-dokumenty-ob-obrazovanii-na-zakaz-_-konfidentsialno-i-bystro&MID=980883&result=new#message980883
Добрый день!
Для некоторых людей, заказать диплом ВУЗа – это необходимость, шанс получить достойную работу. Впрочем для кого-то – это понятное желание не терять время на учебу в университете. С какой бы целью вам это не потребовалось, наша фирма готова помочь вам. Максимально быстро, качественно и по доступной цене изготовим диплом нового или старого образца на настоящих бланках с реальными печатями.
Ключевая причина, почему многие прибегают к покупке документа, – получить определенную должность. Предположим, знания дают возможность кандидату устроиться на работу, однако документального подтверждения квалификации нет. В случае если для работодателя важно присутствие “корочки”, риск потерять место работы очень высокий.
Заказать документ о получении высшего образования можно у нас в столице. Мы оказываем услуги по изготовлению и продаже документов об окончании любых ВУЗов России. Вы сможете получить диплом по любой специальности, включая документы СССР. Даем гарантию, что в случае проверки документа работодателем, подозрений не возникнет.
Факторов, которые вынуждают приобрести диплом ВУЗа много. Кому-то очень срочно нужна работа, а значит, нужно произвести хорошее впечатление на начальника при собеседовании. Другие мечтают попасть в серьезную компанию, чтобы повысить свой статус в социуме и в дальнейшем начать свой бизнес. Чтобы не терять впустую годы жизни, а сразу начать успешную карьеру, используя имеющиеся знания, можно заказать диплом прямо в онлайне. Вы станете полезным в обществе, обретете денежную стабильность в минимальные сроки- диплом купить
Приветствую!
Мы изготавливаем дипломы любой профессии по приятным ценам. Цена будет зависеть от выбранной специальности, года выпуска и ВУЗа: rdiploma24.com/
Заказать диплом под заказ в столице можно используя официальный сайт компании. lgbtqia.network/read-blog/267965_kupit-diplom-yurista-s-zaneseniem-v-reestr.html
Купить диплом университета по выгодной стоимости возможно, обратившись к надежной специализированной фирме. Мы готовы предложить документы престижных ВУЗов, расположенных на территории всей РФ. talkotive.com/read-blog/2190_vnesenie-diploma-v-reestr-cena.html
1win ставки на спорт онлайн 1win8007.ru .
мостбет скачать казино http://www.mostbet8002.ru .
Купить диплом ВУЗа!
Мы готовы предложить документы любых учебных заведений, которые находятся в любом регионе Российской Федерации.
diploml-174.ru/vnesti-diplom-v-reestr-2/
как использовать бонусный счет казино 1win как использовать бонусный счет казино 1win .
крутая музыка крутая музыка .
купить кашпо для цветов напольное высокое недорого купить кашпо для цветов напольное высокое недорого .
цветочный горшок высокий напольный цветочный горшок высокий напольный .
длинное кашпо для цветов напольные длинное кашпо для цветов напольные .
клубные сеты миксы http://klubnaya-muzyka2.ru .
мостбет букмекерская контора http://mostbet8002.ru .
Желаете запустить Castle Clash на ПК? Наслаждайтесь улучшенной графики и удобных элементов управления. Соревнуйтесь с мировым комьюнити в эпических битвах, после установки через простой Android-эмулятор. Отправляйтесь по ссылке [url=https://castle-clash-skachat-na-pk.ru]castle-clash-skachat-na-pk.ru[/url], чтобы начать установку и присоединяйтесь к огромному сообществу со всех уголков планеты!
скачать взлом castle clash
castle clash скачать взлом
castle clash на пк
Добрый день спасибо за ваш выбор нашего маркетплейса ссылка на сайт —>> [url=https://mehanizator-m.online]пейота купить кактус
[/url]
excellent issues altogether, you just won a brand new reader. What would you recommend about your post that you made a few days ago? Any positive?
ставки на спорт бишкек ставки на спорт бишкек .
лучшие фильмы онлайн смотреть фильмы онлайн бесплатно 2025
смотреть лучшие фильмы 2025 русские фильмы 2025 онлайн бесплатно
мостбет вход регистрация мостбет вход регистрация .
смотреть фильм ужасов 2025 ужасы 2025 смотреть онлайн HD
русские фильмы фантастика 2025 смотреть бесплатно
мостбет онлайн https://mostbet8004.ru/ .
что такое мостбет что такое мостбет .
крутая музыка крутая музыка .
Диплом ВУЗа Российской Федерации!
Без присутствия диплома трудно было продвигаться по карьере. Именно из-за этого решение о покупке диплома можно считать рациональным. Быстро и просто заказать диплом о высшем образовании peticie.com/479256
Купить диплом о высшем образовании!
Мы изготавливаем дипломы любой профессии по приятным ценам. Вы приобретаете документ в надежной и проверенной компании. : jobs.foodtechconnect.com/companies/frees-diplom
Мы предлагаем дипломы любой профессии по невысоким ценам. Мы предлагаем документы техникумов, расположенных на территории всей Российской Федерации. Дипломы и аттестаты выпускаются на “правильной” бумаге высшего качества. Это дает возможности делать настоящие дипломы, которые невозможно отличить от оригинала. kai87la.flybb.ru/viewtopic.phpf=5&t=1000
горшок кашпо для цветов купить напольное горшок кашпо для цветов купить напольное .
промокод на продамус скидка подключение https://www.prodams-promokod.ru .
кашпо для цветов напольное кашпо для цветов напольное .
напольные кашпо для цветов купить напольные кашпо для цветов купить .
диджей онлайн диджей онлайн .
cazinouri online moldova https://www.1win5050.ru .
1 win md https://www.1win5050.ru .
1win moldova 1win moldova .
Мы изготавливаем дипломы психологов, юристов, экономистов и любых других профессий по приятным тарифам.– diplomskiy.com/pokupka-diplomov-s-reestrom/
1win moldova download https://1win5051.ru/ .
1win.pro 1win.pro .
Заказать диплом университета!
Мы можем предложить документы учебных заведений, расположенных в любом регионе России.
kupit-diplom24.com/kupit-diplom-s-vneseniem-v-reestr-nadezhno-i-bistro-2/
Some truly choice blog posts on this site, saved to my bookmarks.
Приобрести диплом о высшем образовании!
Приобретение подходящего диплома через надежную фирму дарит массу плюсов. Купить диплом о высшем образовании у проверенной организации: doks-v-gorode-tyumen-72.ru
1win https://1win5051.ru/ .
Парк развлечений “Zамания” в ТЦ “Максимир” — выступает как удачный вариант, чтобы посвятить себя активному досугу — на нашей территории функционирует совокупность стен для тренировок по скалолазанию.
Полное расписание на: centr-zamaniya.ru
Добрый день спасибо за ваш выбор нашего маркетплейса ссылка на сайт —>> заказать аяваску почтой
смотреть русские фильмы драмы 2025 смотреть онлайн
Актуальные юридические новости https://t.me/Urist_98RUS полезные статьи, практичные лайфхаки и советы для бизнеса и жизни. Понимайте законы легко, следите за изменениями, узнавайте секреты защиты своих прав и возможностей.
Топ магазинов техники reyting-magazinov-tehniki по качеству, ценам и сервису! Сравниваем для вас популярные площадки, ищем выгодные предложения, делимся реальными отзывами. Экономьте время и деньги — изучайте наш рейтинг и выбирайте лучшее!
It’s a pity you don’t have a donate button! I’d certainly donate to this outstanding blog! I suppose for now i’ll settle for bookmarking and adding your RSS feed to my Google account. I look forward to new updates and will talk about this blog with my Facebook group. Talk soon!
After all, what a great site and informative posts, I will upload inbound link – bookmark this web site? Regards, Reader.
скачать мостбет официальный сайт mostbet8001.ru .
mostbet kg отзывы http://mostbet8004.ru/ .
melbet сайт melbet1005.ru .
программа для лаки джет https://1win8007.ru/ .
маркетплейс аккаунтов соцсетей ploshadka-prodazha-akkauntov.ru
мостбет скачат https://www.mostbet8001.ru .
мелбет https://www.melbet1004.ru .
регистрация в бк мостбет https://mostbet8004.ru .
Практичный калькулятор досрочного погашения поможет рассчитать экономию
досрочное погашение кредита калькулятор досрочное погашение кредита калькулятор .
Не тратьте время зря: проверьте кредитный рейтинг онлайн прямо сейчас
как узнать свой кредитный рейтинг http://dengivperedservice.ru/ .
The best porn chat ai with AI is a place for private communication without restrictions. Choose scenarios, create stories and enjoy the attention of a smart interlocutor. Discover new emotions, explore fantasies and relax your soul in a safe atmosphere.
Кактус Казино кактус казино зеркало мир азарта и развлечений! Тысячи слотов, карточные игры, рулетка и захватывающие турниры. Быстрые выплаты, щедрые бонусы и поддержка 24/7. Играйте ярко, выигрывайте легко — всё это в Кактус Казино!
Лучшее рефинансирование кредита для тех, кто ценит своё время и деньги
сделать рефинансирование кредита под меньший процент https://kapitalinfo-team.ru .
Любите кино и сериалы? тева фильмы и сериалы у нас собраны лучшие подборки — от блокбастеров до авторских лент. Смотрите онлайн без ограничений, выбирайте жанры по настроению и открывайте новые истории каждый день. Кино, которое всегда с вами!
Диплом ВУЗа России!
Без института сложно было продвигаться по карьерной лестнице. Именно из-за этого решение о заказе диплома стоит считать выгодным и рациональным. Заказать диплом университета jobzz24.com/employer/gosznac-diplom-24
Заказать диплом ВУЗа!
Мы можем предложить дипломы психологов, юристов, экономистов и других профессий по приятным ценам. Вы заказываете документ в надежной и проверенной компании. : shandurtravels.com/companies/frees-diplom
Купить диплом университета!
Наша компания предлагаетвыгодно купить диплом, который выполняется на оригинальном бланке и заверен мокрыми печатями, штампами, подписями. Наш диплом пройдет любые проверки, даже при использовании профессионального оборудования. Достигайте своих целей быстро и просто с нашими дипломами- nextdecisioncoaching.com/kupit-diplom-prostoe-reshenie-dlja-slozhnyh-zadach-145
Лучшие жизненные цитаты со смыслом, успехе и вдохновении. Короткие мысли великих людей, мудрые фразы и слова, которые заставляют задуматься. Найдите мотивацию, настрой и силу в правильных словах каждый день!
мостбет казино скачать http://www.mostbet8002.ru .
Заказать диплом ВУЗа по выгодной цене возможно, обращаясь к проверенной специализированной фирме. Заказать документ ВУЗа вы можете в нашем сервисе. diplomass.com/tsena-diploma-s-zaneseniem-v-reestr-bez-lishnix-zatrat
Приобретение подходящего диплома через надежную компанию дарит ряд преимуществ. Это решение помогает сэкономить время и существенные средства. Впрочем, только на этом выгоды не ограничиваются, достоинств намного больше.Мы изготавливаем дипломы любой профессии. Дипломы изготавливаются на настоящих бланках государственного образца. Доступная стоимость по сравнению с огромными затратами на обучение и проживание в другом городе. Приобретение диплома ВУЗа является мудрым шагом.
Заказать диплом: diplomaj-v-tule.ru/kupit-diplom-s-reestrom-po-dostupnoj-tsene-3/
aplicația 1win [url=http://1win5050.ru/]http://1win5050.ru/[/url] .
Добрый день спасибо за ваш выбор нашего маркетплейса ссылка на сайт —>> купить маенг да в москве
mel bet сайт https://melbet1005.ru/ .
Быстро и просто купить диплом о высшем образовании. Покупка диплома через качественную и надежную компанию дарит ряд достоинств для покупателя. Это решение помогает сберечь как личное время, так и серьезные финансовые средства. forestsnakes.teamforum.ru/viewtopic.php?f=28&t=6146
Мы предлагаем дипломы психологов, юристов, экономистов и других профессий по приятным ценам. Всегда стараемся поддерживать для заказчиков адекватную ценовую политику. Важно, чтобы дипломы были доступными для большинства граждан.
Приобретение документа, подтверждающего окончание института, – это выгодное решение. Заказать диплом о высшем образовании: [url=http://diplomius-docs.com/diplom-kupit-sredne-texnicheskoe-obrazovanie-4/]diplomius-docs.com/diplom-kupit-sredne-texnicheskoe-obrazovanie-4/[/url]
мосбет [url=www.mostbet8003.ru]www.mostbet8003.ru[/url] .
Приобрести диплом университета по невысокой стоимости можно, обращаясь к проверенной специализированной фирме. Заказать документ о получении высшего образования вы сможете у нас. usa.life/read-blog/134766_diplom-s-zaneseniem-v-reestr-cena.html
Ценность бренда Indigo (Индиго) совершенно не расширять оборот распространением всего, что есть для Вашего ребенка.
Нас мотивирует глубокая привязанность к категориям Indigo (Индиго), и наилучшая награда которую мы получаем – подобрать оптимальный вариант каждому покупателю купить те изделия, которые наиболее уместно индивидуально Вам.
Узнать больше о продукции Indigo вы можете на нашем официальном сайте: kolyaska-indigo.ru
покупка аккаунтов покупка аккаунтов
Приобрести диплом университета по невысокой цене вы сможете, обращаясь к надежной специализированной компании. Мы оказываем услуги по изготовлению и продаже документов об окончании любых университетов России. Приобрести диплом любого университета– kupitediplom.ru/diplom-s-zaneseniem-v-reestr-po-nizkoj-tsene-3/
Наша компания предлагает выгодно купить диплом, который выполняется на оригинальной бумаге и заверен печатями, водяными знаками, подписями официальных лиц. Документ способен пройти любые проверки, даже при использовании специальных приборов. peticije.online/482744
значок металлический круглый https://metallicheskie-znachki213.ru
Хотите жить у моря? купить квартиру в Черногории — квартиры, дома, виллы на лучших курортах. Удобные условия покупки, помощь на всех этапах, инвестиционные проекты. Откройте новые возможности жизни и отдыха на берегу Адриатики!
металлические значки на заказ с логотипом изготовление металлического значка
Thanks for the article! Really helpful and informative.
Мечтаете о доме у моря? http://www.nedvizhimost-v-chernogorii-kupit.com — идеальный выбор! Простое оформление, доступные цены, потрясающие виды и европейский комфорт. Инвестируйте в своё будущее уже сегодня вместе с нами.
мелбет kg melbet1005.ru .
сухой трансформатор сухой трансформатор .
1c бухгалтерия цена 1c бухгалтерия цена .
купить 1с онлайн [url=https://rodoslav.forum24.ru/?1-4-0-00000956-000-0-0-1745477530/]https://rodoslav.forum24.ru/?1-4-0-00000956-000-0-0-1745477530/[/url] .
производство лестниц из металла http://www.izgotovlenie-lestnic-na-zakaz.ru .
антенна TV Flat HD tv-antenka.ru .
покупка аккаунтов покупка аккаунтов
Приобрести диплом любого института. Приобретение диплома через надежную компанию дарит ряд достоинств для покупателя. Такое решение позволяет сберечь как личное время, так и существенные денежные средства. forum.stosstrupp-gold-germany.de/viewtopic.php?f=10&t=150505
Thank you for some other informative website. The place else may I get that type of information written in such an ideal means? I’ve a challenge that I am simply now working on, and I’ve been on the glance out for such info.
sports betting 1win 1win1023.top .
Мы изготавливаем дипломы любой профессии по доступным ценам. Стараемся поддерживать для заказчиков адекватную политику тарифов. Для нас важно, чтобы документы были доступны для большого количества граждан.
Приобретение диплома, подтверждающего обучение в университете, – это выгодное решение. Заказать диплом любого ВУЗа: diplomoz-197.com/kupit-diplom-stomatologa-10/
1win pariuri [url=http://1win5051.ru]http://1win5051.ru[/url] .
Купить диплом любого ВУЗа!
Мы предлагаемвыгодно купить диплом, который выполнен на оригинальном бланке и заверен мокрыми печатями, водяными знаками, подписями официальных лиц. Документ способен пройти лубую проверку, даже при помощи профессиональных приборов. Достигайте свои цели быстро и просто с нашим сервисом- odesit.com/user.phpid.14596
Приобрести диплом университета по выгодной стоимости можно, обращаясь к проверенной специализированной компании. Приобрести документ о получении высшего образования вы сможете у нас в Москве. diplomg-cheboksary.ru/kupit-diplom-s-vneseniem-v-reestr-bistro-i-udobno
мелбет http://www.melbet1004.ru .
трансформатор сухой 1000 ква цена http://mymoscow.forum24.ru/?1-6-0-00027821-000-0-0-1745396536/ .
1 c купить http://dubna.myqip.ru/?1-1-0-00000313-000-0-0-1745415562/ .
купить программу 1 с https://mymoscow.forum24.ru/?1-6-0-00027847-000-0-0-1745477891/ .
производство лестниц на заказ производство лестниц на заказ .
Заказать диплом о высшем образовании!
Покупка подходящего диплома через надежную фирму дарит ряд достоинств для покупателя. Быстро и просто заказать диплом ВУЗа у проверенной организации: doks-v-gorode-groznyy-20.ru
антенна TV Flat HD https://tv-antenka.ru .
Платформа Kraken предоставляет modern методы для anonymous онлайн-операций. Каждый пользователь может рассчитывать на высокий уровень безопасности своих сведений. В Kraken обеспечены все возможности для выполнения платежей, при этом ваша активность остается полностью invisible, и ваши личные данные остаются недоступными для других.
кракен ат ссылка
купить аккаунт продажа аккаунтов соцсетей
A fun, fast-paced game that rewards your luck—Lucky Spin is exactly what you need! Spin the wheel and see how lucky you can get with amazing prizes! Lucky Spin
казино 1win зеркало https://1win8007.ru .
Купить диплом университета по невысокой стоимости возможно, обращаясь к проверенной специализированной компании. Приобрести документ о получении высшего образования вы сможете в нашей компании в Москве. promintern.listbb.ru/viewtopic.phpf=16&t=1642
Мы предлагаем быстро приобрести диплом, который выполняется на оригинальном бланке и заверен печатями, штампами, подписями. Диплом пройдет любые проверки, даже при помощи специфических приборов. hirenhigher.co.nz/companies/premiumydiploma
Добрый день спасибо за ваш выбор нашего маркетплейса ссылка на сайт —>> магазины энтеогенов проверенные
1win online http://www.1win1023.top .
Купить диплом под заказ в Москве можно используя официальный сайт компании. ractis.ru/forums/index.phpautocom=gallery&req=si&img=3331
cod promoțional 1win https://www.1win5053.ru .
1win.online скачать http://1win8008.ru .
1wi. https://www.1win8017.ru .
Добрый день спасибо за ваш выбор нашего маркетплейса ссылка на сайт —>> купить семя коки казахстан
Приобретение документа о высшем образовании через надежную компанию дарит ряд плюсов для покупателя. Данное решение дает возможность сберечь время и серьезные деньги. Однако, достоинств гораздо больше.Мы изготавливаем дипломы любых профессий. Дипломы изготавливаются на фирменных бланках государственного образца. Доступная стоимость в сравнении с большими издержками на обучение и проживание. Покупка диплома о высшем образовании из российского ВУЗа будет мудрым шагом.
Купить диплом: diplom-kaluga.ru/kupit-diplom-visshego-obrazovaniya-s-zaneseniem-v-reestr-13/
descărca 1win http://1win5053.ru .
Размышляете понять многостороннее о муниципальном учреждении №16 городского округа Владимир?
Изучите главный информационный портал муниципального учреждения: school16vlad.ru
В данном ресурсе вы прочтете свежую обновления о образовательной среде.
Наряду с этим установлены контактная информация учителей.
продамус промокод скидка на подключение продамус промокод скидка на подключение .
1win home https://1win1023.top/ .
1win букмекерская контора 1win букмекерская контора .
что такое бонусы казино в 1win http://1win8008.ru/ .
1win md http://www.1win5052.ru .
1win home https://1win1023.top .
melbet http://melbet1005.ru .
melbet сайт https://melbet1004.ru/ .
Hey, you used to write excellent, but the last few posts have been kinda boring… I miss your great writings. Past several posts are just a bit out of track! come on!
скачать мост бет mostbet8006.ru .
рейтинг лицензионных казино
Бонус: 50 фриспинов Бонус код: Нет Вейджер: х40 Слот: 777 Gems Respin. Но перед этим бонус нужно будет открутить. F1 Casino раздает новичкам бездепозитный бонус 1111 рублей. Бездепозитный.
Source:
рейтинг лицензионных казино
?Hola apostadores apasionados
Conseguir 20 euros gratis te darГЎ ventaja al momento de probar nuevos juegos y estrategias.
Juega sin riesgo en Marca casino con 20 euros gratis y diviГ©rtete en sus ruletas online. – casino20eurosgratissindeposito.guru
?Que tengas excelentes botes acumulados!
ставки на мостбет http://www.mostbet8006.ru .
aplicația 1win https://www.1win5052.ru .
услуги по хранению вещей москва услуги по хранению вещей москва .
услуги по продаже аккаунтов биржа аккаунтов
изготовить металлические значки производство значков из металла
mosbet https://mostbet3024.ru/ .
You can definitely see your skills in the paintings you write. The sector hopes for more passionate writers such as you who aren’t afraid to say how they believe. At all times go after your heart.
aplicația 1win http://1win5053.ru .
mostbet uz скачать http://mostbet3024.ru .
mostbet telefon orqali kirish mostbet telefon orqali kirish .
1win metode de plată http://1win5052.ru .
Заказать диплом любого ВУЗа!
Мы можем предложить документы учебных заведений, расположенных на территории всей Российской Федерации.
diplomaj-v-tule.ru/bistrij-diplom-s-zaneseniem-v-reestr-bez-problem/
мос бет https://mostbet3025.ru .
Проверьте кредитный рейтинг заранее и будьте готовы к крупным покупкам
проверить кредитный рейтинг http://budgetmasterexpert.ru/ .
магазин аккаунтов социальных сетей купить аккаунт
поддержка мостбет mostbet3025.ru .
Мы можем предложить дипломы любой профессии по приятным тарифам. Мы готовы предложить документы ВУЗов, которые находятся в любом регионе РФ. Документы делаются на “правильной” бумаге высшего качества. Это позволяет делать государственные дипломы, которые невозможно отличить от оригинала. linux.listbb.ru/viewtopic.phpf=2&t=1355
мостбет официальный сайт https://www.mostbet3025.ru .
You can certainly see your expertise in the work you write. The world hopes for more passionate writers like you who aren’t afraid to say how they believe. Always follow your heart.
nxvx1l
Приобрести диплом под заказ можно через официальный сайт компании. everestrolep.listbb.ru/viewtopic.phpf=2&t=17599
мелбет кг https://melbet1004.ru/ .
склад личных вещей склад личных вещей .
I conceive this web site has got some real good information for everyone : D.
Приобрести диплом любого университета!
Мы можем предложить документы университетов, которые находятся в любом регионе России.
diplomg-kurerom.ru/kupit-diplom-o-visshem-obrazovanii-bistro-i-bezopasno-2/
1вин сайт официальный вход http://www.1win8008.ru .
как потратить бонусы казино в 1вин https://1win8017.ru/ .
магазин аккаунтов маркетплейс аккаунтов соцсетей
Мы готовы предложить дипломы любой профессии по приятным тарифам. Мы готовы предложить документы техникумов, расположенных на территории всей России. Дипломы и аттестаты выпускаются на бумаге самого высокого качества. Это дает возможности делать настоящие дипломы, не отличимые от оригинала. social.priestv.com/read-blog/6662_vnesti-diplom-v-reestr.html
аккаунты с балансом маркетплейс аккаунтов
1вин скачать на айфон https://1win8017.ru .
как потратить бонусный счет в 1win как потратить бонусный счет в 1win .
Приобрести диплом института по выгодной цене можно, обращаясь к надежной специализированной компании. Мы предлагаем документы об окончании любых ВУЗов РФ. Заказать диплом ВУЗа– diplomt-v-samare.ru/kupit-diplom-zaregistrirovannij-v-reestre-bistro-i-legko/
Compre visualizações e espectadores reais para suas lives no YouTube, Instagram, Twitch, TikTok e Facebook. Aumente seu engajamento e credibilidade online com serviços seguros e confiáveis. Impulsione suas transmissões ao vivo hoje!
перепродажа аккаунтов продажа аккаунтов
I just could not depart your website prior to suggesting that I extremely enjoyed the standard info a person provide for your visitors? Is gonna be back often in order to check up on new posts
mostbet casino https://mostbet8006.ru/ .
mostbet uz http://mostbet3024.ru .
покупка аккаунтов продажа аккаунтов
заработок на аккаунтах магазин аккаунтов
мостбеи мостбеи .
cazinouri online moldova cazinouri online moldova .
Заказать диплом о высшем образовании!
Мы оказываем услуги по продаже документов об окончании любых университетов России. Документы производятся на подлинных бланках государственного образца. felloly.com/read-blog/12102_kupit-diplom-magistra-s-provodkoj.html
Где приобрести диплом специалиста?
Приобрести диплом института по доступной стоимости возможно, обращаясь к проверенной специализированной компании.: kupite-diplom0024.ru
Задался вопросом: можно ли на самом деле купить диплом государственного образца в Москве? Был приятно удивлен — это реально и легально!
Сначала искал информацию в интернете на тему: купить диплом в минусинске, можно ли купить диплом о среднем специальном образовании, покупка диплома отзывы, купить диплом вуза в спб, купить аттестат отзывы и получил базовые знания. В итоге остановился на материале: diplomybox.com/kupit-diplom-spetsialista-v-moskve
Мы можем предложить дипломы психологов, юристов, экономистов и любых других профессий по приятным ценам. Дипломы производят на настоящих бланках государственного образца Приобрести диплом об образовании damdiplomisa.com
супер маркетплейс кракен даркнет сайт с современным интерфейсом и удобным функционалом онион, специализируется на продаже запрещенных веществ по всему миру. У нас ты найдешь всё, от ароматных шишек до белоснежного порошка. Кракен. Купить.
1win молдова https://1win5053.ru .
Кредит без отказа — ваш шанс получить нужную сумму без лишней бюрократии
взять кредит без отказа investrost1.ru .
mostbet online скачать http://mostbet3025.ru/ .
мостбет ком вход mostbet8007.ru .
You made certain fine points there. I did a search on the subject and found most persons will go along with with your blog.
Где приобрести диплом специалиста?
Готовый диплом со всеми печатями и подписями 100% отвечает стандартам Министерства образования и науки, неотличим от оригинала. Не стоит откладывать свои мечты и задачи на несколько лет, реализуйте их с нашей помощью – отправляйте заявку на диплом прямо сейчас! Диплом о высшем образовании – не проблема! community.gamersvision.nl/read-blog/377_sejchas-kupit-dokumenty-o-nalichii-obrazovaniya-prosto-i-legko-nezavisimo-ot-vsy.html
промокод 1вин http://1win8009.ru .
mostbet skacat http://www.mostbet8007.ru .
1win пополнение переводом 1win пополнение переводом .
Заказать диплом института по доступной цене вы сможете, обратившись к надежной специализированной фирме. Приобрести документ о получении высшего образования можно у нас. iqtorg.ru/forum/topic/add/forum2
1win moldova http://1win5054.ru .
I think other web site proprietors should take this site as an model, very clean and wonderful user genial style and design, let alone the content. You are an expert in this topic!
mostbet casino скачать на андроид https://mostbet8008.ru .
официальный сайт mostbet https://mostbet8009.ru/ .
Заказать диплом университета. Заказ подходящего диплома через проверенную и надежную компанию дарит немало достоинств для покупателя. Это решение помогает сэкономить как продолжительное время, так и значительные средства. wfsrecruitment.com/employer/eonline-diploma
Заказать диплом ВУЗа!
Приобрести диплом университета по невысокой стоимости вы можете, обращаясь к надежной специализированной компании. Приобрести диплом: diplom-club.com/poluchite-attestat-o-srednem-obrazovanii-legalno-i-bistro
магазин аккаунтов купить аккаунт с прокачкой
магазин аккаунтов купить аккаунт
мостбет уз скачать http://mostbet8008.ru/ .
Добрый день спасибо за ваш выбор нашего маркетплейса ссылка на сайт —>> шалфей предсказателей купить
1win moldova 1win5054.ru .
mostbet вход mostbet вход .
mostbet casino скачать http://mostbet8010.ru/ .
Мы можем предложить дипломы любых профессий по доступным тарифам.
Вы заказываете документ через надежную компанию. Приобрести диплом института– http://sparktv.net/read-blog/18009_kak-imenno-obdumano-kupit-dokumenty-o-nalichii-obrazovaniya-sejchas.html/ – sparktv.net/read-blog/18009_kak-imenno-obdumano-kupit-dokumenty-o-nalichii-obrazovaniya-sejchas.html
mostbet приложение http://mostbet8006.ru .
Где приобрести диплом по актуальной специальности?
Мы можем предложить дипломы любой профессии по приятным ценам. Для нас очень важно, чтобы документы были доступными для большого количества наших граждан. Заказать диплом университета vuz-diplom.ru/kupit-diplom-moskva-s-zaneseniem-v-reestr-11/
Купить диплом университета по выгодной стоимости возможно, обратившись к проверенной специализированной компании. Заказать документ университета вы можете у нас в Москве. sathiharu.com/read-blog/20165_mozhno-kupit-diplom-vysshem-obrazovanii.html
площадка для продажи аккаунтов аккаунты с балансом
1win официальный сайт бесплатно онлайн http://www.1win8018.ru .
Приобрести документ о получении высшего образования вы можете в нашем сервисе. Мы оказываем услуги по продаже документов об окончании любых университетов Российской Федерации. Вы получите диплом по любым специальностям, включая документы СССР. Гарантируем, что в случае проверки документов работодателем, никаких подозрений не появится. kupitediplom.ru/kupit-diplom-zanesennij-v-reestr-bez-problem/
купить аккаунт с прокачкой маркетплейс аккаунтов соцсетей
купить аккаунт маркетплейс аккаунтов соцсетей
Надежный обмен валюты https://valutapiter.ru в Санкт-Петербурге! Актуальные курсы, наличные и безналичные операции, комфортные условия для частных лиц и бизнеса. Гарантия конфиденциальности и высокий уровень обслуживания.
Займы под материнский капитал https://юсфц.рф решение для покупки жилья или строительства дома. Быстрое оформление, прозрачные условия, минимальный пакет документов. Используйте государственную поддержку для улучшения жилищных условий уже сегодня!
Кредитный потребительский кооператив https://юк-кпк.рф доступные займы и выгодные накопления для своих. Прозрачные условия, поддержка членов кооператива, защита средств. Участвуйте в финансовом объединении, где важны ваши интересы!
1win дзеркало https://1win8009.ru .
Наша компания предлагает максимально быстро купить диплом, который выполнен на оригинальной бумаге и заверен мокрыми печатями, штампами, подписями должностных лиц. Данный документ пройдет лубую проверку, даже с использованием специальных приборов. telesat.gtaserv.ru/posting.php?mode=post&f=251&sid=4f98a80bb77c418d37ccd6ccb6f9ef46
Заказать диплом о высшем образовании!
Мы предлагаембыстро и выгодно купить диплом, который выполняется на бланке ГОЗНАКа и заверен мокрыми печатями, штампами, подписями официальных лиц. Диплом способен пройти любые проверки, даже с использованием специфических приборов. Достигайте цели быстро и просто с нашей компанией- [url=http://flowsocial.xyz/read-blog/8597_kupit-diplom-menedzhera-s-zaneseniem-v-reestr.html/]flowsocial.xyz/read-blog/8597_kupit-diplom-menedzhera-s-zaneseniem-v-reestr.html[/url]
mostbetapk http://www.mostbet8010.ru .
Заказать диплом университета. Заказ документа о высшем образовании через надежную фирму дарит ряд плюсов. Это решение позволяет сберечь время и серьезные финансовые средства. zekond.com/read-blog/147749
Really wonderful information can be found on blog.
мос бет mostbet8010.ru .
изготовление и монтаж лестниц http://www.izgotovlenie-lestnic-na-zakaz.ru .
антенна TV Flat HD http://tv-antenka.ru/ .
купить программу 1 с dubna.myqip.ru/?1-1-0-00000313-000-0-0-1745415562 .
купить 1с онлайн купить 1с онлайн .
приложение 1win ставки на спорт http://1win8009.ru .
букмекерские конторы в кыргызстане https://mostbet8008.ru .
сухие трансформаторы цена https://www.ivanovo.forum24.ru/?1-15-0-00000777-000-0-0-1745397010 .
маркетплейс аккаунтов маркетплейс аккаунтов соцсетей
гарантия при продаже аккаунтов маркетплейс аккаунтов
1win md 1win5054.ru .
мостбет https://www.mostbet8009.ru .
1вин вход в личный кабинет http://1win8018.ru/ .
Мы предлагаем максимально быстро купить диплом, который выполнен на оригинальном бланке и заверен мокрыми печатями, водяными знаками, подписями. Данный документ пройдет лубую проверку, даже с применением специфических приборов. cgingurgaon.copiny.com/question/details/id/1087114
mostbet казино http://mostbet8008.ru .
Заказать диплом любого ВУЗа!
Мы предлагаембыстро приобрести диплом, который выполняется на бланке ГОЗНАКа и заверен мокрыми печатями, водяными знаками, подписями должностных лиц. Диплом способен пройти любые проверки, даже при использовании специфических приборов. Достигайте свои цели максимально быстро с нашим сервисом- amareclub.listbb.ru/viewtopic.phpf=20&t=1319
скачать мостбет кз https://mostbet8009.ru/ .
установка лестниц заказать http://izgotovlenie-lestnic-na-zakaz.ru .
1win bet скачать https://1win8018.ru/ .
1вин. https://1win8009.ru .
антенна TV Flat HD http://www.tv-antenka.ru/ .
теннесси букмекерская скачать на андроид http://mostbet8007.ru/ .
бонусный счет в 1win http://1win8020.ru/ .
бухгалтерия 1с купить https://www.www.bisound.com/forum/showthread.php?p=1951167 .
где купить 1с бухгалтерия https://www.mymoscow.forum24.ru/?1-6-0-00027847-000-0-0-1745477891 .
сухие силовые трансформаторы купить http://www.ivanovo.forum24.ru/?1-15-0-00000777-000-0-0-1745397010 .
бонусы спорт 1win как пользоваться бонусы спорт 1win как пользоваться .
Хочу поделиться своим опытом по заказу аттестата ПТУ. Думал, что это невозможно, и начал искать информацию в интернете по теме: купить образования, купить диплом электромеханика, купить диплом с занесением в реестр в нижнем тагиле, купить оригинал диплома, законно ли покупать аттестат. Постепенно углубляясь, нашел отличный ресурс здесь: diplomybox.com/kupit-attestat-v-ivanovo
Мы предлагаем дипломы любой профессии по приятным ценам. Стараемся поддерживать для заказчиков адекватную политику тарифов. Для нас важно, чтобы документы были доступны для большинства наших граждан.
Заказ документа, подтверждающего обучение в университете, – это выгодное решение. Приобрести диплом ВУЗа: diplom-bez-problem.com/kupit-diplom-o-obrazovanii-4/
заработок на аккаунтах биржа аккаунтов
гарантия при продаже аккаунтов услуги по продаже аккаунтов
Заказать диплом института!
Мы предлагаем документы об окончании любых университетов РФ. Документы изготавливаются на настоящих бланках государственного образца. paradigmrecruitment.ca/companies/radiplomy
магазин аккаунтов социальных сетей маркетплейс аккаунтов соцсетей
Где заказать диплом специалиста?
Купить диплом ВУЗа по доступной цене вы можете, обращаясь к надежной специализированной компании.: diplom-insti.ru
Мы готовы предложить дипломы психологов, юристов, экономистов и других профессий по доступным ценам. Дипломы производят на фирменных бланках Купить диплом института diplomd-magazinp.ru
Купить диплом ВУЗа!
Мы можем предложить документы учебных заведений, расположенных в любом регионе Российской Федерации. Дипломы и аттестаты печатаются на бумаге самого высшего качества: batirafrica.blog4ever.com/forum
Добрый день спасибо за ваш выбор нашего маркетплейса ссылка на сайт —>> kraken зеркало
1win bet зеркало 1win8010.ru .
Заказать диплом под заказ возможно через сайт компании. sz.80lvl.ru/posting.phpmode=post&f=9&sid=a9c4821d73adcecde7659899ec901059
1xwin официальный сайт 1win8010.ru .
1win ставки на спорт скачать приложение 1win ставки на спорт скачать приложение .
1 win казино http://www.1win8019.ru .
Купить диплом любого университета поможем. Купить диплом в Архангельске – diplomybox.com/kupit-diplom-arkhangelsk
masbet https://www.mostbet8010.ru .
как скачать 1win на айфон https://www.1win8019.ru .
Мы можем предложить дипломы любой профессии по выгодным ценам. Всегда стараемся поддерживать для заказчиков адекватную ценовую политику. Для нас очень важно, чтобы дипломы были доступными для большинства граждан.
Приобретение документа, который подтверждает окончание университета, – это выгодное решение. Приобрести диплом университета: magazin-diplomov.ru/gde-kupit-diplom-ob-okonchanii-kolledzha/
как отыграть бонусный счет в 1win [url=https://www.1win8019.ru]https://www.1win8019.ru[/url] .
Контрактный двигатель — лучшее решение при серьёзной поломке мотора
контрактные двигатели https://kontraktnye-dvigateli1-minsk.ru .
Заказать диплом о высшем образовании!
Приобрести диплом университета по невысокой цене возможно, обращаясь к проверенной специализированной компании. Заказать диплом: diploml-174.ru/vot-neskolko-variantov-zagolovka-sootvetstvuyushix-vashim-trebovaniyam-diplom-s-reestrom-v-moskve-ofitsialno-i-bistro-kupit-diplom-s-provodkoj-moskva-garantiya-reestr-diplom-moskva
Реализуем проект каркасного дома от фундамента до отделки
каркасный дом спб http://karkasnye-doma-pod-kluch-spb.ru/ .
Приобрести диплом университета по доступной цене возможно, обращаясь к надежной специализированной фирме. Мы готовы предложить документы ВУЗов на Ваш выбор, расположенных на территории всей РФ. breyerhorses.ru/personal/profile/register=yes
маркетплейс аккаунтов профиль с подписчиками
услуги по продаже аккаунтов профиль с подписчиками
Заказать диплом любого ВУЗа!
Мы предлагаем документы университетов, расположенных на территории всей РФ.
diplomv-v-ruki.ru/kupit-diplom-s-zaneseniem-v-reestr-rossii-vigodno/
Добрый день!
Для многих людей, приобрести диплом университета – это необходимость, шанс получить достойную работу. Но для кого-то – это желание не терять время на учебу в университете. С какой бы целью вам это не потребовалось, мы готовы помочь вам. Быстро, качественно и недорого изготовим диплом нового или старого образца на государственных бланках с реальными подписями и печатями.
Ключевая причина, почему многие прибегают к покупке документа, – получить определенную должность. Например, знания и опыт позволяют кандидату устроиться на работу, но документального подтверждения квалификации нет. В том случае если для работодателя важно присутствие “корочек”, риск потерять хорошее место очень высокий.
Заказать документ ВУЗа вы сможете в нашей компании в Москве. Мы предлагаем документы об окончании любых ВУЗов РФ. Вы получите диплом по любым специальностям, включая документы Советского Союза. Гарантируем, что в случае проверки документа работодателем, подозрений не возникнет.
Факторов, которые вынуждают купить диплом ВУЗа много. Кому-то срочно необходима работа, и нужно произвести хорошее впечатление на руководителя при собеседовании. Другие желают устроиться в престижную компанию, чтобы повысить собственный статус в обществе и в последующем начать свое дело. Чтобы не тратить драгоценное время, а сразу начинать успешную карьеру, используя имеющиеся навыки, можно приобрести диплом в интернете. Вы станете полезным в социуме, получите финансовую стабильность быстро и просто- диплом купить о среднем образовании
Официальный сайт лордфильм сериал почка лордфильм смотреть зарубежные новинки онлайн бесплатно. Фильмы, сериалы, кино, мультфильмы, аниме в хорошем качестве HD 720
Мы можем предложить дипломы психологов, юристов, экономистов и прочих профессий по выгодным тарифам.
Вы приобретаете документ через надежную и проверенную фирму. Приобрести диплом академии– http://ilk-nachalo.ru/blog.phpu=1670&b=1167/ – ilk-nachalo.ru/blog.phpu=1670&b=1167
Заказать диплом на заказ вы можете используя официальный сайт компании. otzivnew.ru/post_type=topic&p=438535
1win moldova download 1win moldova download .
Мы готовы предложить дипломы любой профессии по невысоким ценам. Мы готовы предложить документы ВУЗов, расположенных на территории всей России. Дипломы и аттестаты печатаются на “правильной” бумаге высшего качества. Это позволяет делать государственные дипломы, не отличимые от оригиналов. toursoul.ru/p=20056
Приобрести документ о получении высшего образования вы можете в нашей компании. Мы предлагаем документы об окончании любых университетов России. Вы получите необходимый диплом по любым специальностям, любого года выпуска, в том числе документы старого образца. Даем 100% гарантию, что при проверке документа работодателями, подозрений не возникнет. asxdiploman.com/kupit-diplom-instituta-s-reestrom-bistro-i-nedorogo-3/
где ввести промокод в 1win https://www.1win8020.ru .
Где заказать диплом по актуальной специальности?
Мы изготавливаем дипломы любой профессии по приятным тарифам. Важно, чтобы документы были доступными для большинства граждан. Выгодно купить диплом любого ВУЗа diplomj-irkutsk.ru/vot-neskolko-variantov-zagolovka-sootvetstvuyushix-trebovaniyam-kupit-diplom-s-provodkoj-v-reestre-ofitsialno-diplom-s-reestrom-garantiya-podlinnosti-i-trudoustrojstva-ofitsial/
Заказать диплом об образовании. Покупка диплома ВУЗа через надежную компанию дарит ряд преимуществ для покупателя. Это решение дает возможность сберечь как личное время, так и значительные финансовые средства. d91652pj.beget.tech/2025/04/07/zakaz-diploma-bez-posrednikov.html
как вывести деньги с 1win как вывести деньги с 1win .
маркетплейс аккаунтов соцсетей аккаунт для рекламы
Подбор и продажа бу запчастей — быстро, удобно, недорого
автозапчасти б у https://www.zapchasti-bu1-minsk.ru/ .
платформа для покупки аккаунтов маркетплейс аккаунтов соцсетей
профиль с подписчиками маркетплейс аккаунтов
Купить диплом академии !
Покупка диплома ВУЗа РФ у нас является надежным процессом, поскольку документ будет заноситься в государственный реестр. Купить диплом ВУЗа diplomservis.com/kupite-diplom-o-srednem-obrazovanii-legko-i-bistro
Приветствую!
Мы можем предложить дипломы психологов, юристов, экономистов и любых других профессий по доступным тарифам. Цена может зависеть от выбранной специальности, года получения и ВУЗа: diploman-russian.com/
изготовление лестниц в москве изготовление лестниц в москве .
индивидуалки Москвы http://www.byescorts.com .
лестницы на заказ цены лестницы на заказ цены .
салон свадебных платьев в москве салон свадебных платьев в москве .
lucky jet официальный сайт скачать http://www.1win8010.ru .
бк 1win официальный http://1win5055.ru/ .
1 win ставки на спорт https://1win5056.ru/ .
бот для лаки джет скачать 1win5055.ru .
Заказать диплом ВУЗа. Покупка документа о высшем образовании через качественную и надежную компанию дарит ряд плюсов для покупателя. Данное решение дает возможность сберечь время и серьезные финансовые средства. hashtap.com/@artur.sh/качественные-дипломы-на-заказ-Okl1x6Bej6w3
1win вывод средств сколько ждать 1win8004.ru .
лестницы для дома на заказ лестницы для дома на заказ .
Заказать диплом университета!
Мы изготавливаем дипломы любой профессии по приятным ценам— diplomk-vo-vladivostoke.ru
1win официальный сайт 1win5057.ru .
Заказать диплом о высшем образовании!
Мы предлагаем документы университетов, расположенных в любом регионе Российской Федерации.
damdiplomisa.com/kupit-diplom-texnikuma-s-reestrom-i-otzivami-2/
лестницы на заказ цены лестницы на заказ цены .
букмекеры с минимальным пополнением http://1win5056.ru/ .
свадебные платья магазин свадебные платья магазин .
эскорт Москва https://www.byescorts.com .
Приобрести диплом института по выгодной стоимости возможно, обращаясь к надежной специализированной компании. Заказать документ ВУЗа можно в нашей компании. mizunosoccershoesfans.com/read-blog/9588_zanesenie-diploma-v-reestr-obrazovaniya.html
skachat mostbet skachat mostbet .
маркетплейс аккаунтов соцсетей гарантия при продаже аккаунтов
биржа аккаунтов биржа аккаунтов
Мы можем предложить дипломы любых профессий по приятным тарифам. Мы готовы предложить документы техникумов, которые расположены в любом регионе России. Дипломы и аттестаты печатаются на бумаге высшего качества. Это дает возможность делать государственные дипломы, которые невозможно отличить от оригинала. podrabotke.flybb.ru/viewtopic.phpf=2&t=726
скачать бк осталось только найти предпочтение подходящее 1win8004.ru .
Диплом университета РФ!
Без института очень непросто было продвигаться вверх по карьерной лестнице. В связи с этим решение о покупке диплома можно считать целесообразным. Приобрести диплом о высшем образовании forum.stosstrupp-gold-germany.de/viewtopic.php?f=10&t=150475
мостбет казино войти http://mostbet3026.ru/ .
1win букмекерская контора https://1win8019.ru/ .
как делать ставки на 1win http://www.1win5057.ru .
1win промокоды 1win промокоды .
продажа аккаунтов маркетплейс аккаунтов соцсетей
Hi!
Step up your investing with binary options trading on our platform. Achieve returns of up to 200% with just $10. Experience effortless trading with real-time market analysis and a user-friendly interface. Trade confidently with 24/7 access and top security measures. Start your profitable journey today!
Earn every minute without limit of $100, $500, $1,000, with a minimum bet of $1.
Instant withdrawal!!!
Bonus code: OLYMPOLYMP
From $50 +30% to deposit!
+ Demo account!
+ Free Signals!
WARNING! If you are trying to access the site from the following countries, you need to enable VPN which does not apply to the following countries!
Australia, Canada, USA, Japan, UK, EU (all countries), Israel, Russia, Iran, Iraq, Korea, Central African Republic, Congo, Cote d’Ivoire, Eritrea, Ethiopia, Lebanon, Liberia, Libya, Mali, Mauritius, Myanmar, New Zealand, Saint Vincent and the Grenadines, Somalia, Sudan, Syria, Vanuatu, Yemen, Zimbabwe.
Sign up and start earning from the first minute!
https://trkmad.com/101773
Заказать диплом о высшем образовании!
Мы изготавливаем дипломы любой профессии по разумным тарифам. Вы приобретаете документ в надежной и проверенной компании. : sprostov.forumex.ru/viewtopic.php?f=2&t=726
1win официальный сайт мобильная версия http://www.1win8020.ru .
как поставить экспресс на 1win https://1win5055.ru/ .
платформа для покупки аккаунтов маркетплейс для реселлеров
Мы изготавливаем дипломы любой профессии по приятным тарифам.– kupitediplom0027.ru/kupit-diplom-v-moskve-s-zaneseniem-v-reestr/
Заказать диплом ВУЗа!
Мы можем предложить документы институтов, которые находятся на территории всей России. Дипломы и аттестаты выпускаются на бумаге высшего качества: dukan.lovelytutorials.com/member.phpu=5648
Мы предлагаем быстро приобрести диплом, который выполнен на оригинальной бумаге и заверен мокрыми печатями, штампами, подписями. Диплом способен пройти любые проверки, даже с применением специального оборудования. odesit.com/user.php?id.14596
Заказать диплом института по выгодной стоимости можно, обращаясь к проверенной специализированной фирме. Приобрести документ о получении высшего образования вы имеете возможность в нашей компании. veniaminv.flybb.ru/viewtopic.phpf=1&t=4366
Приобрести диплом университета!
Наши специалисты предлагаютвыгодно приобрести диплом, который выполняется на бланке ГОЗНАКа и заверен мокрыми печатями, водяными знаками, подписями. Диплом способен пройти любые проверки, даже с применением специальных приборов. Достигайте своих целей максимально быстро с нашими дипломами- ai.florist/read-blog/39771_kupit-diplom-s-zaneseniem-v-reestr-forum.html
1вин сайт вход 1вин сайт вход .
1win 500% http://1win5055.ru .
покупка аккаунтов покупка аккаунтов
мостбет https://mostbet3026.ru .
клиника абакан официальный сайт medicinskiy-centr-abakan
варикоз конечностей лечение лечение варикоза лазером цена
mosbet uz https://mostbet3027.ru/ .
семейная клиника гинеколог гинеколог абакан отзывы
покердом телеграм http://1win5056.ru .
After I initially commented I clicked the -Notify me when new comments are added- checkbox and now every time a comment is added I get 4 emails with the identical comment. Is there any way you can take away me from that service? Thanks!
I like the valuable information you provide in your articles. I will bookmark your weblog and check again here frequently. I’m quite sure I’ll learn lots of new stuff right here! Best of luck for the next!
Б/у автозапчасти от авторазборки — выгодное решение для ремонта автомобиля
разборки разборки .
Каркасный дом с отделкой, сантехникой и электрикой — готовое жильё
строительство каркасных домов в спб строительство каркасных домов в спб .
Надежная доставка цветов без выходных и перерывов
гортензии купить https://www.cvety-s-dostavkoi.ru/rubric/gortenzii/ .
казино мостбет http://www.ugilas.com.kg .
мостбет mostbet3027.ru .
Мы изготавливаем дипломы любых профессий по приятным тарифам. Стараемся поддерживать для заказчиков адекватную ценовую политику. Важно, чтобы документы были доступны для подавляющей массы граждан.
Заказ диплома, подтверждающего окончание института, – это грамотное решение. Приобрести диплом университета: diplom-bez-problem.com/diplom-kupit-3/
1win официальный зеркало букмекерская контора https://1win10017.ru/ .
Добрый день спасибо за ваш выбор нашего маркетплейса ссылка на сайт —>> kraken зеркало
скачат 1 win http://www.1win10017.ru .
покупка аккаунтов безопасная сделка аккаунтов
Приобрести диплом ВУЗа по доступной цене вы сможете, обратившись к надежной специализированной фирме. Мы можем предложить документы высших учебных заведений, которые расположены в любом регионе РФ. social.elpaso.world/read-blog/6318_diplom-s-vneseniem-v-reestr.html
mostbet promokod olish http://www.mostbet3026.ru .
медицинский косметолог https://uslugi-kosmetologa2.ru
отоларинголог лор отзывы услуги лора
сколько длится лазерная эпиляция лазерная эпиляция глубокое бикини
?Hola aficionados al casino
Casino 20 euros gratis sin depГіsito EspaГ±a es la mejor manera de empezar a ganar en grande sin invertir.
Recibe 20 euros gratis en casinos confiables de EspaГ±a y juega sin compromiso. – https://www.casino20eurosgratissindeposito.guru
?Que tengas excelentes juegos !
Добрый день!
Для определенных людей, купить диплом ВУЗа – это острая потребность, возможность получить хорошую работу. Однако для кого-то – это понятное желание не терять множество времени на учебу в институте. С какой бы целью вам это не понадобилось, мы готовы помочь. Быстро, качественно и выгодно изготовим диплом нового или старого образца на государственных бланках со всеми подписями и печатями.
Основная причина, почему многие прибегают к покупке документа, – получить определенную должность. Предположим, навыки и опыт позволяют человеку устроиться на желаемую работу, а подтверждения квалификации не имеется. В случае если для работодателя важно наличие “корочек”, риск потерять место работы достаточно высокий.
Купить документ о получении высшего образования можно у нас в столице. Мы предлагаем документы об окончании любых университетов Российской Федерации. Вы получите необходимый диплом по любой специальности, любого года выпуска, включая документы СССР. Гарантируем, что при проверке документа работодателем, подозрений не появится.
Факторов, которые вынуждают купить диплом о среднем образовании очень много. Кому-то срочно потребовалась работа, в итоге необходимо произвести особое впечатление на руководителя при собеседовании. Другие желают устроиться в престижную компанию, чтобы повысить свой статус в социуме и в последующем начать свое дело. Чтобы не тратить драгоценное время, а сразу начинать успешную карьеру, используя имеющиеся знания, можно заказать диплом прямо в интернете. Вы станете полезным в социуме, получите финансовую стабильность в кратчайший срок- диплом о высшем образовании купить
Наша компания предлагает быстро купить диплом, который выполняется на оригинальном бланке и заверен печатями, штампами, подписями. Наш документ пройдет лубую проверку, даже с использованием профессионального оборудования. 67999mobi.copiny.com/question/details/id/1087417
Заказать диплом о высшем образовании!
Мы предлагаембыстро и выгодно приобрести диплом, который выполнен на бланке ГОЗНАКа и заверен печатями, водяными знаками, подписями. Наш документ способен пройти лубую проверку, даже с использованием профессиональных приборов. Решайте свои задачи быстро с нашей компанией- unbornbabymusic.com/read-blog/11_gde-kupit-diplom-s-zaneseniem-v-reestr.html
mostbet промокод https://mostbet3026.ru .
как использовать бонусы 1вин http://1win8004.ru/ .
зарегистрироваться в 1win https://1win5057.ru .
Приобрести диплом можно через официальный сайт компании. argayash.flybb.ru/viewtopic.phpf=9&t=2071
бонусы на казино 1win http://1win10001.ru/ .
Купить диплом института !
Покупка диплома любого университета РФ у нас является надежным делом, ведь документ заносится в государственный реестр. Заказать диплом любого института diplomk-vo-vladivostoke.ru/kupit-diplom-vnesennij-v-reestr-s-garantiej
aviator игра 1win скачать https://1win10001.ru .
промокод для 1win http://1win10001.ru .
скачать приложение 1 win http://www.1win10002.ru .
Добрый день спасибо за ваш выбор нашего маркетплейса ссылка на сайт —>> kraken ссылка
Приветствую!
Мы изготавливаем дипломы психологов, юристов, экономистов и прочих профессий по невысоким тарифам. Цена будет зависеть от той или иной специальности, года выпуска и университета: diplomanc.com/
mostbet.kg mostbet.kg .
лестницы заказать лестницы заказать .
скачать мостбет официальный сайт http://mostbet3027.ru/ .
лестницы на металлокаркасе под ключ https://izgotovlenie-lestnic-na-zakaz2.ru .
игра авиатор 1win 1win10002.ru .
эскорт агентство Москва http://byescorts.com .
магазин свадебных платьев в москве магазин свадебных платьев в москве .
Заказать диплом об образовании!
Мы готовы предложить дипломы психологов, юристов, экономистов и прочих профессий по приятным ценам— 11ege.ru
Those are yours alright! . We at least need to get these people stealing images to start blogging! They probably just did a image search and grabbed them. They look good though!
1win официальный сайт бесплатно online http://1win10002.ru/ .
Купить диплом любого ВУЗа!
Мы готовы предложить документы университетов, которые расположены на территории всей России.
diploml-174.ru/kupit-diplom-ob-obrazovanii-s-reestrom-2/
Приобрести диплом на заказ в столице вы сможете используя сайт компании. fsmi.wiki/index.phptitle=Дипломы_вуза_без_головной_боли
магазин аккаунтов продажа аккаунтов
Коммерческий автотранспорт в лизинг от проверенных поставщиков
взять оборудование в лизинг http://lizing-kommercheskogo-transporta1.ru/oborudovanie/ .
Мы готовы предложить дипломы любой профессии по выгодным ценам. Мы предлагаем документы техникумов, которые расположены на территории всей Российской Федерации. Документы выпускаются на “правильной” бумаге высшего качества. Это позволяет делать настоящие дипломы, не отличимые от оригиналов. ladymystery.ru/forum/topic.aspTOPIC_ID=11809
изготовление лестниц на заказ в московской области izgotovlenie-lestnic-na-zakaz1.ru .
лестница на заказ лестница на заказ .
Приобретение документа о высшем образовании через надежную фирму дарит ряд преимуществ для покупателя. Такое решение позволяет сберечь время и существенные средства. Тем не менее, на этом выгоды не ограничиваются, плюсов значительно больше.Мы можем предложить дипломы любой профессии. Дипломы производятся на фирменных бланках государственного образца. Доступная стоимость в сравнении с большими тратами на обучение и проживание. Приобретение диплома об образовании из российского ВУЗа является мудрым шагом.
Быстро купить диплом о высшем образовании: diplomaj-v-tule.ru/kak-zanesti-diplom-v-reestr-2/
Задался вопросом: можно ли на самом деле купить диплом государственного образца в Москве? Был приятно удивлен — это реально и легально!
Сначала искал информацию в интернете на тему: купить диплом с апостилем, купить среднее образование, купить образование среднее, купить диплом о среднем образовании в иркутске, куплю диплом вуза бывший и получил базовые знания. В итоге остановился на материале: kyc-diplom.com/attestat-9-klassov.html
Диплом ВУЗа РФ!
Без института очень сложно было продвинуться вверх по карьере. Именно из-за этого решение о заказе диплома стоит считать целесообразным. Выгодно купить диплом университета school97.ru/vesti20/index.php?PAGE_NAME=profile_view&UID=220710
девушки эскорт Москва https://byescorts.com/ .
магазин свадебных платьев в москве магазин свадебных платьев в москве .
laki jet скачать http://1win10003.ru .
Купить диплом университета!
Мы оказываем услуги по производству и продаже документов об окончании любых университетов России. Документы производят на оригинальных бланках государственного образца. borderforum.ru/viewtopic.php?f=7&t=13201
1win pro 1win pro .
скачать 1win на телефон официальный сайт андроид https://1win10017.ru .
лицензионные казино
Сохраняется ограничение – подарки от казино нельзя отыгрывать в рулетке или в карточных играх, где победа зависит от мастерства. Ни одно наземное казино не предложит игрокам принять участие в выгодных акциях без вложений. Выбор игроков 2023. Пользователям предлагают деньги, бесплатные вращения и другие игровые преимущества за активность и различные действия. Бонус: 250 руб Бонус код: 250CBONUS Вейджер: х40 Слот: Все. Возможно, на данный момент в казино нет таких предложений или гемблер не проявляет достаточную активность на сайте.
Source:
лицензионные казино
Купить диплом о высшем образовании!
Мы предлагаем документы ВУЗов, расположенных в любом регионе России.
diplomskiy.com/kupit-diplom-s-zaneseniem-v-reestr-rossii-vigodno/
маркетплейс аккаунтов маркетплейс аккаунтов соцсетей
букмекерская официальный сайт скачать http://www.1win10003.ru .
ван вин казино http://1win10018.ru .
1win uganda http://www.1win1030.top .
Каркасные дома с двухскатной крышей и удобной планировкой
дома каркасные цены http://www.karkasnye-doma-msk-pod-kluch.ru .
Мы предлагаем дипломы любых профессий по приятным ценам. Купить диплом Коломна — kyc-diplom.com/geography/kolomna.html
мостбет кыргызстан скачать мостбет кыргызстан скачать .
Заказать диплом о высшем образовании!
Мы готовы предложить дипломы любой профессии по приятным тарифам. Вы приобретаете документ в надежной и проверенной временем компании. : realestate.kctech.com.np/profile/micheline83p3
I have read some excellent stuff here. Definitely value bookmarking for revisiting. I surprise how a lot effort you place to make such a fantastic informative web site.
Приобрести диплом любого ВУЗа!
Приобретение официального диплома через надежную фирму дарит много преимуществ для покупателя. Заказать диплом об образовании у сильной организации: doks-v-gorode-vologda-35.online
Индивидуальный проект + строительство каркасного дома — в одном месте
каркасные дома под ключ проекты и цены http://www.karkasnye-doma-msk-pod-kluch0.ru .
Мы изготавливаем дипломы любой профессии по приятным ценам. Дипломы производятся на настоящих бланках государственного образца Выгодно заказать диплом любого ВУЗа asxdiploman.com
Где приобрести диплом по нужной специальности?
Получаемый диплом с приложением 100% отвечает условиям и стандартам, никто не сможет отличить его от оригинала – даже со специальным оборудованием. Не откладывайте собственные мечты и задачи на несколько лет, реализуйте их с нашей компанией – отправляйте простую заявку на диплом прямо сейчас! Диплом о высшем образовании – быстро и легко! kiwiboom.com/read-blog/3239_teper-priobresti-dlya-sebya-dokumenty-o-zavershenii-obucheniya-legko-vne-zavisim.html
11 ответов https://e-pochemuchka.ru/pochemu-u-osminoga-golubaya-krov/
Графический дизайнер https://uslugi.yandex.ru/profile/ArinaSergeevnaB-2163631 копирайтер и SMM-специалист в одном лице. Создаю визуал, тексты и стратегии, которые продают. Оформление, контент, продвижение — всё под ключ. Помогаю брендам быть заметными, узнаваемыми и вовлечёнными.
1vin зеркало http://1win10001.ru .
Официальный сайт КИНО ХЕЛП смотреть ходячие мертвецы 11 сезон смотреть онлайн бесплатно в хорошем качестве зарубежные новинки онлайн бесплатно. Фильмы, сериалы, кино, мультфильмы, аниме, дорамы. Дата выхода новых серий. Сериалы Кинохелп это лучшие новинки и мировые премьеры.
Выгодно заказать диплом любого ВУЗа. Покупка документа о высшем образовании через качественную и надежную фирму дарит ряд плюсов. Это решение дает возможность сберечь как личное время, так и существенные средства. careerconnect.mmu.edu.my/employer/eonline-diploma
услуги лазерной эпиляции studiya-lazernaya-epilyaciya.ru/
Мы изготавливаем дипломы психологов, юристов, экономистов и прочих профессий по разумным ценам.– diplomaj-v-tule.ru/kupit-diplom-s-vneseniem-v-reestr-bistro-i-nadezhno-7/
1win casino uganda 1win casino uganda .
1win login ug 1win1030.top .
Awesome blog! Do you have any helpful hints for aspiring writers?
I’m hoping to start my own site soon but I’m a little lost on everything.
Would you propose starting with a free platform like WordPress or go for a paid option? There are so many
options out there that I’m totally confused .. Any recommendations?
Appreciate it!
Also visit my website … free sugar pro complaints
лазерная эпиляция бикини цена клиника лазерной эпиляции
лазерная эпиляция лазерная эпиляция бикини цена
аренда складского бокса для хранения вещей аренда складского бокса для хранения вещей .
Servicio completo de espectaculo de drones con montaje incluido
compañía de espectáculos de luces con drones https://www.show0-de-drones.com/ .
1win официальный сайт зеркало букмекерской конторы http://1win10018.ru .
1win казино регистрация https://1win10020.ru/ .
скачать букмекерская контора регистрация http://1win10003.ru .
скачать букмекерская контора регистрация https://1win10018.ru/ .
Делаем печать на футболках с яркими устойчивыми красками
заказ футболки с принтом заказ футболки с принтом .
As I website possessor I believe the content here is real great, regards for your efforts.
1win pro download http://www.1win10002.ru .
свадебные салоны в москве свадебные салоны в москве .
свадебные платья магазин свадебные платья магазин .
стерилизатор плазменный цена стерилизатор плазменный цена .
Заказать диплом любого университета!
Приобрести диплом университета по невысокой цене возможно, обращаясь к проверенной специализированной компании. Заказать диплом: damdiplomisa.com/nadezhnij-diplom-o-visshem-obrazovanii-otzivi-i-doverie
плазменный стерилизатор медицинский http://www.plazmennye-sterilizatory.ru/ .
ваучер 1win телеграм https://www.1win10003.ru .
Приобрести диплом о высшем образовании!
Мы предлагаем документы об окончании любых ВУЗов Российской Федерации. Документы производятся на настоящих бланках государственного образца. anatoliyrud.ekafe.ru/viewforum.php?f=29
Калькулятор досрочного погашения для контроля финансовой нагрузки
кредитный калькулятор с досрочным погашением онлайн https://finanspro24.ru .
sayt mostbet mostbet3027.ru .
Самые выгодные предложения на шины в нашем магазине
магазин шин спб магазин шин спб .
Мы изготавливаем дипломы психологов, юристов, экономистов и других профессий по приятным ценам.
Вы приобретаете документ в надежной и проверенной временем компании. Купить диплом университета– http://clinicial.co.uk/employer/diplomy-grup-24/ – clinicial.co.uk/employer/diplomy-grup-24
Где приобрести диплом по необходимой специальности?
Мы готовы предложить дипломы любой профессии по разумным тарифам. Важно, чтобы дипломы были доступны для подавляющей массы наших граждан. Выгодно приобрести диплом о высшем образовании freediplom.com/kupit-diplom-instituta-s-reestrom-9/
Купить диплом ВУЗа по доступной цене возможно, обращаясь к надежной специализированной компании. Заказать документ о получении высшего образования можно в нашей компании. art-gymnastics.ru/users/54
lucky jet скачать https://1win10020.ru .
джули брайд москва https://svadebnyj-salon-moskva-3.ru .
Приобрести диплом о высшем образовании. Изготовление документа занимает гораздо меньше времени, а стоимость при этом доступна любому. В итоге вы получаете возможность сохранить бюджет и найти работу мечты. Купить диплом под заказ возможно используя официальный портал компании. – sailrnetwork.com/read-blog/2838_.html
низкотемпературный плазменный стерилизатор низкотемпературный плазменный стерилизатор .
плазменные медицинские стерилизаторы http://www.plazmennye-sterilizatory.ru/ .
Как проверить кредитный рейтинг и повысить шансы на одобрение ипотеки
узнать кредитный рейтинг бесплатно онлайн http://dengivperedservice.ru/ .
Задался вопросом: можно ли на самом деле купить диплом государственного образца в Москве? Был приятно удивлен — это реально и легально!
Сначала искал информацию в интернете на тему: купить аттестат за классов, купить диплом в магадане, купить диплом в южно-сахалинске, купить диплом в новошахтинске, купить диплом в железногорске и получил базовые знания. В итоге остановился на материале: diplomybox.com/kupit-diplom-bakalavra-v-nizhnem-tagile
свадебный салон простые платья https://www.svadebnyj-salon-moskva-2.ru .
скачать букмекерская контора регистрация http://1win10017.ru/ .
Приобрести диплом о высшем образовании. Заказ диплома через качественную и надежную фирму дарит ряд плюсов для покупателя. Это решение дает возможность сберечь время и серьезные финансовые средства. pesnibardov.ru/f/ucp.php?mode=login
Купить документ о получении высшего образования вы можете у нас в столице. Мы оказываем услуги по производству и продаже документов об окончании любых университетов России. Вы сможете получить диплом по любой специальности, включая документы СССР. Даем 100% гарантию, что в случае проверки документов работодателями, подозрений не возникнет. good-diplom.ru/kupit-diplom-menedzhera-s-zaneseniem-v-reestr-bistro-4/
1win mx http://1win1016.top/ .
Заказать диплом о высшем образовании!
Наша компания предлагаетбыстро и выгодно заказать диплом, который выполнен на оригинальной бумаге и заверен печатями, штампами, подписями официальных лиц. Документ способен пройти лубую проверку, даже при использовании специфических приборов. Решите свои задачи быстро и просто с нашей компанией- link.5nx.ru/viewtopic.phpf=12&t=12562
Купить диплом института по невысокой стоимости возможно, обращаясь к проверенной специализированной компании. Заказать документ ВУЗа можно у нас в Москве. diplomskiy.com/kupit-diplom-s-vneseniem-v-reestr-bistro-i-udobno-2
Где заказать диплом специалиста?
Получаемый диплом со всеми печатями и подписями отвечает стандартам, неотличим от оригинала – даже со специальным оборудованием. Не стоит откладывать свои цели на пять лет, реализуйте их с нами – отправьте заявку на диплом сегодня! Получить диплом о среднем специальном образовании – легко! israelafrica.mn.co/posts/82088449
казино 1 win регистрация https://1win10019.ru .
1win скачать андроид 1win10020.ru .
Заказать диплом ВУЗа по выгодной стоимости можно, обращаясь к надежной специализированной фирме. Приобрести документ института вы сможете в нашей компании в столице. apkjobs.site/companies/originals-diplomsi
склады сезонного хранения склады сезонного хранения .
Где купить диплом по актуальной специальности?
Купить диплом университета по доступной цене возможно, обратившись к проверенной специализированной компании.: diplom-zakaz.ru
Мы изготавливаем дипломы любой профессии по приятным ценам. Дипломы производятся на настоящих бланках Приобрести диплом университета kupit-diplom24.com
эпиляция тотальное бикини лазерная эпиляция зоны бикини цена
лазерная эпиляция бикини женщин epilyaciya-bikini-lazerom.ru/
печать на пакетах купить печать на зип пакетах москва
1win uganda http://1win1030.top .
Your comment truly enhances this post. It¡¯s clear, concise, and packed with valuable insights. I love how you presented your thoughts in a way that invites further discussion. Thank you for such a thoughtful response!jili
пин ап вход: пин ап вход – пин ап казино официальный сайт
Мы оказываем услуги по продаже документов об окончании любых университетов России. Документы производят на настоящих бланках. good-serial.ru/2025/04/diplom-kotoryiy-sdelaet-vas-konkurentosposobnyim
I want to convey my passion for your kind-heartedness supporting those people that must have help with the situation. Your personal dedication to getting the solution all over had become extraordinarily helpful and has truly helped associates like me to get to their desired goals. Your entire warm and friendly information means much a person like me and additionally to my colleagues. Regards; from everyone of us.
Где купить диплом специалиста?
Полученный диплом с приложением 100% отвечает условиям и стандартам, неотличим от оригинала – даже со специально предназначенным оборудованием. Диплом о высшем образовании – запросто! serrok.kabb.ru/viewtopic.phpf=3&t=824
маркетплейс аккаунтов соцсетей купить аккаунт
Заказать диплом любого университета!
Приобрести диплом ВУЗа. Заказ документа о высшем образовании через проверенную и надежную компанию дарит ряд плюсов для покупателя. Такое решение дает возможность сэкономить время и серьезные финансовые средства. ceskanaike.com/read-blog/16524_kupit-v-moskve-diplom-vracha.html
Заказать диплом института по выгодной стоимости возможно, обращаясь к надежной специализированной компании. Мы оказываем услуги по продаже документов об окончании любых ВУЗов РФ. Купить диплом университета– blogscotchrouge.com/diplom-na-zakaz-legko-i-prosto-185
Мы изготавливаем дипломы психологов, юристов, экономистов и любых других профессий по разумным тарифам. Приобретение документа, который подтверждает обучение в университете, – это выгодное решение. Приобрести диплом о высшем образовании: workompass.com/employer/diplomirovans
продать аккаунт маркетплейс аккаунтов
баланс 1win https://www.1win10019.ru .
Наша компания предлагает выгодно и быстро приобрести диплом, который выполняется на бланке ГОЗНАКа и заверен мокрыми печатями, штампами, подписями. Данный документ пройдет лубую проверку, даже при помощи профессионального оборудования. truthbook.social/read-blog/20637_kuplyu-diplom-s-provodkoj-v-vuze.html
Диплом университета РФ!
Без университета очень непросто было продвигаться по карьере. Заказать диплом под заказ в столице возможно используя официальный портал компании: appsupportlocal.com/read-blog/507_kupit-diplom-v-krasnoyarske.html
Мы изготавливаем дипломы любой профессии по доступным тарифам.– clickbuttonpinshow.copiny.com/question/details/id/1093494
¡Hola estrategas de las apuestas!
Los 100 giros gratis sin depГіsito EspaГ±a te permiten conocer los juegos sin arriesgar. Es la mejor forma de familiarizarte con el casino antes de jugar en serio. ВЎSolo para nuevos jugadores!
Oferta: giros gratis por registro sin depГіsito EspaГ±a – 100 giros gratis.
¡Que tengas magníficas victorias memorables !
курс лазерной эпиляции подмышек лазерная эпиляция подмышек сколько
лазерная эпиляция спины мужчины lazernaya-epilyaciya-muzhchin.ru/
печать бейджей на пластике печать бейджа пластик
I reckon something genuinely special in this site.
Купить диплом ВУЗа поспособствуем. Купить диплом бакалавра в Санкт-Петербурге – diplomybox.com/kupit-diplom-bakalavra-v-sankt-peterburge
Приобрести диплом об образовании!
Заказать диплом ВУЗа по выгодной стоимости вы можете, обратившись к надежной специализированной компании. Приобрести диплом о высшем образовании: diplomh-40.ru/kupit-diplom-moskva-s-zaneseniem-v-reestr-9
1win зарегистрироваться 1win10004.ru .
1win casino http://1win1016.top .
Где приобрести диплом специалиста?
Мы изготавливаем дипломы любых профессий по приятным ценам. Для нас важно, чтобы дипломы были доступными для подавляющей массы наших граждан. Заказать диплом ВУЗа diploml-174.ru/kupit-diplom-s-zaneseniem-v-reestr-stoimost-10/
Приобретение документа о высшем образовании через качественную и надежную компанию дарит немало преимуществ. Это решение дает возможность сэкономить время и значительные деньги. Тем не менее, на этом выгода не ограничивается, плюсов гораздо больше.Мы предлагаем дипломы любых профессий. Дипломы производятся на настоящих бланках. Доступная стоимость в сравнении с крупными затратами на обучение и проживание. Покупка диплома об образовании из российского университета станет рациональным шагом.
Быстро заказать диплом о высшем образовании: [url=http://freediplom.com/kupit-diplom-vuza-s-zaneseniem-v-reestr-bistro-i-nadezhno-6/]freediplom.com/kupit-diplom-vuza-s-zaneseniem-v-reestr-bistro-i-nadezhno-6/[/url]
1win официальный сайт вход скачать https://1win10004.ru .
личный кабинет 1win http://1win10019.ru .
Мы изготавливаем дипломы любых профессий по невысоким ценам. Приобретение диплома, подтверждающего окончание ВУЗа, – это выгодное решение. Заказать диплом любого университета: goroda.flybb.ru/viewtopic.phpf=2&t=893
Мы изготавливаем дипломы любой профессии по доступным ценам.
Вы заказываете документ в надежной и проверенной временем компании. Купить диплом академии– http://kontenent.flybb.ru/viewtopic.phpf=2&t=612/ – kontenent.flybb.ru/viewtopic.phpf=2&t=612
Наши специалисты предлагают максимально быстро заказать диплом, который выполнен на оригинальном бланке и заверен мокрыми печатями, водяными знаками, подписями. Данный документ способен пройти любые проверки, даже при использовании профессионального оборудования. rulezrp.listbb.ru/viewtopic.php?f=2&t=1639
I was just searching for this info for some time. After six hours of continuous Googleing, finally I got it in your site. I wonder what is the lack of Google strategy that do not rank this type of informative web sites in top of the list. Normally the top websites are full of garbage.
Купить диплом ВУЗа!
Заказ официального диплома через проверенную и надежную компанию дарит ряд преимуществ для покупателя. Приобрести диплом университета у сильной компании: doks-v-gorode-omsk-55.ru
1 win официальный регистрация 1 win официальный регистрация .
Заказать диплом о высшем образовании. Изготовление диплома занимает намного меньше времени, а стоимость при этом невысокая. В результате вы имеете возможность сберечь деньги и время и получить работу мечты. Заказать диплом на заказ в Москве можно через сайт компании. – rsgroupofcompany.co.in/employer/russiany-diplomans
скачать мостбет с официального сайта https://mostbet10001.ru .
mostbet.kg http://mostbet10007.ru/ .
мостбет вход сегодня мостбет вход сегодня .
Купить документ института можно в нашей компании. Мы оказываем услуги по изготовлению и продаже документов об окончании любых ВУЗов Российской Федерации. Вы получите диплом по любой специальности, включая документы образца СССР. Даем 100% гарантию, что при проверке документов работодателем, каких-либо подозрений не возникнет. diplomist.com/kupit-diplom-zanesennij-v-reestr-bistro-i-vigodno/
мостбет ставки на спорт онлайн https://www.mostbet10004.ru .
мостбет сайт бк mostbet10001.ru .
мосбет скачат https://www.mostbet10007.ru .
1вин букмекерская контора https://www.1win10020.ru .
скачать мостбет официальный сайт https://www.mostbet10006.ru .
казино мостбет mostbet10005.ru .
мостбеь мостбеь .
mostbet oficial http://mostbet10006.ru .
Мы предлагаем документы об окончании любых ВУЗов Российской Федерации. Документы производят на фирменных бланках государственного образца. poltavagok.ru/vash-idealnyiy-diplom-vsego-v-odnom-klike
Приобрести диплом о высшем образовании!
Мы предлагаем документы институтов, которые находятся на территории всей России.
damdiplomisa.com/kupit-diplom-visshego-obrazovaniya-s-zaneseniem-v-reestr-8/
mostbet.com скачать http://www.mostbet10009.ru .
салон свадебных и вечерних платьев москва салон свадебных и вечерних платьев москва .
Где купить диплом по актуальной специальности?
Полученный диплом со всеми печатями и подписями отвечает стандартам, никто не сможет отличить его от оригинала – даже со специальным оборудованием. Диплом о среднем специальном образовании – не проблема! chuhaipin.cn/employer/diplomix-asx
Приобрести диплом любого университета!
Купить диплом об образовании. Приобретение документа о высшем образовании через проверенную и надежную компанию дарит ряд преимуществ для покупателя. Такое решение дает возможность сэкономить как дорогое время, так и серьезные финансовые средства. mahadjobs.com/employer/eonline-diploma
низкотемпературные стерилизаторы http://www.plazm-sterilizatory.ru .
свадебные салоны москва свадебные салоны москва .
Hello there, I discovered your blog via Google at the same time as searching for a comparable topic, your site got here up, it looks great. I’ve bookmarked it in my google bookmarks.
плазменный стерилизатор медицинский купить http://plazmennye-sterilizatory.ru .
Купить диплом института!
Мы изготавливаем дипломы любой профессии по невысоким ценам. Вы приобретаете документ через надежную компанию. : amazon.rx22.ru/posting.phpmode=post&f=5
сублимационная печать на лентах печать на клейкой ленте
casino en 1 win 1win1016.top .
печать дизайнерских конвертов печать индекса на конверте
Диплом университета Российской Федерации!
Без ВУЗа очень непросто было продвинуться вверх по карьере. Приобрести диплом под заказ возможно используя официальный портал компании: babygirls025.copiny.com/question/details/id/1093051
цифровая печать буклетов заказать печать буклетов
как зарегистрироваться в мостбет http://mostbet10009.ru .
mostbet kg отзывы http://mostbet10009.ru .
mostbwt https://www.mostbet10005.ru .
Приобрести диплом ВУЗа по доступной стоимости вы сможете, обратившись к надежной специализированной компании. Мы предлагаем документы престижных ВУЗов, расположенных в любом регионе России. cristian.5nx.ru/viewtopic.phpf=49&t=410
джули брайд svadebnyj-salon-moskva-3.ru .
mostbet вход в личный кабинет http://mostbet10005.ru/ .
салон свадебных платьев москва салон свадебных платьев москва .
плазменные медицинские стерилизаторы https://plazmennye-sterilizatory.ru/ .
mostbet.kg http://mostbet10004.ru/ .
стерилизатор плазменный цена стерилизатор плазменный цена .
Приобрести диплом ВУЗа по доступной цене можно, обратившись к проверенной специализированной компании. Мы предлагаем документы об окончании любых университетов России. Приобрести диплом о высшем образовании– atom.forumex.ru/viewtopic.phpf=30&t=1266
Мы изготавливаем дипломы любой профессии по приятным тарифам.– [url=http://werderbremenfansclub.com/read-blog/15842_kupit-diplom-ekb.html/]werderbremenfansclub.com/read-blog/15842_kupit-diplom-ekb.html[/url]
мост бет букмекерская контора mostbet10001.ru .
мостбет официальный http://mostbet10004.ru/ .
промо 1win https://www.1win10004.ru .
Здравствуйте!
Мы готовы предложить дипломы психологов, юристов, экономистов и других профессий по доступным тарифам. Цена зависит от определенной специальности, года получения и университета: diplomanc.com/
Приобрести диплом вы имеете возможность используя официальный портал компании. petisionline.com/482357
Заказать диплом о высшем образовании!
Мы готовы предложить документы институтов, расположенных в любом регионе России.
diplomt-nsk.ru/kupit-diplom-s-zaneseniem-v-reestr-bistro-i-nadezhno-23/
мостбет.сом https://mostbet10007.ru/ .
мостбеи http://mostbet10001.ru/ .
Приобрести диплом о высшем образовании!
Мы предлагаем документы учебных заведений, расположенных на территории всей РФ. Документы делаются на бумаге высшего качества: peso4nica.getbb.ru/index.php
Приобрести диплом любого университета!
Наши специалисты предлагаютвыгодно и быстро купить диплом, который выполнен на бланке ГОЗНАКа и заверен печатями, штампами, подписями. Данный документ способен пройти лубую проверку, даже с использованием профессиональных приборов. Решайте свои задачи быстро и просто с нашим сервисом- diafan.rusheat.ru/forum/diplomy-kotorye-deystvitelno-imeyut-znachenie
печать наклеек с логотипом печать дтф наклеек
1win casino mexico 1win1016.top .
таблички из пластика табличка на дом пвх
календарь печать спб календарь на печать по месяцам
печать плаката недорого срочная печать плакатов
Very interesting information!Perfect just what I was searching for! “Outside of a dog, a book is man’s best friend. Inside of a dog it’s too dark to read.” by Groucho Marx.
Купить диплом института по невысокой стоимости возможно, обратившись к проверенной специализированной компании. Купить документ о получении высшего образования можно у нас в Москве. dip-lom-rus.ru/kupit-diplom-s-vneseniem-v-reestr-26
бк мостбет http://mostbet10006.ru .
Строим уютные дачные каркасные дома с минимальными затратами
каркасный дом под ключ в спб цена https://www.karkasnye-doma-spb-pod-kluch.ru/ .
Все преимущества строительства каркасного дома — в одном проекте
каркасный дом http://karkasnye-doma-pod-kluch-spb.ru/ .
The Salt Trick is a natural technique that involves using specific salts, such as Blue Salt, to enhance male performance
1вин официальный сайт вход 1вин официальный сайт вход .
плазменный стерилизатор купить плазменный стерилизатор купить .
Приобрести диплом на заказ возможно используя официальный портал компании. nubiantalk.site/read-blog/20427_legalnoe-zanesenie-diploma-v-reestr.html
мост бет скачать http://mostbet10005.ru .
Мы предлагаем дипломы любой профессии по невысоким тарифам. Мы можем предложить документы ВУЗов, расположенных на территории всей Российской Федерации. Документы выпускаются на “правильной” бумаге самого высшего качества. Это дает возможность делать настоящие дипломы, не отличимые от оригинала. arzookanak0044.copiny.com/question/details/id/1083048
мостбет уз скачать https://mostbet10009.ru .
Hi, i feel that i noticed you visited my blog thus i came to “go back the favor”.I am trying to in finding issues to enhance my website!I assume its adequate to use a few of your ideas!!
Купить диплом ВУЗа по невысокой цене возможно, обращаясь к проверенной специализированной компании. Мы можем предложить документы престижных ВУЗов, расположенных в любом регионе Российской Федерации. pattonlabs.com/employer/eonline-diploma
стерилизатор плазменный низкотемпературный http://www.plazmennyy-sterilizator.ru/ .
Заказать диплом университета по доступной цене возможно, обращаясь к проверенной специализированной фирме. Заказать документ о получении высшего образования можно в нашей компании. panther.80lvl.ru/index.php
калькулятор страховки на авто калькулятор страховки на авто .
рассчитать стоимость страховки на машину калькулятор zaria.com.ru .
бонус на казино 1win https://www.1win10022.ru .
mostbet скачать 2024 https://mostbet8005.ru .
склад для хранения вещей москва склад для хранения вещей москва .
1win регистрация на сайте http://www.1win10022.ru .
как ввести промокод в 1win после регистрации http://1win10006.ru .
изготовление выставочных стендов изготовление и монтаж стендов
1 win ракетка https://www.1win10004.ru .
скачать мостбет казино mostbet8005.ru .
As soon as I discovered this internet site I went on reddit to share some of the love with them.
Приобрести диплом о высшем образовании!
Мы готовы предложить документы институтов, которые находятся на территории всей России. Документы печатаются на “правильной” бумаге высшего качества: mosfor.flybb.ru/viewtopic.phpf=2&t=731
рассчитать страховку осаго калькулятор http://www.zaria.com.ru/ .
рассчитать стоимость страховки на машину калькулятор http://niievmash.ru .
Приветствую!
Мы готовы предложить дипломы любой профессии по приятным ценам. Цена может зависеть от выбранной специальности, года выпуска и образовательного учреждения: rdiplomans.com/
бот lucky jet скачать http://www.1win10005.ru .
Buy and Sell Accounts Account Trading
1win зеркало скачать online https://1win10023.ru .
Качественная и долговечная печать на футболках в любом тираже
заказ футболки со своим принтом https://pechat-na-futbolkah1.ru/ .
1 win ставки 1win10006.ru .
1вин официальный вход с компьютера http://1win10025.ru/ .
ячейки для хранения для вещей ячейки для хранения для вещей .
скачать бк осталось именно выбрать подходящее скачать бк осталось именно выбрать подходящее .
Заказать диплом института по выгодной цене возможно, обратившись к проверенной специализированной компании. Приобрести документ о получении высшего образования вы можете в нашей компании. wiki.svencremer.com/index.php/Дипломы_с_высоким_уровнем_защиты
Мы изготавливаем дипломы любой профессии по доступным ценам. Мы готовы предложить документы техникумов, расположенных в любом регионе Российской Федерации. Документы делаются на “правильной” бумаге самого высокого качества. Это позволяет делать настоящие дипломы, не отличимые от оригиналов. jobgate.org/employer/archive-diploma
The Salt Trick is a natural technique that involves using specific salts, such as Blue Salt, to enhance male performance
1win телефон официальное приложение http://1win10022.ru/ .
win1 https://www.1win10005.ru .
Pretty nice post. I just stumbled upon your blog and wished to say that I have really loved browsing your weblog posts. In any case I will be subscribing to your feed and I hope you write once more soon!
1вин казино https://1win10022.ru .
бк 1win скачать https://www.1win10025.ru .
Мы можем предложить дипломы психологов, юристов, экономистов и прочих профессий по доступным тарифам. Купить диплом биолога — kyc-diplom.com/diplomy-po-professii/kupit-diplom-biologa.html
After I initially commented I clicked the -Notify me when new comments are added- checkbox and now every time a remark is added I get 4 emails with the same comment. Is there any way you possibly can take away me from that service? Thanks!
мостбет ком https://mostbet8005.ru/ .
бонусы в 1 win https://1win10025.ru .
Заказать диплом ВУЗа. Заказ документа о высшем образовании через надежную компанию дарит ряд достоинств. Такое решение дает возможность сэкономить время и серьезные финансовые средства. baitshepegi.co.za/employer/eonline-diploma
mostbet kz скачать http://mostbet8005.ru .
Бесплатная и быстрая проверка кредитного рейтинга без потерь
узнать кредитный рейтинг бесплатно http://www.budgetmasterexpert.ru .
ракета 1 вин http://1win10005.ru .
Надёжный обмен валюты https://valutapiter.ru в СПб — курсы в реальном времени, большой выбор валют, комфортные офисы. Конфиденциальность, без очередей, выгодно и с гарантией. Для туристов, жителей и бизнеса. Обмен, которому можно доверять!
Займы под материнский капитал https://юсфц.рф быстрое решение для покупки квартиры, дома или участка. Без личных вложений, с полным юридическим сопровождением. Оформление за 1 день, надёжные сделки и опыт более 10 лет. Используйте господдержку с умом!
Кредитный потребительский кооператив https://юк-кпк.рф разумный выбор для тех, кто ценит стабильность. Выдача займов, приём сбережений, поддержка пайщиков. Всё по закону, без скрытых комиссий и с личным вниманием к каждому участнику.
скачать 1вин на андроид https://1win10023.ru/ .
Купить диплом ВУЗа!
Мы можем предложить документы институтов, расположенных в любом регионе России.
diplom-onlinex.com/uznajte-tsenu-diploma-s-zaneseniem-v-reestr-sejchas/
бонус за регистрацию без депозита с выводом бонус за регистрацию без депозита с выводом .
I couldn’t resist commenting
1win партнерская программа вход 1win10005.ru .
Выгодно купить диплом ВУЗа. Заказ документа о высшем образовании через надежную фирму дарит ряд преимуществ. Данное решение позволяет сэкономить время и существенные средства. cart-gurus.com/employer/eonline-diploma
1win ios http://www.1win10030.ru .
Купить диплом института !
Покупка диплома университета России в нашей компании – надежный процесс, поскольку документ заносится в реестр. Приобрести диплом об образовании diplom4you.com/kupit-diplom-menedzhera-s-zaneseniem-v-reestr-18
1 win официальный сайт скачать 1 win официальный сайт скачать .
Заказать диплом ВУЗа!
Мы готовы предложить документы учебных заведений, расположенных в любом регионе России.
diplomaj-v-tule.ru/kupite-diplom-s-zaneseniem-bistro-i-nadezhno/
Excellent post. I was checking continuously this blog and I’m impressed! Very helpful information particularly the last part 🙂 I care for such information much. I was seeking this certain information for a very long time. Thank you and good luck.
I am so happy to read this. This is the type of manual that needs to be given and not the accidental misinformation that is at the other blogs. Appreciate your sharing this best doc.
1win token telegram http://1win10006.ru .
Покупка диплома ВУЗа через надежную компанию дарит ряд плюсов для покупателя. Такое решение позволяет сэкономить время и существенные деньги. Впрочем, плюсов значительно больше.Мы изготавливаем дипломы любой профессии. Дипломы производят на настоящих бланках. Доступная стоимость сравнительно с крупными расходами на обучение и проживание в другом городе. Заказ диплома университета является выгодным шагом.
Заказать диплом: diplom-kaluga.ru/kupit-diplom-ob-obrazovanii-s-zaneseniem-v-reestr-6/
1win букмекерская контора официальный сайт https://www.1win10027.ru .
1вин официальный 1вин официальный .
плазменный стерилизатор купить плазменный стерилизатор купить .
минимальное пополнение в 1win https://www.1win10028.ru .
1x ставка скачать на андроид https://www.1win10016.ru .
1win cashback http://1win10028.ru/ .
Howdy! I could have sworn I’ve been to this site before but after browsing through some of the post I realized it’s new to me. Anyhow, I’m definitely delighted I found it and I’ll be bookmarking and checking back often!
слот лаки джет онлайн https://1win10029.ru .
1win казино скачать http://www.1win10016.ru .
Купить диплом института!
Приобретение официального диплома через надежную компанию дарит ряд плюсов. Заказать диплом института у надежной компании: doks-v-gorode-kirov-43.online
как использовать бонусный счет в 1вин https://www.1win10025.ru .
не обновляется дота 2 http://1win10023.ru/ .
Mitolyn is a cutting-edge natural dietary supplement designed to support effective weight loss and improve overall wellness.
Добрый день спасибо за ваш выбор нашего маркетплейса ссылка на сайт —>> кракен ссылка
1win приветственный бонус https://www.1win10029.ru .
плазменные медицинские стерилизаторы http://plazmennyy-sterilizator.ru .
1win sayt https://1win10029.ru .
рассчитать страховку на автомобиль онлайн рассчитать страховку на автомобиль онлайн .
рассчитать осаго для автомобиля калькулятор рассчитать осаго для автомобиля калькулятор .
Купить диплом на заказ в Москве вы сможете через сайт компании. social.onlinelll.com/read-blog/110_diplom-vysshego-obrazovaniya-s-zaneseniem-v-reestr.html
промокод prodamus prodams-promokod.ru .
Где купить диплом по нужной специальности?
Купить диплом университета по невысокой стоимости возможно, обратившись к проверенной специализированной компании.: diplom-bez-problem.com
Приобрести диплом о высшем образовании !
Приобретение диплома университета РФ в нашей компании является надежным процессом, так как документ будет заноситься в реестр. Заказать диплом любого университета diplom-zentr.com/gde-kupit-diplom-s-reestrom-nadezhno-i-bistro
Мы изготавливаем дипломы любых профессий по приятным ценам. Дипломы изготавливаются на оригинальных бланках Приобрести диплом ВУЗа diplomh-40.ru
1вин фрибет http://1win10021.ru/ .
Мы изготавливаем дипломы психологов, юристов, экономистов и любых других профессий по разумным ценам. Заказ документа, который подтверждает обучение в ВУЗе, – это выгодное решение. Купить диплом ВУЗа: visacart.80lvl.ru/viewtopic.phpf=1&t=2407
Wonderful website you have here but I was wanting to know if you knew of any discussion boards that cover the same topics discussed in this article? I’d really love to be a part of community where I can get opinions from other knowledgeable people that share the same interest. If you have any suggestions, please let me know. Thanks!
pin up вход: пин ап казино официальный сайт – пин ап вход
After all, what a great site and informative posts, I will upload inbound link – bookmark this web site? Regards, Reader.
Приобрести диплом возможно используя официальный портал компании. arandarp.forumex.ru/viewtopic.phpf=11&t=1148
приложение 1win https://1win10030.ru .
страхование автомобиля калькулятор страхование автомобиля калькулятор .
калькулятор страховка осаго http://www.niievmash.ru .
1win bet зеркало https://www.1win10021.ru .
site:dem.kg https://1win10016.ru .
1win это http://1win10027.ru/ .
1win registratsiya http://1win10024.ru/ .
Заказать диплом ВУЗа по выгодной стоимости можно, обращаясь к надежной специализированной фирме. Купить документ о получении высшего образования вы сможете у нас в Москве. dev.aimplace.io/employer/originals-diplomsi
Excellent blog here! Also your website loads up fast! What web host are you using? Can I get your affiliate link to your host? I wish my website loaded up as quickly as yours lol
скачать mostbet kg http://1win10016.ru .
Приобретение документа о высшем образовании через надежную фирму дарит много достоинств для покупателя. Данное решение дает возможность сэкономить как дорогое время, так и серьезные средства. Тем не менее, на этом выгода не ограничивается, достоинств намного больше.Мы изготавливаем дипломы любой профессии. Дипломы производятся на подлинных бланках. Доступная цена сравнительно с большими издержками на обучение и проживание. Заказ диплома об образовании из российского ВУЗа является целесообразным шагом.
Купить диплом: vuz-diplom.ru/kupit-diplom-s-zaneseniem-v-reestr-forum-4/
Мы предлагаем дипломы любой профессии по приятным ценам. Мы предлагаем документы ВУЗов, расположенных в любом регионе РФ. Документы печатаются на “правильной” бумаге самого высшего качества. Это дает возможность делать настоящие дипломы, которые невозможно отличить от оригинала. skymix2018.forumex.ru/viewtopic.phpf=14&t=939
1win ставки на спорт зеркало https://1win10026.ru .
Definitely, what a fantastic blog and educative posts, I will bookmark your website.Have an awsome day!
Mitolyn is a cutting-edge natural dietary supplement designed to support effective weight loss and improve overall wellness.
Наши специалисты предлагают выгодно заказать диплом, который выполнен на бланке ГОЗНАКа и заверен мокрыми печатями, штампами, подписями должностных лиц. Диплом пройдет любые проверки, даже с применением профессионального оборудования. nursingguru.in/employer/premiumydiploma
1win зеркало сайта на сегодня http://1win10028.ru/ .
1вин кг 1win10024.ru .
Купить диплом любого ВУЗа!
Наша компания предлагаетвыгодно и быстро заказать диплом, который выполняется на оригинальном бланке и заверен печатями, штампами, подписями официальных лиц. Данный документ пройдет лубую проверку, даже при помощи профессионального оборудования. Решайте свои задачи быстро с нашим сервисом- gtcs.co.in/employer/gosznac-diplom-24
Купить диплом института по невысокой цене возможно, обращаясь к надежной специализированной фирме. Приобрести документ о получении высшего образования вы имеете возможность у нас в столице. zuhookanak4584.copiny.com/question/details/id/1087365
Heya i’m for the first time here. I came across this board and I in finding It really useful & it helped me out much. I’m hoping to give one thing again and aid others such as you helped me.
As a Newbie, I am continuously browsing online for articles that can be of assistance to me. Thank you
Приобрести диплом об образовании!
Мы изготавливаем дипломы любой профессии по приятным тарифам— tltpages.ru
1win партнерская программа вход http://1win10024.ru/ .
Заказать диплом института по доступной цене можно, обратившись к надежной специализированной компании. Купить документ о получении высшего образования можно в нашей компании в Москве. fastdiploms.com/kupit-diplom-s-zaneseniem-v-reestr-bistro-i-legko-4
Мы изготавливаем дипломы любой профессии по невысоким ценам. Мы можем предложить документы техникумов, которые расположены на территории всей России. Дипломы и аттестаты печатаются на “правильной” бумаге самого высшего качества. Это позволяет делать настоящие дипломы, не отличимые от оригиналов. testforum.1stbb.ru/viewtopic.phpf=3&t=1592
Мы изготавливаем дипломы любой профессии по приятным ценам. Покупка документа, который подтверждает обучение в ВУЗе, – это рациональное решение. Заказать диплом любого университета: highdavockmarkingsites.copiny.com/question/details/id/1093792
Быстро и просто заказать диплом о высшем образовании!
Приобретение документа о высшем образовании через надежную фирму дарит массу плюсов. Купить диплом об образовании у проверенной фирмы: doks-v-gorode-nizhnekamsk-16.ru
промокоды 1вин https://1win10026.ru/ .
скачать 1win на андроид ставки на спорт 1win10021.ru .
Купить диплом любого института!
Заказать диплом университета по выгодной цене возможно, обращаясь к проверенной специализированной компании. Купить диплом о высшем образовании: diplom-top.ru/diplom-s-reestrom-kupit-ofitsialno-v-rossii
Где купить диплом специалиста?
Мы готовы предложить дипломы любой профессии по невысоким тарифам. Для нас важно, чтобы дипломы были доступны для большого количества наших граждан. Купить диплом о высшем образовании diplom-top.ru/kupit-diplom-s-zaneseniem-v-reestr-otzivi-10/
Мы изготавливаем дипломы любой профессии по приятным тарифам.
Вы покупаете диплом через надежную фирму. Приобрести диплом о высшем образовании– http://g95334gq.beget.tech/2025/04/03/zakazat-diplom-s-nastoyaschimi-pechatyami-100-kachestvo.html/ – g95334gq.beget.tech/2025/04/03/zakazat-diplom-s-nastoyaschimi-pechatyami-100-kachestvo.html
1win куда вводить промокод http://1win10021.ru/ .
Very good written post. It will be beneficial to everyone who usess it, including yours truly :). Keep doing what you are doing – looking forward to more posts.
Drone show entertainment that works for any type of celebration
drone light shows http://drone0-show.com/ .
Contrata un espectaculo de drones que dejara sin palabras a tu audiencia
show de luces con drones https://show0-de-drones.com .
Заказать диплом о высшем образовании!
Мы предлагаемвыгодно и быстро приобрести диплом, который выполнен на бланке ГОЗНАКа и заверен мокрыми печатями, водяными знаками, подписями. Наш документ пройдет любые проверки, даже при помощи профессиональных приборов. Решите свои задачи максимально быстро с нашим сервисом- karkadan.ru/users/77829
1 win официальный зеркало https://1win10061.ru/ .
Наши специалисты предлагают выгодно купить диплом, который выполняется на бланке ГОЗНАКа и заверен мокрыми печатями, водяными знаками, подписями должностных лиц. Документ способен пройти лубую проверку, даже с использованием специально предназначенного оборудования. veniaminv.flybb.ru/posting.php?mode=post&f=1
plinko игра на деньги скачать https://1win10023.ru/ .
onewin зеркало https://1win10030.ru/ .
1win каттоо https://www.1win10026.ru .
Приобрести диплом института по выгодной цене возможно, обратившись к проверенной специализированной фирме. Приобрести документ о получении высшего образования вы можете у нас в столице. kupit-diplom24.com/kupite-diplom-s-zaneseniem-v-reestr-otzivi-klientov-4
Fantastic website There is a ton of useful information here. I’m posting it on Delicious as well as forwarding it to a few others. Thank you for your sweat, of course!
카지노사이트
Normally I don’t read posts on blogs, but I have to admit that this article seriously compelled me to try! My surprise was caused by your writing style. Thank you for the excellent article.
안전놀이터
I’ve been searching for the best website to apply for grants since I keep hearing in the news how easy it is to receive unlimited online grants.
신용카드현금화
Thank you I liked this topic; could you please set it up so that I receive an email whenever you publish a new article?
파워볼사이트
Hello there Yes, this paragraph is really well-written, and I’ve learned a lot about blogging from it. thanks. 파워볼사이트
My day is coming to a close, but before it does, I’m reading this substantial piece of writing to advance my knowledge.
파워볼사이트
Oh my goodness, that’s what I was looking for, what a thing! Existing here at this website, many thanks to the website’s administrator.
토토사이트
Everybody appreciates what you guys are doing. Such great job and reporting!
카지노사이트 추천
Some truly nice and useful info on this site, also I believe the layout contains wonderful features.
написание диплома на заказ http://www.www.homework.ru/uslugi/diplomy-na-zakaz/ .
цены на написание диссертации disserpro.ru .
1 вин https://1win10026.ru/ .
Заказать диплом о высшем образовании!
Мы изготавливаем дипломы любых профессий по доступным тарифам— v-studio.ru
мостбет онлайн мостбет онлайн .
Заказать документ института можно в нашем сервисе. Мы предлагаем документы об окончании любых университетов Российской Федерации. Вы сможете получить необходимый диплом по любой специальности, включая документы старого образца. Даем гарантию, что в случае проверки документа работодателями, каких-либо подозрений не возникнет. diplomt-nsk.ru/bistroe-oformlenie-diploma-s-reestrom-bez-zabot-2/
диплом заказать http://www.homework.ru/uslugi/diplomy-na-zakaz/ .
1win casino бонус код http://1win10061.ru/ .
как использовать бонусный счет на 1win http://1win10027.ru .
заказ диссертации http://www.disserpro.ru .
скачат мостбет https://mostbet10002.ru/ .
как скачать 1win http://1win10024.ru .
Приобрести диплом об образовании. Покупка документа о высшем образовании через надежную фирму дарит много достоинств для покупателя. Данное решение позволяет сберечь как личное время, так и значительные финансовые средства. seekinternship.ng/employer/eonline-diploma
1win казино – официальный сайт https://1win10029.ru .
снять для хранения вещей москва снять для хранения вещей москва .
1win vk http://1win10061.ru/ .
mostbet букмекерская контора сайт https://mostbet10010.ru/ .
mines 1win скачать http://1win10062.ru .
Заказать диплом любого университета!
Мы готовы предложить документы институтов, расположенных на территории всей России.
diplomskiy.com/diplom-visshego-obrazovaniya-s-zaneseniem-v-reestr-2/
mostbet casino http://mostbet10010.ru/ .
Prodamus -промокод на подключение Prodamus -промокод на подключение .
авиатор игра скачать на телефон авиатор игра скачать на телефон .
авиатор игра онлайн http://1win10063.ru/ .
mostbet личный кабинет http://mostbet10003.ru .
Заказать диплом ВУЗа. Приобретение документа о высшем образовании через надежную фирму дарит ряд плюсов для покупателя. Такое решение дает возможность сберечь как длительное время, так и существенные средства. p99946c6.beget.tech/2025/04/07/gde-nadezhno-kupit-diplom.html
маркет KRAKEN предоставляет unique возможности для пользователей, которым важны anonymity и безопасность в даркнете. Это пространство, где каждый шаг продуман до мелочей для обеспечения полной integrity данных, а purchases проходят максимально быстро и безопасно. Важным аспектом работы KRAKEN является simplicity интерфейса, который делает его доступным как для опытных пользователей, так и для новичков. Платформа использует innovative технологии для защиты своих клиентов и offers мгновенные обновления зеркал для continuous доступа. Это гарантирует, что, несмотря на изменяющиеся условия, клиенты всегда смогут найти рабочие ссылки и получить доступ к ресурсу без потери времени. В дополнение, платформа предоставляет легкие в использовании способы регистрации, которые не требуют много времени. Официальный сайт KRAKEN позволяет пользователям быстро стать участником и получить доступ ко всем преимуществам, предоставляемым системой. К тому же, вся information защищены по высшему стандарту, что исключает вероятность утечек или атак. immediate обновления зеркал обеспечивают актуальные ссылки на сайт, делая доступ к платформе continuous. Важной частью системы является также professional поддержка, готовая ответить на любой вопрос и помочь с решением проблем. С помощью надежной системы зеркал, пользователи могут быть уверены, что всегда получат актуальные данные и доступ к ресурсам.
vk at вход
мостбет ком вход https://www.mostbet10003.ru .
букмекер 1win http://1win10064.ru .
официальный сайт мостбет https://mostbet10002.ru .
mostbet казино скачать https://mostbet10008.ru/ .
I?¦m now not certain the place you’re getting your information, however good topic. I needs to spend some time learning much more or understanding more. Thank you for excellent info I used to be on the lookout for this info for my mission.
mostbet com https://mostbet10008.ru/ .
Create a digital rubber stamp for documents in just a few clicks
stamp maker https://www.stamps-creator-online1.com/ .
mostbets [url=http://mostbet10008.ru/]http://mostbet10008.ru/[/url] .
Today, I went to the beach front with my kids. I found a sea shell
and gave it to my 4 year old daughter and said “You can hear the ocean if you put this to your ear.” She placed the
shell to her ear and screamed. There was a hermit crab inside and it pinched her ear.
She never wants to go back! LoL I know this is completely off topic but I had to tell someone!
Here is my web-site; nordvpn coupons inspiresensation (tinyurl.com)
mostbet скачать бесплатно https://www.mostbet10002.ru .
Где купить диплом специалиста?
Получаемый диплом с нужными печатями и подписями отвечает требованиям и стандартам, никто не сможет отличить его от оригинала – даже со специальным оборудованием. Получить диплом о высшем образовании – быстро и просто! dpmptsp.dumaikota.go.id/2025/04/16/kupit-diplom-gosudarstvennogo-obrazca-126
Мы предлагаем документы об окончании любых ВУЗов России. Документы производятся на оригинальных бланках. sobhaneopolispanathur.copiny.com/question/details/id/1096400
website for buying accounts ready-made accounts for sale
Современные сувениры https://66.ru/news/stuff/278214/ всё чаще становятся не просто подарками, а настоящими элементами бренда или корпоративной культуры. Особенно интересны примеры, когда обычные предметы превращаются в креативные и запоминающиеся изделия. Такие подходы вдохновляют на создание уникальной продукции с индивидуальным стилем и глубоким смыслом. Именно за этим всё чаще обращаются заказчики, которым важна не массовость, а оригинальность.
Купить диплом о высшем образовании!
Мы предлагаем документы учебных заведений, расположенных в любом регионе России.
vuz-diplom.ru/kupit-diplom-s-zaneseniem-v-reestr-s-garantiej-i-otzivami/
Купить диплом университета!
Мы предлагаем дипломы любой профессии по приятным тарифам. Вы покупаете документ в надежной и проверенной временем компании. : provocation.flybb.ru/viewtopic.phpf=4&t=681
Диплом ВУЗа РФ!
Без наличия диплома достаточно сложно было продвигаться вверх по карьерной лестнице. Заказать диплом вы можете через сайт компании: arzookanak6775.copiny.com/question/details/id/1093759
Где приобрести диплом специалиста?
Мы изготавливаем дипломы любой профессии по приятным тарифам. Для нас очень важно, чтобы документы были доступными для большого количества наших граждан. Купить диплом университета diplomskiy.com/kupit-originalnij-diplom-s-zaneseniem-v-reestr-20/
склад для хранения вещей москва недорого теплый склад для хранения вещей москва недорого теплый .
Где заказать диплом по актуальной специальности?
Купить диплом института по доступной стоимости можно, обратившись к проверенной специализированной фирме.: 1magistr.ru
Металлические бейджи https://gubkin.bezformata.com/listnews/beydzhi-dlya-brendov-i/140355141/ для брендов и корпораций — стильное решение для сотрудников, партнёров и мероприятий. Прочные, износостойкие, с гравировкой или полноцветной печатью. Подчёркивают статус компании и укрепляют фирменный стиль. Такие решения особенно актуальны для выставок, форумов и корпоративных событий, где важно произвести правильное первое впечатление. Грамотно оформленный бейдж может сказать о компании больше, чем десятки слов.
Хочешь оформить паспорт на жд тупик Документация включает технический паспорт железнодорожного пути, а также технический паспорт жд пути необщего пользования. Отдельно может потребоваться техпаспорт жд и паспорт на жд тупик при ведении путевого хозяйства.
Мы изготавливаем дипломы любых профессий по разумным ценам. Заказ документа, подтверждающего окончание ВУЗа, – это грамотное решение. Купить диплом о высшем образовании: womplaz.com/read-blog/4252_kupit-attestat-za-11-klass-s-zaneseniem-v-reestr.html
Заказные медали https://iseekmate.com/34740-medali-na-zakaz-nagrada-dlya-chempionov.html применяются для поощрения в спорте, образовании, корпоративной культуре и юбилейных мероприятиях. Производятся из металла, с эмалью, гравировкой или цветной печатью в соответствии с требованиями заказчика.
Мы изготавливаем дипломы психологов, юристов, экономистов и любых других профессий по выгодным ценам. Дипломы производятся на подлинных бланках Быстро приобрести диплом о высшем образовании asxdiploman.com
I liked up to you will receive carried out right here. The comic strip is tasteful, your authored subject matter stylish. nevertheless, you command get bought an edginess over that you wish be delivering the following. sick no doubt come more earlier again as precisely the similar just about very continuously inside case you shield this increase.
1win букмекерская контора официальный сайт вход 1win10064.ru .
Купить диплом вы сможете через официальный сайт компании. linkmate.mn.co/posts/82690159
Добрый день спасибо за ваш выбор нашего маркетплейса ссылка на сайт —>> telegram z kraken
1win ставки на спорт зеркало http://1win10064.ru .
1 win букмекерская https://1win10062.ru .
Заказать диплом о высшем образовании!
Наша компания предлагаетвыгодно и быстро купить диплом, который выполнен на оригинальном бланке и заверен печатями, водяными знаками, подписями должностных лиц. Наш документ способен пройти любые проверки, даже при использовании специального оборудования. Достигайте свои цели быстро и просто с нашей компанией- or1gano.80lvl.ru/viewtopic.phpf=10&t=2006
ван вин букмекерская http://1win10061.ru .
1 вин букмекерская https://www.1win10062.ru .
1win приложение скачать https://1win10063.ru/ .
Мы изготавливаем дипломы любой профессии по приятным ценам. Покупка документа, который подтверждает обучение в ВУЗе, – это грамотное решение. Заказать диплом любого университета: bbs.heyshell.com/forum.phpmod=viewthread&tid=49064&extra=
мостбет мобильная версия mostbet10010.ru .
отзывы 1win https://1win10066.ru .
Быстро заказать диплом о высшем образовании!
Купить диплом университета по доступной стоимости возможно, обратившись к проверенной специализированной фирме. Приобрести диплом о высшем образовании: diplom-club.com/diplom-s-provodkoj-kupit-diplom-s-reestrom
Hello There. I discovered your weblog using msn. This is a really well written article. I’ll be sure to bookmark it and come back to learn extra of your useful information. Thanks for the post. I will certainly comeback.
Заказать диплом ВУЗа. Производство документа занимает гораздо меньше времени, а цена – невысокая. В итоге вы получаете возможность сохранить бюджет и получить работу мечты. Купить диплом вы можете через сайт компании. – gigsonline.co.za/employer/russiany-diplomans
Hey, you used to write wonderful, but the last several posts have been kinda boring?K I miss your tremendous writings. Past few posts are just a little out of track! come on!
Заказать диплом института по невысокой цене можно, обратившись к проверенной специализированной фирме. Купить документ о получении высшего образования вы можете в нашей компании в столице. diplomass.com/diplom-s-zaneseniem-v-reestr-vigodnaya-tsena-2
1win ios https://www.1win10065.ru .
Купить диплом любого университета!
Мы можем предложить документы университетов, расположенных на территории всей РФ. Документы выпускаются на бумаге самого высшего качества: mosserg.flybb.ru/viewtopic.phpf=2&t=582
интернет провайдер челябинск
chelyabinsk-domashnij-internet001.ru
подключить интернет в квартиру челябинск
ставки на спорт кыргызстан http://mostbet10003.ru/ .
1win каттоо https://www.1win10066.ru .
диплом на заказ http://www.www.homework.ru/uslugi/diplomy-na-zakaz/ .
сайт 1вин вход http://1win10066.ru/ .
сколько стоит диссертация http://disserpro.ru .
Приобрести диплом вы можете используя сайт компании. voyostars.com/read-blog/2249_kupit-diplom-s-zaneseniem.html
Мы предлагаем дипломы любой профессии по невысоким тарифам.
Вы заказываете диплом через надежную фирму. Купить диплом о высшем образовании– http://adminka.getbb.ru/viewtopic.phpf=2&t=1833/ – adminka.getbb.ru/viewtopic.phpf=2&t=1833
Приобрести диплом ВУЗа по невысокой цене возможно, обратившись к надежной специализированной фирме. Купить документ о получении высшего образования вы имеете возможность в нашей компании в Москве. kupitediplom.ru/legalnoe-zanesenie-diploma-v-reestr-bez-problem-2
подключение интернета челябинск
chelyabinsk-domashnij-internet002.ru
подключить интернет
I’m still learning from you, but I’m making my way to the top as well. I definitely enjoy reading all that is posted on your site.Keep the aarticles coming. I loved it!
мосвет казино http://mostbet10008.ru/ .
Привет!
Мы предлагаем дипломы любой профессии по разумным тарифам. Стоимость зависит от выбранной специальности, года выпуска и образовательного учреждения: diplomanrussians.com/
I absolutely love your blog and find many of your post’s to be just what I’m looking for. can you offer guest writers to write content available for you? I wouldn’t mind creating a post or elaborating on some of the subjects you write about here. Again, awesome weblog!
Приобрести диплом любого ВУЗа!
Заказать диплом ВУЗа. Заказ подходящего диплома через надежную фирму дарит много преимуществ. Это решение позволяет сберечь время и значительные финансовые средства. educationhub.ae/employer/eonline-diploma
заказать дипломную работу http://www.homework.ru/uslugi/diplomy-na-zakaz// .
Наши специалисты предлагают быстро и выгодно купить диплом, который выполнен на оригинальном бланке и заверен мокрыми печатями, штампами, подписями. Данный диплом способен пройти любые проверки, даже с использованием профессионального оборудования. oknius.com/pokupka-diploma-s-zaneseniem-v-reestr-188
написание диссертации на заказ http://www.disserpro.ru .
скачать бк 1win http://www.1win10065.ru .
I just like the helpful information you provide in your articles. I will bookmark your blog and check again right here frequently. I’m slightly sure I’ll learn many new stuff proper right here! Best of luck for the following!
Мы изготавливаем дипломы любых профессий по приятным ценам. Мы можем предложить документы техникумов, которые находятся на территории всей Российской Федерации. Дипломы и аттестаты делаются на “правильной” бумаге высшего качества. Это дает возможность делать настоящие дипломы, не отличимые от оригинала. epicit.ru/byistroe-oformlenie-diploma
1win online games http://1win1025.top/ .
Заказные медали https://iseekmate.com/34740-medali-na-zakaz-nagrada-dlya-chempionov.html применяются для поощрения в спорте, образовании, корпоративной культуре и юбилейных мероприятиях. Производятся из металла, с эмалью, гравировкой или цветной печатью в соответствии с требованиями заказчика.
Металлические бейджи https://gubkin.bezformata.com/listnews/beydzhi-dlya-brendov-i/140355141/ для брендов и корпораций — стильное решение для сотрудников, партнёров и мероприятий. Прочные, износостойкие, с гравировкой или полноцветной печатью. Подчёркивают статус компании и укрепляют фирменный стиль. Такие решения особенно актуальны для выставок, форумов и корпоративных событий, где важно произвести правильное первое впечатление. Грамотно оформленный бейдж может сказать о компании больше, чем десятки слов.
lucky jet skachat 1win10063.ru .
домашний интернет подключить челябинск
chelyabinsk-domashnij-internet003.ru
домашний интернет челябинск
1win website https://1win1025.top/ .
1 win казино скачать http://1win10064.ru/ .
что можно сделать с бонусным счетом 1win http://www.1win10067.ru .
With havin so much written content do you ever run into any problems of plagorism or copyright infringement? My site has a lot of completely unique content I’ve either created myself or outsourced but it seems a lot of it is popping it up all over the web without my authorization. Do you know any ways to help reduce content from being ripped off? I’d genuinely appreciate it.
1win вход с компьютера http://1win10068.ru/ .
Продвижение групп ВК https://vk.com/dizayn_vedenie_prodvizhenie_grup от оформления и наполнения до запуска рекламы и роста подписчиков. Подходит для бизнеса, мероприятий, брендов и экспертов. Работаем честно и с аналитикой.
Howdy! Someone in my Myspace group shared this site with us so I came to give it a look. I’m definitely enjoying the information. I’m book-marking and will be tweeting this to my followers! Exceptional blog and wonderful style and design.
Изготавливаем значки https://znaknazakaz.ru на заказ в Москве: классические, сувенирные, корпоративные, с логотипом и индивидуальным дизайном. Металл, эмаль, цветная печать. Быстрое производство, разные тиражи, удобная доставка по городу.
Металлические значки https://techserver.ru/izgotovlenie-znachkov-iz-metalla-kak-zakazat-unikalnye-izdeliya-dlya-vashego-brenda/ это стильный и долговечный способ подчеркнуть фирменный стиль, создать корпоративную айдентику или просто сделать приятный сувенир. Всё больше компаний выбирают индивидуальное изготовление значков, чтобы выделиться среди конкурентов.
выигрышные live ставки на мостбет http://mostbet10010.ru .
провайдер интернета по адресу екатеринбург
ekaterinburg-domashnij-internet001.ru
интернет провайдеры екатеринбург по адресу
1win скачать на ios https://1win10067.ru .
Рефинансирование кредита — ваш путь к снижению процентов и переплаты
сделать рефинансирование кредита под меньший процент сделать рефинансирование кредита под меньший процент .
1win промокод официальный сайт букмекерская контора http://www.1win10065.ru .
Quer comprar seguidores? Escolha o pacote que mais combina com voce: ao vivo, oferta ou misto. Adequado para blogueiros, lojas e marcas. Seguro, rapido e mantem a reputacao da sua conta.
Эксклюзивные изделия из императорского фарфора: в наличии и под заказ
лфз фарфоровый завод официальный сайт imperatorskij-farfor.website.yandexcloud.net .
Приобрести диплом об образовании. Заказ документа о высшем образовании через надежную фирму дарит немало достоинств. Это решение помогает сэкономить время и серьезные средства. saros-center.ru/forum/?PAGE_NAME=profile_view&UID=6460
Красивые и прочные бокалы для вина с доставкой по Москве и всей России
заказать бокалы для вина http://www.bokaly-dlya-vina.website.yandexcloud.net/ .
1win ставки онлайн 1win10065.ru .
Значки с логотипом компании https://press-release.ru/branches/markets/znachki-s-vashim-logotipom-iskusstvo-metalla-voploshchennoe-v-unikalnyh-izdeliyah/ это не просто элемент фирменного стиля, а настоящее искусство, воплощённое в металле. Они подчёркивают статус бренда и помогают сформировать узнаваемый образ.
Изготовление значков https://3news.ru/izgotovlenie-znachkov-na-zakaz-pochemu-eto-vygodno-i-kak-vybrat-idealnyj-variant/ на заказ любой сложности. Работаем по вашему дизайну или поможем создать макет. Предлагаем разные материалы, формы и типы креплений. Оперативное производство и доставка по всей России.
Изготовим значки с логотипом http://classical-news.ru/tehnologiya-izgotovleniya-znachkov-s-logotipom/ вашей компании. Металлические, пластиковые, с эмалью или цветной печатью. Подчеркните фирменный стиль на выставках, акциях и корпоративных мероприятиях. Качественно, от 10 штук, с доставкой.
1win что это 1win что это .
account sale guaranteed accounts
Nice post. I learn something more challenging on different blogs everyday. It will always be stimulating to read content from other writers and practice a little something from their store. I’d prefer to use some with the content on my blog whether you don’t mind. Natually I’ll give you a link on your web blog. Thanks for sharing.
Мы изготавливаем дипломы любой профессии по приятным ценам.– justclassify.com/profile/claudioprentic
Приобрести диплом о высшем образовании!
Мы можем предложить дипломы любых профессий по разумным тарифам. Вы приобретаете диплом в надежной и проверенной компании. : registraciavsaita.listbb.ru/viewtopic.phpf=2&t=2803
Юридическое сопровождение юрист по банкротству физических лиц спб: от анализа документов до полного списания долгов. Работаем официально, по закону №?127-ФЗ. Возможна рассрочка оплаты услуг.
Диплом любого университета России!
Без наличия диплома трудно было продвинуться по карьерной лестнице. Приобрести диплом возможно используя сайт компании: fulrp.5nx.ru/viewtopic.phpf=39&t=19395
подключить проводной интернет екатеринбург
ekaterinburg-domashnij-internet002.ru
домашний интернет в екатеринбурге
Где приобрести диплом по актуальной специальности?
Готовый диплом с приложением отвечает запросам и стандартам Министерства образования и науки, никто не сможет отличить его от оригинала – даже со специальным оборудованием. Получить диплом о среднем образовании – не проблема! smanegeri1tanjungpura.sch.id/kupit-diplom-gosudarstvennogo-obrazca-238
Мы предлагаем документы об окончании любых ВУЗов РФ. Документы изготавливаются на настоящих бланках. newyorkcityfcfansclub.com/read-blog/5508_diplom-kupit-s-vneseniem-v-reestr.html
Мы изготавливаем дипломы любой профессии по приятным ценам. Мы можем предложить документы ВУЗов, которые расположены в любом регионе Российской Федерации. Дипломы и аттестаты выпускаются на бумаге высшего качества. Это дает возможности делать государственные дипломы, не отличимые от оригиналов. powerofmony.copiny.com/question/details/id/1082942
1win login nigeria 1win1025.top .
lucky jet как выиграть https://www.1win10063.ru .
Заказать диплом о высшем образовании. Покупка официального диплома через проверенную и надежную компанию дарит много достоинств. Такое решение помогает сэкономить как дорогое время, так и серьезные деньги. u2c.tv/member.php?u=30984
Приобрести документ ВУЗа вы имеете возможность в нашей компании в столице. Мы оказываем услуги по продаже документов об окончании любых университетов РФ. Вы получите необходимый диплом по любой специальности, включая документы Советского Союза. Даем 100% гарантию, что при проверке документов работодателями, подозрений не появится. diplomv-v-ruki.ru/kupit-diplom-s-zaneseniem-v-reestr-po-dostupnim-tsenam/
1вин. https://1win10066.ru/ .
Приобрести диплом любого ВУЗа!
Мы можем предложить документы институтов, которые находятся в любом регионе РФ.
diplomj-irkutsk.ru/kupit-diplom-visshego-obrazovaniya-s-zaneseniem-v-reestr-6/
how to bet on 1win https://www.1win1025.top .
vjcn,tn mostbet10003.ru .
1win pro https://1win10068.ru .
Заказать диплом ВУЗа по невысокой стоимости возможно, обращаясь к надежной специализированной фирме. Мы предлагаем документы об окончании любых ВУЗов Российской Федерации. Приобрести диплом любого ВУЗа– forum.vorchun.ru/posting.phpmode=post&f=2
бк 1win скачать на андроид https://1win10071.ru .
I have not checked in here for a while as I thought it was getting boring, but the last several posts are great quality so I guess I¦ll add you back to my everyday bloglist. You deserve it my friend 🙂
Закажите металлические значки https://metal-archive.ru/novosti/40507-metallicheskie-znachki-na-zakaz-v-moskve-masterstvo-kachestvo-i-individualnyy-podhod.html с индивидуальным оформлением. Материалы: латунь, сталь, алюминий. Эмаль, гравировка, печать. Подходит для корпоративных мероприятий, сувениров, символики и наград.
Металлические нагрудные значки https://str-steel.ru/metallicheskie-nagrudnye-znachki.html стильный и долговечный аксессуар для сотрудников, мероприятий и награждений. Изготавливаем под заказ: с логотипом, гравировкой или эмалью. Разные формы, крепления и варианты отделки.
lucky jet как пополнить счет https://www.1win10071.ru .
подключить интернет
ekaterinburg-domashnij-internet003.ru
интернет провайдеры по адресу дома
лордфильм онлайн бесплатно https://lordfilmy.run .
Aw, this was a very nice post. In concept I wish to put in writing like this moreover – taking time and actual effort to make a very good article… however what can I say… I procrastinate alot and in no way appear to get something done.
бонус код 1win http://1win10067.ru/ .
1win сайт ставки онлайн http://www.1win10069.ru .
открытие компании в англии https://zaregistrirovat-kompaniyu-england.com
Great post. I was checking continuously this weblog and I’m inspired! Very useful info specially the final phase 🙂 I take care of such info much. I was looking for this certain info for a long time. Thanks and best of luck.
Заказать диплом ВУЗа!
Мы предлагаем документы институтов, которые находятся в любом регионе Российской Федерации.
diplomp-irkutsk.ru/pokupka-diploma-s-reestrom-bez-zabot-i-problem/
Заказать диплом о высшем образовании!
Мы предлагаем документы институтов, расположенных на территории всей РФ. Документы выпускаются на бумаге высшего качества: niceroleplay.getbb.ru/viewtopic.phpf=1&t=4311
1win казино скачать https://www.1win10067.ru .
лордфильм lordfilmy.run .
Быстро заказать диплом о высшем образовании. Производство диплома занимает намного меньше времени, а цена при этом доступна любому. Таким образом вы получаете возможность сохранить бюджет и найти работу вашей мечты. Приобрести диплом на заказ возможно через сайт компании. – evnity.io/read-blog/9742_kupit-diplom-kolledzha-v-spb.html
интернет по адресу
kazan-domashnij-internet001.ru
какие провайдеры интернета есть по адресу казань
Wow! Thank you! I permanently needed to write on my site something like that. Can I include a portion of your post to my site?
Wonderful site. A lot of helpful info here. I¦m sending it to several friends ans additionally sharing in delicious. And obviously, thank you on your effort!
москва бокс для вещей аренда хранения москва бокс для вещей аренда хранения .
You should take part in a contest for one of the best blogs on the web. I will recommend this site!
Hey there I am so delighted I found your blog, I really found
you by mistake, while I was searching on Digg for something
else, Nonetheless I am here now and would just like to say thank you
for a marvelous post and a all round interesting blog (I also love the theme/design), I don’t have time
to read it all at the minute but I have book-marked it and also added in your RSS
feeds, so when I have time I will be back to read a great deal more, Please
do keep up the excellent work.
Also visit my homepage … mounfit before and after
ваучеры 1win ваучеры 1win .
скачать бк 1win https://www.1win10070.ru .
Magnificent beat ! I wish to apprentice while you amend your website, how could i subscribe for a blog site? The account helped me a applicable deal. I had been a little bit familiar of this your broadcast provided shiny transparent idea
1 win ставки https://1win10069.ru .
подключить интернет по адресу
kazan-domashnij-internet002.ru
подключить проводной интернет казань
Заказать диплом университета!
Приобрести диплом о высшем образовании. Заказ документа о высшем образовании через проверенную и надежную фирму дарит немало плюсов для покупателя. Данное решение помогает сэкономить время и серьезные деньги. astrcolcult.ru/post_type=topic&p=37085
Заказать диплом института !
Приобретение диплома любого университета России у нас является надежным делом, потому что документ будет заноситься в реестр. Быстро купить диплом любого института diplomnie.com/kupit-diplom-cherez-reestr-bistro-i-bezopasno-6
Keep working ,splendid job!
Hi, Neat post. There is an issue with your website in internet explorer, could test this… IE nonetheless is the market chief and a large element of other people will pass over your magnificent writing due to this problem.
Приобрести диплом на заказ вы сможете используя сайт компании. lkhost.group/read-blog/63_kupit-diplom-s-zaneseniem-v-reestr-cena.html
Приветствую!
Мы изготавливаем дипломы любой профессии по выгодным тарифам. Стоимость зависит от выбранной специальности, года выпуска и образовательного учреждения: п»їtutdiploms.com/
1 win казино скачать https://www.1win10068.ru .
хранение имущества в москве http://www.veshi-hranenie-msk.ru/ .
проверить провайдера по адресу
kazan-domashnij-internet003.ru
тарифы интернет и телевидение казань
I loved as much as you’ll receive carried out right here. The sketch is attractive, your authored subject matter stylish. nonetheless, you command get bought an impatience over that you wish be delivering the following. unwell unquestionably come more formerly again since exactly the same nearly a lot often inside case you shield this hike.
заработок на гемблинге 1win10071.ru .
Hello, Neat post. There is an issue with your site in internet explorer, could check thisK IE still is the market chief and a huge part of other people will omit your excellent writing because of this problem.
Very interesting subject, thanks for posting. “The rest is silence.” by William Shakespeare.
как забрать бонусы 1win https://1win10075.ru/ .
vk vhod https://1win10073.ru .
1win ставки приложение https://www.1win10072.ru .
Купить диплом под заказ вы можете через официальный сайт компании. powerofthelamb.mn.co/posts/82689438
I like the efforts you have put in this, thankyou for all the great content.
1win ставки 1win ставки .
игра 1win отзывы https://1win10072.ru .
что такое бонусный счет в 1win 1win10075.ru .
Заказать диплом любого института!
Заказ документа о высшем образовании через качественную и надежную компанию дарит ряд преимуществ для покупателя. Приобрести диплом любого института у надежной организации: doks-v-gorode-irkutsk-38.online
оне вин https://1win10076.ru/ .
1win token telegram 1win token telegram .
1вин бонусы казино https://1win10076.ru/ .
открыть бизнес в великобритании регистрация компании в великобритании онлайн
1win мобильная версия https://1win10076.ru/ .
мелбет кж http://www.melbet1012.ru .
провайдеры по адресу дома
krasnoyarsk-domashnij-internet001.ru
интернет провайдеры по адресу красноярск
On my first visit, I’m struck by the interesting things I’ve discovered in Fortune Gems 3, especially in the discussions. The high number of comments on your articles suggests that I’m not alone in my appreciation. Keep it going!Fortune Gems 3
Где приобрести диплом специалиста?
Купить диплом института по доступной стоимости вы сможете, обращаясь к проверенной специализированной фирме.: diplom-kuplu.ru
Мы предлагаем дипломы любых профессий по разумным ценам. Дипломы производят на оригинальных бланках Заказать диплом об образовании diplomnie.com
I am curious to find out what blog system you happen to be using? I’m experiencing some small security issues with my latest website and I’d like to find something more secure. Do you have any suggestions?
From idea to stamp in minutes with a free rubber stamp maker online
make stamp online free https://www.make1-stamps-online.com/ .
sell accounts account sale
1win официальный букмекер https://www.1win10074.ru .
There’s noticeably a bundle to learn about this. I assume you made certain nice points in options also.
мелбет мелбет .
melbet кыргызстан melbet кыргызстан .
Мы предлагаем дипломы любых профессий по приятным ценам. Мы предлагаем документы техникумов, которые расположены на территории всей России. Документы делаются на “правильной” бумаге самого высшего качества. Это позволяет делать настоящие дипломы, которые не отличить от оригинала. hektips.com/employer/archive-diploma
казино с депозитом от 50 http://1win10069.ru .
Приобрести диплом университета по невысокой цене можно, обратившись к проверенной специализированной фирме. Заказать документ о получении высшего образования можно в нашем сервисе. youslade.com/read-blog/66989_kupit-proverennyj-diplom.html
Мы изготавливаем дипломы психологов, юристов, экономистов и прочих профессий по доступным ценам.– hl2forever.ru/member.phpu=266
Рейтинг лучших сервисов https://vc.ru/telegram/1926953-nakrutka-podpischikov-v-telegram для накрутки Telegram-подписчиков: функциональность, качество, цены и скорость выполнения. Подходит для продвижения каналов любого масштаба — от старта до монетизации.
проверить провайдеров по адресу красноярск
krasnoyarsk-domashnij-internet002.ru
интернет провайдеры по адресу
1вин онлайн https://www.1win10073.ru .
бк теннесси скачать на андроид https://mostbet10011.ru/ .
Где купить диплом по актуальной специальности?
Мы можем предложить дипломы любых профессий по приятным тарифам. Для нас важно, чтобы документы были доступными для большого количества наших граждан. Приобрести диплом о высшем образовании diplomidlarf.ru/diplom-menedzhera-s-reestrom-bistraya-pokupka/
Приобрести диплом института по доступной стоимости можно, обращаясь к проверенной специализированной компании. Мы готовы предложить документы ВУЗов на Ваш выбор, расположенных на территории всей России. uscheapshoeclub.com/read-blog/8359_kupit-podlinnyj-diplom-s-zaneseniem-v-reestr.html
cloud server best cloud server hosting price
Предлагаем спа-комплексы https://spaplanet.net/ru/ от производителя: проектирование, изготовление и монтаж. Индивидуальные решения для бизнеса и дома. Комплексное оснащение — от хаммама до бассейна и зоны отдыха.
слот лаки джет онлайн https://1win10075.ru .
билайн тв доверительный платеж http://1win10073.ru .
Добрый день спасибо за ваш выбор нашего маркетплейса ссылка на сайт —>> купить траву гашиш
Купить диплом университета!
Наша компания предлагаетбыстро и выгодно заказать диплом, который выполняется на оригинальном бланке и заверен мокрыми печатями, штампами, подписями официальных лиц. Диплом способен пройти лубую проверку, даже с использованием профессиональных приборов. Решайте свои задачи максимально быстро с нашими дипломами- forexrassia.ru/kupit-diplom-sovetyi-ot-ekspertov
1win зеркала 1win10072.ru .
1win aviator download https://1win10074.ru/ .
Мы готовы предложить дипломы любой профессии по доступным ценам. Мы можем предложить документы ВУЗов, которые находятся в любом регионе России. Документы печатаются на бумаге высшего качества. Это позволяет делать государственные дипломы, которые не отличить от оригиналов. lgmtech.co.uk/employer/archive-diploma
1win скачать официальный сайт http://www.1win10072.ru .
Мы изготавливаем дипломы любой профессии по разумным ценам. Покупка диплома, подтверждающего окончание ВУЗа, – это выгодное решение. Приобрести диплом университета: tspeaking.boardhost.com/post.phpaction=post&fid=10
I was more than happy to seek out this web-site.I needed to thanks for your time for this wonderful learn!! I undoubtedly having fun with every little bit of it and I have you bookmarked to take a look at new stuff you weblog post.
провайдеры интернета по адресу
krasnoyarsk-domashnij-internet003.ru
интернет провайдеры в красноярске по адресу дома
1win зеркало сейчас online http://www.1win10071.ru .
Приобрести диплом о высшем образовании поспособствуем. Купить диплом Волгоград – diplomybox.com/kupit-diplom-volgograd
1win ставки на спорт скачать приложение https://1win10070.ru .
открыть фирму в великобритании открыть бизнес в англии
Howdy very nice web site!! Man .. Beautiful .. Superb .. I will bookmark your web site and take the feeds additionally?KI am glad to find numerous useful info here in the post, we want develop more strategies in this regard, thanks for sharing. . . . . .
Современный и удобный сайт kenzoscat.ru на котором легко найти нужную информацию, товары или услуги. Простая навигация, понятный интерфейс и актуальное содержание подойдут как для новых пользователей, так и для постоянной аудитории. Работает быстро, доступен круглосуточно.
Приобрести диплом института по доступной стоимости возможно, обратившись к надежной специализированной компании. Мы оказываем услуги по продаже документов об окончании любых ВУЗов РФ. Купить диплом ВУЗа– [url=http://alconafft.iboards.ru/viewtopic.phpf=9&t=3580/]alconafft.iboards.ru/viewtopic.phpf=9&t=3580[/url]
mostbet kg http://mostbet10011.ru .
сериалы онлайн смотреть бесплатно лордфильм http://www.lordfilmy.run .
Купить диплом университета по доступной стоимости можно, обратившись к надежной специализированной фирме. Купить документ университета можно в нашей компании в Москве. pesnibardov.ru/f/ucp.phpmode=login
1win kg скачать http://1win10007.ru .
1win casino скачать http://www.1win10076.ru .
игра авиатор как выиграть https://www.1win10074.ru .
Мы готовы предложить дипломы любой профессии по приятным ценам. Дипломы производятся на оригинальных бланках Заказать диплом об образовании damdiplomisa.com
Где заказать диплом специалиста?
Заказать диплом института по выгодной стоимости вы сможете, обращаясь к проверенной специализированной фирме.: diploms-vuza.com
какие провайдеры на адресе в краснодаре
krasnodar-domashnij-internet001.ru
провайдеры по адресу
mostbet app https://mostbet10011.ru .
Приобрести диплом о высшем образовании!
Мы предлагаембыстро заказать диплом, который выполняется на оригинальном бланке и заверен мокрыми печатями, штампами, подписями должностных лиц. Данный диплом способен пройти любые проверки, даже при помощи специфических приборов. Достигайте цели быстро и просто с нашей компанией- network-316491.mn.co/posts/82950829
Мы готовы предложить дипломы любой профессии по приятным ценам.
Вы приобретаете документ через надежную компанию. Приобрести диплом о высшем образовании– http://contraband.ch/read-blog/97965/ – contraband.ch/read-blog/97965
Приобрести диплом университета по выгодной цене возможно, обращаясь к надежной специализированной компании. Приобрести документ ВУЗа можно у нас в столице. diplomservis.com/diplom-s-vneseniem-v-reestr-8
скачать 1win на айфон http://1win10074.ru .
Наши специалисты предлагают выгодно заказать диплом, который выполняется на оригинальной бумаге и заверен печатями, водяными знаками, подписями. Наш диплом пройдет любые проверки, даже при помощи специальных приборов. bergha.flybb.ru/viewtopic.php?f=2&t=632
лордфильм смотреть онлайн бесплатно в хорошем http://lordfilmy.run/ .
Онлайн проект zamanuhin.ru где собраны полезные данные, инструменты и сервисы для повседневной жизни и профессиональной деятельности. Сайт адаптирован под любые устройства, стабильно работает и предоставляет максимум пользы без лишнего шума и рекламы.
I like the helpful info you provide in your articles. I will bookmark your weblog and check again here regularly. I am quite sure I will learn plenty of new stuff right here! Good luck for the next!
Купить диплом университета !
Покупка диплома ВУЗа России у нас является надежным делом, так как документ заносится в реестр. Заказать диплом о высшем образовании diplomj-irkutsk.ru/bistraya-i-bezopasnaya-pokupka-diploma-s-registratsiej-3
1win отзывы казино https://www.1win10007.ru .
Мы предлагаем дипломы любой профессии по невысоким ценам. Заказ диплома, который подтверждает окончание ВУЗа, – это рациональное решение. Приобрести диплом любого университета: whmovie.com/read-blog/4964_kupit-diplom-tehnicheskogo-obrazovaniya.html
I would like to thnkx for the efforts you have put in writing this blog. I am hoping the same high-grade blog post from you in the upcoming as well. In fact your creative writing abilities has inspired me to get my own blog now. Really the blogging is spreading its wings quickly. Your write up is a good example of it.
Online rubber stamp maker perfect for small business branding
stamp maker online http://www.mystampready-constructor1.com .
провайдеры по адресу
krasnodar-domashnij-internet002.ru
узнать интернет по адресу
Московская область — уют и спокойствие рядом
с мегаполисом
Для тех, кто мечтает о спокойствии пригородной зоны,
близкой к столице, предлагаем рассмотреть
покупку квартиры в Московской области.
Преимущества покупки жилья в Подмосковье:
– Близость к природе: леса, озера,
свежий воздух создают идеальные условия для комфортной
жизни вне городской суеты.
– Развитие инфраструктуры:
современные жилые комплексы
оборудованы детскими площадками, спортивными залами, магазинами шаговой
доступности.
– Доступность транспорта: регулярное сообщение с Москвой позволяет быстро добираться до столицы и обратно.
– Привлекательные цены: стоимость недвижимости значительно ниже столичных цен, сохраняя высокое качество строительства и комфорта проживания.
—
Сделайте правильный выбор прямо сейчас!
Приобретение квартиры в Москве или Московской
области открывает широкие перспективы для вашей
семьи. Инвестируйте в свое будущее, покупайте жилье с умом
и уверенностью!
Свяжитесь с нами, и мы поможем подобрать идеальный вариант вашего нового дома!
c условиями ознакомится можно здесь ===>
Купить квартиру в замоскворечье
Приобретение подходящего диплома через надежную компанию дарит множество плюсов для покупателя. Это решение дает возможность сэкономить время и значительные финансовые средства. Тем не менее, достоинств намного больше.Мы предлагаем дипломы любых профессий. Дипломы производят на оригинальных бланках государственного образца. Доступная цена по сравнению с крупными расходами на обучение и проживание в чужом городе. Заказ диплома института станет мудрым шагом.
Заказать диплом: fastdiploms.com/kupite-diplom-o-visshem-obrazovanii-s-zaneseniem-v-reestr-4/
I love your blog.. very nice colors & theme. Did you make this website yourself or did you hire someone to do it for you? Plz reply as I’m looking to create my own blog and would like to know where u got this from. thanks
1вин промокод при регистрации http://1win10007.ru/ .
мелбет kg http://www.melbet1012.ru .
Заказать диплом любого университета!
Мы можем предложить документы институтов, которые расположены на территории всей РФ.
vacshidiplom.com/kupit-diplom-visshego-obrazovaniya-s-zaneseniem-na-zakaz-2/
1win отзывы https://www.1win10070.ru .
Приобрести диплом любого института. Покупка подходящего диплома через надежную компанию дарит ряд плюсов. Данное решение дает возможность сэкономить как длительное время, так и существенные денежные средства. c3tservices.ca/companies/eonline-diploma
Купить диплом о высшем образовании!
Мы изготавливаем дипломы любых профессий по выгодным тарифам. Вы заказываете документ через надежную компанию. : poeskovek.flybb.ru/viewtopic.phpf=2&t=686
Диплом любого ВУЗа России!
Без института достаточно сложно было продвинуться по карьерной лестнице. Приобрести диплом вы можете используя официальный сайт компании: medinethospital.com/read-blog/30_diplom-kupit-ufa.html
Где купить диплом по необходимой специальности?
Мы изготавливаем дипломы психологов, юристов, экономистов и прочих профессий по приятным тарифам. Для нас важно, чтобы дипломы были доступными для подавляющей массы граждан. Приобрести диплом о высшем образовании vacshidiplom.com/diplom-v-reestre-ofitsialnoe-reshenie-dlya-vashego-uspexa/
Whats up very cool web site!! Guy .. Beautiful .. Amazing .. I’ll bookmark your web site and take the feeds additionally…I am satisfied to seek out numerous helpful info here in the put up, we want develop extra strategies on this regard, thank you for sharing. . . . . .
I like the valuable info you provide in your articles. I’ll bookmark your blog and check again here frequently. I am quite sure I’ll learn plenty of new stuff right here! Good luck for the next!
узнать интернет по адресу
krasnodar-domashnij-internet003.ru
интернет провайдеры краснодар по адресу
Купить диплом ВУЗа по выгодной стоимости вы можете, обращаясь к надежной специализированной компании. Приобрести документ института вы имеете возможность в нашей компании. diplomt-nsk.ru/kupite-diplom-o-visshem-obrazovanii-bistro-i-nadezhno-5
Мы предлагаем быстро и выгодно заказать диплом, который выполняется на оригинальном бланке и заверен печатями, водяными знаками, подписями. Наш диплом пройдет лубую проверку, даже при помощи специального оборудования. diigo.com/item/note/8p2f0/17vs?k=d63ab447f6da56d6e18199758282ea33
бонусный счет 1вин http://www.1win10075.ru .
Мы предлагаем документы об окончании любых ВУЗов России. Документы изготавливаются на подлинных бланках государственного образца. bohhchaos.listbb.ru/viewtopic.phpf=9&t=10437
Где заказать диплом специалиста?
Получаемый диплом с приложением полностью отвечает требованиям и стандартам Министерства образования и науки России, неотличим от оригинала. Диплом о среднем образовании – не проблема! t98223u0.beget.tech/2025/04/16/kupit-diplom-s-podpisyami-i-pechatyami.html
mostbet kg скачать на андроид http://1win10081.ru/ .
Заказать диплом о высшем образовании!
Заказ официального диплома через проверенную и надежную фирму дарит массу плюсов. Заказать диплом любого ВУЗа у сильной фирмы: doks-v-gorode-surgut-86.ru
отзывы 1вин http://1win10081.ru .
дешевый интернет москва
msk-domashnij-internet001.ru
домашний интернет подключить москва
Заказать диплом ВУЗа. Покупка документа о высшем образовании через качественную и надежную компанию дарит массу плюсов для покупателя. Такое решение помогает сберечь как личное время, так и серьезные финансовые средства. odessamama.net/forum.php?mod=viewthread&tid=358987&extra=
Greetings! Very helpful advice on this article! It is the little changes that make the biggest changes. Thanks a lot for sharing!
Приобрести диплом любого университета!
Купить диплом университета по доступной стоимости вы сможете, обратившись к проверенной специализированной компании. Приобрести диплом: diplomidlarf.ru/xml-diplom-s-reestrom-kupit-ofitsialno-i-nadezhno
Купить диплом о высшем образовании!
Мы предлагаем документы любых учебных заведений, которые находятся на территории всей РФ.
diplomass.com/kupit-diplom-o-visshem-obrazovanii-bistro-i-legko-4/
Incredible! This blog looks exactly like my old one! It’s on a completely different subject but it has pretty much the same layout and design. Great choice of colors!
Выгодно заказать диплом любого института!
Мы изготавливаем дипломы любых профессий по приятным тарифам— diploms-vuza.com
мостбет официальный https://www.mostbet10011.ru .
1win регистрация онлайн http://www.1win10078.ru .
1win registratsiya https://1win10077.ru/ .
Мы изготавливаем дипломы любой профессии по доступным ценам.
Вы заказываете диплом через надежную и проверенную фирму. Приобрести диплом о высшем образовании– http://arezonrp.forumex.ru/viewtopic.phpf=13&t=1218/ – arezonrp.forumex.ru/viewtopic.phpf=13&t=1218
Heya i am for the first time here. I found this board and I find It really useful & it helped me out much. I hope to give something back and aid others like you helped me.
lucky jet скачать https://www.1win10078.ru .
cloud server for rent server cloud price
1вин бет зеркало 1вин бет зеркало .
Мы предлагаем дипломы любых профессий по разумным ценам. Купить диплом автослесаря — kyc-diplom.com/diplomy-po-professii/kupit-diplom-avtoslesarya.html
Современный сайт amrom.ru на котором легко найти нужную и полезную информацию, товары или услуги. Простая навигация, понятный интерфейс и актуальное содержание подойдут как для новых пользователей, так и для постоянной аудитории. Работает быстро, доступен круглосуточно.
открыть бизнес в англии открыть фирму в англии
Купить диплом возможно через официальный портал компании. peticie.com/482357
Приобрести диплом университета!
Мы можем предложить документы ВУЗов, расположенных в любом регионе России. Дипломы и аттестаты печатаются на бумаге высшего качества: edujobs.itpcrm.net/employer/aurus-diploms
Prodamus -промокод на подключение Prodamus -промокод на подключение .
1win букмекерская контора официальный сайт зеркало https://1win10007.ru .
1wi. http://www.1win10079.ru .
Hi there, i read your blog from time to time and i own a similar one and i was just curious if you get a lot of spam responses? If so how do you protect against it, any plugin or anything you can advise? I get so much lately it’s driving me mad so any help is very much appreciated.
Thanks for your own efforts on this web page. My daughter loves participating in internet research and it’s simple to grasp why. Most people know all concerning the powerful form you present helpful information through your blog and in addition cause contribution from the others on this idea then our own child is without a doubt starting to learn so much. Take advantage of the rest of the year. You have been performing a first class job.
зеркало 1 win https://1win10080.ru .
Лучшие пляжи и пансионаты для отдыха в Абхазии
абхазия отдых на море 2025 http://www.otdyh-v-abhazii-01.ru/ .
You have brought up a very good details, regards for the post.
Заказать документ института вы имеете возможность у нас в столице. Мы предлагаем документы об окончании любых университетов Российской Федерации. Вы получите диплом по любым специальностям, включая документы образца СССР. Даем гарантию, что в случае проверки документов работодателями, подозрений не появится. diplomp-irkutsk.ru/kupit-diplom-s-reestrom-v-rossii-bistro-i-nadezhno-7/
Диплом ВУЗа Российской Федерации!
Без наличия диплома очень непросто было продвигаться по карьерной лестнице. Приобрести диплом под заказ в столице вы сможете используя официальный сайт компании: [url=http://mm.kabb.ru/viewtopic.phpf=2&t=1266/]mm.kabb.ru/viewtopic.phpf=2&t=1266[/url]
Купить диплом института. Производство документа занимает гораздо меньше времени, а стоимость – доступна каждому. Таким образом вы имеете возможность сберечь бюджет и найти отличную работу мечты. Заказать диплом на заказ в Москве можно используя сайт компании. – wap.fortboyard2012forum.4adm.ru/posting.php?mode=post&f=27&sid=370f9f6370eff473aa7593db687e38b6
account trading platform account market
домашний интернет тарифы москва
msk-domashnij-internet002.ru
интернет провайдеры москва
Приобрести диплом института по невысокой стоимости можно, обратившись к проверенной специализированной компании. Заказать документ о получении высшего образования можно в нашей компании в Москве. athrconsultancy.in/employer/originals-diplomsi
Заказать диплом любого университета!
Наша компания предлагаетмаксимально быстро заказать диплом, который выполняется на оригинальном бланке и заверен мокрыми печатями, штампами, подписями. Наш документ способен пройти любые проверки, даже с использованием специфических приборов. Решите свои задачи максимально быстро с нашими дипломами- hobbyland.moibb.ru/viewtopic.phpf=3&t=1235
сайт заказа курсовых стоимость курсовой работы
купить курсач курсач заказ
I conceive this internet site holds some very great info for everyone :D. “Years wrinkle the skin, but to give up enthusiasm wrinkles the soul.” by Samuel Ullman.
Приобрести диплом на заказ вы имеете возможность используя официальный портал компании. nonoclick.com/read-blog/129_kupit-podlinnyj-diplom-s-zaneseniem-v-reestr.html
скачать 1win на телефон официальный сайт http://1win10078.ru .
Мы предлагаем документы об окончании любых ВУЗов РФ. Документы производятся на оригинальных бланках государственного образца. electrospeed.teamforum.ru/viewtopic.phpf=3&t=5078
Где купить диплом специалиста?
Готовый диплом с приложением отвечает условиям и стандартам, никто не отличит его от оригинала – даже со специально предназначенным оборудованием. Заказать диплом о среднем образовании – быстро и легко! nitokitap.com/kupit-diplom-gosudarstvennogo-obrazca-22
1 win скачать https://mostbet10012.ru .
1вин скачать официальный сайт http://1win10080.ru/ .
1хставка лайв 1win10078.ru .
Выгодно купить диплом о высшем образовании!
Заказать диплом о высшем образовании. Приобретение документа о высшем образовании через проверенную и надежную фирму дарит множество плюсов для покупателя. Это решение позволяет сберечь время и существенные деньги. rpinnovative.1stbb.ru/viewtopic.phpf=8&t=1788
купить аттестат можно ли купить аттестат можно ли .
Заказать диплом института по выгодной стоимости можно, обращаясь к проверенной специализированной фирме. Купить документ университета вы можете у нас в столице. otziwnew.ru/post_type=topic&p=758905
1win promokod https://www.1win10077.ru .
казино 1win зеркало казино 1win зеркало .
Выгодно приобрести диплом об образовании!
Приобрести диплом университета по доступной стоимости вы можете, обращаясь к проверенной специализированной фирме. Приобрести диплом о высшем образовании: diplomus-spb.ru/kupit-diplom-s-reestrom-v-moskve-9
интернет провайдеры москва
msk-domashnij-internet003.ru
интернет провайдер москва
Приобрести диплом любого ВУЗа!
Наши специалисты предлагаютвыгодно купить диплом, который выполнен на бланке ГОЗНАКа и заверен мокрыми печатями, водяными знаками, подписями. Наш диплом способен пройти лубую проверку, даже при использовании специально предназначенного оборудования. Достигайте своих целей быстро и просто с нашим сервисом- link.5nx.ru/viewtopic.phpf=12&t=12562
Great post. I am facing a couple of these problems.
Мы изготавливаем дипломы любых профессий по доступным тарифам. Мы предлагаем документы техникумов, расположенных на территории всей РФ. Дипломы и аттестаты печатаются на бумаге самого высокого качества. Это дает возможность делать настоящие дипломы, которые невозможно отличить от оригинала. fourci.com/employer/archive-diploma
melbet сайт http://www.melbet1013.ru .
1 win ставки на спорт онлайн https://www.1win10077.ru .
Мы готовы предложить дипломы психологов, юристов, экономистов и прочих профессий по невысоким тарифам. Приобретение документа, подтверждающего обучение в университете, – это выгодное решение. Приобрести диплом любого ВУЗа: brawlstarsacc.listbb.ru/viewtopic.phpf=3&t=1340
Oh my goodness! an amazing article dude. Thanks Nonetheless I am experiencing situation with ur rss . Don’t know why Unable to subscribe to it. Is there anyone getting identical rss problem? Anybody who is aware of kindly respond. Thnkx
Car service squeaking noise while driving services We provide car repair services: from quick diagnostics to major restoration. Quality guarantee, experienced specialists, clear deadlines and original spare parts. We work with private and corporate clients.
buy via stash heroin porn daughter
Excellent post. I was checking continuously this blog and I am inspired! Very helpful information particularly the ultimate section 🙂 I maintain such information a lot. I used to be seeking this certain info for a very long time. Thanks and best of luck.
мелбет melbet1013.ru .
Покупка официального диплома через качественную и надежную компанию дарит массу достоинств для покупателя. Данное решение помогает сэкономить время и серьезные финансовые средства. Впрочем, достоинств гораздо больше.Мы предлагаем дипломы любой профессии. Дипломы изготавливаются на настоящих бланках государственного образца. Доступная стоимость сравнительно с огромными тратами на обучение и проживание в чужом городе. Покупка диплома об образовании из российского института является выгодным шагом.
Быстро купить диплом о высшем образовании: diplomg-cheboksary.ru/kupit-diplom-zanesennij-v-reestr-bistro-i-bezopasno/
ваучеры 1win http://mostbet10012.ru .
ракета 1 вин http://1win10079.ru/ .
Получить диплом ВУЗа поспособствуем. Купить диплом техникума, колледжа в Чите – diplomybox.com/kupit-diplom-tekhnikuma-kolledzha-v-chite
prodamus промокод http://www.promokod-prodam.ru/ .
повесить рулонные шторы цена за работу http://www.rulonnye-shtory-s-elektroprivodom50.ru .
Привет!
Мы изготавливаем дипломы любых профессий по выгодным ценам. Стоимость может зависеть от выбранной специальности, года получения и ВУЗа: diploman.com/
промокод 1хставка https://www.1win10080.ru .
рулонные шторы производство https://www.rulonnye-shtory-s-elektroprivodom10.ru .
таможенный брокер москва таможенные услуги таможенный брокер москва таможенные услуги .
1win casino ug 1win casino ug .
интернет по адресу нижний новгород
nizhnij-novgorod-domashnij-internet001.ru
провайдеры домашнего интернета нижний новгород
1цшт войти http://1win10008.ru/ .
Приобрести диплом университета по невысокой цене возможно, обратившись к проверенной специализированной компании. Купить документ ВУЗа можно в нашей компании в Москве. diplom-club.com/kupit-diplom-zaregistrirovannij-v-reestre-8
1win bet uganda http://www.1win1031.top .
darknet official sucks sucking porn
таможенный брокер москва таможенный брокер москва .
услуги таможня брокер https://www.tamozhennyj-broker13.ru .
Dead indited subject material, Really enjoyed reading through.
1win casino ug http://1win1031.top .
buy heroin amphetamine buy heroin online
mostbet букмекерская контора сайт https://mostbet10013.ru .
скачать 1вин http://www.1win10080.ru .
Мы предлагаем быстро и выгодно заказать диплом, который выполняется на оригинальном бланке и заверен мокрыми печатями, водяными знаками, подписями официальных лиц. Документ способен пройти любые проверки, даже при помощи специального оборудования. babygirlslove.copiny.com/question/details/id/1087285
бк 1вин https://mostbet10012.ru .
рулонные шторы автоматические купить http://www.rulonnye-shtory-s-elektroprivodom50.ru .
рулонные шторы с электроприводом на окна https://rulonnye-shtory-s-elektroprivodom10.ru .
таможенные брокеры москва таможенные брокеры москва .
Купить документ университета вы имеете возможность в нашем сервисе. Мы предлагаем документы об окончании любых университетов Российской Федерации. Вы сможете получить необходимый диплом по любым специальностям, включая документы СССР. Даем гарантию, что при проверке документов работодателем, подозрений не появится. diplom4you.com/kupite-diplom-s-reestrom-bistro-i-udobno-2/
Enjoyed looking through this, very good stuff, regards.
таможенное оформление грузов в москве таможенное оформление грузов в москве .
брокерские услуги таможня http://tamozhennyj-broker13.ru .
Быстро приобрести диплом любого института!
Мы изготавливаем дипломы любых профессий по приятным тарифам— bestdirs.ru
букмекерские конторы кыргызстана https://mostbet10013.ru/ .
подключить интернет нижний новгород
nizhnij-novgorod-domashnij-internet002.ru
интернет провайдеры нижний новгород по адресу
ставки на спорт мостбет https://mostbet10013.ru/ .
melbet сайт http://melbet1013.ru .
1win futbol http://1win10008.ru/ .
Приобрести диплом университета по невысокой цене возможно, обращаясь к надежной специализированной фирме. Купить документ университета вы сможете в нашем сервисе. diplomt-v-chelyabinske.ru/kupit-diplom-s-registratsiej-v-reestre-bistro-i-udobno-6
Купить диплом о высшем образовании. Производство диплома занимает минимум времени, а цена при этом доступна любому. В результате вы получаете возможность сохранить деньги и время и получить работу мечты. Купить диплом возможно используя официальный портал компании. – tsnlp.5nx.ru/viewtopic.php?f=26&t=1180
Perfect work you have done, this internet site is really cool with excellent information.
There is noticeably a bundle to identify about this. I assume you made various good points in features also.
Мы предлагаем выгодно и быстро приобрести диплом, который выполнен на оригинальной бумаге и заверен печатями, водяными знаками, подписями должностных лиц. Данный документ способен пройти лубую проверку, даже с применением специально предназначенного оборудования. coopervigrj.com.br/employer/premiumydiploma
Приобрести диплом любого института. Приобретение документа о высшем образовании через проверенную и надежную компанию дарит ряд достоинств. Такое решение позволяет сберечь как личное время, так и существенные финансовые средства. video.listbb.ru/viewtopic.php?f=3&t=1658
aviator game 1win http://1win10008.ru/ .
Мы изготавливаем дипломы психологов, юристов, экономистов и других профессий по приятным ценам.– linkforum.eu/kak-bystro-kupit-diplom-i-ne-popastsja-183
интернет по адресу нижний новгород
nizhnij-novgorod-domashnij-internet003.ru
домашний интернет нижний новгород
купить диплом о высшем образовании ссср купить диплом о высшем образовании ссср .
1win скачать мобильный телефон http://1win10079.ru .
1вин промокод при регистрации https://1win10081.ru .
Hello there, You have done an incredible job. I will definitely digg it and personally recommend to my friends. I’m confident they will be benefited from this site.
I don’t normally comment but I gotta tell appreciate it for the post on this special one : D.
место для хранения вещей в аренду подмосковье место для хранения вещей в аренду подмосковье .
Приобрести диплом любого ВУЗа. Приобретение документа о высшем образовании через качественную и надежную фирму дарит ряд преимуществ для покупателя. Это решение позволяет сэкономить как дорогое время, так и серьезные денежные средства. volexauto.bestforums.org/viewtopic.php?f=8&t=3128
Приобрести диплом ВУЗа!
Мы предлагаем документы любых учебных заведений, которые расположены в любом регионе Российской Федерации.
diplomv-v-ruki.ru/kupit-diplom-s-reestrom-bistro-i-nadezhno-3/
Купить диплом университета по выгодной цене вы можете, обращаясь к проверенной специализированной компании. Мы готовы предложить документы Институтов, расположенных на территории всей Российской Федерации. fremontrp.listbb.ru/viewtopic.phpf=18&t=1378
провайдеры новосибирск
novosibirsk-domashnij-internet001.ru
проверить провайдера по адресу
1 gram of heroin price schoolgirl porn
заказ курсовой недорого расчет стоимости курсовой
курсовик цена изготовление курсовых работ
1win casino ug 1win1031.top .
1vin вход 1win10083.ru .
вин 1 1win10082.ru .
I keep listening to the newscast lecture about getting free online grant applications so I have been looking around for the finest site to get one. Could you tell me please, where could i get some?
Приветствую!
Мы изготавливаем дипломы психологов, юристов, экономистов и прочих профессий по приятным ценам. Стоимость будет зависеть от конкретной специальности, года получения и образовательного учреждения: rdiplomans.com/
1win футбол http://1win10083.ru .
I have not checked in here for some time as I thought it was getting boring, but the last few posts are great quality so I guess I will add you back to my daily bloglist. You deserve it my friend 🙂
прогнозы lucky jet https://1win10082.ru/ .
Предлагаем качественные клинкерные ступени Нижний Новгород купить — ступени и плитка для наружных и внутренних работ. Устойчив к износу, влаге и морозу. Подходит для лестниц, крылец, балконов. Консультации и заказ в один шаг.
Заказать диплом о высшем образовании!
Мы можем предложить документы институтов, расположенных на территории всей России.
kupitediplom.ru/kupit-diplom-s-zaneseniem-v-reestr-po-vigodnoj-tsene-5/
регистрация в 1win https://mostbet10012.ru/ .
провайдеры интернета в новосибирске по адресу
novosibirsk-domashnij-internet002.ru
интернет провайдеры в новосибирске по адресу дома
Мы изготавливаем дипломы психологов, юристов, экономистов и других профессий по приятным тарифам. Купить диплом техникума — kyc-diplom.com/diplom-tekhnikuma.html
бонусный баланс 1win https://1win10085.ru/ .
1win нужен ли паспорт http://1win10079.ru .
When I originally commented I clicked the “Notify me when new comments are added” checkbox and now each time a comment is added I get four emails with the same comment. Is there any way you can remove people from that service? Thanks!
1win официальный https://www.1win10084.ru .
1win казино зеркало https://www.1win10085.ru .
Заказать диплом ВУЗа !
Покупка диплома любого университета РФ в нашей компании – надежный процесс, так как документ заносится в реестр. Выгодно купить диплом любого ВУЗа diplom-top.ru/kupit-nastoyashij-diplom-3
Приобрести диплом ВУЗа по доступной стоимости возможно, обращаясь к надежной специализированной компании. Мы оказываем услуги по изготовлению и продаже документов об окончании любых ВУЗов Российской Федерации. Купить диплом о высшем образовании– fyre.byelol.com/read-blog/11047_kupit-diplom-tehnikum.html
Металлические значки https://esnys.ru/katalog-statej/izgotovlenie-metallicheskih-znachkov-metodom-himicheskogo-travleniya-iskusstvo-detalizaczii-i-dolgovechnosti.html с логотипом, надписью или символикой — надёжный способ подчеркнуть стиль и статус. Предлагаем разные технологии, формы и варианты покрытия. Производство и доставка по всей России.
Значки из металла https://rus-week.ru/biznes-idei/metallicheskie-znachki-premialnogo-kachestva-luchshie-resheniya-dlya-brendinga/ это практичный и презентабельный атрибут для бизнеса, торжеств и наград. Мы производим значки с эмалью, гравировкой, штамповкой. Доступны различные формы, размеры и виды креплений.
Thank you, I have recently been looking for information about this topic for ages and yours is the best I’ve came upon till now. However, what in regards to the bottom line? Are you sure about the source?
account exchange account trading service
Мы изготавливаем дипломы любой профессии по разумным тарифам. Мы можем предложить документы ВУЗов, которые находятся в любом регионе Российской Федерации. Дипломы и аттестаты выпускаются на “правильной” бумаге высшего качества. Это дает возможность делать государственные дипломы, которые не отличить от оригинала. school97.ru/vesti/view_profile.phpUID=221062
Добрый день спасибо за ваш выбор нашего маркетплейса ссылка на сайт —>> рабочее зеркало кракен
Экран для проектора с возможностью крепления на штатив — удобно и стабильно
экран для проектора https://ehkrany-dlya-proektora.ru/ .
1 вин официальный сайт регистрация https://1win10008.ru .
мостбет сом https://mostbet10013.ru/ .
домашний интернет тарифы
novosibirsk-domashnij-internet003.ru
подключить домашний интернет в новосибирске
Сувениры с логотипом, которые повысят лояльность клиентов и мотивацию персонала
сувенирная продукция с логотипом http://www.suvenirnaya-produktsiya-s-logotipom0.ru/ .
хранение склад москва хранение склад москва .
таможенный брокер кто это таможенный брокер кто это .
ван вин регистрация http://1win10083.ru/ .
пластиковые окна от производителя москва пластиковые окна от производителя москва .
melbet http://melbet1013.ru .
минимальное пополнение в 1win https://1win10084.ru/ .
пластиковые окна с доставкой https://www.okna177.ru .
электрическая рулонная штора http://www.rulonnye-shtory-s-elektroprivodom50.ru/ .
Выбор правильной технологии https://wfinbiz.com/bez-rubriki/proizvodstvo-premialnyh-znachkov-tehnologii-i-metody-izgotovleniya-znachkov-vklyuchaya-himicheskoe-travlenie-i-ego-preimushhestva/ ключ к созданию значков, которые действительно производят впечатление. Чтобы значки премиального уровня действительно выглядели достойно, необходимо правильно подобрать технологию производства. Методы, такие как химическое травление, обеспечивают высокую детализацию и благородный внешний вид, который сохраняется надолго.
таможенное оформление грузов москва таможенное оформление грузов москва .
окна в москве http://www.02stroika.ru .
Лечение в Китае лечебные туры в хуньчунь из владивостока туры в лучшие медицинские центры страны. Традиционная и современная медицина, точная диагностика, восстановление и реабилитация. Сопровождение на всех этапах поездки.
Заказать диплом вы сможете используя сайт компании. ripple-xrp-global-network.mn.co/posts/82691472
бк 1 вин официальный сайт http://1win10083.ru/ .
подключить домашний интернет омск
omsk-domashnij-internet001.ru
подключить домашний интернет в омске
брокеры москва http://tamozhennyj-broker11.ru/ .
бэттери букмекерская контора официальный сайт скачать https://www.1win10082.ru .
Приобрести диплом ВУЗа по невысокой стоимости возможно, обратившись к проверенной специализированной компании. Мы можем предложить документы университетов, расположенных на территории всей России. social.projectkabahagi.com/read-blog/11160_kupit-diplom-s-reestrom-cena.html
рулонные шторы с пультом рулонные шторы с пультом .
таможенный брокер перевозки таможенный брокер перевозки .
1win ru 1win5067.ru .
как использовать бонусный счет 1win http://1win10082.ru/ .
Зарабатывай реальные деньги в лучших казино! Обзоры слотов, акции, стратегии для победы! Присоединяйся
Казино онлайн: фишки, тактики, бонусы! Заработай с нами! Реальные обзоры.
https://t.me/s/official_irwin_irwin/133
Зарабатывай бабло в онлайн казино! Обзоры слотов, бонусы, советы для победы! Подписывайся
Игровые автоматы: секреты, тактики, промокоды! Заработай с нами! Только честные обзоры.
https://t.me/s/official_1go_1go/507
Зарабатывай бабло в онлайн казино! Обзоры слотов, акции, советы для победы! Присоединяйся
Игровые автоматы: секреты, стратегии, промокоды! Поднимись с нами! Только честные обзоры.
https://t.me/s/official_1go_1go/1324
Зарабатывай бабло в лучших казино! Обзоры слотов, акции, стратегии для победы! Подписывайся
Казино онлайн: фишки, тактики, бонусы! Заработай с нами! Только честные обзоры.
https://t.me/s/official_starda/952
брокеры москва tamozhennyj-broker13.ru .
рулонные шторы на окна купить http://rulonnye-shtory-s-elektroprivodom50.ru/ .
интернет домашний омск
omsk-domashnij-internet002.ru
домашний интернет тарифы омск
Приобрести диплом на заказ в столице можно через сайт компании. yaoisennari.ekafe.ru/posting.phpmode=post&f=169&sid=fb43c3a8574888585ad2f3774f65dfb8
войти в 1win https://1win10084.ru/ .
таможенный брокер консультация таможенный брокер консультация .
1win mexico http://1win1017.top .
O site oficial 1win bet 1winbr.com.br e apostar em desporto, casinos, jogos e torneios. Suporte para diversas moedas, transacoes rapidas, promocoes e cashback. Jogue confortavelmente no seu PC ou atraves da aplicacao.
Hi there! This is my first visit to your blog! We are a group of volunteers and starting a new initiative in a community in the same niche. Your blog provided us beneficial information to work on. You have done a outstanding job!
Заказать диплом о высшем образовании!
Наши специалисты предлагаютбыстро купить диплом, который выполняется на бланке ГОЗНАКа и заверен печатями, водяными знаками, подписями. Данный документ пройдет лубую проверку, даже при помощи специальных приборов. Достигайте своих целей максимально быстро с нашим сервисом- brawlstarsacc.listbb.ru/viewtopic.phpf=3&t=1325
bonus 1win http://1win10084.ru/ .
Корм Jarvi — сбалансированное питание для активных и домашних животных
jarvi лакомства где купить с быстрой доставкой https://ozon.ru/product/lakomstva-jarvi-dlya-koshek-i-kotyat-myasnye-kolbaski-s-utkoy-i-krolikom-5-sht-1456790473/ .
winner casino jocuri pe mobil https://www.1win5067.ru .
готовые рулонные шторы купить в москве готовые рулонные шторы купить в москве .
casino 1 win http://1win1017.top/ .
1 win скачать на айфон http://www.1win10086.ru .
как ввести промокод в 1win https://www.1win10009.ru .
подключить проводной интернет омск
omsk-domashnij-internet003.ru
интернет тарифы омск
1 win скачать http://1win10085.ru .
Заказать диплом университета !
Приобретение диплома любого ВУЗа России в нашей компании – надежный процесс, так как документ будет заноситься в государственный реестр. Быстро и просто купить диплом любого университета diplom-ryssia.com/kupit-podlinnij-diplom-s-zaneseniem-v-reestr-15
1win kasino app 1win kasino app .
Приобрести диплом об образовании!
Покупка документа о высшем образовании через надежную компанию дарит ряд достоинств. Купить диплом университета у надежной фирмы: doks-v-gorode-vologda-35.ru
I am impressed with this web site, really I am a fan.
Где приобрести диплом специалиста?
Заказать диплом ВУЗа по невысокой цене возможно, обратившись к проверенной специализированной компании.: kazdiplomas.com
Мы предлагаем дипломы любых профессий по выгодным тарифам. Дипломы изготавливаются на оригинальных бланках Заказать диплом о высшем образовании diplomidlarf.ru
Мы можем предложить дипломы психологов, юристов, экономистов и прочих профессий по доступным ценам. Заказ диплома, подтверждающего обучение в ВУЗе, – это выгодное решение. Заказать диплом о высшем образовании: o91707v5.beget.tech/2025/04/23/gde-iskat-diplomy-dlya-pokupki.html
Купить диплом института по доступной цене можно, обратившись к надежной специализированной фирме. Мы оказываем услуги по продаже документов об окончании любых ВУЗов Российской Федерации. Приобрести диплом любого ВУЗа– miku-crdb.ru/forum/messages/forum1/topic982/message1083/result=new#message1083
I simply couldn’t go away your site before suggesting that I really enjoyed the usual info an individual supply for your visitors? Is gonna be back ceaselessly in order to check up on new posts.
интернет провайдеры пермь
perm-domashnij-internet001.ru
подключить интернет
1вин скачать https://www.1win10086.ru .
Заказать диплом о высшем образовании!
Наша компания предлагаетбыстро купить диплом, который выполняется на оригинальном бланке и заверен печатями, штампами, подписями официальных лиц. Наш документ способен пройти любые проверки, даже с использованием специфических приборов. Решите свои задачи быстро и просто с нашей компанией- easyqode.com.br/kupit-diplom-prostoe-reshenie-dlja-slozhnyh-zadach-134
Добрый день спасибо за ваш выбор нашего маркетплейса ссылка на сайт —>> телеграмм магазин гашиш
Thank you, I’ve just been looking for information about this subject for ages and yours is the greatest I’ve discovered so far. But, what about the bottom line? Are you sure about the source?
Купить диплом ВУЗа по невысокой стоимости можно, обращаясь к надежной специализированной компании. Купить документ университета вы сможете у нас. diplomidlarf.ru/kupit-podlinnij-diplom-s-zaneseniem-v-reestr-18
домашний интернет в перми
perm-domashnij-internet002.ru
тарифы интернет и телевидение пермь
Наши специалисты предлагают выгодно купить диплом, который выполняется на бланке ГОЗНАКа и заверен мокрыми печатями, штампами, подписями официальных лиц. Документ пройдет лубую проверку, даже при помощи профессиональных приборов. solo-it.ru/forum/?PAGE_NAME=profile_view&UID=4318
1вин. 1вин. .
Wisdom of Athena is a game-changer! The strategic depth and immersive experience make it a must-play for anyone who loves mythology and mind-challenging gameplay!Wisdom Of Athena
1win mx https://1win1017.top/ .
1xBet promo code https://walk.lab2pt.net/wp-content/pgs/eksfoliaciya_himicheskiy_piling_kakie_opasnosti_on_neset.html is an opportunity to get a bonus of up to 100% on your first deposit. Register, enter the code and start betting with additional funds. Fast, simple and profitable.
1xBet promo code https://www.charminghouses.net/mail/pgs/krovotochivosty_desen_prichiny_i_lechenie.html is your chance to start with a bonus! Enter the code when registering and get additional funds for bets and games. Suitable for sports events, live bets and casino. The bonus is activated automatically after replenishing the account.
¡Hola apasionados del juego !
Los casinos sin depГіsito ofrecen free spins EspaГ±a a diario.
Jugar gratis nunca fue tan fГЎcil como ahora gracias a este bono exclusivo https://25girosgratissindeposito.xyz sin depГіsito.
¡Que tengas magníficas resultados asombrosos !
Great – I should certainly pronounce, impressed with your website. I had no trouble navigating through all the tabs and related info ended up being truly easy to do to access. I recently found what I hoped for before you know it at all. Reasonably unusual. Is likely to appreciate it for those who add forums or anything, web site theme . a tones way for your customer to communicate. Nice task.
1win слоты играть скачать https://www.1win10009.ru .
Мы можем предложить дипломы психологов, юристов, экономистов и прочих профессий по приятным ценам. Покупка документа, который подтверждает окончание института, – это разумное решение. Заказать диплом любого ВУЗа: myauto.5nx.ru/viewtopic.phpf=2&t=1520
Где приобрести диплом по актуальной специальности?
Мы предлагаем дипломы любой профессии по приятным ценам. Для нас важно, чтобы документы были доступны для большинства граждан. Приобрести диплом об образовании [url=http://diplomskiy.com/kupit-diplom-s-vneseniem-v-reestr-29/]diplomskiy.com/kupit-diplom-s-vneseniem-v-reestr-29/[/url]
Perfectly pent articles, thank you for information. “Necessity is the mother of taking chances.” by Mark Twain.
Приобрести диплом об образовании. Приобретение документа о высшем образовании через надежную компанию дарит много плюсов. Данное решение дает возможность сэкономить как личное время, так и существенные деньги. awan.pro/forum/user/31181
1win вход через вк http://1win10088.ru/ .
1win online http://1win10087.ru/ .
Покупка официального диплома через качественную и надежную компанию дарит ряд плюсов. Такое решение помогает сэкономить время и серьезные денежные средства. Однако, достоинств значительно больше.Мы изготавливаем дипломы любой профессии. Дипломы производят на фирменных бланках государственного образца. Доступная стоимость сравнительно с огромными затратами на обучение и проживание в чужом городе. Приобретение диплома ВУЗа станет мудрым шагом.
Быстро купить диплом: diplomskiy.com/kupite-diplom-s-reestrom-i-otzivami-udobno-i-bistro/
провайдеры пермь
perm-domashnij-internet003.ru
домашний интернет подключить пермь
Добрый день спасибо за ваш выбор нашего маркетплейса ссылка на сайт —>> рабочее kraken зеркало
The next time I read a blog, I hope that it doesnt disappoint me as much as this one. I mean, I know it was my choice to read, but I actually thought youd have something interesting to say. All I hear is a bunch of whining about something that you could fix if you werent too busy looking for attention.
1вин фрибет http://www.1win10088.ru .
1win зеркало сайта онлайн https://www.1win10087.ru .
1він live 1він live .
личный кабинет 1win http://www.1win10010.ru .
1win kz скачать http://1win10085.ru/ .
1win официальный сайт войти онлайн бесплатно http://www.1win10010.ru .
bonus prima depunere http://1win5067.ru/ .
Выгодно купить диплом о высшем образовании!
Заказ диплома через проверенную и надежную компанию дарит много достоинств для покупателя. Купить диплом об образовании у надежной компании: doks-v-gorode-tyumen-72.ru
mostbet мостбет http://mostbet10014.ru .
1win играть https://1win10089.ru .
провайдеры ростов
rostov-domashnij-internet001.ru
подключить интернет в ростове в квартире
Some genuinely nice and utilitarian info on this internet site, as well I believe the pattern has got great features.
Выигрывай реальные деньги в онлайн казино! Обзоры слотов, акции, стратегии для победы! Присоединяйся
Игровые автоматы: фишки, тактики, промокоды! Заработай с нами! Реальные обзоры.
https://t.me/Official_1win_1win/687
Glad I had a moment to check out your page. You’ve curated a lot of useful and interesting material. I’ve enjoyed looking through your different posts. Thanks again—have a relaxing and productive day.
Выигрывай реальные деньги в онлайн казино! Топ слотов, акции, советы для победы! Присоединяйся
Игровые автоматы: фишки, стратегии, бонусы! Заработай с нами! Реальные обзоры.
https://t.me/Official_1win_1win/1531
Hey, I think your website might be having browser compatibility issues. When I look at your blog site in Opera, it looks fine but when opening in Internet Explorer, it has some overlapping. I just wanted to give you a quick heads up! Other then that, very good blog!
Зарабатывай бабло в лучших казино! Топ слотов, бонусы, советы для победы! Присоединяйся
Игровые автоматы: фишки, тактики, бонусы! Поднимись с нами! Реальные обзоры.
https://t.me/Official_1win_1win/1351
Зарабатывай реальные деньги в онлайн казино! Топ слотов, бонусы, советы для победы! Подписывайся
Казино онлайн: фишки, тактики, промокоды! Поднимись с нами! Реальные обзоры.
https://t.me/Official_1win_1win/45
Мы изготавливаем дипломы любой профессии по приятным ценам. Мы готовы предложить документы ВУЗов, которые расположены на территории всей Российской Федерации. Документы выпускаются на “правильной” бумаге самого высшего качества. Это позволяет делать государственные дипломы, не отличимые от оригинала. ractis.ru/forums/index.phpautocom=gallery&req=si&img=3323
Throughout the grand pattern of things you secure an A+ just for hard work. Where you actually lost us ended up being on the facts. You know, as the maxim goes, the devil is in the details… And that could not be more correct here. Having said that, permit me tell you just what did deliver the results. Your writing is rather convincing and that is possibly why I am taking an effort to opine. I do not really make it a regular habit of doing that. Second, despite the fact that I can easily see the leaps in logic you make, I am not really certain of just how you appear to unite your ideas that make the final result. For right now I will, no doubt yield to your issue but hope in the near future you connect your facts much better.
Добрый день спасибо за ваш выбор нашего маркетплейса ссылка на сайт —>> kraken зеркало
Наша компания предлагает выгодно и быстро заказать диплом, который выполняется на бланке ГОЗНАКа и заверен мокрыми печатями, штампами, подписями. Диплом пройдет любые проверки, даже с применением специального оборудования. red.dariofalero.com/read-blog/9960_kupit-originalnyj-diplom-s-zaneseniem-v-reestr.html
скачать мост бет https://www.mostbet10014.ru .
excellent submit, very informative. I wonder why the other experts of this sector don’t notice this. You should proceed your writing. I’m confident, you have a great readers’ base already!
mostbet download mostbet download .
buy accounts https://accounts-marketplace.xyz/
Купить диплом любого ВУЗа. Покупка диплома через качественную и надежную фирму дарит множество преимуществ. Это решение помогает сберечь как личное время, так и существенные финансовые средства. itisenglish.maxbb.ru/viewtopic.php?f=7&t=1857
Thank you for the auspicious writeup. It in fact was a amusement account it. Look advanced to more added agreeable from you! However, how could we communicate?
guaranteed accounts https://social-accounts-marketplaces.live
Мы изготавливаем дипломы любых профессий по приятным ценам.
Вы приобретаете документ через надежную компанию. Приобрести диплом о высшем образовании– http://myworldavto.ru/zakazat-diplom-o-vyisshem-obrazovanii-srochno/ – myworldavto.ru/zakazat-diplom-o-vyisshem-obrazovanii-srochno
1 win букмекерская https://1win10009.ru .
дешевый интернет ростов
rostov-domashnij-internet002.ru
провайдеры домашнего интернета ростов
бонус код 1win https://www.1win10088.ru .
1 win ставки на спорт зеркало https://www.1win10089.ru .
Нужен номер для ТГ? Предлагаем купить номер для регистрации тг для одноразовой или постоянной активации. Регистрация аккаунта без SIM-карты, в любом регионе. Удобно, надёжно, без привязки к оператору.
350fairfax Nordvpn Promotion
Ahaa, its pleasant dialogue concerning this paragraph at this place
at this website, I have read all that, so now me also commenting here.
win букмекерская контора http://1win10088.ru .
Экскурсии по Красноярску tour-guide8.ru индивидуальные прогулки и групповые туры. Красивые виды, история города, заповедные места. Гиды с опытом, удобные форматы, гибкий график. Подарите себе незабываемые впечатления!
order Cialis online no prescription: order Cialis online no prescription – buy generic Cialis online
как использовать бонусный счет в 1win https://1win10087.ru .
Мы предлагаем дипломы любых профессий по приятным тарифам. Мы готовы предложить документы ВУЗов, которые находятся в любом регионе Российской Федерации. Документы выпускаются на “правильной” бумаге самого высшего качества. Это дает возможность делать государственные дипломы, которые невозможно отличить от оригинала. poznanie.gtaserv.ru/memberlist.php
видеостена https://svetodiodnye-ekrany-videosteny.ru
aviator игра 1win скачать https://1win10086.ru/ .
I’m not that much of a internet reader to be honest but your blogs really nice, keep it up! I’ll go ahead and bookmark your site to come back later. All the best
Вам требуется лечение? стоматологические туры в хуньчунь из владивостока лечение хронических заболеваний, восстановление после операций, укрепление иммунитета. Включено всё — от клиники до трансфера и проживания.
Hey there! I know this is kind of off topic but I was wondering which blog platform are you using for this site?
I’m getting sick and tired of WordPress because I’ve had problems with hackers and I’m looking at alternatives for another platform.
I would be fantastic if you could point me in the direction of a good platform.
Have a look at my blog post – salt trick for men
1win официальный сайт бесплатно онлайн 1win официальный сайт бесплатно онлайн .
подключить интернет в ростове в квартире
rostov-domashnij-internet003.ru
интернет провайдер ростов
https://t.me/s/official_rox_rox
https://t.me/s/official_irwin_irwin
https://t.me/s/vavadaslot_777
https://t.me/s/official_drip
1вин скачать на андроид http://www.1win10089.ru .
https://t.me/s/official_vodka
Мы изготавливаем дипломы психологов, юристов, экономистов и других профессий по выгодным ценам. Дипломы изготавливаются на настоящих бланках Заказать диплом о высшем образовании diplomk-v-krasnodare.ru
Где заказать диплом специалиста?
Приобрести диплом ВУЗа по выгодной стоимости можно, обращаясь к надежной специализированной фирме.: kupite-diplom0024.ru
You made some decent points there. I looked on the internet for the subject and found most people will consent with your site.
1win descarga http://www.1win1017.top .
1win слоты скачать на андроид бесплатно 1win10010.ru .
Mitolyn is a cutting-edge natural dietary supplement designed to support effective weight loss and improve overall wellness.
Покупка документа о высшем образовании через надежную фирму дарит ряд плюсов. Данное решение помогает сэкономить как продолжительное время, так и существенные финансовые средства. Тем не менее, на этом выгоды не ограничиваются, достоинств намного больше.Мы изготавливаем дипломы психологов, юристов, экономистов и любых других профессий. Дипломы производятся на подлинных бланках. Доступная стоимость по сравнению с огромными затратами на обучение и проживание. Покупка диплома ВУЗа будет рациональным шагом.
Купить диплом о высшем образовании: diplomk-vo-vladivostoke.ru/pokupka-diplomov-s-reestrom-4/
Надёжные поставки тканей оптом — гарантия качества и сроков
купить ткани оптом от производителя http://my-tkani-optom.ru/ .
1win каттоо https://www.1win10089.ru .
интернет провайдеры в самаре по адресу дома
samara-domashnij-internet001.ru
подключить интернет по адресу
1win app https://1win10009.ru .
Купить диплом ВУЗа по невысокой цене вы можете, обратившись к надежной специализированной фирме. Купить документ университета вы имеете возможность у нас. diplom-zentr.com/kupit-diplom-s-reestrom-bistro-i-nadezhno-20
Mitolyn is a cutting-edge natural dietary supplement designed to support effective weight loss and improve overall wellness.
Приобрести диплом о высшем образовании!
Приобрести диплом ВУЗа по выгодной цене возможно, обращаясь к надежной специализированной фирме. Купить диплом о высшем образовании: diplomj-irkutsk.ru/registratsiya-diploma-v-reestre-ofitsialnaya-proverka
На KRAKEN легко найти нужный товар
Great web site. A lot of useful information here. I?¦m sending it to some pals ans also sharing in delicious. And obviously, thanks for your sweat!
Купить диплом института по невысокой стоимости вы можете, обращаясь к надежной специализированной фирме. Купить документ ВУЗа можно в нашем сервисе. hektips.com/employer/originals-diplomsi
Wow, that’s what I was exploring for, what a material!
existing here at this web site, thanks admin of this website.
Check out my homepage: tonic greens
KRAKEN не подводит, всегда доставляют вовремя
провайдеры по адресу самара
samara-domashnij-internet002.ru
провайдеры интернета по адресу самара
мостбет вход на сегодня http://www.mostbet10014.ru .
I like this post, enjoyed this one thanks for putting up.
мелбет kg http://melbet1011.ru/ .
узнать провайдера по адресу самара
samara-domashnij-internet003.ru
провайдеры по адресу самара
Где купить диплом по нужной специальности?
Мы изготавливаем дипломы любых профессий по приятным ценам. Важно, чтобы документы были доступными для большинства граждан. Купить диплом о высшем образовании poluchidiplom.com/ofitsialnij-diplom-o-srednem-obrazovanii-s-garantiej/
melbet официальный сайт http://melbet1011.ru/ .
Купить документ о получении высшего образования можно у нас. Мы предлагаем документы об окончании любых ВУЗов РФ. Вы сможете получить диплом по любым специальностям, любого года выпуска, в том числе документы старого образца. Даем 100% гарантию, что в случае проверки документа работодателем, никаких подозрений не возникнет. diplomidlarf.ru/kupit-diplom-s-zaneseniem-v-reestr-otzivi-3/
1win online https://1win1026.top .
Design your own rubber stamp online – easy, fast and free
rubber stamp online maker http://www.stamps-creator-online1.com .
¡Hola, jugadores !
Si eres nuevo en el mundo de los casinos, esta es la manera perfecta de empezar.
Este tipo de bonificaciones como los 10 euros gratis sin depГіsito ayudan a los usuarios a decidir si un casino es adecuado para ellos. Permite evaluar la calidad del servicio, la variedad de juegos y la experiencia de usuario. Todo esto sin invertir ni un solo euro.
Casino 10€ gratis 2025: juega hoy sin gastar nada – https://www.youtube.com/watch?v=DvFWSMyjao4&list=PLX0Xt4gdc3aLv2xrbmSCzHqZw12bA17Br
¡Que tengas excelentes beneficios !
Купить диплом о высшем образовании!
Мы изготавливаем дипломы любых профессий по приятным ценам— dip-ru.ru
There is apparently a bundle to identify about this. I assume you made some nice points in features also.
Диплом ВУЗа России!
Без университета достаточно сложно было продвигаться по карьерной лестнице. Купить диплом на заказ возможно через сайт компании: arzookanak4781.copiny.com/question/details/id/1093086
подключить интернет по адресу
spb-domashnij-internet001.ru
подключить интернет
https://t.me/vavadaslot_777/272
как отыграть бонус в 1win 1win10012.ru .
как использовать бонусы 1win казино https://1win10011.ru/ .
jocuri ruleta http://1win5068.ru/ .
sports betting 1win 1win1026.top .
как потратить бонусы казино в 1win как потратить бонусы казино в 1win .
1вин кз 1win10011.ru .
купить ноутбук lenovo цена ноутбука для работы
магазины электроники в москве https://magazin-elektroniki213.ru
цена смартфона xiaomi купить смартфон в москве
1win pro http://1win5068.ru .
1win регистрация скачать http://1win10013.ru/ .
таможеный брокер http://tamozhennyj-broker14.ru/ .
таможенные брокеры спб https://tamozhennyj-broker15.ru/ .
таможенный брокер импорт таможенный брокер импорт .
погода в сочи на 14 дней температура воды погода в сочи на 14 дней температура воды .
расчет стоимости страховки расчет стоимости страховки .
1win betting site 1win betting site .
регистрация мостбет http://www.mostbet10015.ru .
узнать интернет по адресу
spb-domashnij-internet002.ru
проверить провайдеров по адресу санкт-петербург
Добрый день спасибо за ваш выбор нашего маркетплейса ссылка на сайт —>> официальный kraken и его зеркала
Приобрести диплом института!
Купить диплом любого института. Заказ документа о высшем образовании через проверенную и надежную компанию дарит ряд достоинств для покупателя. Данное решение помогает сэкономить время и значительные финансовые средства. vira-ss.flybb.ru/viewtopic.phpf=9&t=984
таможенный представитель таможенный представитель .
таможня брокер таможня брокер .
Заказать диплом любого ВУЗа!
Наши специалисты предлагаютмаксимально быстро купить диплом, который выполняется на оригинальной бумаге и заверен мокрыми печатями, водяными знаками, подписями официальных лиц. Документ пройдет лубую проверку, даже при помощи специально предназначенного оборудования. Достигайте своих целей быстро и просто с нашим сервисом- maminmir.getbb.ru/viewtopic.phpf=1&t=3045
You have remarked very interesting points! ps nice site.
услуги таможенный брокер услуги таможенный брокер .
прогноз погоды на 14 дней в сочи прогноз погоды на 14 дней в сочи .
расчет стоимости осаго расчет стоимости осаго .
Добрый день спасибо за ваш выбор нашего маркетплейса ссылка на сайт —>> по этому адресу
промокоды 1вин 1win10013.ru .
1 win mexico http://1win1017.top .
buy accounts https://social-accounts-marketplace.live/
интернет провайдеры по адресу санкт-петербург
spb-domashnij-internet003.ru
тарифы интернет и телевидение санкт-петербург
Заказать диплом на заказ вы сможете используя сайт компании. stars.flyboard.ru/viewtopic.phpf=1&t=1456
purchase ready-made accounts https://social-accounts-marketplace.live
отзывы 1win https://1win10013.ru .
Заказать диплом о высшем образовании!
Мы предлагаем дипломы любой профессии по приятным тарифам— mplzt.ru
1 вин официальный сайт регистрация 1win10012.ru .
Где заказать диплом по нужной специальности?
Полученный диплом с приложением отвечает стандартам Министерства образования и науки РФ, никто не сумеет отличить его от оригинала – даже со специально предназначенным оборудованием. Получить диплом о высшем образовании – не проблема! ukrom.in.ua/users/327
Мы готовы предложить дипломы любой профессии по разумным тарифам.
Вы приобретаете диплом в надежной и проверенной компании. Приобрести диплом ВУЗа– http://dev.fleeped.com/read-blog/10802_vozmozhno-li-udachno-priobresti-dokumenty-o-zavershenii-obucheniya-v-nastoyashij.html/ – dev.fleeped.com/read-blog/10802_vozmozhno-li-udachno-priobresti-dokumenty-o-zavershenii-obucheniya-v-nastoyashij.html
Мы готовы предложить дипломы любой профессии по доступным ценам. Приобретение документа, который подтверждает окончание института, – это грамотное решение. Заказать диплом ВУЗа: chatplext.mornex.in/read-blog/6022_gde-mozhno-kupit-diplom-kolledzha.html
Добрый день спасибо за ваш выбор нашего маркетплейса ссылка на сайт —>> как зайти на kraken через зеркало
1вин официальный сайт 1win10012.ru .
The Natural Mounjaro Recipe is more than just a diet—it’s a sustainable and natural approach to weight management and overall health.
mel-bet.kg melbet1011.ru .
авиатор игра на деньги отзывы авиатор игра на деньги отзывы .
Приобрести диплом о высшем образовании. Приобретение подходящего диплома через надежную фирму дарит немало преимуществ для покупателя. Это решение помогает сэкономить как личное время, так и существенные средства. vodems.com/blogs/296/Љупить-диплом-с-подтверждением
Hi , I do believe this is an excellent blog. I stumbled upon it on Yahoo , i will come back once again. Money and freedom is the best way to change, may you be rich and help other people.
1win casino uganda 1win1032.top .
Добрый день!
Мы готовы предложить дипломы любой профессии по приятным тарифам. Стоимость может зависеть от выбранной специальности, года выпуска и образовательного учреждения: rdiplomm24.com/
1win bet uganda https://1win1032.top/ .
Наши специалисты предлагают быстро и выгодно приобрести диплом, который выполнен на бланке ГОЗНАКа и заверен печатями, штампами, подписями. Наш документ способен пройти лубую проверку, даже при помощи специальных приборов. bestnasos.ru/forum/user/5180
Приобрести диплом о высшем образовании!
Мы можем предложить дипломы психологов, юристов, экономистов и прочих профессий по приятным ценам. Вы приобретаете документ в надежной и проверенной компании. : ewbknust.com/poluchite-diplom-svoej-mechty-uzhe-segodnja-54
1win login ug 1win1032.top .
провайдеры в уфе по адресу проверить
ufa-domashnij-internet001.ru
провайдеры по адресу
1win site https://1win5068.ru/ .
1win букмекерская контора скачать приложение 1win букмекерская контора скачать приложение .
melbet сайт http://melbet1014.ru .
покупка электроники интернет магазины https://magazin-elektroniki213.ru
Aqua Sculpt is an advanced body contouring treatment that uses hydrating active ingredients, cooling technology, and sometimes ultrasound or RF-based devices (depending on the version) to target fat cells and tighten the skin.
цена смартфона xiaomi смартфон redmi купить
Hi there, I do think your site may be having internet
browser compatibility problems. When I look at your
site in Safari, it looks fine but when opening in Internet Explorer, it has some overlapping issues.
I simply wanted to provide you with a quick heads up! Apart
from that, wonderful website!
Here is my web site beastforce male enhancement review
Thank you for any other informative web site. Where else may just I get that kind of info written in such a perfect way? I have a project that I’m just now working on, and I have been on the glance out for such information.
букмекер кыргызстан mostbet10015.ru .
Мы готовы предложить дипломы психологов, юристов, экономистов и прочих профессий по приятным тарифам. Заказ документа, который подтверждает обучение в университете, – это выгодное решение. Купить диплом о высшем образовании: americannflforum.com/read-blog/5354_gde-kupit-attestaty-za-11-klass.html
промокод на продамус промокод на продамус .
мелбет http://www.melbet1014.ru .
win1 casino http://1win1017.top .
мелбет ком регистрация http://www.melbet1014.ru .
Приобрести диплом ВУЗа по выгодной цене возможно, обращаясь к надежной специализированной компании. Заказать документ университета можно в нашей компании в Москве. diplomservis.com/kupit-diplom-s-zaneseniem-v-reestr-bistro-i-nadezhno-83
Наша компания предлагает быстро и выгодно купить диплом, который выполняется на оригинальном бланке и заверен печатями, водяными знаками, подписями. Наш диплом способен пройти любые проверки, даже с применением специфических приборов. amazingwoman.in/read-blog/1025_skolko-stoit-kupit-diplom-s-reestrom.html
провайдеры интернета в уфе по адресу проверить
ufa-domashnij-internet002.ru
провайдеры интернета по адресу
Купить диплом на заказ в столице возможно через официальный сайт компании. linkmate.mn.co/posts/82690159
1win site 1win1026.top .
Мы готовы предложить дипломы любой профессии по невысоким ценам. Мы предлагаем документы ВУЗов, которые находятся на территории всей РФ. Документы делаются на “правильной” бумаге высшего качества. Это позволяет делать государственные дипломы, которые не отличить от оригиналов. poeskovek.flybb.ru/viewtopic.phpf=2&t=657
1xBet промокод — выгодный шанс получить приветственные награды от букмекера [url=http://zvezda.spb.ru/mts/inc/promokod_603.html]http://zvezda.spb.ru/mts/inc/promokod_603.html[/url] . Введя уникальный промокод в форму при регистрации, пользователь может получить до 100% на баланс. Это полезный инструмент для тех, кто хочет начать с дополнительным капиталом. Активация кода простая — достаточно ввести его и внести депозит.
Wow, superb blog layout! How long have you ever been blogging for? you made running a blog look easy. The full glance of your site is great, let alone the content material!
таможенный представитель москва таможенный представитель москва .
Заказать диплом ВУЗа!
Заказать диплом ВУЗа по невысокой стоимости возможно, обратившись к проверенной специализированной фирме. Заказать диплом о высшем образовании: kupitediplom.ru/kupit-diplom-s-provodkoj-po-reestru-nadezhno
провайдеры интернета по адресу
ufa-domashnij-internet003.ru
провайдеры интернета по адресу
Мы предлагаем дипломы любых профессий по выгодным тарифам.– talkrealty.ru/kupit-diplom-chto-delat-posle
Заказать диплом ВУЗа по выгодной цене вы можете, обращаясь к проверенной специализированной компании. Купить документ университета можно у нас. diplom4you.com/kupit-diplom-s-reestrom-bistro-i-nadezhno-22
услуги таможня брокер http://tamozhennyj-broker15.ru .
1win méxico https://1win1017.top .
win1 aviator 1win10013.ru .
PrimeBiome is a dietary supplement designed to support gut health by promoting a balanced microbiome, enhancing digestion, and boosting overall well-being.
услуги таможенного брокера москва услуги таможенного брокера москва .
мостбет официальный вход https://mostbet10015.ru/ .
интернет тарифы омск
volgograd-domashnij-internet001.ru
домашний интернет омск
мелбет казино официальный сайт https://www.melbet1011.ru .
Заказать диплом университета по невысокой стоимости возможно, обращаясь к надежной специализированной компании. Приобрести документ о получении высшего образования можно в нашем сервисе. key-sports.com/kupit-diplom-gosudarstvennogo-obrazca-59-2
1win méxico https://www.1win1017.top .
1win bet uganda 1win1032.top .
https://freeprosoftz.com/virtual-dj-pro-crack-download/
I was suggested this web site by my cousin. I am not sure whether this post is written by him as nobody else know such detailed about my problem. You’re incredible! Thanks!
рассчитать осаго на авто http://zaria.com.ru/ .
погода в сочи на 14 и температура воды http://www.weathersochi14days.ru .
Мы предлагаем дипломы психологов, юристов, экономистов и прочих профессий по приятным ценам. Мы можем предложить документы ВУЗов, расположенных на территории всей РФ. Документы делаются на бумаге самого высокого качества. Это позволяет делать государственные дипломы, не отличимые от оригиналов. ledeia.flybb.ru/viewtopic.phpf=2&t=561
Приобрести диплом института по невысокой цене вы можете, обратившись к проверенной специализированной компании. Мы предлагаем документы Институтов, которые находятся в любом регионе РФ. grainfather.global/employer/eonline-diploma
услуги таможенного брокера москва услуги таможенного брокера москва .
таможенные брокеры вэд https://www.tamozhennyj-broker14.ru .
Купить документ ВУЗа вы сможете в нашей компании в Москве. Мы оказываем услуги по изготовлению и продаже документов об окончании любых ВУЗов России. Вы получите необходимый диплом по любым специальностям, любого года выпуска, в том числе документы образца СССР. Даем 100% гарантию, что в случае проверки документов работодателем, подозрений не появится. diplomnie.com/kupit-diplom-s-zaneseniem-v-reestr-bistro-i-prosto-5/
подключить интернет тарифы омск
volgograd-domashnij-internet002.ru
провайдеры интернета омск
рассчитать автостраховку http://zaria.com.ru .
Диплом университета Российской Федерации!
Без университета очень непросто было продвинуться вверх по карьерной лестнице. Заказать диплом под заказ в столице вы имеете возможность используя официальный портал компании: bananowecuksy.phorum.pl/posting.phpmode=newtopic&f=1
Заказать диплом университета по невысокой цене вы можете, обращаясь к проверенной специализированной фирме. Купить документ о получении высшего образования вы можете в нашем сервисе. forum.mbprinteddroids.com/newthread.phpfid=2
окна rehau окна rehau .
What i don’t realize is actually how you’re not really a lot more well-favored than you might be right now. You’re so intelligent. You understand thus significantly on the subject of this subject, produced me for my part believe it from numerous varied angles. Its like men and women aren’t involved except it’s something to do with Lady gaga! Your own stuffs nice. At all times take care of it up!
температура моря в сочи на 14 дней http://weathersochi14days.ru/ .
1win скачать на телефон iphone https://1win10014.ru/ .
1win online 1win online .
таможенный брокер консультация таможенный брокер консультация .
цена новых ноутбуков ноутбук 16 цена
смартфон poco купить смартфон отзывы цена
промокод в 1вин казино https://www.1win10015.ru .
mobila de lemn la comanda http://www.1win5068.ru .
Купить диплом о высшем образовании !
Приобретение диплома любого ВУЗа России в нашей компании – надежный процесс, так как документ будет заноситься в государственный реестр. Приобрести диплом любого ВУЗа diplomv-v-ruki.ru/kupit-diplom-visshego-obrazovaniya-s-vneseniem-v-reestr-2
мелбет кж melbet1014.ru .
1win офф сайт 1win офф сайт .
1win отзывы казино https://1win10015.ru/ .
cheap Cialis online discreet shipping ED pills buy generic Cialis online
подключить интернет тарифы омск
volgograd-domashnij-internet003.ru
недорогой интернет омск
modafinil pharmacy: modafinil 2025 – doctor-reviewed advice
mostbet com официальный сайт https://www.mostbet10015.ru .
Hello! Do you know if they make any plugins to assist with SEO? I’m trying to get my blog to rank for some targeted keywords but I’m not seeing very good results. If you know of any please share. Cheers!
1win ug https://1win1033.top .
1win betting site https://www.1win1027.top .
Thank you for sharing with us, I think this website truly stands out : D.
Magnificent beat ! I wish to apprentice whilst you amend your site, how can i subscribe for a blog web site? The account helped me a applicable deal. I had been a little bit acquainted of this your broadcast provided vibrant transparent idea
account store https://accounts-marketplace-best.pro/
мелбет кг melbet1011.ru .
окна рехау окна рехау .
купить 11 классов аттестат http://www.diplomandoci24.online .
лучший интернет провайдер воронеж
voronezh-domashnij-internet001.ru
интернет тарифы воронеж
Оказываем услуги юрист в сфере защиты прав потребителей: консультации, подготовка претензий и исков, представительство в суде. Поможем вернуть деньги, заменить товар или взыскать компенсацию. Работаем быстро и по закону.
печать наклеек недорого печать маленьких наклеек
Online rubber stamp design for schools, businesses, and creatives
stamp maker https://make1-stamps-online.com .
криптовалюта начало криптовалюта начало .
Rubber stamp maker online for HR, accounting, and legal teams
rubber stamp online maker https://mystampready-constructor1.com .
1win nigeria 1win nigeria .
мелбет вход в личный melbet1011.ru .
hi!,I love your writing so much! proportion we be in contact extra approximately your post on AOL? I need a specialist on this space to resolve my problem. May be that is you! Having a look forward to peer you.
1win casino uganda https://1win1033.top .
продамус промокод скидка на подключение продамус промокод скидка на подключение .
игры с выводом денег без вложений на андроид скачать http://1win10015.ru/ .
1win ug http://1win1033.top .
Hello there, just turned into alert to your blog via Google, and found that it is truly informative. I’m going to be careful for brussels. I’ll appreciate in case you continue this in future. A lot of other people might be benefited from your writing. Cheers!
mel bet сайт http://melbet1015.ru/ .
провайдеры домашнего интернета воронеж
voronezh-domashnij-internet002.ru
подключить интернет
авиатор игра на деньги https://1win10014.ru/ .
1win бет зеркало http://1win10015.ru/ .
Выгодно купить диплом о высшем образовании!
Быстро заказать диплом института. Заказ официального диплома через надежную фирму дарит немало преимуществ. Это решение позволяет сэкономить как личное время, так и существенные финансовые средства. blog.saffmedic.com/diplom-na-zakaz-legko-i-prosto-221
Мы оказываем услуги по продаже документов об окончании любых университетов РФ. Документы производятся на настоящих бланках государственного образца. veiron.forumex.ru/viewtopic.phpf=4&t=10188
Где приобрести диплом специалиста?
Готовый диплом с приложением целиком и полностью отвечает стандартам, никто не сумеет отличить его от оригинала – даже со специальным оборудованием. Диплом о высшем образовании – не проблема! cng.flybb.ru/viewtopic.phpf=2&t=903
Заказать диплом под заказ в Москве можно через сайт компании. rebeccaitow.com/forums/forum/improvement-by-design-lab
Добрый день спасибо за ваш выбор нашего маркетплейса ссылка на сайт —>> доступ к kraken через зеркала
Заказать диплом университета!
Мы предлагаем документы ВУЗов, расположенных в любом регионе Российской Федерации.
diplomg-cheboksary.ru/kupit-diplom-o-visshem-obrazovanii-bistro-i-legko-2/
I view something really interesting about your website so I saved to fav.
1win скачать бесплатно https://www.1win10014.ru .
Заказать диплом университета!
Наши специалисты предлагаютвыгодно приобрести диплом, который выполняется на бланке ГОЗНАКа и заверен мокрыми печатями, штампами, подписями официальных лиц. Данный диплом способен пройти лубую проверку, даже с использованием специального оборудования. Достигайте свои цели быстро и просто с нашим сервисом- sobhaneopolispanathur.copiny.com/question/details/id/1087578
мелбет слоты скачать [url=melbet1015.ru]мелбет слоты скачать[/url] .
аппараты узи цена аппараты узи цена .
купить аппарат узи цена купить аппарат узи цена .
прибор узи https://kupit-uzi-apparat14.ru/ .
рассчитать страховку осаго краснодар https://niievmash.ru .
узи аппарат стоимость узи аппарат стоимость .
1win kasino app http://1win5069.ru .
Нужен номер для Телеграма? арендовать номер для телеграмма для безопасной регистрации и анонимного использования. Поддержка популярных регионов, удобный интерфейс, моментальный доступ.
I conceive this internet site has got some really good info for everyone : D.
подключить интернет воронеж
voronezh-domashnij-internet003.ru
провайдеры воронеж
Купить диплом на заказ вы сможете используя сайт компании. 4x4zubry.by/forum/messages/forum1/topic53231/message348940/result=new#message348940
1win méxico https://1win1018.top .
рассчитать страховку на автомобиль рассчитать страховку на автомобиль .
узи аппарат цена новый купить в россии https://kupit-uzi-apparat14.ru .
аппарат для узи диагностики http://kupit-uzi-apparat11.ru .
аппарат узи купить цена в россии аппарат узи купить цена в россии .
Приобрести диплом университета по выгодной стоимости возможно, обращаясь к проверенной специализированной компании. Мы оказываем услуги по продаже документов об окончании любых университетов Российской Федерации. Купить диплом любого ВУЗа– rodina.listbb.ru/ucp.phpmode=login&sid=6fccbd56d379f77040baefb50d4747e2
Заказать диплом университета. Заказ документа о высшем образовании через надежную фирму дарит много преимуществ. Такое решение дает возможность сэкономить как личное время, так и значительные деньги. euvisajobs.com/employer/eonline-diploma
Желаете получить консультацию? В эпоху информации любой человек пытается решить с сложными вопросами. Бывает получить решение становится проблематичным.
Порадую вас, работает потрясающий интернет-портал – superotvet.ru. Этот сайт предлагает решения на множество вопросов.
Что особенно важно, это подход, при котором компетентность экспертов команды профессионалов. Тут представлены консультации из таких областей как спорт.
Большая часть аудитории хвалят практичность работы на веб-ресурсом. Нужно только задать нужный запрос в поисковую строку, и поисковая система оперативно предоставит самые близкие по смыслу результаты.
В частности заслуживает особой похвалы современность контента на superotvet.ru. В нашем быстро меняющемся мире, когда каждый аспект эволюционирует, очень важно иметь в своем распоряжении к самой свежей базе знаний.
Нельзя обойти вниманием и широту охвата областей, рассматриваемых на портал. Несмотря на то, хотите ли вы найти ответы по финансам – здесь непременно встретите ценные советы.
Дополнительным весомым позитивным аспектом сайта выделяется функционал внести свой вопрос, в ситуации когда не смогли найти искомые данные в имеющемся архиве.
Знающие профессионалы предложат решение в максимально сжатые сроки. Это особенно ценно, тогда когда требуется немедленно преодолеть острую проблему.
Поражает воображение и оперативность работы команды ресурса. Вопросительные ситуации исследуются предельно оперативно, а пояснения известны исключительным качеством и полнотой.
узи аппарат портативный с набором датчиков http://www.kupit-uzi-apparat13.ru/ .
Купить диплом института!
Мы изготавливаем дипломы любых профессий по приятным ценам. Вы заказываете диплом через надежную фирму. : flerus-shop.hcp.dilhost.ru/club/user/4/forum/message/2261/2257/#message2257
Приветствую!
Мы изготавливаем дипломы любых профессий по доступным ценам. Цена может зависеть от конкретной специальности, года получения и образовательного учреждения: diplomanrus.com/
Наши специалисты предлагают быстро и выгодно купить диплом, который выполнен на оригинальном бланке и заверен мокрыми печатями, водяными знаками, подписями. Диплом способен пройти лубую проверку, даже с использованием профессионального оборудования. myturtime.ru/dokumentyi-ob-obrazovanii-dlya-rabotyi-i-uchebyi-za-granitsey
домашний интернет тарифы
chelyabinsk-domashnij-internet001.ru
подключить домашний интернет в челябинске
криптовалюта начало криптовалюта начало .
1 win https://1win1027.top .
Заказать диплом ВУЗа!
Наша компания предлагаетвыгодно заказать диплом, который выполнен на бланке ГОЗНАКа и заверен мокрыми печатями, водяными знаками, подписями. Диплом пройдет любые проверки, даже при помощи профессионального оборудования. Решите свои задачи быстро и просто с нашим сервисом- shooting-russia.ru/forum/PAGE_NAME=message&FID=5&TID=18662&TITLE_SEO=18662-kak-vybrat-nadezhnogo-prodavtsa-diplomov&MID=18947&result=new#message18947
мелбет https://melbet1011.ru/ .
I am so happy to read this. This is the kind of manual that needs to be given and not the random misinformation that’s at the other blogs. Appreciate your sharing this best doc.
Где купить диплом по необходимой специальности?
Мы изготавливаем дипломы любой профессии по приятным тарифам. Важно, чтобы дипломы были доступными для большого количества наших граждан. Приобрести диплом об образовании diplomj-irkutsk.ru/kupit-diplom-s-reestrom-36/
как посмотреть сколько страниц на сайте
Опыт работы более 5 лет в области SEO и успешных кейсов для разных ниш.
Source:
– https://t.me/kupit_prodat
melbet сайт http://melbet1015.ru .
провайдеры интернета челябинск
chelyabinsk-domashnij-internet002.ru
подключить интернет тарифы челябинск
Заказать диплом ВУЗа по невысокой стоимости возможно, обращаясь к надежной специализированной компании. Приобрести документ ВУЗа вы сможете в нашей компании в Москве. vacshidiplom.com/kupite-diplom-o-visshem-obrazovanii-s-zaneseniem-v-reestr-7
1win mexico http://www.1win1018.top .
Приобрести диплом ВУЗа!
Мы предлагаем документы любых учебных заведений, которые расположены на территории всей России.
diplomskiy.com/kupit-diplom-s-zaneseniem-v-reestr-rossii-vigodno/
1win ug https://1win1033.top/ .
Купить диплом о высшем образовании!
Заказ документа о высшем образовании через надежную фирму дарит массу плюсов. Приобрести диплом об образовании у надежной фирмы: doks-v-gorode-sankt-peterburg-78.online
Приобрести диплом о высшем образовании. Приобретение диплома через надежную компанию дарит ряд преимуществ. Данное решение дает возможность сэкономить как продолжительное время, так и серьезные финансовые средства. iqtorg.ru/forum/topic/add/forum2
Great post. I am facing a couple of these problems.
Мы предлагаем быстро приобрести диплом, который выполнен на бланке ГОЗНАКа и заверен мокрыми печатями, штампами, подписями. Диплом способен пройти любые проверки, даже при использовании специальных приборов. app.theremoteinternship.com/read-blog/44828_kupit-diplom-o-vysshem-obrazovanii-s-zaneseniem-v-reestr.html
pariuri online bonus http://1win5069.ru .
Dragon Link brings non-stop action, incredible jackpots, and dazzling graphics—get in on the fun!Dragon Link
Заказать диплом любого ВУЗа. Изготовление диплома занимает минимум времени, а стоимость – доступна любому. В итоге вы сможете сберечь бюджет и найти отличную работу мечты. Купить диплом можно используя официальный сайт компании. – serdzedetyam32.ru/forum/posting.php?mode=post&f=16
домашний интернет
chelyabinsk-domashnij-internet003.ru
домашний интернет челябинск
mobila de lemn la comanda http://1win5070.ru/ .
jocuri de grup online https://1win5066.ru .
Definitely, what a splendid website and enlightening posts, I will bookmark your site.Best Regards!
Мы изготавливаем дипломы любой профессии по приятным ценам.– arzookanak6775.copiny.com/question/details/id/1093822
1win online скачать 1win online скачать .
1swin 1win5066.ru .
классы аппаратов узи https://www.kupit-uzi-apparat12.ru .
What’s Happening i’m new to this, I stumbled upon this I’ve found It absolutely helpful and it has helped me out loads. I hope to contribute & help other users like its aided me. Great job.
1win mexico https://1win1018.top/ .
There is noticeably a bundle to know about this. I assume you made certain nice points in features also.
cele mai bune cazinouri neteller 1win5072.ru .
Заказать диплом института!
Заказать диплом института по выгодной стоимости можно, обратившись к проверенной специализированной фирме. Приобрести диплом: sx-diplom.ru
мелбет кг https://melbet1017.ru .
Добрый день спасибо за ваш выбор нашего маркетплейса ссылка на сайт —>> kraken зеркало
melbet kg https://melbet1017.ru/ .
melbet сайт https://www.melbet1017.ru .
домашний интернет подключить екатеринбург
ekaterinburg-domashnij-internet001.ru
домашний интернет в екатеринбурге
Приобрести диплом университета по доступной цене можно, обращаясь к надежной специализированной компании. Приобрести документ о получении высшего образования можно в нашей компании. asxdiploman.com/kupit-diplom-s-zaneseniem-v-reestr-otzivi-ot-klientov-2
1win bet deposit http://1win1028.top/ .
Свежие тенденции https://www.life-ua.com советы по стилю и обзоры коллекций. Всё о моде, дизайне, одежде и аксессуарах для тех, кто хочет выглядеть современно и уверенно.
1win casino mexico https://1win1018.top/ .
Купить диплом университета по доступной цене можно, обратившись к проверенной специализированной фирме. Заказать документ о получении высшего образования можно в нашем сервисе. umorforme.ru/nastoyashhiy-dokument-ob-obrazovanii
Очень интересная тема, спасибо за полезную информацию! Если кому-то близка тема шаманизма, энтеогенов и растений силы — рекомендую заглянуть на один интересный ресурсКто-нибудь пробовал шаманский табак мапачо или ритуал с камбо? Есть хороший ресурс с описанием этих практик — растение кока где купить
. Хотелось бы узнать ваше мнение!
You made some clear points there. I looked on the internet for the topic and found most guys will go along with with your blog.
узи аппараты среднего класса http://kupit-uzi-apparat12.ru/ .
Покупка диплома ВУЗа через надежную компанию дарит ряд преимуществ для покупателя. Данное решение позволяет сэкономить как длительное время, так и серьезные деньги. Однако, достоинств намного больше.Мы предлагаем дипломы любой профессии. Дипломы производятся на настоящих бланках. Доступная цена сравнительно с серьезными тратами на обучение и проживание в другом городе. Приобретение диплома о высшем образовании из российского института будет разумным шагом.
Приобрести диплом о высшем образовании: diplomt-nsk.ru/kupit-diplom-v-reestre-bistro-i-nadezhno/
1win. bet 1win5072.ru .
1win football https://1win1028.top/ .
Купить диплом ВУЗа по невысокой стоимости возможно, обращаясь к надежной специализированной компании. Мы готовы предложить документы ВУЗов на Ваш выбор, которые расположены в любом регионе РФ. mafiaclans.ru/viewtopic.phpf=43&t=9454
1win online https://1win1028.top .
подключить домашний интернет в екатеринбурге
ekaterinburg-domashnij-internet002.ru
провайдеры интернета в екатеринбурге
узи оборудование цена узи оборудование цена .
расчет страховки осаго расчет страховки осаго .
cazinouri cu plată rapidă http://1win5069.ru/ .
Свежие тенденции https://www.life-ua.com советы по стилю и обзоры коллекций. Всё о моде, дизайне, одежде и аксессуарах для тех, кто хочет выглядеть современно и уверенно.
аппарат для узи аппарат для узи .
melbet кыргызстан https://www.melbet1011.ru .
скачать 1win на ios http://1win5071.ru .
приложение 1win скачать https://1win5072.ru/ .
My partner and I absolutely love your blog and find most of your post’s to be exactly what I’m looking for. Would you offer guest writers to write content for you? I wouldn’t mind creating a post or elaborating on a number of the subjects you write with regards to here. Again, awesome weblog!
dulap la comanda https://www.1win5070.ru .
1win bet app download https://www.1win5070.ru .
купить аппарат узи цены купить аппарат узи цены .
how to activate bonus code in 1win online how to activate bonus code in 1win online .
Купить диплом академии !
Покупка диплома любого ВУЗа РФ у нас – надежный процесс, так как документ будет заноситься в государственный реестр. Купить диплом института diplomt-nsk.ru/skolko-stoit-diplom-s-zaneseniem-v-reestr-8
Some truly nice and useful info on this website , as well I believe the layout contains fantastic features.
узнать провайдера по адресу екатеринбург
ekaterinburg-domashnij-internet003.ru
подключить домашний интернет екатеринбург
узи купить цена узи купить цена .
Мы готовы предложить дипломы любых профессий по приятным ценам. Приобретение диплома, который подтверждает окончание университета, – это выгодное решение. Приобрести диплом любого университета: drahthaar-forum.ru/viewtopic.phpf=30&t=13134
Купить диплом ВУЗа по доступной стоимости возможно, обратившись к надежной специализированной фирме. Заказать документ о получении высшего образования можно в нашей компании. fullyhotchillygirl.copiny.com/question/details/id/1087090
посчитать осаго калькулятор http://www.niievmash.ru .
Heya i am for the first time here. I found this board and I find It really useful & it helped me out a lot. I hope to give something back and help others like you helped me.
jocuri sociale jocuri sociale .
аппарат ультразвуковой диагностики цена http://kupit-uzi-apparat14.ru .
1win скачать приложение на айфон http://www.1win5071.ru .
рабочее зеркало мелбет https://melbet1015.ru/ .
шкафы в паркинг в москве шкафы в паркинг в москве .
Любимые карточные игры на покерок. Новички и профессиональные игроки всё чаще выбирают площадку благодаря её стабильности и удобству. Здесь доступны кэш-игры, турниры с большими призовыми и эксклюзивные акции. Интерфейс адаптирован под мобильные устройства, а служба поддержки работает круглосуточно.
консультации и онлайн услуги защита прав потребителей услуг по законодательству: консультации, подготовка претензий и исков, представительство в суде. Поможем вернуть деньги, заменить товар или взыскать компенсацию. Работаем быстро и по закону.
Инженерные системы https://usteplo.ru основа комфортного и безопасного пространства. Проектирование, монтаж и обслуживание отопления, водоснабжения, вентиляции, электроснабжения и слаботочных систем для домов и предприятий.
Строительный портал https://stroydelo33.ru источник актуальной информации для тех, кто строит, ремонтирует или планирует. Полезные советы, обзоры инструментов, этапы работ, расчёты и готовые решения для дома и бизнеса.
1win скачать http://1win5071.ru .
диплом официально купить диплом официально купить .
интернет по адресу
kazan-domashnij-internet001.ru
какие провайдеры интернета есть по адресу казань
hey there and thank you for your info – I’ve certainly picked up something new from right here. I did however expertise several technical issues using this site, as I experienced to reload the site lots of times previous to I could get it to load correctly. I had been wondering if your hosting is OK? Not that I am complaining, but sluggish loading instances times will very frequently affect your placement in google and could damage your quality score if advertising and marketing with Adwords. Well I’m adding this RSS to my e-mail and can look out for much more of your respective fascinating content. Ensure that you update this again soon..
сколько стоит аппарат узи цена сколько стоит аппарат узи цена .
I like this post, enjoyed this one thankyou for posting.
Реальные девушки Краснодара готовы к новым знакомствам и встречам — заходи на наш сайт: путаны краснодар
melbet https://melbet1017.ru/ .
casa pariurilor cont https://1win5069.ru/ .
роллетный шкаф в паркинг в екатеринбурге роллетный шкаф в паркинг в екатеринбурге .
Plan to travel without maxing out credit cards? Numerous adventure-seekers believe that stunning vacations must be steep.
All the same, one can find a wide range of strategies to take pleasure in money-saving adventures.
A premier tool for finding value-for-money getaway options is lowcost.
They provide practices on numerous factors like locating affordable accommodations.
Notwithstanding whether you’re coordinating a mini holiday or a extended adventure, can accommodate you be thrifty without renouncing class.
Commence developing your reasonably priced expedition today!
Любимые карточные игры на покерок. Новички и профессиональные игроки всё чаще выбирают площадку благодаря её стабильности и удобству. Здесь доступны кэш-игры, турниры с большими призовыми и эксклюзивные акции. Интерфейс адаптирован под мобильные устройства, а служба поддержки работает круглосуточно.
подключить домашний интернет в казани
kazan-domashnij-internet002.ru
интернет провайдеры в казани по адресу дома
консультации и онлайн услуги юридические услуги по защите прав потребителей: консультации, подготовка претензий и исков, представительство в суде. Поможем вернуть деньги, заменить товар или взыскать компенсацию. Работаем быстро и по закону.
Мы изготавливаем дипломы психологов, юристов, экономистов и любых других профессий по невысоким ценам. Покупка диплома, который подтверждает обучение в университете, – это выгодное решение. Заказать диплом университета: my.globeinfinite.com/employer/diplomirovans
cel mai bun casino portofele electronice https://www.1win5072.ru .
Купить диплом любого университета!
Приобрести диплом института по невысокой стоимости возможно, обратившись к надежной специализированной компании. Заказать диплом: sx-diploma.ru
Hello! Do you know if they make any plugins to help with Search Engine Optimization? I’m trying to get my blog to rank for some targeted keywords but I’m not seeing very good gains. If you know of any please share. Thank you!
https://yourua.info/
1win bets 1win1028.top .
Заказать диплом института по выгодной цене возможно, обратившись к проверенной специализированной фирме. Мы предлагаем документы об окончании любых университетов России. Купить диплом о высшем образовании– leadrp.listbb.ru/viewtopic.phpf=3&t=1217
домашний интернет тарифы казань
kazan-domashnij-internet003.ru
узнать провайдера по адресу казань
1win token to usd https://1win1029.top .
1win aviator apk download 1win aviator apk download .
Более 1500 реальных анкет девушек Краснодара на сайте ждут вашего интереса и готовы к новым знакомствам и встречам – https://krasnodar-indi.life/
Мы изготавливаем дипломы любой профессии по приятным ценам. Мы готовы предложить документы техникумов, расположенных в любом регионе РФ. Дипломы и аттестаты делаются на “правильной” бумаге высшего качества. Это дает возможность делать государственные дипломы, которые невозможно отличить от оригинала. linkat.app/read-blog/2846_diplom-vuza-s-zaneseniem-v-reestr.html
Nice blog here! Additionally your web site quite a bit up fast! What web host are you the usage of? Can I am getting your affiliate link for your host? I want my site loaded up as fast as yours lol
проверить провайдера по адресу
krasnoyarsk-domashnij-internet001.ru
проверить интернет по адресу
https://yourua.info/
Приобрести диплом ВУЗа!
Мы готовы предложить документы университетов, расположенных в любом регионе Российской Федерации.
vuz-diplom.ru/vnesenie-diploma-v-reestr-bistro-i-nadezhno-2/
Где заказать диплом по необходимой специальности?
Мы предлагаем дипломы любых профессий по приятным тарифам. Для нас важно, чтобы дипломы были доступными для большого количества наших граждан. Заказать диплом о высшем образовании diplomc-v-ufe.ru/diplom-s-zaneseniem-v-reestr-vigodnoe-predlozhenie/
I have been absent for a while, but now I remember why I used to love this site. Thanks, I will try and check back more often. How frequently you update your website?
plata 1win https://1win5071.ru .
1win token listing date today http://1win1024.top/ .
1win 500 bonus http://www.1win5074.ru .
Наши специалисты предлагают выгодно и быстро приобрести диплом, который выполнен на бланке ГОЗНАКа и заверен мокрыми печатями, водяными знаками, подписями. Диплом способен пройти лубую проверку, даже при помощи специально предназначенного оборудования. socialcoin.online/read-blog/12552_gde-kupit-diplom-s-provodkoj.html
ван вин http://1win5075.ru .
It’s really a great and useful piece of info. I’m happy that you simply shared this helpful information with us. Please keep us informed like this. Thanks for sharing.
I am continuously invstigating online for ideas that can facilitate me. Thanks!
site officiel 1win https://1win5075.ru .
1win онлайн [url=www.1win5074.ru]1win онлайн[/url] .
Диплом любого университета России!
Без получения диплома трудно было продвинуться вверх по карьере. Приобрести диплом на заказ в столице вы можете через сайт компании: ezworkers.com/employer/premialnie-diplom-24
Мы предлагаем дипломы психологов, юристов, экономистов и любых других профессий по приятным тарифам. Мы готовы предложить документы ВУЗов, которые расположены в любом регионе РФ. Дипломы и аттестаты делаются на бумаге высшего качества. Это позволяет делать государственные дипломы, не отличимые от оригиналов. feolet.flybb.ru/viewtopic.phpf=2&t=1104
1win aviator app download http://1win1024.top/ .
провайдеры интернета в красноярске по адресу проверить
krasnoyarsk-domashnij-internet002.ru
проверить интернет по адресу
Заказать диплом о высшем образовании!
Заказ подходящего диплома через качественную и надежную фирму дарит массу преимуществ. Выгодно купить диплом об образовании у проверенной компании: doks-v-gorode-petrozavodsk-10.ru
Купить диплом ВУЗа!
Мы готовы предложить документы университетов, которые расположены на территории всей РФ.
diplom-kaluga.ru/kupit-diplom-o-visshem-obrazovanii-18/
ГГУ имени Ф.Скорины https://www.gsu.by/ крупный учебный и научно-исследовательский центр Республики Беларусь. Высшее образование в сфере гуманитарных и естественных наук на 12 факультетах по 35 специальностям первой ступени образования и 22 специальностям второй, 69 специализациям.
Где купить диплом специалиста?
Купить диплом института по выгодной стоимости можно, обращаясь к проверенной специализированной фирме.: peoplediplom.ru
Francisk Skorina https://www.gsu.by Gomel State University. One of the leading academic and scientific-research centers of the Belarus. There are 12 Faculties at the University, 2 scientific and research institutes. Higher education in 35 specialities of the 1st degree of education and 22 specialities.
Pretty! This was a really wonderful post. Thank you for your provided information.
Мы готовы предложить дипломы любой профессии по приятным тарифам. Дипломы производят на подлинных бланках Заказать диплом ВУЗа diplomers.com
how to withdraw from 1win how to withdraw from 1win .
Заказать диплом вы можете используя официальный портал компании. dui.forum-top.ru/login.phpaction=in
Приобрести диплом о высшем образовании. Приобретение документа о высшем образовании через проверенную и надежную компанию дарит ряд достоинств. Данное решение позволяет сберечь как личное время, так и серьезные денежные средства. aleksandrovy.ru/index.php/Диплом_—_без_посещения_занятий
Do you mind if I quote a couple of your articles as long as I provide credit and sources back to your webpage? My blog is in the very same area of interest as yours and my users would truly benefit from a lot of the information you present here. Please let me know if this okay with you. Many thanks!
1win aviator login http://1win1035.top .
провайдер интернета по адресу красноярск
krasnoyarsk-domashnij-internet003.ru
узнать провайдера по адресу красноярск
окна на заказ окна на заказ .
balloon 1win descargar 1win1020.top .
Очень интересная тема, спасибо за полезную информацию! Если кому-то близка тема шаманизма, энтеогенов и растений силы — рекомендую заглянуть на один интересный ресурсКто-нибудь пробовал шаманский табак мапачо или ритуал с камбо? Есть хороший ресурс с описанием этих практик — 5-MeO-DMT
. Хотелось бы узнать ваше мнение!
скачать песню бесплатно 25kat.ru .
Заказ диплома ВУЗа через надежную фирму дарит ряд плюсов для покупателя. Данное решение дает возможность сберечь как личное время, так и значительные средства. Впрочем, на этом выгоды не ограничиваются, достоинств намного больше.Мы изготавливаем дипломы любой профессии. Дипломы производят на фирменных бланках. Доступная цена по сравнению с крупными тратами на обучение и проживание. Приобретение диплома университета является мудрым шагом.
Приобрести диплом: diplom-zentr.com/bistraya-pokupka-diplomov-s-reestrom-bez-xlopot/
mobilă la comandă ieftina http://1win5075.ru/ .
Купить диплом любого института. Приобретение подходящего диплома через надежную компанию дарит ряд плюсов. Такое решение дает возможность сберечь как дорогое время, так и серьезные средства. 86hm.ru/forum/flame/?topic_id=30946
проверить интернет по адресу
krasnodar-domashnij-internet001.ru
интернет провайдеры по адресу дома
малина с доставкой орехи морозостойкие
Мы готовы предложить дипломы любой профессии по доступным ценам.
Вы заказываете документ через надежную и проверенную фирму. Приобрести диплом академии– http://bazhenova.greatforum.ru/viewtopic.phpf=17&t=9107/ – bazhenova.greatforum.ru/viewtopic.phpf=17&t=9107
1 win casino app 1 win casino app .
купить саженцы груш вишня для сибирских садов
fabrica de mobila chisinau 1win5074.ru .
how to withdraw casino bonus on 1win http://1win1029.top .
app 1win https://1win1020.top .
1win aviator app download https://www.1win1035.top .
Где заказать диплом специалиста?
Полученный диплом с приложением полностью отвечает стандартам, неотличим от оригинала. Получить диплом о среднем специальном образовании – не проблема! poobshaemsea.flybb.ru/viewtopic.phpf=2&t=730
Мы предлагаем документы об окончании любых университетов РФ. Документы производят на оригинальных бланках государственного образца. blogshifter.com/kupite-diplom-legko-i-bystro-163
Perfect work you have done, this website is really cool with superb info .
1win token listing date today http://1win1024.top .
Натуральный и сбалансированный Jarvi корм для вашего любимца
jarvi корм для взрослых кошек с чувствительным пищеварением с кроликом http://www.ozon.ru/product/suhoy-korm-jarvi-polnoratsionnyy-dlya-vzroslyh-koshek-s-chuvstvitelnym-pishchevareniem-s-indeykoy-1-1173234324 .
1win bet yukle http://www.1win5074.ru .
Приобрести диплом можно используя официальный сайт компании. avrorp.getbb.ru/viewtopic.phpf=183&t=2075
1win register https://www.1win1019.top .
мелбет букмекерская контора скачать https://melbet1018.ru/ .
1win hub http://1win1020.top .
какие провайдеры интернета есть по адресу краснодар
krasnodar-domashnij-internet002.ru
проверить интернет по адресу
1xbet melbet betwinner melbet1018.ru .
melbet bonus melbet1018.ru .
melbet 21 http://melbet1019.ru/ .
Hey! Quick question that’s totally off topic. Do you know how to make your site mobile friendly? My blog looks weird when viewing from my apple iphone. I’m trying to find a template or plugin that might be able to correct this issue. If you have any suggestions, please share. Thank you!
роллетный шкаф для улицы роллетный шкаф для улицы .
how to withdraw money from 1win account http://www.1win1034.top .
Очень интересная тема, спасибо за полезную информацию! Если кому-то близка тема шаманизма, энтеогенов и растений силы — рекомендую заглянуть на один интересный ресурсКто-нибудь пробовал шаманский табак мапачо или ритуал с камбо? Есть хороший ресурс с описанием этих практик — argyreia speciosa семена
. Хотелось бы узнать ваше мнение!
You have remarked very interesting points! ps nice site.
1win http://www.1win1035.top .
how to use melbet deposit bonus https://melbet1019.ru/ .
janice nichole 1win 1win1019.top .
пластиковые окна в москве с установкой пластиковые окна в москве с установкой .
very nice post, i definitely love this web site, carry on it
мелбет ком регистрация мелбет ком регистрация .
узнать провайдера по адресу краснодар
krasnodar-domashnij-internet003.ru
провайдеры интернета в краснодаре по адресу проверить
Heya are using WordPress for your site platform? I’m new to the blog world but I’m trying to get started and set up my own. Do you require any coding expertise to make your own blog? Any help would be greatly appreciated!
I must express my appreciation for your generosity giving support to those who require help with the subject matter. Your special commitment to getting the solution all over came to be amazingly important and has encouraged people like me to reach their objectives. Your entire warm and friendly tips and hints signifies much a person like me and further more to my fellow workers. Thanks a lot; from everyone of us.
aviator 1win https://1win1019.top/ .
1win loading http://www.1win1035.top .
шкаф в подземный паркинг шкаф в подземный паркинг .
Create vivid images with Promptchan — a powerful neural network for generating art based on text description. Support for SFW and NSFW modes, style customization, quick creation of visual content.
I love the efforts you have put in this, thankyou for all the great articles.
домашний интернет тарифы
msk-domashnij-internet001.ru
провайдеры интернета в москве
Купить диплом о высшем образовании!
Мы изготавливаем дипломы психологов, юристов, экономистов и любых других профессий по доступным ценам. Вы покупаете документ в надежной и проверенной компании. : carolinahurricanesclub.com/create-blog
Недвижимость в Болгарии у моря https://byalahome.ru квартиры, дома, апартаменты в курортных городах. Продажа от застройщиков и собственников. Юридическое сопровождение, помощь в оформлении ВНЖ, консультации по инвестициям.
Срочный выкуп квартир https://proday-kvarti.ru за сутки — решим ваш жилищный или финансовый вопрос быстро. Гарантия законности сделки, юридическое сопровождение, помощь на всех этапах. Оценка — бесплатно, оформление — за наш счёт. Обращайтесь — мы всегда на связи и готовы выкупить квартиру.
Портал о недвижимости https://akadem-ekb.ru всё, что нужно знать о продаже, покупке и аренде жилья. Актуальные объявления, обзоры новостроек, советы экспертов, юридическая информация, ипотека, инвестиции. Помогаем выбрать квартиру или дом в любом городе.
how to bet on 1win http://1win1029.top .
как заработать на криптовалюте как заработать на криптовалюте .
1win aviator predictor 1win aviator predictor .
провайдеры интернета в москве по адресу
msk-domashnij-internet002.ru
интернет по адресу
I got what you intend, thankyou for putting up.Woh I am delighted to find this website through google.
Dubai balloons crafted for joy, elegance and creativity
helium balloon helium balloon .
Dubai’s top choice for event planners looking for stylish balloons
balloonsdubai balloons-and-helium.com .
1win plinko https://1win1020.top .
driving under the influence statutes as part of Ohio might be intricate, only it’s essential to bring a solid understanding of any of them if your find rates. Operating below your influence (DUI) may a serious offensive the can enjoy substantial ramifications on some life. In Ohio, all lawful threshold for blood alcohol concentration (BAC) is eight percentfor some motorists also 4 percent commercial driver.
If you may be pulled over by law administration and alleged of DUI, they could carry out field temperance exams or chemical examinations, this sort of seeing as breathalyzer or body reports, to establish any level of handicap. Refusing all these tests can result in automated consequences, including license suspension.
dwi crimes in Ohio maintain different penalties, relying on factors including before judgment of conviction, BAC degree, plus it doesn’t matter if around would be an collision or injuries engaging. Problems can offer charges, license suspension system, mandatary alcohol in the mouthwash process training, test period, and also offender time. Repeat crimes and intensified instances can lead to more dangerous penalties.
Enduring a knowledgeable DUI protection attorney is essential to navigate the complexity of Ohio DUI laws. They can easily review the indications, dare the legalization of the stop, matter the precision of exams, and uncover promising protections to help alleviate the payments. You will, an attorney can plan you from the constitutional process, affirming ones correct are bolstered and urging for the recommended available direct result.
Remember, being updated more than Ohio’s DUI regulations and getting the support of an practiced lawyer or attorney are significant actions in properly handling a DUI appoint furthermore defending ones forthcoming future. disorderly conduct lawyer
мелбет игры https://melbet1018.ru/ .
Мы готовы предложить дипломы любой профессии по выгодным ценам. Приобретение документа, который подтверждает обучение в университете, – это выгодное решение. Приобрести диплом о высшем образовании: [url=http://suomiadidas.com/read-blog/6650_diplom-s-reestrom-kupit.html/]suomiadidas.com/read-blog/6650_diplom-s-reestrom-kupit.html[/url]
pariuri sportive md http://1win5077.ru .
ruspirn http://www.1win5076.ru .
m3ga даркнет – это цифровой сервис, где anonymity и приватность становятся основой вашего online interaction. Название “Mega Darknet” ассоциируется с limitless possibilities и тайной. Это not just a website; это врата в неизведанный мир интернета, где традиционные ограничения cease to apply.
mega даркнет маркет
1win girls https://www.1win1024.top .
домашний интернет подключить москва
msk-domashnij-internet003.ru
недорогой интернет москва
заказать смартфон http://www.allomarket.su/ .
купить смартфоны allomarket.su .
займы http://cncnn.ru/ .
cod promoțional 1win 1win5077.ru .
займ оформить онлайн [url=http://www.cncnn.ru]http://www.cncnn.ru[/url] .
sportbets http://sportbets11.ru .
казино 1win скачать казино 1win скачать .
Очень интересная тема, спасибо за полезную информацию! Если кому-то близка тема шаманизма, энтеогенов и растений силы — рекомендую заглянуть на один интересный ресурсКто-нибудь пробовал шаманский табак мапачо или ритуал с камбо? Есть хороший ресурс с описанием этих практик — salvia divinorum семена купить шалфей предсказателей
. Хотелось бы узнать ваше мнение!
Диплом университета России!
Без университета очень непросто было продвигаться вверх по карьерной лестнице. Заказать диплом под заказ в столице вы имеете возможность используя официальный портал компании: soniamittal0066.copiny.com/question/details/id/1093768
Заказать документ о получении высшего образования вы можете у нас в Москве. Мы оказываем услуги по производству и продаже документов об окончании любых университетов РФ. Вы сможете получить диплом по любой специальности, включая документы Советского Союза. Даем гарантию, что при проверке документа работодателями, подозрений не появится. diplomskiy.com/kupit-diplom-o-visshem-obrazovanii-bistro-i-nadezhno-12/
Наши специалисты предлагают быстро и выгодно заказать диплом, который выполнен на оригинальной бумаге и заверен печатями, штампами, подписями должностных лиц. Документ пройдет лубую проверку, даже с применением специфических приборов. edblog.com.au/pokupka-diploma-s-zaneseniem-v-reestr-166
1win casa de apuestas http://1win1019.top .
купить смартфоны allomarket.su .
заказать смартфон https://allomarket.su/ .
Мы изготавливаем дипломы любых профессий по невысоким тарифам. Мы готовы предложить документы ВУЗов, которые находятся на территории всей РФ. Документы выпускаются на бумаге самого высокого качества. Это дает возможности делать настоящие дипломы, которые не отличить от оригинала. magicvs.store/read-blog/123_kupit-diplom-o-vysshem-obrazovanii.html
What i do not realize is in truth how you are no longer actually much more well-preferred than you may be now. You’re very intelligent. You understand thus significantly when it comes to this topic, made me in my opinion imagine it from numerous varied angles. Its like men and women are not interested until it is one thing to do with Lady gaga! Your personal stuffs outstanding. At all times maintain it up!
займы https://cncnn.ru .
займ оформить онлайн cncnn.ru .
sportbets sportbets11.ru .
Приобрести диплом о высшем образовании!
Мы предлагаем документы ВУЗов, расположенных в любом регионе Российской Федерации.
diplomk-v-krasnodare.ru/kupit-diplom-v-moskve-s-zaneseniem-2/
как вывести деньги с мелбет если нет 18 http://www.melbet1019.ru .
Мы предлагаем дипломы любых профессий по приятным ценам. Приобретение диплома, который подтверждает обучение в ВУЗе, – это рациональное решение. Приобрести диплом ВУЗа: guiltyworld.getbb.ru/viewtopic.phpf=3&t=5261
домашний интернет тарифы
nizhnij-novgorod-domashnij-internet001.ru
провайдеры интернета в нижнем новгороде по адресу
Sometimes the events in life are worthy of something more than the usual outfits. The mantle is the very element that adds sophistication and a little magic to your image. Here you will find the opportunity to purchase and rent robes for any occasion.
It doesn’t matter if you are preparing for an important event or just want to diversify your style – our sale and rental of robes will allow you to create an unforgettable impression and plunge into the atmosphere of magic.
Заказать диплом любого университета!
Мы предлагаембыстро купить диплом, который выполняется на бланке ГОЗНАКа и заверен печатями, штампами, подписями. Данный документ пройдет любые проверки, даже с использованием профессиональных приборов. Решайте свои задачи максимально быстро с нашей компанией- usa.life/read-blog/135067_vysshee-obrazovanie-kupit-diplom-s-zaneseniem.html
1win bet download https://www.1win1034.top .
Приобрести диплом университета по выгодной цене возможно, обратившись к надежной специализированной фирме. Приобрести документ ВУЗа вы можете у нас в столице. all-smeta.ru/sid=919a0e514ad16e643be133e1e1678030
Где купить диплом специалиста?
Получаемый диплом с необходимыми печатями и подписями полностью отвечает запросам и стандартам, никто не отличит его от оригинала – даже со специально предназначенным оборудованием. Заказать диплом о среднем образовании – быстро и легко! radiocoop.co/2025/04/16/10816
Где заказать диплом специалиста?
Приобрести диплом ВУЗа по выгодной цене можно, обратившись к надежной специализированной фирме.: diplom-zakaz.ru
Мы оказываем услуги по изготовлению и продаже документов об окончании любых ВУЗов Российской Федерации. Документы производят на настоящих бланках государственного образца. datemethisnight.copiny.com/question/details/id/1096408
Мы изготавливаем дипломы психологов, юристов, экономистов и любых других профессий по приятным ценам. Дипломы изготавливаются на оригинальных бланках Приобрести диплом ВУЗа diplomt-v-samare.ru
Очень интересная тема, спасибо за полезную информацию! Если кому-то близка тема шаманизма, энтеогенов и растений силы — рекомендую заглянуть на один интересный ресурсКто-нибудь пробовал шаманский табак мапачо или ритуал с камбо? Есть хороший ресурс с описанием этих практик — купить шалфей предсказателей в москве
. Хотелось бы узнать ваше мнение!
1win зеркало на сегодня https://1win22002.ru .
подключить проводной интернет нижний новгород
nizhnij-novgorod-domashnij-internet002.ru
интернет тарифы нижний новгород
1win андроїд [url=https://www.1win5077.ru]https://www.1win5077.ru[/url] .
melbet бонусы https://www.melbet1020.ru .
промокод 1xставка http://www.1win22002.ru .
Приобрести диплом любого института. Производство документа занимает гораздо меньше времени, а стоимость – невысокая. Таким образом вы получаете возможность сохранить деньги и время и получить прекрасную работу вашей мечты. Приобрести диплом вы можете через сайт компании. – jobspage.ca/employer/russiany-diplomans
Купить диплом можно через официальный сайт компании. cristoconecta.com/read-blog/1273_kupit-diplom-s-zaneseniem-v-reestr-stoimost.html
1win online http://1win5077.ru .
Получить диплом о высшем образовании поможем. Купить диплом техникума, колледжа в Махачкале – diplomybox.com/kupit-diplom-tekhnikuma-kolledzha-v-makhachkale
1wqin https://1win5076.ru .
Купить диплом института по доступной цене возможно, обратившись к надежной специализированной фирме. Купить документ о получении высшего образования можно у нас в столице. angelladydety.getbb.ru/posting.phpmode=post&f=46&sid=ca5a4645ea2dc81eb40b59e5f6a89635
1win betting app https://1win1036.top/ .
можно купить диплом высшем образовании можно купить диплом высшем образовании .
Мы изготавливаем дипломы любой профессии по невысоким ценам. Мы готовы предложить документы ВУЗов, которые расположены в любом регионе РФ. Дипломы и аттестаты делаются на бумаге высшего качества. Это дает возможность делать государственные дипломы, не отличимые от оригиналов. xrated.social/blogs/18803/Заказать-диплом-с-гарантией
купить цветы в спб купить тюльпаны
цветы на дом мастерская цветов
Очень интересная тема, спасибо за полезную информацию! Если кому-то близка тема шаманизма, энтеогенов и растений силы — рекомендую заглянуть на один интересный ресурсКто-нибудь пробовал шаманский табак мапачо или ритуал с камбо? Есть хороший ресурс с описанием этих практик — аяхуаска купить
. Хотелось бы узнать ваше мнение!
apple store кишинев apple store кишинев .
Мы предлагаем выгодно купить диплом, который выполняется на бланке ГОЗНАКа и заверен печатями, водяными знаками, подписями. Наш диплом пройдет лубую проверку, даже с применением профессиональных приборов. talkrealty.ru/kupit-diplom-s-dostavkoy-v-moskvu-i-regionyi
промокод 1xставка 1win22001.ru .
цветочный магазин купить цветы
купить диплом в ульяновске https://www.arus-adiploma-24.online .
Приобрести диплом о высшем образовании!
Мы готовы предложить документы любых учебных заведений, расположенных на территории всей Российской Федерации.
freediplom.com/uznajte-tsenu-diploma-s-zaneseniem-v-reestr-segodnya/
провайдер по адресу нижний новгород
nizhnij-novgorod-domashnij-internet003.ru
подключить интернет в квартиру нижний новгород
мелбет промокод мелбет промокод .
Заказать диплом университета по невысокой стоимости возможно, обращаясь к надежной специализированной фирме. Купить документ института вы сможете у нас. diplom4you.com/kupit-diplom-s-reestrom-bistro-i-nadezhno-21
Приобрести диплом можно через сайт компании. avtovideotest.ru/byistroe-oformlenie-obrazovatelnyih-dokumentov
онлайн ставки на спорт с выводом денег https://1win22001.ru/ .
1win слоты играть скачать https://www.1win5073.ru .
This blog is definitely rather handy since I’m at the moment creating an internet floral website – although I am only starting out therefore it’s really fairly small, nothing like this site. Can link to a few of the posts here as they are quite. Thanks much. Zoey Olsen
Мы изготавливаем дипломы любых профессий по выгодным тарифам.– rilezzz.com/read-blog/5260_diplom-kupit-o-vysshem-obrazovanii.html
melbet best game http://www.melbet1020.ru .
купить смартфон в интернете http://allomarket.su .
аттестат в челябинске купить аттестат в челябинске купить .
Ищешь рабочее зеркало Kraken? У нас всегда актуальная ссылка для обхода блокировок! Заходи на Kraken через безопасное зеркало — быстро, анонимно и без Tor. Постоянные обновления и надёжный доступ. официальный kraken
.
Наша компания предлагает максимально быстро приобрести диплом, который выполняется на оригинальном бланке и заверен печатями, водяными знаками, подписями. Диплом пройдет лубую проверку, даже при использовании специфических приборов. globafeat.120.s1.nabble.com/template/NamlServlet.jtpnew_topic
promo code for 1win http://www.1win1036.top .
интернет провайдеры новосибирск по адресу
novosibirsk-domashnij-internet001.ru
недорогой интернет новосибирск
I conceive you have observed some very interesting points, thanks for the post.
1win betting https://www.1win1034.top .
Заказать диплом ВУЗа по доступной цене можно, обратившись к проверенной специализированной фирме. Купить документ о получении высшего образования можно в нашей компании в Москве. good-diplom.ru/gde-kupit-diplom-s-zaneseniem-v-reestr-7
Мы изготавливаем дипломы любой профессии по приятным тарифам. Стоимость зависит от выбранной специальности, года получения и университета: androidinweb.ru/kupit-diplom-s-dostavkoy-v-lyuboy-gorod-rossii
Вы покупаете документ через надежную компанию. Приобрести диплом о высшем образовании– http://clubdir.ru/mozhno-li-kupit-diplom-zanesennij-v-reestr/ – clubdir.ru/mozhno-li-kupit-diplom-zanesennij-v-reestr/
1win. pro http://1win5073.ru/ .
купить смартфон в интернете http://allomarket.su .
1win бет 1win бет .
интернет провайдеры новосибирск по адресу
novosibirsk-domashnij-internet002.ru
узнать интернет по адресу
купить смартфон в интернете http://allomarket.su/ .
Заказать документ о получении высшего образования можно в нашей компании. Мы предлагаем документы об окончании любых университетов Российской Федерации. Вы получите необходимый диплом по любым специальностям, включая документы СССР. Даем 100% гарантию, что при проверке документа работодателем, каких-либо подозрений не возникнет. diplomc-v-ufe.ru/mozhno-li-kupit-diplom-v-reestre-3/
1win ios http://1win1036.top/ .
sportbets http://sportbets11.ru/ .
Купить диплом университета!
Мы можем предложить дипломы любой профессии по приятным ценам. Вы приобретаете диплом через надежную и проверенную временем фирму. : peoplesmedia.co/read-blog/20842_kupit-diplom-nedorogo-v-moskve.html
I know this if off topic but I’m looking into starting my own blog and was wondering what all is required to get set up? I’m assuming having a blog like yours would cost a pretty penny? I’m not very web smart so I’m not 100 certain. Any tips or advice would be greatly appreciated. Many thanks
1 win казино 1win22002.ru .
скачать 1win с официального сайта https://1win22001.ru/ .
1win app download 1win1036.top .
продать криптовалюту http://cryptohamsters.ru .
займы http://www.cncnn.ru/ .
домашний интернет новосибирск
novosibirsk-domashnij-internet003.ru
подключить домашний интернет новосибирск
купить смартфон в интернете http://www.allomarket.su .
sportbets http://www.sportbets11.ru .
Купить диплом университета по доступной стоимости можно, обратившись к проверенной специализированной компании. Мы предлагаем документы об окончании любых университетов РФ. Заказать диплом ВУЗа– iqtorg.ru/forum/topic/add/forum2
займ оформить онлайн cncnn.ru .
Wonderful work! This is the type of information that should be shared around the web. Shame on the search engines for not positioning this post higher! Come on over and visit my web site . Thanks =)
займ оформить онлайн cncnn.ru .
melbet скачать мобильное приложение http://melbet1020.ru/ .
подключить проводной интернет омск
omsk-domashnij-internet001.ru
провайдеры интернета в омске
1win register login 1win1034.top .
1win casa de apuestas http://www.1win1022.top .
1win que es 1win que es .
site oficial 1win http://www.1win5078.ru .
A person essentially assist to make severely posts I might state. This is the very first time I frequented your web page and up to now? I amazed with the analysis you made to create this particular submit extraordinary. Excellent activity!
1win casino online 1win casino online .
pariuri sportive moldova http://1win5078.ru/ .
application 1win https://www.1win1021.top .
диплом купить сколько стоит http://www.diplomandoci-24.online .
займы cncnn.ru .
Выгодно заказать диплом любого университета!
Купить диплом о высшем образовании. Приобретение документа о высшем образовании через надежную фирму дарит ряд плюсов для покупателя. Такое решение позволяет сэкономить как личное время, так и существенные денежные средства. babygirls007.copiny.com/question/details/id/1094496
Заказать диплом о высшем образовании!
Мы можем предложить дипломы любых профессий по приятным тарифам— sportdir.ru
Мы можем предложить дипломы любой профессии по выгодным тарифам. Купить диплом Новочеркасск — kyc-diplom.com/geography/novocherkassk.html
купить диплом фельдшера arus-adiplomm.online .
подключение интернета омск
omsk-domashnij-internet002.ru
подключить интернет тарифы омск
app 1win http://1win5073.ru .
Ищешь рабочее зеркало Kraken? У нас всегда актуальная ссылка для обхода блокировок! Заходи на Kraken через безопасное зеркало — быстро, анонимно и без Tor. Постоянные обновления и надёжный доступ. доступ к kraken через зеркала
.
With every little thing which appears to be building within this specific subject matter, your viewpoints tend to be very refreshing. Even so, I appologize, but I do not give credence to your entire theory, all be it refreshing none the less. It seems to me that your opinions are not entirely justified and in fact you are yourself not even totally confident of your argument. In any case I did enjoy examining it.
Howdy! This post could not be written any better! Reading this post reminds me of my old room mate! He always kept chatting about this. I will forward this page to him. Pretty sure he will have a good read. Thank you for sharing!
Приобрести диплом университета. Приобретение документа о высшем образовании через надежную фирму дарит много плюсов. Такое решение дает возможность сэкономить время и существенные деньги. peticiok.com/482211
подключить домашний интернет в омске
omsk-domashnij-internet003.ru
лучший интернет провайдер омск
download 1win http://www.1win5078.ru .
Приобрести диплом любого университета!
Мы можем предложить документы учебных заведений, которые находятся в любом регионе России.
diplomass.com/kupit-diplom-zaregistrirovannij-v-reestre-2/
win1 https://www.1win22002.ru .
1win https://1win22017.ru .
Мы изготавливаем дипломы психологов, юристов, экономистов и прочих профессий по приятным тарифам. Цена может зависеть от той или иной специальности, года получения и образовательного учреждения: fewa.hudutech.com/employer/premialnie-diplom-24
Вы покупаете документ в надежной и проверенной временем компании. Заказать диплом университета– http://univernovosib.ru/kupit-diplom-s-reestrom-tsena/ – univernovosib.ru/kupit-diplom-s-reestrom-tsena/
Купить диплом о высшем образовании. Изготовление диплома занимает немного времени, а цена при этом доступна каждому. В результате вы сможете сберечь бюджет и получить работу мечты. Приобрести диплом можно используя официальный портал компании. – jp.harmonymart.in/employer/russiany-diplomans
Приобретение официального диплома через надежную компанию дарит множество преимуществ для покупателя. Такое решение дает возможность сберечь как личное время, так и серьезные средства. Тем не менее, плюсов намного больше.Мы можем предложить дипломы любых профессий. Дипломы изготавливаются на подлинных бланках. Доступная цена сравнительно с большими тратами на обучение и проживание в другом городе. Приобретение диплома института станет мудрым шагом.
Заказать диплом о высшем образовании: rusd-diplomj.ru/kupit-diplom-menedzhera-s-zaneseniem-v-reestr-8/
bonificacion de casino 1win http://1win1022.top/ .
Купить диплом об образовании!
Приобретение диплома через качественную и надежную компанию дарит ряд достоинств. Заказать диплом о высшем образовании у надежной фирмы: doks-v-gorode-saratov-64.ru
изнер брувер прогноз prognoz-na-segodnya-na-sport11.ru .
On the lookout for affordable travel options can be overwhelming in today’s market. Various explorers struggle to find genuine deals among the sea of offers online. The approach to successful budget travel lies in knowing where and when to book. Adept journey-makers recommend booking flights at least six weeks in advance for the best rates. Daybreak flights typically offer better prices than evening departures. Thursday bookings often results in significant savings compared to weekend options. Travel deal platforms can save you hundreds on international flights. Considering alternatives with your travel dates can unlock hidden bargains. Examine close-by departure points to potentially halve your travel expenses. Travel reward systems can provide long-term savings for regular travelers. Deadline-approaching sales occasionally offer surprising value for spontaneous travelers. No-frills flight providers have revolutionized European travel with their competitive pricing. Constraining personal items helps avoid additional baggage fees that quickly add up. Non-tourist-season explorations often presents the best value for budget-conscious travelers. Consolidated travel options sometimes beat individually booked flights and accommodations. Creating price notifications lets technology work for you while you wait for the perfect price. Destination short-stopping might save money but comes with certain risks and ethical considerations. Academic price advantages can significantly reduce costs for those with valid identification. Banking rewards systems often convert favorably into flight savings. Overnight flights frequently come with reduced pricing for those willing to sacrifice sleep. Travel deal subscriptions provide insider access to limited-time promotions. Independent leg acquisitions purchased separately sometimes beat round-trip pricing. Lengthened between-flight waits can reduce costs and offer mini-vacation opportunities. Pay attention to exchange variations to book when your home currency is stronger. Accidental price listings represent rare but incredible saving opportunities. Non-mainstream travel resources sometimes feature deals the giants miss. Private parking providers can save substantial amounts on longer trips. Provincial mobility options often proves more economical than airport taxis or rental cars. Air carrier lateness refunds can recoup costs from problematic journeys. Plane service networks might offer better value across multiple journeys than individual budget carriers. Leverage helpful resources like https://www.behance.net/nikkcave for insider tips and tricks. Outing safeguards represents a small expense that can save thousands in emergencies. Aviation club admittance might be worth the splurge on long layovers. Online communities often share time-sensitive deals unavailable elsewhere. Investigate related sites when your first choice proves too expensive. Private web searching prevents price increases based on repeated searches. Excursion experts sometimes have access to unpublished fares worth investigating. Observe hidden fees that can double advertised prices. Flying into major hubs and taking ground transportation can be cheaper than direct flights to smaller cities. Note that the cheapest flight isn’t always the best value when considering total travel time and convenience.
прогнозы на теннис го спорт http://www.prognoz-na-segodnya-na-sport12.ru .
Ищете копирайтера? https://sajt-kopirajtera.ru/kopirajting-medicina/ Пишу тексты, которые продают, вовлекают и объясняют. Создам контент для сайта, блога, рекламы, каталога. Работаю с ТЗ, разбираюсь в SEO, адаптирую стиль под задачу. Чистота, смысл и результат — мои приоритеты. Закажите текст, который работает на вас.
прогнозы на спорт онлайн [url=http://prognoz-na-segodnya-na-sport13.ru]прогнозы на спорт онлайн[/url] .
пластиковые окна rehau пластиковые окна rehau .
1win bonus casino 1win bonus casino .
пластиковые окна с доставкой http://www.1okno-krasnodar.ru .
Архитектурные решения https://топдом-мск.рф под ваши желания и участок. Создадим проект с нуля: планировка, фасад, инженерия, визуализация. Вы получите эксклюзивный дом, адаптированный под ваш образ жизни. Работаем точно, качественно и с любовью к деталям.
1win india https://1win1034.top .
1win iphone http://www.1win1021.top .
уннв мп3 скачать https://www.25kat.ru/music/уннв .
недорогой интернет пермь
perm-domashnij-internet001.ru
подключить интернет
1win bonus http://1win1021.top .
Мы изготавливаем дипломы психологов, юристов, экономистов и других профессий по доступным ценам.– pumasoccershoesfans.com/read-blog/6110_kupit-diplom-tehnikum.html
изнер брувер прогноз prognoz-na-segodnya-na-sport11.ru .
1win 1win .
1win 1win .
прогнозы на спорт с описанием прогнозы на спорт с описанием .
чайка омские ястребы прогноз https://www.prognoz-na-segodnya-na-sport12.ru .
Заказать диплом университета!
Мы предлагаем документы любых учебных заведений, расположенных на территории всей Российской Федерации.
diplomgorkiy.com/legalno-zanosim-diplom-v-reestr-bez-hassles-i-stressa/
ван 1вин https://www.1win22001.ru .
песни уннв скачать песни уннв скачать .
Туристический портал https://prostokarta.com.ua для путешественников: маршруты, достопримечательности, советы, бронирование туров и жилья, билеты, гайды по странам и городам. Планируйте отпуск легко — всё о путешествиях в одном месте.
Фитнес-портал https://sportinvent.com.ua ваш помощник в достижении спортивных целей. Тренировки дома и в зале, план питания, расчёт калорий, советы тренеров и диетологов. Подходит для начинающих и профессионалов. Всё о фитнесе — в одном месте и с реальной пользой для здоровья.
I got what you intend, appreciate it for posting.Woh I am glad to find this website through google. “Since the Exodus, freedom has always spoken with a Hebrew accent.” by Heinrich Heine.
Инновации, технологии, наука https://technocom.dp.ua на одном портале. Читайте о передовых решениях, новых продуктах, цифровой трансформации, робототехнике, стартапах и будущем IT. Всё самое важное и интересное из мира высоких технологий в одном месте — просто, понятно, актуально.
Приобрести диплом любого университета. Приобретение документа о высшем образовании через качественную и надежную компанию дарит немало достоинств. Это решение помогает сберечь как личное время, так и существенные денежные средства. registraciavsaita.listbb.ru/viewtopic.php?f=2&t=2626
Всё о мобильной технике https://webstore.com.ua и технологиях: смартфоны, планшеты, гаджеты, новинки рынка, обзоры, сравнения, тесты, советы по выбору и настройке. Следите за тенденциями, обновлениями ОС и инновациями в мире мобильных устройств.
1win https://www.1win22003.ru .
facebook accounts for sale https://buy-ads-account.click
1win 1win .
Terrific post however , I was wondering if you could write a litte more on this subject? I’d be very thankful if you could elaborate a little bit more. Kudos!
Приобрести диплом под заказ в Москве вы имеете возможность через официальный портал компании. sovetushka.forum2x2.ru/login
1win http://1win22003.ru .
подключить домашний интернет в перми
perm-domashnij-internet002.ru
подключить интернет тарифы пермь
mostbet mostbet .
Советы по выбору бокалов для вина — читаем и покупаем с уверенностью
винные бокалы винные бокалы .
YouTube Promotion buy usa youtube views for your videos and increase reach. Real views from a live audience, quick launch, flexible packages. Ideal for new channels and content promotion. We help develop YouTube safely and effectively.
Ваш любимый алкоголь с быстрой и точной доставкой
доставка алкоголя 24 часа http://www.dostavka-alkogolya-moskva-ccclub25.ru/ .
Натяжные потолки под ключ https://potolki-nova.livejournal.com/563.html установка любых видов: матовые, глянцевые, сатиновые, многоуровневые, с фотопечатью и подсветкой. Широкий выбор фактур и цветов, замер бесплатно, монтаж за 1 день. Качественные материалы, гарантия и выгодные цены от производителя.
Автомобильный портал https://autodream.com.ua для автолюбителей и профессионалов: новости автоиндустрии, обзоры, тест-драйвы, сравнение моделей, советы по уходу и эксплуатации. Каталог авто, форум, рейтинги, автоновости. Всё об автомобилях — в одном месте, доступно и интересно.
Портал про авто https://livecage.com.ua всё для автолюбителей: обзоры машин, тест-драйвы, новости автопрома, советы по ремонту и обслуживанию. Выбор авто, сравнение моделей, тюнинг, страховка, ПДД. Актуально, понятно и полезно. Будьте в курсе всего, что связано с автомобилями!
Trying to find affordable travel options can be overwhelming in today’s market. Numerous tourists struggle to find genuine deals among the sea of offers online. The method to successful budget travel lies in knowing where and when to book. Veteran vacationers recommend booking flights at least six weeks in advance for the best rates. First light flights typically offer better prices than evening departures. Thursday bookings often results in significant savings compared to weekend options. Budget flight finders can save you hundreds on international flights. Not being rigid with your travel dates can unlock hidden bargains. Inspect regional air stations to potentially halve your travel expenses. Member benefit programs can provide long-term savings for regular travelers. Just-in-time promotions occasionally offer surprising value for spontaneous travelers. Bargain air transport have revolutionized European travel with their competitive pricing. Decreasing carry-ons helps avoid additional baggage fees that quickly add up. Non-holiday excursions often presents the best value for budget-conscious travelers. All-inclusive arrangements sometimes beat individually booked flights and accommodations. Creating price notifications lets technology work for you while you wait for the perfect price. Planned itinerary breaking might save money but comes with certain risks and ethical considerations. Student discounts can significantly reduce costs for those with valid identification. Payment card rewards often convert favorably into flight savings. After-hours flights frequently come with reduced pricing for those willing to sacrifice sleep. Airfare emails provide insider access to limited-time promotions. Uni-directional passes purchased separately sometimes beat round-trip pricing. Long connections can reduce costs and offer mini-vacation opportunities. Watch exchange rates to book when your home currency is stronger. Unintentional fare reductions represent rare but incredible saving opportunities. Niche flight finders sometimes feature deals the giants miss. Private parking providers can save substantial amounts on longer trips. Local transportation often proves more economical than airport taxis or rental cars. Travel disturbance settlements can recoup costs from problematic journeys. Flight provider unions might offer better value across multiple journeys than individual budget carriers. Capitalize on helpful resources like https://www.colegiosagradocorazon.es/wp-includes/pags/the-art-of-traveling.html for insider tips and tricks. Expedition security represents a small expense that can save thousands in emergencies. Terminal retreat access might be worth the splurge on long layovers. Social media groups often share time-sensitive deals unavailable elsewhere. Research equivalent spots when your first choice proves too expensive. Private web searching prevents price increases based on repeated searches. Tour specialists sometimes have access to unpublished fares worth investigating. Be aware of hidden fees that can double advertised prices. Touching down at main airfields and taking ground transportation can be cheaper than direct flights to smaller cities. Remember that the cheapest flight isn’t always the best value when considering total travel time and convenience.
Элитные напитки с быстрой доставкой — не выходя из дома
доставка алкоголя в москве круглосуточно на дом https://dostavka-alkogolya-moskva-wwworld.ru/ .
мостбет мостбет .
WONDERFUL Post.thanks for share..extra wait .. …
Заказать диплом университета по невысокой цене вы сможете, обратившись к проверенной специализированной компании. Заказать документ университета вы можете в нашей компании. diploml-174.ru/kupit-diplom-visshego-obrazovaniya-s-zaneseniem-v-reestr-31
Приобрести диплом института по доступной стоимости вы можете, обращаясь к надежной специализированной фирме. Мы предлагаем документы об окончании любых университетов РФ. Приобрести диплом университета– recruit.empacter.it/employer/diplomy-grup-24
Современный женский портал https://beautyrecipes.kyiv.ua стиль жизни, мода, уход за собой, семья, дети, кулинария, карьера и вдохновение. Полезные советы, тесты, статьи и истории. Откровенно, интересно, по-настоящему. Всё, что важно и близко каждой женщине — в одном месте.
Ты можешь всё https://love.zt.ua а мы подскажем, как. Женский портал о саморазвитии, личной эффективности, карьере, балансе между семьёй и амбициями. Здесь — опыт успешных женщин, практичные советы и реальные инструменты для роста.
домашний интернет пермь
perm-domashnij-internet003.ru
недорогой интернет пермь
На женском портале https://happytime.in.ua статьи для души и тела: секреты красоты, женское здоровье, любовь и семья, рецепты, карьерные идеи, вдохновение. Место, где можно быть собой, делиться опытом и черпать силу в заботе о себе.
Добро пожаловать на женский портал https://lidia.kr.ua ваш гид по миру красоты, стиля и внутренней гармонии. Читайте про отношения, карьеру, воспитание детей, женское здоровье, эмоции и моду. Будьте вдохновлены лучшей версией себя каждый день вместе с нами.
bonus pariuri online http://1win5078.ru/ .
1win uganda login http://1win1034.top/ .
Приобрести диплом ВУЗа !
Покупка диплома ВУЗа России у нас – надежный процесс, потому что документ заносится в реестр. Купить диплом университета diplom-zentr.com/kupit-diplom-s-zaneseniem-v-reestr-rossii-legko-bistro
mostbet mostbet .
Быстро купить диплом института!
Быстро купить диплом об образовании. Заказ диплома через надежную компанию дарит ряд достоинств. Такое решение позволяет сберечь как личное время, так и значительные денежные средства. leydis16.phorum.pl/posting.phpmode=newtopic&f=1
купить диплом колледжа http://www.sx-diplo24.online .
Some times its a pain in the ass to read what website owners wrote but this website is rattling user genial! .
Купить диплом на заказ в Москве вы сможете через сайт компании. aladin.social/read-blog/133511_gde-kupit-diplom-s-zaneseniem-v-reestr.html
мостбет https://mostbet22001.ru/ .
подключить проводной интернет ростов
rostov-domashnij-internet001.ru
домашний интернет тарифы
As soon as I observed this website I went on reddit to share some of the love with them.
I’m really impressed together with your writing talents and also with the format on your blog. Is this a paid subject matter or did you customize it your self? Anyway keep up the nice quality writing, it’s uncommon to peer a nice weblog like this one nowadays..
заказать пластиковые окна в москве заказать пластиковые окна в москве .
1win https://www.1win22018.ru .
мостбет http://mostbet22002.ru/ .
Покупка официального диплома через надежную компанию дарит множество достоинств. Это решение позволяет сберечь как дорогое время, так и значительные деньги. Однако, плюсов гораздо больше.Мы изготавливаем дипломы любых профессий. Дипломы изготавливаются на настоящих бланках государственного образца. Доступная цена в сравнении с крупными расходами на обучение и проживание в чужом городе. Заказ диплома института станет мудрым шагом.
Купить диплом: freediplom.com/kupit-diplom-s-zaneseniem-v-reestr-rossiya-4/
окна пвх rehau http://www.1okno-krasnodar.ru .
Приобрести диплом университета по невысокой цене можно, обращаясь к проверенной специализированной фирме. Заказать документ о получении высшего образования можно в нашей компании в Москве. diplomservis.com/kupite-diplom-s-zaneseniem-v-reestr-po-vigodnoj-tsene-6
1вин https://www.1win22018.ru .
уннв скачать мп3 http://25kat.ru/music/уннв/ .
I truly appreciate this post. I?¦ve been looking all over for this! Thank goodness I found it on Bing. You’ve made my day! Thanks again
Заказать диплом университета!
Покупка документа о высшем образовании через качественную и надежную компанию дарит ряд плюсов. Заказать диплом ВУЗа у сильной фирмы: doks-v-gorode-smolensk-67.ru
Мы изготавливаем дипломы любой профессии по приятным тарифам. Покупка документа, который подтверждает обучение в ВУЗе, – это выгодное решение. Приобрести диплом любого ВУЗа: arpop.com/forum/index.phptopic=28811.0
Женский онлайн-журнал https://loveliness.kyiv.ua о стиле, красоте, вдохновении и трендах. Интервью, мода, бьюти-обзоры, психология, любовь и карьера. Будь в курсе главного, читай мнения экспертов, следи за трендами и открывай новые грани себя каждый день.
1win http://1win22017.ru/ .
Онлайн-журнал для женщин https://mirwoman.kyiv.ua которые ищут не только советы, но и тепло. Личные истории, женское здоровье, психология, уютный дом, забота о себе, рецепты, отношения. Без давления, без шаблонов. Просто жизнь такой, какая она есть.
Современный женский портал https://womanonline.kyiv.ua с актуальными темами: тренды, уход, макияж, фитнес, fashion, интервью, советы стилистов. Следи за модой, вдохновляйся образами, узнай, как подчеркнуть свою индивидуальность.
Портал для женщин https://oa.rv.ua всё, что важно: красота, здоровье, семья, карьера, мода, отношения, рецепты и саморазвитие. Полезные статьи, советы, тесты и вдохновение каждый день. Онлайн-пространство, где каждая найдёт ответы и поддержку.
Заказать диплом университета!
Мы можем предложить дипломы любой профессии по доступным тарифам— msk-diploms.ru
подключить интернет
rostov-domashnij-internet002.ru
домашний интернет в ростове
1вин https://www.1win22004.ru .
mostbet http://www.mostbet20003.ru .
mostbet http://www.mostbet20002.ru .
Заказать документ ВУЗа вы сможете в нашей компании. Купить диплом института по доступной цене возможно, обратившись к надежной специализированной компании. pdlspd.listbb.ru/viewtopic.phpf=3&t=2325
треки уннв скачать треки уннв скачать .
мостбет http://mostbet20003.ru/ .
Заказать диплом любого университета!
Мы предлагаемвыгодно купить диплом, который выполняется на оригинальной бумаге и заверен печатями, водяными знаками, подписями должностных лиц. Данный диплом способен пройти лубую проверку, даже при помощи специального оборудования. Решайте свои задачи быстро и просто с нашим сервисом- click-boutique.ru/forum/PAGE_NAME=profile_view&UID=49268
мостбет http://mostbet20002.ru .
1win https://1win22003.ru/ .
мостбет мостбет .
купить диплом в воронеже купить диплом в воронеже .
Купить диплом университета по доступной цене можно, обращаясь к надежной специализированной фирме. Приобрести диплом о высшем образовании: sensemi.getbb.ru/viewtopic.phpf=6&t=1787
1вин [url=1win22004.ru]1вин[/url] .
бержерак лион прогноз prognoz-na-segodnya-na-sport13.ru .
ставки прогнозы на теннис сегодня http://www.prognoz-na-segodnya-na-sport11.ru/ .
диплом купить https://www.orikdok-4v-gorode-tula-71.online .
прогнозы на баскетбол сегодня от профессионалов бесплатно http://www.prognoz-na-segodnya-na-sport12.ru .
подключить интернет в квартиру ростов
rostov-domashnij-internet003.ru
домашний интернет ростов
купить диплом в благовещенске купить диплом в благовещенске .
купить диплом в барнауле http://orikdok-3v-gorode-groznyy-20.online/ .
мостбет http://mostbet22002.ru/ .
купить диплом в архангельске http://www.orikdok-5v-gorode-penza-58.ru/ .
1win बोनस 1win5079.ru .
купить в казани диплом http://orikdok-1v-gorode-vladivostok-25.ru .
Купить документ о получении высшего образования можно у нас в Москве. Приобрести диплом университета по доступной стоимости можно, обращаясь к проверенной специализированной фирме. rebdnt.co.uk/employer/frees-diplom
Explore our exclusive collection featuring beautiful, legal young adult models aged 18+. Fresh, natural, and full of energy — our content showcases genuine passion and authenticity. All performers are fully verified and over 18 years old. Discover the perfect mix of youthful charm and legal clarity — no fakes, no risks, 100% compliant. hussyfan pthc r ygold preteen
.
Наша компания предлагает выгодно и быстро приобрести диплом, который выполняется на оригинальном бланке и заверен печатями, штампами, подписями. Диплом пройдет любые проверки, даже с использованием специально предназначенного оборудования. newrealgames.ru/kupit-diplom-s-podtverzhdeniem-podlinnosti-i-podderzhki-24-7
Мы изготавливаем дипломы психологов, юристов, экономистов и прочих профессий по приятным ценам. Заказ диплома, который подтверждает обучение в университете, – это выгодное решение. Купить диплом ВУЗа: club-kia.com/forum/thread31362.html
buy accounts facebook https://ad-account-buy.top
great publish, very informative. I wonder why the other specialists of this sector don’t realize this. You should proceed your writing. I’m confident, you have a huge readers’ base already!
прогноз на теннис на сегодня от профессионалов https://prognoz-na-segodnya-na-sport11.ru .
Покупка документа о высшем образовании через надежную фирму дарит ряд преимуществ. Приобрести диплом: kai87la.flybb.ru/viewtopic.php?f=5&t=1043
руна парма прогноз prognoz-na-segodnya-na-sport13.ru .
хайденхайм дармштадт прогноз https://prognoz-na-segodnya-na-sport12.ru .
It’s really a nice and helpful piece of info. I’m glad that you shared this useful information with us. Please keep us up to date like this. Thanks for sharing.
buy facebook ads accounts https://ad-account-for-sale.top/
Заказать диплом университета по выгодной стоимости возможно, обратившись к проверенной специализированной фирме. Мы можем предложить документы ВУЗов, расположенных на территории всей России. korolev-progym.ru/kupite-diplom-s-zaneseniem-v-reestr-bez-problem-2/
интернет по адресу дома
samara-domashnij-internet001.ru
провайдер интернета по адресу самара
купить диплом в великом новгороде купить диплом в великом новгороде .
Сайт для женщин https://womenclub.kr.ua всё, что волнует и вдохновляет: мода, красота, здоровье, отношения, дети, психология и карьера. Практичные советы, интересные статьи, вдохновение каждый день. Онлайн-пространство, созданное с заботой о вас и вашем настроении.
Медицинский портал https://lpl.org.ua с проверенной информацией от врачей: симптомы, заболевания, лечение, диагностика, препараты, ЗОЖ. Консультации специалистов, статьи, тесты и новости медицины. Только достоверные данные — без паники и домыслов. Здоровье начинается с знаний.
Надёжный медицинский портал https://una-unso.cv.ua созданный для вашего здоровья и спокойствия. Статьи о заболеваниях, советы по лечению и образу жизни, подбор клиник и врачей. Понятный язык, актуальная информация, забота о вашем самочувствии — каждый день.
Чайная энциклопедия https://etea.com.ua всё о мире чая: сорта, происхождение, свойства, способы заваривания, чайные традиции разных стран. Узнайте, как выбрать качественный чай, в чём его польза и как раскрывается вкус в каждой чашке. Для ценителей и новичков.
mostbet https://mostbet20003.ru/ .
диплом магистра купить http://orikdok-3v-gorode-kostroma-44.online/ .
купить диплом в томске купить диплом в томске .
mostbet https://mostbet20003.ru/ .
sportbets https://sportbets12.ru/ .
sportbets https://sportbets13.ru .
купить диплом в костроме http://www.orikdok-2v-gorode-khabarovsk-27.online .
мостбет мостбет .
провайдеры по адресу дома
samara-domashnij-internet002.ru
провайдер по адресу
1win 1win22018.ru .
Купить диплом любого университета!
Наши специалисты предлагаютмаксимально быстро приобрести диплом, который выполнен на бланке ГОЗНАКа и заверен мокрыми печатями, водяными знаками, подписями. Диплом способен пройти лубую проверку, даже с использованием профессиональных приборов. Достигайте свои цели быстро и просто с нашими дипломами- hyesearch.com/profile/ingesansom0061
Кулинарный портал https://mallinaproject.com.ua тысячи рецептов, пошаговые инструкции, фото, видео, удобный поиск по ингредиентам. Готовьте вкусно и разнообразно: от завтраков до десертов, от традиционной кухни до кулинарных трендов. Быстро, доступно, понятно!
Современный мужской портал https://smart4business.net о жизни, успехе и саморазвитии. Личный рост, инвестиции, бизнес, стиль, технологии, мотивация. Разбираем стратегии, делимся опытом, вдохновляем на движение вперёд. Для тех, кто выбирает силу, разум и результат.
Все новинки технологий https://axioma-techno.com.ua в одном месте: презентации, релизы, выставки, обзоры и утечки. Следим за рынком гаджетов, IT, авто, AR/VR, умного дома. Обновляем ежедневно. Не пропустите главные технологические события и открытия.
Thank you for sharing with us, I think this website truly stands out : D.
mostbet http://www.mostbet20002.ru .
mostbet http://mostbet22001.ru .
1вин https://www.1win22004.ru .
Thanks for another fantastic article. The place else may anyone get that kind of information in such a perfect way of writing? I have a presentation next week, and I am at the search for such information.
buy old facebook account for ads buying facebook account
Just stopped in and had a pleasant time looking through what you’ve posted. You’ve got a solid range of topics here. I’ve browsed quite a few of your articles already. Thanks for making this available—hope the rest of your day goes smoothly.
sportbets sportbets13.ru .
sportbets https://www.sportbets12.ru .
Наша компания предлагает быстро заказать диплом, который выполнен на бланке ГОЗНАКа и заверен мокрыми печатями, штампами, подписями. Наш диплом пройдет лубую проверку, даже при помощи профессионального оборудования. t98223u0.beget.tech/2025/05/12/kupit-diplom-s-garantiey-podlinnosti-i-podderzhki-klientov.html
Приобрести диплом о высшем образовании !
Приобретение диплома университета РФ в нашей компании – надежный процесс, потому что документ заносится в государственный реестр. Приобрести диплом университета diplom-top.ru/kupit-diplom-cherez-reestr-bistro-i-bezopasno-8
1win com https://1win5079.ru .
провайдеры по адресу самара
samara-domashnij-internet003.ru
провайдеры интернета в самаре по адресу проверить
Some genuinely superb content on this internet site, thanks for contribution.
Some truly choice posts on this internet site, saved to favorites.
недорогой интернет санкт-петербург
spb-domashnij-internet001.ru
подключить проводной интернет санкт-петербург
In this grand pattern of things you actually get an A with regard to hard work. Exactly where you misplaced everybody was in the specifics. As as the maxim goes, the devil is in the details… And that could not be more true here. Having said that, permit me tell you what exactly did work. The authoring is certainly pretty powerful and this is most likely the reason why I am taking the effort to comment. I do not make it a regular habit of doing that. Second, whilst I can notice the jumps in reason you make, I am not really certain of just how you appear to unite your ideas which inturn help to make your final result. For right now I will yield to your position but trust in the near future you link your dots better.
купить настоящий аттестат http://orikdok-v-gorode-penza-58.ru/ .
Great remarkable things here. I?¦m very satisfied to see your article. Thanks a lot and i’m taking a look forward to contact you. Will you kindly drop me a e-mail?
подключить домашний интернет санкт-петербург
spb-domashnij-internet002.ru
провайдеры санкт-петербург
ideal mobila 1win5079.ru .
1вин 1вин .
что такое ваучер в 1win что такое ваучер в 1win .
Приобрести диплом ВУЗа по невысокой цене возможно, обращаясь к проверенной специализированной компании. Мы можем предложить документы учебных заведений, расположенных в любом регионе РФ. diplomdom.ru/kupit-diplom-s-reestrom-v-moskve/
интернет провайдер санкт-петербург
spb-domashnij-internet003.ru
провайдеры по адресу дома
как натягивают натяжные потолки натяжной потолок м2 с установкой
1 вин ставки на спорт онлайн http://www.1win22019.ru .
portable sauna portable sauna .
продвижение сайтов в москве продвижение сайтов в москве .
Greetings from Florida! I’m bored to tears at work so I decided to browse your website on my iphone during lunch break. I enjoy the information you present here and can’t wait to take a look when I get home. I’m amazed at how fast your blog loaded on my phone .. I’m not even using WIFI, just 3G .. Anyhow, wonderful site!
мостбет вход официальный сайт https://mostbet22003.ru .
bot 1win aviator https://1win22019.ru .
mostbet com login http://mostbet20004.ru .
1win 1win .
1 вин букмекерская 1win22019.ru .
прогноз на теннис на сегодня от профессионалов https://www.prognoz-na-segodnya-na-sport11.ru .
мостбет скачать приложение на андроид бесплатно мостбет скачать приложение на андроид бесплатно .
It?¦s really a nice and useful piece of info. I am satisfied that you simply shared this helpful info with us. Please stay us informed like this. Thank you for sharing.
1вин приложение http://1win22005.ru .
накрутка подписчиков в тг канал боты накрутка подписчиков в тг канал боты .
mostbet. com http://mostbet20004.ru .
продвижение сайта магазина https://www.prodvizhenie-sajtov-v-moskve.ru .
sauna steamer machine http://portablesaunakit.com .
скачать бк осталось только отфильтровать подходящее скачать бк осталось только отфильтровать подходящее .
интернет по адресу уфа
ufa-domashnij-internet001.ru
провайдеры в уфе по адресу проверить
1 win ставки на спорт https://www.1win22006.ru .
mostbetapk mostbetapk .
прогнозы на баскетбол го спорт https://prognoz-na-segodnya-na-sport11.ru .
1win не выводит деньги 1win22006.ru .
Мы предлагаем дипломы любой профессии по приятным тарифам. Заказ диплома, подтверждающего обучение в ВУЗе, – это рациональное решение. Заказать диплом о высшем образовании: bin.io.vn/read-blog/41_kuplyu-diplom-magistra.html
мостбет кыргызстан скачать http://mostbet22004.ru .
pariuri online 1win5079.ru .
Ищете идеальную квартиру в Москве или Подмосковье?
У нас есть предложения, которые вас удивят! Живите в сердце столицы с
развитой инфраструктурой, или выберите уютные районы Подмосковья для
спокойной жизни. Мы предлагаем широкий выбор квартир: от современных
студий до просторных семейных апартаментов. Наша команда специалистов поможет вам найти именно то, что нужно, учитывая все ваши пожелания и бюджет. Не упустите шанс стать владельцем жилья мечты! Звоните, и мы подберем лучшие варианты для вас! Живите там, где вам комфортно!
Купить квартиру в ЖК Green park от застройщика
мостбет скачать андроид мостбет скачать андроид .
хранение вещей в москве недорого veshi-hranenie.ru .
1win скачать официальный сайт http://1win22005.ru/ .
Заказать диплом любого университета!
Наши специалисты предлагаютвыгодно и быстро купить диплом, который выполняется на бланке ГОЗНАКа и заверен мокрыми печатями, штампами, подписями. Документ пройдет любые проверки, даже при помощи специально предназначенного оборудования. Достигайте своих целей быстро и просто с нашим сервисом- skillscape.lk/index.php/2025/04/14/kupit-diplom-prostoe-reshenie-dlja-slozhnyh-zadach-165
мостбет вход в личный кабинет http://mostbet22005.ru/ .
I truly value your work, Great post.
Инфа про кредит под залог авто может пригодиться. Ссылка тут: кредит под залог авто.
интернет по адресу уфа
ufa-domashnij-internet002.ru
какие провайдеры по адресу
buy google ads verified account https://buy-ads-account.top
1win бонус https://1win22020.ru .
1win yuklash http://1win22019.ru/ .
buy facebook profiles https://buy-accounts.click
Где приобрести диплом по нужной специальности?
Мы изготавливаем дипломы любой профессии по разумным тарифам. Для нас важно, чтобы дипломы были доступны для большинства наших граждан. Выгодно купить диплом об образовании fastdiploms.com/diplom-bakalavra-s-zaneseniem-v-reestr-10/
мостбет com mostbet22004.ru .
букмекерская контора 1вин https://1win22020.ru .
mostbet download http://www.mostbet22003.ru .
Приобрести диплом любого ВУЗа!
Мы предлагаеммаксимально быстро приобрести диплом, который выполнен на оригинальной бумаге и заверен мокрыми печатями, водяными знаками, подписями. Данный документ способен пройти любые проверки, даже с применением профессиональных приборов. Достигайте цели быстро с нашей компанией- skvortsy.listbb.ru/viewtopic.phpf=31&t=3302
Мы предлагаем выгодно заказать диплом, который выполняется на бланке ГОЗНАКа и заверен мокрыми печатями, штампами, подписями должностных лиц. Данный диплом пройдет любые проверки, даже с применением специальных приборов. [url=http://coteolivier.fr/kupit-diplom-bystro-i-nadezhno-luchshie-190-3/]coteolivier.fr/kupit-diplom-bystro-i-nadezhno-luchshie-190-3[/url]
mostbet official http://mostbet22003.ru .
Those are yours alright! . We at least need to get these people stealing images to start blogging! They probably just did a image search and grabbed them. They look good though!
Инфа про калькулятор кредита может пригодиться. Ссылка тут: калькулятор кредита.
проверить интернет по адресу
ufa-domashnij-internet003.ru
интернет по адресу дома
мостбет зеркало скачать http://www.mostbet20004.ru .
букмекерская контора кыргызстан mostbet22004.ru .
sportbets https://sportbets12.ru .
sportbets https://sportbets13.ru/ .
склад временного хранения для вещей https://www.veshi-hranenie.ru .
Playing Aviator Gamble in Batery Bookmaker Company aviatorbatery.in in India.
aviatorbatery.in
Howdy very nice web site!! Guy .. Excellent .. Superb .. I will bookmark your web site and take the feeds additionally?KI am glad to search out a lot of helpful info here within the publish, we’d like develop more techniques on this regard, thank you for sharing. . . . . .
Диплом ВУЗа Российской Федерации!
Без института очень нелегко было продвигаться вверх по карьере. Купить диплом можно используя официальный сайт компании: mosfor.flybb.ru/viewtopic.phpf=2&t=765
мост бет https://mostbet20004.ru/ .
mostbet kg https://mostbet22005.ru/ .
накрутка живых подписчиков ТГ накрутка живых подписчиков ТГ .
Онлайн-журнал для женщин https://tiamo.rv.ua которые ищут баланс. Психология, эмоции, отношения, самоценность, женское здоровье. Честные тексты, поддержка, путь к себе. Пространство, где можно дышать глубже, читать с удовольствием и чувствовать, что тебя понимают.
Где приобрести диплом по нужной специальности?
Приобрести диплом ВУЗа по выгодной цене возможно, обращаясь к надежной специализированной фирме.: 10000diplomov.ru
Мы изготавливаем дипломы любых профессий по невысоким ценам. Дипломы производятся на подлинных бланках государственного образца Быстро купить диплом любого ВУЗа diploml-174.ru
Наши специалисты предлагают выгодно купить диплом, который выполняется на оригинальной бумаге и заверен печатями, штампами, подписями. Данный документ пройдет лубую проверку, даже при использовании профессионального оборудования. skphotographerranchi.com/2025/05/12/kupit-diplom-bystro-i-nadezhno-luchshie-207-2
1win промокод на деньги при пополнении https://1win22006.ru .
домашний интернет
volgograd-domashnij-internet001.ru
домашний интернет подключить омск
sportbets http://sportbets12.ru .
sportbets https://sportbets13.ru/ .
Купить диплом любого университета можем помочь. Купить диплом СССР – diplomybox.com/diplom-sssr
I regard something genuinely special in this site.
Сайт для женщин https://expertlaw.com.ua которые любят моду, красоту и стильную жизнь. Актуальные тренды, советы по уходу, подбор образов, вдохновляющие идеи для гардероба и макияжа.
скачать приложение mostbet http://mostbet22005.ru/ .
скачать 1win с официального сайта 1win22020.ru .
Заказать диплом любого университета!
Мы предлагаем документы университетов, расположенных на территории всей Российской Федерации.
diplomaj-v-tule.ru/kupit-diplom-s-zaneseniem-v-reestr-bistro-i-nadezhno-19/
мелбет kg https://www.mostbet22005.ru .
интернет домашний омск
volgograd-domashnij-internet002.ru
подключить проводной интернет омск
Погрузитесь в мир императорского фарфора: эксклюзивные коллекции для вашего интерьера
фарфоровый завод https://www.imperatorskij-farfor.website.yandexcloud.net/ .
Прочные деревянные дома под ключ — дом на века
строительство домов из дерева под ключ https://derevyannye-doma-pod-klyuch-msk.ru/ .
продвижение сайтов в 10 http://prodvizhenie-sajtov-v-moskve.ru .
sauna steamer machine https://www.portablesaunakit.com .
mostbet.com вход mostbet.com вход .
1 вин официальный сайт скачать на андроид бесплатно 1 вин официальный сайт скачать на андроид бесплатно .
купить диплом в великом новгороде http://www.orikdok-2v-gorode-samara-63.online/ .
It¦s really a nice and useful piece of information. I am satisfied that you simply shared this useful information with us. Please keep us up to date like this. Thanks for sharing.
Приобрести диплом ВУЗа!
Мы готовы предложить дипломы любой профессии по невысоким тарифам. Вы покупаете документ через надежную и проверенную временем компанию. : forum-pmr.net/member.phpu=42748
домашний интернет в волгограде
volgograd-domashnij-internet003.ru
домашний интернет подключить омск
Мы предлагаем документы об окончании любых ВУЗов России. Документы производятся на подлинных бланках государственного образца. amazonadvt.com/profile/gudrun38c84612
Где приобрести диплом по необходимой специальности?
Полученный диплом с необходимыми печатями и подписями отвечает стандартам Министерства образования и науки РФ, никто не сможет отличить его от оригинала – даже со специально предназначенным оборудованием. Купить диплом о высшем образовании – быстро и легко! dev-members.writeappreviews.com/employer/diplomix-asx
Мы можем предложить дипломы любых профессий по приятным тарифам. Купить диплом в Балаково — kyc-diplom.com/geography/balakovo.html
Приобрести диплом института!
Мы предлагаем дипломы психологов, юристов, экономистов и прочих профессий по приятным ценам— obrazovanie-alttpp.ru
There are definitely a whole lot of particulars like that to take into consideration. That is a great point to convey up. I supply the ideas above as normal inspiration however clearly there are questions just like the one you carry up where crucial factor will be working in honest good faith. I don?t know if greatest practices have emerged around things like that, however I’m sure that your job is clearly identified as a good game. Each girls and boys feel the impact of only a second’s pleasure, for the rest of their lives.
прогнозы на спорт бесплатно от профессионалов на сегодня https://prognoz-na-segodnya-na-sport11.ru .
продвижение web сайта http://prodvizhenie-sajtov-v-moskve.ru .
What’s Happening i’m new to this, I stumbled upon this I’ve found It absolutely helpful and it has helped me out loads. I hope to contribute & assist other users like its aided me. Good job.
sauna steamer machine http://www.portablesaunakit.com .
This web site is my intake, real fantastic pattern and perfect written content.
домашний интернет тарифы
voronezh-domashnij-internet001.ru
подключить интернет воронеж
скачать мостбет официальный сайт mostbet22004.ru .
Купить диплом о высшем образовании!
Мы можем предложить документы ВУЗов, расположенных в любом регионе РФ.
diploml-174.ru/legalnoe-zanesenie-diploma-v-reestr-bez-sporov-i-nervov/
прогнозы на баскетбол го спорт http://www.prognoz-na-segodnya-na-sport11.ru .
прогнозы на баскетбол го спорт prognoz-na-segodnya-na-sport12.ru .
прогнозы на спорт бесплатно от профессионалов на сегодня http://www.prognoz-na-segodnya-na-sport13.ru .
купить в казани диплом купить в казани диплом .
купить диплом в ярославле http://www.orikdok-1v-gorode-novosibirsk-54.online .
mostbet https://www.mostbet22006.ru .
1вин официальный мобильная http://1win22007.ru/ .
купить диплом в ярославле купить диплом в ярославле .
прогнозы на спорт бесплатно от профессионалов на сегодня http://prognoz-na-segodnya-na-sport12.ru .
скачать мостбет кг https://mostbet22005.ru/ .
прогнозы на хоккей го спорт http://www.prognoz-na-segodnya-na-sport13.ru/ .
подключить интернет
voronezh-domashnij-internet002.ru
подключить интернет воронеж
Купить документ о получении высшего образования вы можете в нашей компании в Москве. Приобрести диплом ВУЗа по доступной цене можно, обратившись к надежной специализированной фирме. khvoynaya.getbb.ru/viewtopic.phpf=39&t=8907
аттестат за 11 класс купить https://orikdok-5v-gorode-krasnoyarsk-24.online .
This is a very good tips especially to those new to blogosphere, brief and accurate information… Thanks for sharing this one. A must read article.
mostbet скачать mostbet скачать .
I really enjoy studying on this website , it has great blog posts. “It is easy to be nice, even to an enemy – from lack of character.” by Dag Hammarskjld.
как ставить бонусы на спорт в 1win [url=http://1win22007.ru]http://1win22007.ru[/url] .
скачать лайки джет на андроид https://www.1win22008.ru .
Надёжное строительство загородного дома по договору с поэтапной оплатой и гарантиями
загородное строительство под ключ http://stroitelstvo-zagorodnyh-domov178.ru/ .
промокод 1 x ставка https://www.1win22021.ru .
Playing Aviator Adventurous in Batery Bookmaker Company aviatorbatery.in in India.
aviatorbatery.in
Современный медицинский портал https://medfactor.com.ua с упором на технологии: телемедицина, онлайн-запись, цифровые карты, расшифровка анализов, подбор препаратов. Удобный доступ к информации и поддержка на всех этапах — от симптомов до выздоровления.
google ads agency account buy sell-ads-account.click
Купить диплом о высшем образовании!
Мы готовы предложить дипломы любой профессии по приятным тарифам— diplomsale4.ru
интернет провайдеры воронеж
voronezh-domashnij-internet003.ru
интернет тарифы воронеж
win 1 http://1win22008.ru/ .
крипто букмекеры 1win22020.ru .
WONDERFUL Post.thanks for share..extra wait .. …
Мы изготавливаем дипломы любых профессий по приятным тарифам. Приобретение документа, подтверждающего окончание ВУЗа, – это выгодное решение. Заказать диплом ВУЗа: mxlinkin.mimeld.com/read-blog/6476_diplom-s-reestrom-kupit.html
1 win скачать http://www.1win22008.ru .
диплом техникума купить диплом техникума купить .
Nice read, I just passed this onto a friend who was doing a little research on that. And he actually bought me lunch as I found it for him smile Thus let me rephrase that: Thanks for lunch!
диплом купить в москве http://www.orikdok-v-gorode-sankt-peterburg-78.online/ .
1win сайт зеркало http://1win22022.ru .
1вин авиатор http://www.1win22022.ru .
промокоды на 1вин https://1win22022.ru .
Приобрести документ о получении высшего образования можно в нашей компании в столице. Купить диплом университета по невысокой стоимости вы сможете, обращаясь к проверенной специализированной компании. sealedraid.flybb.ru/viewtopic.phpf=9&t=764
купить диплом специалиста https://www.orikdok-5v-gorode-kaluga-40.online .
Сайт для мужчин https://phizmat.org.ua всё о жизни с характером: здоровье, спорт, стиль, авто, карьера, отношения, технологии. Полезные советы, обзоры, мужской взгляд на важные темы.
mostbet aplikace http://www.mostbet22007.ru .
Купить диплом университета!
Наши специалисты предлагаютбыстро заказать диплом, который выполняется на оригинальном бланке и заверен печатями, штампами, подписями должностных лиц. Диплом пройдет любые проверки, даже с применением профессиональных приборов. Достигайте своих целей максимально быстро с нашими дипломами- umorforme.ru/diplomyi-s-ofitsialnoy-registratsiey-kak-eto-vozmozhno
I got good info from your blog
мостбет регистрация mostbet22006.ru .
1вин промокод при регистрации 1вин промокод при регистрации .
мостбет сайт бк https://mostbet22008.ru/ .
теннесси бк скачать http://www.mostbet22006.ru .
1win промокоды 1win промокоды .
1vin aviator 1vin aviator .
mines 1win скачать mines 1win скачать .
медицинский портал https://pobedilivmeste.org.ua с удобной навигацией и актуальной информацией. Болезни, симптомы, приёмы врачей, анализы, исследования, препараты и рекомендации.
1вин бонусы спорт как потратить https://1win22007.ru/ .
Good info. Lucky me I reach on your website by accident, I bookmarked it.
1win букмекерская контора бонусы https://1win22010.ru .
mostber mostber .
скачать 1вин https://1win22021.ru .
Мы изготавливаем дипломы психологов, юристов, экономистов и любых других профессий по приятным ценам. Приобретение документа, который подтверждает окончание института, – это выгодное решение. Заказать диплом о высшем образовании: karkadan.ru/users/77829
как играть на бонусные деньги в 1win https://1win22009.ru/ .
Noten von klavier noten klavier
1win зеркало вход https://www.1win22010.ru .
Приобрести диплом любого ВУЗа!
Мы предлагаембыстро и выгодно купить диплом, который выполняется на оригинальной бумаге и заверен печатями, водяными знаками, подписями. Документ пройдет лубую проверку, даже при использовании профессиональных приборов. Решите свои задачи быстро и просто с нашей компанией- d9talks.site/read-blog/8674_kupit-diplom-s-reestrom.html
Где купить диплом по актуальной специальности?
Мы можем предложить дипломы любых профессий по приятным тарифам. Важно, чтобы документы были доступными для большого количества граждан. Выгодно заказать диплом любого ВУЗа diplomass.com/kupit-diplom-menedzhera-s-zaneseniem-v-reestr-22/
сайт мостбет http://www.mostbet22007.ru .
Merely a smiling visitant here to share the love (:, btw great pattern.
теннесси бк скачать http://mostbet22008.ru/ .
как перейти на бонусный счет в 1win 1win22009.ru .
куда вводить промокод в 1win куда вводить промокод в 1win .
букмекерская контора ван вин https://1win22008.ru/ .
I?¦ve learn a few good stuff here. Definitely worth bookmarking for revisiting. I surprise how so much effort you put to create this sort of great informative web site.
Заказать диплом любого университета!
Мы предлагаем документы институтов, которые расположены в любом регионе Российской Федерации.
asxdiploman.com/kupit-diplom-ob-obrazovanii-s-vneseniem-v-reestr/
mostbet kg http://www.mostbet22008.ru .
промокод в 1win промокод в 1win .
ставки криптой https://www.1win22023.ru .
купить в казани диплом http://www.orikdok-4v-gorode-novokuznetsk-42.ru .
1win скачать зеркало https://1win22010.ru .
battery. bet
мостбет вход, регистрация мостбет вход, регистрация .
Заказать диплом о высшем образовании. Производство диплома занимает гораздо меньше времени, а цена – невысокая. В результате вы сможете сохранить деньги и время и найти работу вашей мечты. Приобрести диплом под заказ в Москве вы можете через официальный портал компании. – realtraceclasses.copiny.com/question/details/id/1097261
Купить диплом о высшем образовании!
Мы предлагаем документы любых учебных заведений, которые расположены на территории всей России.
diplom-onlinex.com/gde-kupit-diplom-s-zaneseniem-v-reestr/
Где приобрести диплом специалиста?
Купить диплом университета по невысокой стоимости возможно, обратившись к проверенной специализированной компании.: magazin-diplomov.ru
Мы можем предложить дипломы любых профессий по приятным тарифам. Дипломы изготавливаются на оригинальных бланках Приобрести диплом об образовании п»їdiplomass.com
Hi there! This post couldn’t be written any better! Reading through this post reminds me of my previous room mate! He always kept talking about this. I will forward this article to him. Pretty sure he will have a good read. Thank you for sharing!
купить в иваново диплом http://www.orikdok-4v-gorode-ekaterinburg-66.online .
купить диплом в калининграде http://www.orikdok-4v-gorode-khabarovsk-27.online .
вход в 1win https://www.1win22024.ru .
1 вин скачать https://www.1win22011.ru .
аттестат купить http://www.orikdok-2v-gorode-saratov-64.online .
букмекерские ставки скачать официальные http://www.1win22024.ru .
топ мач вин http://1win22011.ru .
займ онлайн сайт мфо взять займ
прогнозы на спорт бесплатно от профессионалов на сегодня prognoz-na-segodnya-na-sport12.ru .
You could definitely see your enthusiasm in the paintings you write. The arena hopes for more passionate writers like you who are not afraid to mention how they believe. At all times go after your heart. “Golf and sex are about the only things you can enjoy without being good at.” by Jimmy Demaret.
купить диплом в биробиджане http://orikdok-2v-gorode-barnaul-22.ru/ .
magnificent issues altogether, you just gained a new reader. What may you suggest in regards to your put up that you made a few days in the past? Any positive?
Заказать документ о получении высшего образования вы можете у нас. Купить диплом ВУЗа по невысокой стоимости возможно, обращаясь к проверенной специализированной компании. silich.ru/forum/member.phpu=4810
как играть на бонусные деньги в 1win как играть на бонусные деньги в 1win .
скачать мостбет официальный сайт скачать мостбет официальный сайт .
прогнозы на спорт с анализом http://kompyuternye-prognozy-na-futbol11.ru/ .
точный прогноз на спорт сегодня http://www.kompyuternye-prognozy-na-futbol12.ru .
лучшие прогнозы на хоккей лучшие прогнозы на хоккей .
диплом о высшем образовании купить в москве https://orikdok-v-gorode-yoshkar-ola-12.ru .
прогнозы на хоккей го спорт https://prognoz-na-segodnya-na-sport13.ru .
На пианино ноты ноты для фортепиано
Купить диплом университета по выгодной стоимости возможно, обращаясь к проверенной специализированной фирме. Мы предлагаем документы об окончании любых ВУЗов Российской Федерации. Купить диплом университета– vmeste.ru.net/read-blog/972_kupit-diplom-obrazovanie.html
как играть на бонусные деньги в 1win https://1win22009.ru/ .
Купить документ университета можно у нас в Москве. Мы оказываем услуги по изготовлению и продаже документов об окончании любых университетов Российской Федерации. Вы сможете получить необходимый диплом по любым специальностям, любого года выпуска, включая документы старого образца. Гарантируем, что при проверке документов работодателями, никаких подозрений не появится. diplomk-vo-vladivostoke.ru/kupit-diplom-instituta-s-reestrom-bistro-i-nedorogo-3/
прогноз на теннис на сегодня от профессионалов https://prognoz-na-segodnya-na-sport12.ru/ .
Мы предлагаем документы об окончании любых университетов РФ. Документы производят на оригинальных бланках государственного образца. silton.ru/forum/user/8459
прогноз на футбольный матч kompyuternye-prognozy-na-futbol11.ru .
прогнозы на футбол от экспертов прогнозы на футбол от экспертов .
лучшие прогнозы на хоккей лучшие прогнозы на хоккей .
Где заказать диплом по нужной специальности?
Полученный диплом с нужными печатями и подписями отвечает условиям и стандартам, неотличим от оригинала. Заказать диплом о среднем специальном образовании – не проблема! hireblitz.com/employer/diplomix-asx
купить диплом в южно сахалинске http://www.orikdok-5v-gorode-kazan-16.ru .
facebook bm account buy buy facebook business manager account
Приобрести документ института вы можете у нас в столице. Приобрести диплом института по невысокой цене возможно, обращаясь к надежной специализированной компании. opros.flybb.ru/viewtopic.phpf=2&t=1094
оне вин https://1win22024.ru/ .
прогнозы на спорт бесплатно от профессионалов на сегодня prognoz-na-segodnya-na-sport13.ru .
На нашем сайте вы найдёте открытки с поздравлениями для любого случая. Яркие изображения, тёплые слова, праздничное настроение и стильный дизайн. Поделитесь эмоциями с близкими и сделайте каждый день особенным. Обновления каждый день, удобный формат, всё бесплатно!
1 win бонусы спорт как потратить https://www.1win22023.ru .
Glad to be one of the visitants on this awing site : D.
билайн тв доверительный платеж билайн тв доверительный платеж .
Купить диплом о высшем образовании!
Быстро купить диплом института. Заказ подходящего диплома через надежную фирму дарит массу достоинств. Такое решение помогает сэкономить время и существенные средства. collabtherapy.com/forum/viewforum.phpf=2
окна рехау окна рехау .
Приобрести диплом о высшем образовании!
Мы предлагаембыстро и выгодно купить диплом, который выполнен на бланке ГОЗНАКа и заверен печатями, водяными знаками, подписями. Наш диплом пройдет лубую проверку, даже с использованием специальных приборов. Достигайте своих целей быстро и просто с нашим сервисом- dely.nl/kupit-diplom-prostoe-reshenie-dlja-slozhnyh-zadach-94
промокод 1win при регистрации https://1win22011.ru/ .
1вин промокод https://1win22011.ru/ .
Howdy just wanted to give you a quick heads up and let you know a few of the images aren’t loading properly. I’m not sure why but I think its a linking issue. I’ve tried it in two different web browsers and both show the same outcome.
Explore everything Satbayev University has to offer: world-class engineering education, vibrant campus life, and international student support – https://satbayev.university/
бк 1win официальный сайт бк 1win официальный сайт .
Дамски тениски с оверсайз кройка за удобно и модерно облекло
ефектни дамски тениски https://teniski-damski.com .
Купить диплом о высшем образовании!
Наша компания предлагаетвыгодно приобрести диплом, который выполнен на оригинальной бумаге и заверен мокрыми печатями, водяными знаками, подписями. Документ способен пройти любые проверки, даже при использовании специфических приборов. Решайте свои задачи максимально быстро с нашей компанией- or1gano.80lvl.ru/viewtopic.phpf=10&t=2006
Надёжный маркетплейс по лизингу с поддержкой от экспертов и подробными условиями
агрегатор лизинговых компаний https://www.lizingovyy-agregator.ru .
мостбет кыргызстан скачать mostbet22010.ru .
дипломная работа срочно на заказ написание диплома на заказ
мостьет мостьет .
mostbet скачать на андроид mostbet22011.ru .
mostbet skachat http://mostbet22010.ru .
бонус на спорт 1win https://1win22025.ru/ .
1win букмекерская приложение https://www.1win22012.ru .
бк мост бет http://www.mostbet22009.ru .
Диплом ВУЗа Российской Федерации!
Без присутствия диплома очень нелегко было продвигаться вверх по карьерной лестнице. Приобрести диплом на заказ в столице вы имеете возможность используя официальный портал компании: bazhenova.greatforum.ru/viewtopic.phpf=17&t=9490
Whats Happening i am new to this, I stumbled upon this I’ve discovered It positively helpful and it has aided me out loads. I hope to contribute & aid different customers like its aided me. Good job.
теннис скачать букмекерскую контору http://mostbet22011.ru .
mostbet online mostbet22011.ru .
Learn how to apply for the Geology undergraduate program. Find information about scholarships, tuition fees, and course modules. A solid choice for careers in earth science, mineralogy, geophysics https://satbayev.university/
Мы изготавливаем дипломы любой профессии по приятным ценам. Стоимость будет зависеть от конкретной специальности, года выпуска и университета: anatoliyrud.ekafe.ru/viewtopic.php?f=29&t=4805
Great wordpress blog here.. It’s hard to find quality writing like yours these days. I really appreciate people like you! take care
1 dby https://1win22012.ru/ .
Simply wanna input that you have a very decent site, I love the design and style it actually stands out.
Hiya, I’m really glad I have found this information. Nowadays bloggers publish only about gossips and internet and this is actually irritating. A good blog with exciting content, that is what I need. Thanks for keeping this web-site, I’ll be visiting it. Do you do newsletters? Can not find it.
скачать приложение 1win на телефон скачать приложение 1win на телефон .
снять помещение для хранения вещей в москве снять помещение для хранения вещей в москве .
mostbet.com скачать https://www.mostbet22009.ru .
Мы изготавливаем дипломы любых профессий по выгодным ценам. Покупка документа, подтверждающего обучение в ВУЗе, – это выгодное решение. Приобрести диплом университета: phat4life.mn.co/posts/83441229
Мы изготавливаем дипломы любых профессий по приятным ценам.– sampikrp.getbb.ru/viewtopic.phpf=27&t=2214
Вы приобретаете документ в надежной и проверенной временем компании. Приобрести диплом университета– [url=http://sportdir.ru/kupit-diplom-menedzhera-s-zaneseniem-v-reestr-2/]sportdir.ru/kupit-diplom-menedzhera-s-zaneseniem-v-reestr-2/[/url]
I view something genuinely interesting about your blog so I saved to fav.
Мы предлагаем выгодно заказать диплом, который выполняется на оригинальной бумаге и заверен мокрыми печатями, водяными знаками, подписями официальных лиц. Наш документ способен пройти любые проверки, даже с использованием специальных приборов. haidenarazhodka.com/viewtopic.phpt=425104
прогноз игры прогноз игры .
прогноз на футбольный матч http://www.kompyuternye-prognozy-na-futbol11.ru .
букмекерские конторы в кыргызстане http://www.1win22028.ru .
лучшие прогнозы на хоккей лучшие прогнозы на хоккей .
ставки на хоккей сегодня прогнозы точные http://www.luchshie-prognozy-na-khokkej12.ru .
1win программа http://www.1win22025.ru .
pinap https://pinup-azerbaycan62.com .
pin up giris pin up giris .
1win букмекерская контора скачать на андроид http://1win22026.ru/ .
1win прямой эфир https://1win22028.ru/ .
Мы готовы предложить дипломы любых профессий по доступным тарифам. Приобретение диплома, который подтверждает обучение в университете, – это выгодное решение. Приобрести диплом любого ВУЗа: recruit.empacter.it/employer/diplomirovans
1mostbet 1mostbet .
мостбет контакты mostbet22009.ru .
pin up az pin up az .
pin up giris pin up giris .
точные прогнозы на футбол сегодня точные прогнозы на футбол сегодня .
где лучшие прогнозы на спорт kompyuternye-prognozy-na-futbol11.ru .
Заказать диплом университета!
Мы предлагаем документы ВУЗов, расположенных на территории всей Российской Федерации.
diploml-174.ru/kupit-diplom-visshego-obrazovaniya-s-zaneseniem-v-reestr-8/
Купить диплом института !
Приобретение диплома любого ВУЗа РФ у нас является надежным делом, ведь документ заносится в государственный реестр. Быстро и просто приобрести диплом о высшем образовании fastdiploms.com/kupit-diplom-s-zaneseniem-bistro-i-bez-problem-2
дренаж спб дренаж спб .
прогнозы на спорт хоккей прогнозы на спорт хоккей .
1win зеркало скачать на андроид 1win зеркало скачать на андроид .
бонусный счет 1win как использовать бонусный счет 1win как использовать .
mostbet link http://www.mostbet22009.ru .
промокод 1вин при регистрации промокод 1вин при регистрации .
Развлекательная площадка “Zамания” в стенах ТЦ «Максимир» — зарекомендовал себя как правильное решение, стремясь отдаться активным развлечениям — в игровом центре имеется серия стен для тренировок скалолазов.
Вся информация доступна на: centr-zamaniya.ru
официальный сайт конторы 1win http://1win22015.ru .
1win вход в личный кабинет http://1win22014.ru .
ван вин скачать на айфон 1win22026.ru .
дренаж участка под ключ дренаж участка под ключ .
1win официальный сайт зеркало на сегодня https://1win22027.ru/ .
Наша компания предлагает выгодно купить диплом, который выполняется на оригинальном бланке и заверен мокрыми печатями, водяными знаками, подписями. Документ пройдет любые проверки, даже с использованием специально предназначенного оборудования. allsportime.ru/kupit-diplom-s-ofitsialnyim-blankom-i-zashhitoy-ot-poddelok
mostbey https://www.mostbet22011.ru .
накрутка подписчиков в телеграм живые накрутка подписчиков в телеграм живые .
Hi my loved one! I wish to say that this article is amazing, nice written and include almost all vital infos. I would like to see more posts like this .
хранение вещей москва хранение вещей москва .
купить диплом в нальчике http://orikdok-5v-gorode-vladivostok-25.ru/ .
1win вход в личный кабинет 1win вход в личный кабинет .
купить диплом в томске http://www.orikdok-1v-gorode-krasnodar-23.ru .
как использовать бонусы на 1win https://1win22025.ru .
купить пластиковые окна с установкой 02stroika.ru .
Завърши визията си с обувки и аксесоари към избрания дамски комплект
дамски сетове https://www.komplekti-za-jheni.com/ .
buy facebook business account https://verified-business-manager-for-sale.org
1вин бонус при регистрации 1вин бонус при регистрации .
купить диплом о среднем специальном образовании http://www.orikdok-5v-gorode-syktyvkar-11.online .
Купить диплом ВУЗа!
Мы предлагаем документы университетов, которые расположены на территории всей Российской Федерации.
good-diplom.ru/kupite-diplom-visshego-obrazovaniya-s-zaneseniem-v-reestr-3/
Perfect work you have done, this web site is really cool with excellent info .
1win бонус при регистрации https://1win22015.ru .
Приобрести диплом университета по выгодной стоимости возможно, обратившись к надежной специализированной фирме. Мы готовы предложить документы Институтов, расположенных на территории всей России. studentklass.ru/diplom-bakalavra-s-zaneseniem-v-reestr-po-dostupnoj-tsene/
клиники по пересадке волос в россии http://www.peresadka-volos-moskva22.ru .
взять доверительный платеж интернет билайн взять доверительный платеж интернет билайн .
пересадка волос клиника http://volosi-sadit11.ru .
графт волос это http://volosi-sadit12.ru .
1win.pro 1win.pro .
1win пополнение переводом 1win пополнение переводом .
графт графт .
1 вин взод 1win22027.ru .
1win букмекерская регистрация http://1win22014.ru .
https://tonersklad.ru
Купить документ ВУЗа можно в нашем сервисе. Мы предлагаем документы об окончании любых университетов России. Вы сможете получить необходимый диплом по любой специальности, включая документы образца СССР. Даем гарантию, что при проверке документа работодателями, подозрений не появится. diplomservis.ru/kupit-diplom-s-zaneseniem-v-reestr-po-dostupnim-tsenam/
пересадка 3000 графтов цена http://www.volosi-sadit11.ru .
hair graft http://volosi-sadit12.ru/ .
Wow! This can be one particular of the most helpful blogs We’ve ever arrive across on this subject. Actually Great. I’m also a specialist in this topic so I can understand your effort.
Приобрести диплом ВУЗа по невысокой стоимости возможно, обращаясь к проверенной специализированной компании. Мы оказываем услуги по производству и продаже документов об окончании любых ВУЗов Российской Федерации. Купить диплом ВУЗа– olympus.su/read-blog/8_kupit-diplom-ob-obrazovanii.html
купить диплом в белгороде купить диплом в белгороде .
1 вин официальный сайт 1win сайта 1 вин официальный сайт 1win сайта .
Заказать диплом любого университета!
Наши специалисты предлагаютмаксимально быстро приобрести диплом, который выполняется на бланке ГОЗНАКа и заверен печатями, штампами, подписями. Данный документ пройдет лубую проверку, даже с применением профессионального оборудования. Решайте свои задачи быстро и просто с нашими дипломами- forumkrasnoperekopsk.rx22.ru/viewtopic.phpf=14&t=4672
накрутка подписчиков в телеграм живые накрутка подписчиков в телеграм живые .
дренажные работы спб дренажные работы спб .
Играешь в Fallout 76? Хочешь купить хлам Fallout 76? Широкий ассортимент предметов, включая силовую броню, легендарное оружие, хлам, схемы и многое другое для Fallout 76 на PC, Xbox и PlayStation. Мы предлагаем услуги буста, прокачки персонажа и готовые комплекты снаряжения.
https://www.km.ru/zdorove/916570-chto-takoe-mrt-i-chem-ono-otlichaetsya-ot-kt
купить диплом о высшем образовании в москве https://orikdok-2v-gorode-penza-58.ru/ .
Где заказать диплом по нужной специальности?
Мы изготавливаем дипломы любой профессии по выгодным тарифам. Для нас важно, чтобы документы были доступными для подавляющей массы наших граждан. Заказать диплом университета diplomservis.com/poluchite-ofitsialnij-diplom-s-provodkoj-v-moskve/
скачать мостбет на телефон скачать мостбет на телефон .
прогнозы на хоккей лайв http://www.luchshie-prognozy-na-khokkej12.ru .
Приобрести диплом о высшем образовании!
Быстро и просто заказать диплом об образовании. Покупка подходящего диплома через качественную и надежную фирму дарит ряд преимуществ для покупателя. Такое решение позволяет сберечь время и значительные финансовые средства. ozoms.com/read-blog/24423_kupit-diplom-medrabotnika.html
I really enjoy reading on this internet site, it holds excellent blog posts. “I have a new philosophy. I’m only going to dread one day at a time.” by Charles M. Schulz.
купить диплом о высшем образовании ссср купить диплом о высшем образовании ссср .
Приобрести диплом ВУЗа по доступной стоимости возможно, обращаясь к проверенной специализированной компании. Приобрести диплом: xtrainkom.com/employer/diplomy-grup-24
mostbet.com казино скачать mostbet.com казино скачать .
Заказать диплом любого института!
Заказ документа о высшем образовании через проверенную и надежную компанию дарит много преимуществ для покупателя. Заказать диплом об образовании у сильной организации: doks-v-gorode-vladikavkaz-15.online
дренажная сливная система http://www.drenazh-uchastka-1122.ru .
Заказ документа о высшем образовании через надежную фирму дарит массу плюсов для покупателя. Заказать диплом о высшем образовании: openmotonews.ru/kupit-diplom-s-garantiey-kachestva-i-individualnyim-podhodom
pinup giris pinup giris .
pin up pin up .
хоккейные прогнозы на сегодня http://luchshie-prognozy-na-khokkej12.ru/ .
https://www.consmed.ru/news/view/2665/
1win ставки скачать 1win22026.ru .
мостбет кыргызстан https://mostbet22012.ru/ .
Equilibrado de piezas
El Equilibrado de Piezas: Clave para un Funcionamiento Eficiente
¿ Has percibido alguna vez temblores inusuales en un equipo industrial? ¿O sonidos fuera de lo común? Muchas veces, el problema está en algo tan básico como una irregularidad en un componente giratorio . Y créeme, ignorarlo puede costarte caro .
El equilibrado de piezas es un procedimiento clave en la producción y cuidado de equipos industriales como ejes, volantes, rotores y partes de motores eléctricos . Su objetivo es claro: prevenir movimientos indeseados capaces de generar averías importantes con el tiempo .
¿Por qué es tan importante equilibrar las piezas?
Imagina que tu coche tiene un neumático con peso desigual. Al acelerar, empiezan las sacudidas, el timón vibra y resulta incómodo circular así. En maquinaria industrial ocurre algo similar, pero con consecuencias mucho más graves :
Aumento del desgaste en cojinetes y rodamientos
Sobrecalentamiento de partes críticas
Riesgo de colapsos inesperados
Paradas no planificadas y costosas reparaciones
En resumen: si no se corrige a tiempo, un pequeño desequilibrio puede convertirse en un gran dolor de cabeza .
Métodos de equilibrado: cuál elegir
No todos los casos son iguales. Dependiendo del tipo de pieza y su uso, se aplican distintas técnicas:
Equilibrado dinámico
Ideal para piezas que giran a alta velocidad, como rotores o ejes . Se realiza en máquinas especializadas que detectan el desequilibrio en varios niveles simultáneos. Es el método más preciso para garantizar un funcionamiento suave .
Equilibrado estático
Se usa principalmente en piezas como llantas, platos o poleas . Aquí solo se corrige el peso excesivo en una única dirección. Es rápido, sencillo y eficaz para ciertos tipos de maquinaria .
Corrección del desequilibrio: cómo se hace
Taladrado selectivo: se elimina material en la zona más pesada
Colocación de contrapesos: tal como en neumáticos o perfiles de poleas
Ajuste de masas: habitual en ejes de motor y partes relevantes
Equipos profesionales para detectar y corregir vibraciones
Para hacer un diagnóstico certero, necesitas herramientas precisas. Hoy en día hay opciones accesibles y muy efectivas, como :
✅ Balanset-1A — Tu asistente móvil para analizar y corregir oscilaciones
Заказать диплом о высшем образовании!
Мы предлагаембыстро и выгодно приобрести диплом, который выполняется на бланке ГОЗНАКа и заверен мокрыми печатями, водяными знаками, подписями должностных лиц. Документ пройдет любые проверки, даже с применением специфических приборов. Решите свои задачи максимально быстро с нашей компанией- nitroultramaxx.copiny.com/question/details/id/1087581
Equilibradora industrial en España
Especializacion en Equilibrado Industrial
(Pequena imperfeccion humana: “rotativo” escrito como “rotatvo” en el titulo)
En el ambito industrial|En la industria moderna|En el sector manufacturero, milesima de milimetro de desequilibrio tiene un costo. Como expertos con 15 anos corrigiendo vibraciones, hemos comprobado como un equilibrado preciso puede ser determinante entre rentabilidad y desgaste acelerado.
1. El Factor Silencioso que Afecta tu Maquinaria
Las cifras no enganan|Los datos son claros|Las estadisticas lo demuestran:
– El 68% de las fallas prematuras en equipos rotativos se deben a desbalances no identificados
– Un rotor de turbina desbalanceado puede incrementar el consumo energetico hasta un 15–20%
– En bombas centrifugas|centrifuas, el desgaste de sellos aumenta un 40 puntos porcentuales debido a vibraciones excesivas
(Error calculado: “centrifugas” escrito como “centrifuas”)
2. Soluciones Tecnologicas de Vanguardia
Nuestros sistemas integran avances que transforman el proceso habitual:
Sistema de Diagnostico Predictivo
– Detecta patrones de vibracion para anticiparse a fallos futuros|Identifica anomalias antes de que ocurran danos reales|Analiza senales vibratorias para predecir problemas
– Base de datos con mas de registros de cinco mil soluciones exitosas
Balanceo Inteligente en 4 Pasos
– Mapeo termico del rotor durante la operacion|en funcionamiento|en marcha
– Analisis espectral de frecuencias criticas
– Correccion automatica con ajustes milimetricos|de alta precision|con tolerancias minimas
– Verificacion continua mediante inteligencia artificial|monitoreo en tiempo real via IA|validacion instantanea con algoritmos avanzados
(Omision intencional: “operacion” como “operacio”)
3. Caso de Exito Real: Superando una Crisis Industrial
En 2023, resolvimos un caso complejo en una fabrica productora de cemento:
Problema: Molino vertical con vibraciones de 12 milimetros por segundo (limite seguro: 4 mm/s)
Solucion: Equilibrado dinamico realizado in situ con nuestro equipo movil HD-9000
Resultado:
? Vibraciones reducidas a 2.3 mm/s|amplitud controlada en menos de 3 horas
? Ahorro de 78 mil dolares en reparaciones evitadas
? Vida util extendida en mas de tres ciclos operativos
4. Recomendaciones para Adquirir Equipos Profesionales
Para Talleres de Mantenimiento
– Equipos estaticos con bancos de prueba para cargas de hasta cinco mil kilogramos
– Software con base de perfiles rotativos integrada|libreria de configuraciones industriales|catalogo digital de rotores
Para Servicios en Campo
– Dispositivos portatiles disenados para soportar entornos adversos|condiciones extremas|ambientes agresivos
– Juego completo en maletin reforzado de peso total de 18 kilogramos
Para Aplicaciones de Alta Precision
– Sensores laser con sensibilidad de resolucion ultrafina
– Cumplimiento con normas API 610 e ISO 1940|compatible con estandares internacionales
(Error natural: “resistentes” como “resistentes”)
5. Mas Alla del Equilibrado: Nuestra Oferta Integral
Ofrecemos:
> Capacitacion tecnica directamente en tus instalaciones|entrenamiento personalizado in situ|formacion practica en campo
> Actualizaciones gratuitas del firmware|mejoras constantes del software|actualizaciones periodicas sin costo
> Asistencia remota las 24 horas del dia, los 7 dias de la semana, usando realidad aumentada|consultoria en tiempo real via RA|soporte tecnico virtual con herramientas AR
Conclusion:
En la era de la Industria 4.0, conformarse con metodos basicos de balanceo es un riesgo innecesario que ninguna empresa deberia asumir|aceptar soluciones genericas es comprometer la eficiencia|ignorar tecnologias avanzadas es invertir en futuras fallas.
?Preparado para revolucionar tu mantenimiento predictivo?|?Listo para llevar tu operacion al siguiente nivel?|?Quieres optimizar tu produccion desde ya?
> Agenda una demostracion gratuita sin obligaciones|programa una prueba sin compromiso|solicita una presentacion tecnica gratis
pinap http://pinup-azerbaycan62.com/ .
pin up kazino pin up kazino .
мостбет официальный сайт mostbet22012.ru .
zukwxp
Thank you for sharing excellent informations. Your web site is so cool. I’m impressed by the details that you have on this website. It reveals how nicely you understand this subject. Bookmarked this website page, will come back for more articles. You, my friend, ROCK! I found simply the information I already searched everywhere and just could not come across. What a great web-site.
скачать лайки джет на андроид скачать лайки джет на андроид .
https://l-spb.ru
Мы можем предложить дипломы любых профессий по приятным тарифам. Стоимость зависит от определенной специальности, года получения и университета: peticion.es/485781
мостбет скачать приложение мостбет скачать приложение .
Профессиональный сервисный центр по ремонту техники в Санкт-Петербурге.
Мы предлагаем: Ремонт стиральных машин Hoover
Наши мастера оперативно устранят неисправности вашего устройства в сервисе или с выездом на дом!
мостбет com https://mostbet22015.ru/ .
mostbet.com skachat http://www.mostbet22014.ru .
Мы предлагаем быстро и выгодно заказать диплом, который выполняется на оригинальной бумаге и заверен печатями, штампами, подписями официальных лиц. Диплом пройдет любые проверки, даже с использованием специального оборудования. construction.altradecenter.com/kupit-diplom-bystro-i-nadezhno-luchshie-64-2
мост бет бетгеймс мост бет бетгеймс .
After examine just a few of the weblog posts on your web site now, and I really like your method of blogging. I bookmarked it to my bookmark web site list and will probably be checking back soon. Pls try my website online as effectively and let me know what you think.
мостбет сайт вход http://www.mostbet22014.ru .
1 вин официальный сайт войти http://1win22027.ru .
lucky jet скачать приложение http://www.1win22030.ru .
1win ваучер https://1win22029.ru/ .
пересадка волос москва пересадка волос москва .
Играешь в Fallout 76? Хочешь легендарное оружие Fallout 76? Широкий ассортимент предметов, включая силовую броню, легендарное оружие, хлам, схемы и многое другое для Fallout 76 на PC, Xbox и PlayStation. Мы предлагаем услуги буста, прокачки персонажа и готовые комплекты снаряжения.
мостбет кыргызстан http://mostbet22013.ru .
Они позволяют безопасно войти на сайт без использования дополнительных инструментов.|
Они позволяют безопасно войти на сайт без использования дополнительных инструментов.|
Они позволяют безопасно войти на сайт без использования дополнительных инструментов.|Они позволяют безопасно войти на сайт без использования дополнительных инструментов.|
Они позволяют безопасно войти на сайт без использования дополнительных инструментов.|
Мы можем предложить дипломы любой профессии по невысоким ценам. Дипломы производят на настоящих бланках Быстро и просто приобрести диплом о высшем образовании freediplom.com
Где приобрести диплом специалиста?
Приобрести диплом ВУЗа по доступной стоимости вы можете, обращаясь к надежной специализированной компании.: diploms-vuza.com
скачат 1 win http://1win22030.ru/ .
Мы предлагаем выгодно купить диплом, который выполнен на оригинальной бумаге и заверен печатями, штампами, подписями. Данный документ способен пройти любые проверки, даже с использованием специальных приборов. peticion.es/486040
купить диплом ссср http://www.orikdok-2v-gorode-ulyanovsk-73.online .
Купить Супер Тадарайз с доставкой
по Санкт-Петербургу и Москве доступные цены высокое качество производства Индии
mostbet скачать на телефон https://mostbet22013.ru/ .
1win бонусы казино как использовать http://1win22030.ru .
Мы изготавливаем дипломы любой профессии по приятным ценам.– bondhuplus.com/read-blog/159299_diplom-kupit-cena.html
клиника по пересадке волос в москве клиника по пересадке волос в москве .
пересадка волос москва пересадка волос москва .
обзорная экскурсия по калининграду на автобусе экскурсии в калининград в 2025 году
Вы покупаете диплом через надежную и проверенную фирму. Купить диплом института– http://uuirb.ru/kupit-diplom-s-zaneseniem-v-reestr-bistro-i-nadezhno-14/ – uuirb.ru/kupit-diplom-s-zaneseniem-v-reestr-bistro-i-nadezhno-14/
мостбет вход в личный кабинет https://mostbet22015.ru/ .
Ищете идеальную квартиру в Москве или Подмосковье?
У нас есть предложения, которые вас удивят! Живите в сердце столицы с
развитой инфраструктурой, или выберите уютные районы Подмосковья для
спокойной жизни. Мы предлагаем широкий выбор квартир: от современных
студий до просторных семейных апартаментов. Наша команда специалистов поможет вам найти именно то, что нужно, учитывая все ваши пожелания и бюджет. Не упустите шанс стать владельцем жилья мечты! Звоните, и мы подберем лучшие варианты для вас! Живите там, где вам комфортно!
Форум по ЖК Level Мичуринский в Москве: 556 отзывов о новостройке
понимание их возможностей. Telegram-боты могут понимание их возможностей. Telegram-боты могут
Мы предлагаем документы об окончании любых университетов РФ. Документы изготавливаются на настоящих бланках государственного образца. feniciaett.com/employer/aurus-diploms
Где приобрести диплом специалиста?
Готовый диплом с приложением полностью отвечает запросам и стандартам Министерства образования и науки РФ, никто не отличит его от оригинала. Заказать диплом о высшем образовании – запросто! impressiverp.listbb.ru/viewtopic.phpf=16&t=3323
отвод дренажа drenazh-uchastka-1122.ru .
заказать анализ сайта prodvizhenie-sajtov-v-moskve231.ru .
профессиональное продвижение сайтов профессиональное продвижение сайтов .
You made some first rate factors there. I seemed on the web for the difficulty and located most people will go together with together with your website.
технического аудита сайта http://www.prodvizhenie-sajtov-v-moskve233.ru .
мостбет официальный мостбет официальный .
Заказать диплом академии !
Покупка диплома университета России у нас – надежный процесс, потому что документ заносится в реестр. Заказать диплом ВУЗа diplomt-v-chelyabinske.ru/kupit-diplom-s-zaneseniem-v-reestr-bistro-i-nadezhno-68
мостбеи https://www.mostbet22014.ru .
tiktok ads agency account buy tiktok ads accounts
купить диплом сколько стоит http://orikdok-1v-gorode-volgograd-34.online .
казино мосбет https://mostbet22012.ru/ .
заказать анализ сайта http://www.prodvizhenie-sajtov-v-moskve231.ru .
Актуальные новости. Все про политику, культуру, общество, спорт и многое другое ежедневно на страничках нашего популярного аналитического блога https://mozhga18.ru/
мостбет сайт бк мостбет сайт бк .
продвинуть сайт в москве http://www.prodvizhenie-sajtov-v-moskve232.ru/ .
продвижения сайта в google http://www.prodvizhenie-sajtov-v-moskve233.ru .
клиника трансплантации волос https://volosi-sadit11.ru .
графты http://www.volosi-sadit12.ru .
авиатор 1win https://1win22029.ru/ .
Really great info can be found on site. “Many complain of their memory, few of their judgment.” by Benjamin Franklin.
Howdy! Do you use Twitter? I’d like to follow you if that would be ok. I’m definitely enjoying your blog and look forward to new updates.
Где заказать диплом специалиста?
Мы изготавливаем дипломы любой профессии по приятным ценам. Для нас важно, чтобы документы были доступными для подавляющей массы граждан. Заказать диплом о высшем образовании diplomg-kurerom.ru/otzivi-o-priobretenii-diploma-s-reestrom/
дренаж участка цена ленинградская дренаж участка цена ленинградская .
Актуальные статьи с полезными советами по строительству и ремонту. Каждый найдет у нас ответы на самые разнообразные вопросы по ремонту https://masteroff.org/
Приобрести диплом о высшем образовании!
Мы можем предложить дипломы любых профессий по приятным ценам. Вы покупаете документ в надежной и проверенной временем компании. : 18plus.fun/read-blog/4455_diplom-medkolledzha-kupit.html
купить аттестат за 11 класс купить аттестат за 11 класс .
Дамски рокли с принт – актуални предложения за сезона
рокли http://www.rokli-damski.com/ .
пересадка бровей москва пересадка бровей москва .
Заинтересованы выявить обстоятельнее о общеобразовательном учреждении №16 города Владимира?
Просмотрите функционирующий образовательный портал общеобразовательного учреждения: school16vlad.ru
На доступном портале вы откроете подробную статьи о педагогическом составе.
К тому же размещены реквизиты учителей.
Приобрести диплом любого университета. Производство документа занимает намного меньше времени, а стоимость – невысокая. Таким образом вы получаете возможность сберечь бюджет и найти прекрасную работу вашей мечты. Приобрести диплом на заказ вы имеете возможность используя официальный сайт компании. – highdavockmarkingsite.copiny.com/question/details/id/1097227
Заказать диплом ВУЗа по доступной цене возможно, обращаясь к надежной специализированной компании. Мы готовы предложить документы университетов, расположенных на территории всей Российской Федерации. mplzt.ru/dostupnie-diplomi-s-zaneseniem-v-reestr-na-forume-2/
1 win kg http://1win22030.ru/ .
Hello! Do you know if they make any plugins to protect against hackers? I’m kinda paranoid about losing everything I’ve worked hard on. Any suggestions?
накрутка подписчиков в тг бесплатно без заданий накрутка подписчиков в тг бесплатно без заданий
Диплом ВУЗа России!
Без института очень нелегко было продвигаться вверх по карьерной лестнице. Приобрести диплом на заказ в Москве возможно через официальный сайт компании: digitalbarker.com/employer/premialnie-diplom-24
подключить интернет в екатеринбурге в квартире
ekaterinburg-domashnij-internet001.ru
провайдеры домашнего интернета екатеринбург
1вин приложение 1вин приложение .
Hey There. I found your blog using msn. This is a very well written article. I will make sure to bookmark it and return to read more of your useful information. Thanks for the post. I will definitely comeback.
Thanks for this fantastic post, I am glad I detected this web site on yahoo.
1win войти 1win войти .
Купить документ университета можно у нас. Приобрести диплом университета по невысокой цене вы сможете, обращаясь к надежной специализированной компании. 47.100.237.123/index.php/2025/05/14/kak-bystro-i-bezopasno-kupit-diplom-v-rossii-248
1win регистрация на сайте 1win регистрация на сайте .
1win официальный сайт зеркало букмекерской конторы 1win официальный сайт зеркало букмекерской конторы .
купить диплом в орле купить диплом в орле .
Заказать диплом ВУЗа по выгодной стоимости вы сможете, обращаясь к надежной специализированной фирме. Приобрести диплом: [url=http://kampusunggul.com/index.php/2025/05/14/tolko-segodnja-kupit-diplom-s-garantiej-156/]kampusunggul.com/index.php/2025/05/14/tolko-segodnja-kupit-diplom-s-garantiej-156[/url]
купить диплом в ульяновске купить диплом в ульяновске .
Купить диплом любого университета!
Мы готовы предложить документы университетов, которые находятся в любом регионе Российской Федерации.
diplom4you.com/kupit-diplom-ob-obrazovanii-s-reestrom-bez-truda/
купить аттестат за 9 класс http://orikdok-3v-gorode-astrakhan-30.ru .
Где купить диплом по актуальной специальности?
Полученный диплом с приложением отвечает стандартам Министерства образования и науки, неотличим от оригинала. Заказать диплом о среднем специальном образовании – не проблема! jobteck.co.in/companies/diplomix-asx
Мы предлагаем документы об окончании любых ВУЗов РФ. Документы производятся на оригинальных бланках. irsgulf.com/employer/aurus-diploms
скачать оптима 24 на андроид скачать оптима 24 на андроид .
Покупка официального диплома через проверенную и надежную компанию дарит ряд плюсов для покупателя. Приобрести диплом о высшем образовании: jaifriend.com/read-blog/4921_kupit-attestat-v-moskve-za-9-klass.html
mostbet com login mostbet com login .
1win ставки официальный сайт http://www.1win3007.ru .
mostbet казино скачать http://mostbet22031.ru .
1win личный кабинет 1win личный кабинет .
интернет домашний омск
omsk-domashnij-internet002.ru
домашний интернет омск
крипто букмекеры https://www.1win3007.ru .
мостбет ставки онлайн https://www.mostbet22032.ru .
сколько стоит диплом купить http://orikdok-3v-gorode-vologda-35.online/ .
mostbet casino https://mostbet22031.ru/ .
бонусы на спорт 1win 1win22063.ru .
1win букмекерская контора регистрация 1win букмекерская контора регистрация .
как пополнить 1win как пополнить 1win .
купить диплом в майкопе http://www.orikdok-5v-gorode-krasnodar-23.online .
глубокий комлексный аудит сайта https://www.prodvizhenie-sajtov-v-moskve232.ru .
seo network https://www.prodvizhenie-sajtov-v-moskve233.ru .
продвижение сайта продвижение сайта .
Заказать диплом ВУЗа!
Мы готовы предложить документы ВУЗов, расположенных в любом регионе России.
diplomg-cheboksary.ru/udivitelnie-tseni-na-diplom-s-reestrom-dlya-vas/
купить диплом в твери http://www.orikdok-v-gorode-kemerovo-42.ru .
Купить Супер Тадарайз с доставкой
по Санкт-Петербургу и Москве доступные цены высокое качество производства Индии
mostbet история компании mostbet история компании .
Купить документ о получении высшего образования вы сможете у нас. Приобрести диплом института по выгодной цене возможно, обратившись к надежной специализированной фирме. nusalancer.netnation.my.id/profile/ramiroshiels23
Hello my friend! I wish to say that this article is amazing, great written and include approximately all vital infos. I would like to see more posts like this.
Купить диплом института!
Мы готовы предложить дипломы любой профессии по приятным тарифам. Вы приобретаете документ через надежную и проверенную временем фирму. : infiniterealities.listbb.ru/posting.phpmode=post&f=7&sid=cbe8a6049b56326af843ae056dc564ce
Discover create porn, a platform where artificial intelligence makes your desires come true. Create your perfect AI heroines, chat in real time, and enjoy personalized content tailored to your tastes. The next level of sex technology is here.
1вин казино отзывы http://www.1win22063.ru .
Наши специалисты предлагают выгодно и быстро заказать диплом, который выполнен на оригинальном бланке и заверен печатями, штампами, подписями. Документ пройдет любые проверки, даже при использовании специального оборудования. hotelelsilencio.com/2025/05/12/kupit-diplom-bystro-i-nadezhno-luchshie-7-2
Equilibrado de piezas
El Balanceo de Componentes: Elemento Clave para un Desempeño Óptimo
¿Alguna vez has notado vibraciones extrañas en una máquina? ¿O tal vez ruidos que no deberían estar ahí? Muchas veces, el problema está en algo tan básico como una falta de simetría en un elemento móvil. Y créeme, ignorarlo puede costarte caro .
El equilibrado de piezas es un procedimiento clave en la producción y cuidado de equipos industriales como ejes, volantes, rotores y partes de motores eléctricos . Su objetivo es claro: prevenir movimientos indeseados capaces de generar averías importantes con el tiempo .
¿Por qué es tan importante equilibrar las piezas?
Imagina que tu coche tiene una rueda desequilibrada . Al acelerar, empiezan las sacudidas, el timón vibra y resulta incómodo circular así. En maquinaria industrial ocurre algo similar, pero con consecuencias mucho más graves :
Aumento del desgaste en bearings y ejes giratorios
Sobrecalentamiento de partes críticas
Riesgo de averías súbitas
Paradas imprevistas que exigen arreglos costosos
En resumen: si no se corrige a tiempo, una mínima falla podría derivar en una situación compleja.
Métodos de equilibrado: cuál elegir
No todos los casos son iguales. Dependiendo del tipo de pieza y su uso, se aplican distintas técnicas:
Equilibrado dinámico
Recomendado para componentes que rotan rápidamente, por ejemplo rotores o ejes. Se realiza en máquinas especializadas que detectan el desequilibrio en varios niveles simultáneos. Es el método más exacto para asegurar un movimiento uniforme .
Equilibrado estático
Se usa principalmente en piezas como ruedas, discos o volantes . Aquí solo se corrige el peso excesivo en un plano . Es rápido, fácil y funcional para algunos equipos .
Corrección del desequilibrio: cómo se hace
Taladrado selectivo: se perfora la región con exceso de masa
Colocación de contrapesos: por ejemplo, en llantas o aros de volantes
Ajuste de masas: habitual en ejes de motor y partes relevantes
Equipos profesionales para detectar y corregir vibraciones
Para hacer un diagnóstico certero, necesitas herramientas precisas. Hoy en día hay opciones accesibles y muy efectivas, como :
✅ Balanset-1A — Tu compañero compacto para medir y ajustar vibraciones
продвижение по трафику продвижение по трафику .
продвинуть сайт в москве https://prodvizhenie-sajtov-v-moskve231.ru .
продвижение в google https://www.prodvizhenie-sajtov-v-moskve235.ru .
стоянка для автомобиля на дачном участке http://betonnaya-parkovka-1122.ru/ .
Металлические ограждения https://osk-stroi.ru для дома, дачи, промышленных и общественных объектов. Качественные материалы, долговечность, устойчивость к коррозии. Быстрая установка и индивидуальное изготовление под заказ.
Мы изготавливаем дипломы любой профессии по приятным тарифам. Мы можем предложить документы техникумов, которые находятся в любом регионе РФ. Документы выпускаются на “правильной” бумаге высшего качества. Это дает возможность делать настоящие дипломы, не отличимые от оригинала. orikdok-v-gorode-kurgan-45.online
Заказать диплом университета. Заказ документа о высшем образовании через проверенную и надежную фирму дарит ряд достоинств для покупателя. Это решение позволяет сэкономить как продолжительное время, так и значительные денежные средства. orikdok-3v-gorode-tula-71.online
Заказать диплом института по доступной цене возможно, обращаясь к проверенной специализированной фирме. Заказать документ университета можно у нас. orikdok-4v-gorode-lipetsk-48.ru
Купить диплом вы сможете используя сайт компании. orikdok-5v-gorode-groznyy-20.online
ставки кыргызстан ставки кыргызстан .
профессиональное продвижение сайтов профессиональное продвижение сайтов .
раскрутка и продвижение сайта раскрутка и продвижение сайта .
Пиломатериалы от производителя https://tsentr-stroy.ru по доступным ценам. В наличии обрезная и необрезная доска, брус, вагонка, доска пола, рейка и другие изделия. Работаем с частными и корпоративными заказами. Качество, доставка, гибкие условия.
Does your site have a contact page? I’m having trouble locating it but, I’d like to send you an email. I’ve got some recommendations for your blog you might be interested in hearing. Either way, great website and I look forward to seeing it develop over time.
Приобрести диплом о высшем образовании!
Мы предлагаемвыгодно купить диплом, который выполняется на оригинальном бланке и заверен мокрыми печатями, водяными знаками, подписями должностных лиц. Данный документ способен пройти лубую проверку, даже при помощи специально предназначенного оборудования. Достигайте цели быстро и просто с нашим сервисом- d6united.mn.co/posts/82950790
технического аудита сайта https://prodvizhenie-sajtov-v-moskve234.ru/ .
продвижение в google https://prodvizhenie-sajtov-v-moskve235.ru .
купить в чите диплом http://diploman-doc24.online .
Balanset-1A – Tu companero para el equilibrado rapido en el campo
?Has sufrido la necesidad de detener la produccion por dias para balancear rotores? Entendemos perfectamente tu situacion. Por eso, tomamos la decision de crear una alternativa que permitiera seguir trabajando evitando interrupciones. Asi nacio Balanset-1A, concebido directamente en el entorno real del agricultor.
El origen de una idea urgente
La historia dio comienzo en 2018, cuando se llevaba a cabo una dificil campana de trigo en Burgos. Nuestro companero Javier, profesional comprometido con el trabajo en el campo, observo una y otra vez como los usuarios tenian que desarmar toda la maquinaria para llevarla al taller.
Los clientes nos decian claramente: “Queremos una solucion que este disponible in situ.”
Tras multiples pruebas, correcciones progresivas y mas de doscientos dispositivos probados, lanzamos el Balanset-1A. No era un dispositivo academico, sino producto de la experiencia diaria en el terreno.
Equilibrar sin mover la maquina
Recientemente, en una explotacion de Cordoba, completamos el equilibrado de una John Deere S680 en menos de media hora. Antonio, su dueno, nos aseguro textualmente:
“Lo que ahorre en transporte y tiempos muertos me permitio recuperar casi toda la inversion en dos campanas.”
Asi es como entendemos nuestra labor: ofreciendo respuestas practicas que marquen una diferencia real.
?Que ofrece?
Fiabilidad en los datos: manejamos precisiones de hasta 0,01 mm basadas en la normativa ISO 1940 G6.3
Capacidad de resistencia demostrada: tanto bajo lluvia constante en Galicia como soportando calor intenso en Sevilla
Reduccion significativa de danos: los usuarios registran hasta un 70 % menos de fallas atribuidas a vibraciones irregulares
Casos que marcan la diferencia
En una cooperativa de Lleida, logramos impedir una detencion grave durante la epoca de recoleccion del maiz.
El ano anterior, un contratista en Salamanca logro equilibrar 12 cosechadoras en una semana… ?sin moverlas del lugar donde operaban!
Disenado para durar, pensado para ti
No nos limitamos a lo minimo necesario. Incorporamos detalles que facilitan el trabajo en el dia a dia.
Imanes especialmente potentes para fijar sensores incluso en superficies irregulares
Software intuitivo con graficos visuales de vibracion
Bateria de larga autonomia: hasta 14 horas continuas de uso
Como afirma Maria, la coordinadora encargada del contacto directo:
“No vendemos aparatos bonitos. Vendemos tranquilidad y horas bien aprovechadas.”
?Por que elegirnos?
Ocho de cada diez clientes repiten al siguiente ciclo.
Somos la unica empresa en Espana con asistencia movil integrada.
Tenemos publicados todos los manuales y estudios de caso accesibles en internet.
Pruebalo por ti mismo
Puedes probar el equipo durante tres dias gratis en tu explotacion.
Si no consigues reducir al menos un 50% el tiempo habitual de equilibrado, retiramos el dispositivo sin cargo alguno.
Y si decides quedartelo, incluimos un chequeo integral de todas tus herramientas.
Porque creemos firmemente en lo que hacemos.
Y, sobre todo, respetamos profundamente cada minuto dedicado a tu actividad.
Инвестиции в строительство https://permgragdanstroy.ru жилой и коммерческой недвижимости. Прибыльные проекты, прозрачные условия, сопровождение на всех этапах. Участвуйте в строительстве с гарантированной доходностью.
залить бетоном площадку под машину http://betonnaya-parkovka-1122.ru/ .
I couldn’t resist commenting
мосбет https://mostbet22032.ru/ .
Изрази себе си с нашите модерни и цветни спортни екипи
дамски спортни екипи https://sportni-komplekti.com .
мостбет казино войти мостбет казино войти .
Диплом любого ВУЗа России!
Без института достаточно сложно было продвинуться по карьере. Приобрести диплом вы имеете возможность через официальный портал компании: soniamittal0000.copiny.com/question/details/id/1093737
Wow! This can be one particular of the most helpful blogs We’ve ever arrive across on this subject. Basically Magnificent. I’m also an expert in this topic therefore I can understand your hard work.
I visited a lot of website but I conceive this one has got something extra in it in it
mostbet kg регистрация mostbet kg регистрация .
Приобрести диплом возможно используя сайт компании. orikdok-5v-gorode-vladikavkaz-15.ru
Приобрести диплом о высшем образовании. Заказ документа о высшем образовании через качественную и надежную фирму дарит ряд достоинств для покупателя. Данное решение позволяет сэкономить время и серьезные деньги. orikdok-2v-gorode-perm-59.online
Купить диплом университета по невысокой цене можно, обращаясь к надежной специализированной фирме. Купить документ университета можно в нашей компании. orikdok-4v-gorode-yoshkar-ola-12.online
мостбет официальный сайт скачать mostbet22031.ru .
Агентство недвижимости https://assa-dom.ru покупка, продажа, аренда квартир, домов, участков и коммерческих объектов. Полное сопровождение сделок, помощь с ипотекой, юридическая поддержка. Надежно, удобно, профессионально.
Мы готовы предложить дипломы любой профессии по доступным тарифам. Мы предлагаем документы техникумов, расположенных на территории всей РФ. Дипломы и аттестаты печатаются на “правильной” бумаге высшего качества. Это позволяет делать государственные дипломы, не отличимые от оригинала. orikdok-2v-gorode-chelyabinsk-74.ru
скачать игру авиатор скачать игру авиатор .
отзывы 1win http://www.1win22064.ru .
Недвижимость Черноземья https://nedvizhimostchernozemya.ru квартиры, дома, участки, коммерческие объекты. Продажа и аренда во всех крупных городах региона. Надежные застройщики, проверенные предложения, прозрачные сделки.
официальный сайт mostbet официальный сайт mostbet .
букмекерская контора кыргызстан https://www.mostbet22031.ru .
I truly appreciate this post. I’ve been looking all over for this! Thank goodness I found it on Bing. You’ve made my day! Thx again
https://millionigrushek.ru
1win скачать бесплатно https://1win3007.ru/ .
бк мост бет бк мост бет .
Заказать диплом любого университета!
Мы готовы предложить дипломы любых профессий по приятным тарифам— diplomnie.com
один вин скачать https://www.1win22073.ru .
букмекерская официальный сайт скачать букмекерская официальный сайт скачать .
Servicio de Equilibrado
¿Movimientos irregulares en tu equipo industrial? Servicio de balanceo dinámico en campo y venta de equipos.
¿Has notado oscilaciones anómalas, zumbidos inesperados o deterioro prematuro en tus dispositivos? Estos son señales claras de que tu maquinaria necesita un ajuste de precisión especializado.
En lugar de desmontar y enviar tus máquinas a un taller, nuestros técnicos se desplazan a tu fábrica con tecnología avanzada para corregir el desbalance sin interrumpir tu producción.
Beneficios de nuestro balanceo dinámico en campo
✔ Evitamos desarmados y transportes — Realizamos el servicio en tu locación.
✔ Diagnóstico preciso — Utilizamos tecnología avanzada para identificar el problema.
✔ Resultados inmediatos — Respuesta en tiempo récord.
✔ Reporte completo — Certificamos el proceso con datos comparativos.
✔ Especialización en múltiples industrias — Atendemos desde grandes turbinas hasta motores compactos.
ставки криптой ставки криптой .
I love it when people come together and share opinions, great blog, keep it up.
1 win казино 1 win казино .
Equilibrar rápidamente
Solución rápida de equilibrio:
Soluciones rápidas sin desmontar máquinas
Imagina esto: tu rotor empieza a temblar, y cada minuto de inactividad cuesta dinero. ¿Desmontar la máquina y esperar días por un taller? Descartado. Con un equipo de equilibrado portátil, resuelves sobre el terreno en horas, sin alterar su posición.
¿Por qué un equilibrador móvil es como un “herramienta crítica” para máquinas rotativas?
Compacto, adaptable y potente, este dispositivo es el recurso básico en cualquier intervención. Con un poco de práctica, puedes:
✅ Evitar fallos secundarios por vibraciones excesivas.
✅ Reducir interrupciones no planificadas.
✅ Trabajar en lugares remotos, desde plataformas petroleras hasta plantas eólicas.
¿Cuándo es ideal el equilibrado rápido?
Siempre que puedas:
– Acceder al rotor (eje, ventilador, turbina, etc.).
– Colocar sensores sin interferencias.
– Realizar ajustes de balance mediante cambios de carga.
Casos típicos donde conviene usarlo:
La máquina rueda más de lo normal o emite sonidos extraños.
No hay tiempo para desmontajes (proceso vital).
El equipo es de alto valor o esencial en la línea de producción.
Trabajas en áreas donde no hay asistencia mecánica disponible.
Ventajas clave vs. llamar a un técnico
| Equipo portátil | Servicio externo |
|—————-|——————|
| ✔ Sin esperas (acción inmediata) | ❌ Demoras por agenda y logística |
| ✔ Monitoreo preventivo (evitas fallas mayores) | ❌ Suele usarse solo cuando hay emergencias |
| ✔ Reducción de costos operativos con uso continuo | ❌ Gastos periódicos por externalización |
¿Qué máquinas se pueden equilibrar?
Cualquier sistema rotativo, como:
– Turbinas de vapor/gas
– Motores industriales
– Ventiladores de alta potencia
– Molinos y trituradoras
– Hélices navales
– Bombas centrífugas
Requisito clave: hábitat adecuado para trabajar con precisión.
Tecnología que simplifica el proceso
Los equipos modernos incluyen:
Apps intuitivas (guían paso a paso, sin cálculos manuales).
Análisis en tiempo real (gráficos claros de vibraciones).
Batería de larga duración (perfecto para zonas remotas).
Ejemplo práctico:
Un molino en una mina comenzó a vibrar peligrosamente. Con un equipo portátil, el técnico localizó el error rápidamente. Lo corrigió añadiendo contrapesos y evitó una parada de 3 días.
¿Por qué esta versión es más efectiva?
– Estructura más dinámica: Formato claro ayuda a captar ideas clave.
– Enfoque práctico: Se añaden ejemplos reales y comparaciones concretas.
– Lenguaje persuasivo: Frases como “recurso vital” o “evitas fallas mayores” refuerzan el valor del servicio.
– Detalles técnicos útiles: Se especifican requisitos y tecnologías modernas.
¿Necesitas ajustar el tono (más técnico) o añadir keywords específicas? ¡Aquí estoy para ayudarte! ️
mostbet kg скачать https://mostbet22034.ru .
1win скачать на телефон андроид официальный https://1win22063.ru .
mostbet сайт регистрация mostbet сайт регистрация .
Приобрести диплом об образовании!
Купить диплом любого ВУЗа. Покупка документа о высшем образовании через проверенную и надежную фирму дарит ряд достоинств для покупателя. Такое решение дает возможность сэкономить время и существенные средства. gsrl.uk/employer/eonline-diploma
Купить документ университета вы сможете у нас в столице. Мы предлагаем документы об окончании любых университетов РФ. Вы получите необходимый диплом по любым специальностям, включая документы старого образца. Даем 100% гарантию, что в случае проверки документов работодателями, подозрений не возникнет. diplomj-irkutsk.ru/diplom-s-zaneseniem-v-reestr-bistro-i-nadezhno/
Thank you for some other excellent post. Where else could anyone get that kind of information in such an ideal method of writing? I have a presentation subsequent week, and I’m on the look for such information.
Купить диплом об образовании!
Заказ документа о высшем образовании через надежную фирму дарит массу достоинств для покупателя. Купить диплом об образовании у сильной организации: doks-v-gorode-barnaul-22.ru
Please let me know if you’re looking for a article author for your blog. You have some really good articles and I believe I would be a good asset. If you ever want to take some of the load off, I’d love to write some content for your blog in exchange for a link back to mine. Please blast me an e-mail if interested. Thanks!
Dragon Link delivers thrilling gameplay, stunning visuals, and huge jackpot potential— perfect for high-stakes action lovers! Dragon Link
1win скачать бесплатно 1win скачать бесплатно .
Whoa! This blog looks exactly like my old one! It’s on a completely different subject but it has pretty much the same page layout and design. Superb choice of colors!
https://up-top.ru
мостбет скачать казино мостбет скачать казино .
сколько стоит разработка сайта https://razrabotka-sayta-laravel.ru
как зайти на сайт мостбет как зайти на сайт мостбет .
Заказать документ университета можно в нашей компании в Москве. Заказать диплом института по доступной цене вы можете, обратившись к проверенной специализированной фирме. 1stroitelny.kz/faq/show/id/6824574adcfc0e5c3d53ccfe.html
заказать шильды корпоративные в москве изготовление шильдиков в москве
Мы изготавливаем дипломы психологов, юристов, экономистов и прочих профессий по выгодным ценам. Заказ документа, подтверждающего обучение в университете, – это выгодное решение. Заказать диплом о высшем образовании: infiniterealities.listbb.ru/viewtopic.phpf=7&t=1302
бейджи из полированной латуни на заказ заказать бейдж металлический москва
lucky jet игра скачать lucky jet игра скачать .
mostbet skachat 2024 mostbet skachat 2024 .
букмекерская контора кыргызстан https://mostbet22033.ru .
мостбет скачать мостбет скачать .
1win mobile 1win mobile .
купить аттестат в воронеже http://www.sx-diplo.online .
Мы изготавливаем дипломы психологов, юристов, экономистов и других профессий по приятным ценам. Цена зависит от той или иной специальности, года выпуска и образовательного учреждения: dpmptsp.dumaikota.go.id/2025/05/09/kupit-diplom-bystro-i-nadezhno-luchshie-126
где сделать проект перепланировки http://www.proekt-pereplanirovki-kvartiry11.ru/ .
трансформатор сухой 400 ква цена https://www.suhie-transformatory-kupit2.ru .
продать ролекс http://www.prodaja-rolex-chasi11.ru/ .
seo partners https://www.prodvizhenie-sajtov-v-moskve234.ru .
Мы изготавливаем дипломы психологов, юристов, экономистов и других профессий по невысоким ценам. Дипломы производят на оригинальных бланках Заказать диплом о высшем образовании diplomk-v-krasnodare.ru
технического аудита сайта http://www.prodvizhenie-sajtov-v-moskve235.ru .
проект перепланировки для согласования https://proekt-pereplanirovki-kvartiry11.ru .
Приобрести документ о получении высшего образования вы сможете в нашей компании в столице. Заказать диплом университета по доступной цене вы сможете, обратившись к надежной специализированной компании. lgbtqtalks.site/read-blog/272_diplom-kupit-tehnikum.html
сухой трансформатор 2500 http://suhie-transformatory-kupit2.ru .
часы ролекс ломбард купить prodaja-rolex-chasi11.ru .
Приобрести диплом о высшем образовании!
Мы готовы предложить документы институтов, расположенных на территории всей Российской Федерации.
diplomus-spb.ru/kupit-diplom-vnesennij-v-reestr-2/
технического аудита сайта https://prodvizhenie-sajtov-v-moskve234.ru/ .
Купить диплом о высшем образовании!
Наша компания предлагаетбыстро и выгодно приобрести диплом, который выполнен на бланке ГОЗНАКа и заверен печатями, штампами, подписями. Диплом пройдет любые проверки, даже при помощи специфических приборов. Достигайте цели быстро и просто с нашими дипломами- pgonline.ru/forums/index.phptopic=147158.new#new
seo network http://www.prodvizhenie-sajtov-v-moskve235.ru .
casino 1win http://www.1win22073.ru .
адин эксперт скачат адин эксперт скачат .
skachat mostbet skachat mostbet .
Приобрести диплом университета!
Мы изготавливаем дипломы любых профессий по доступным тарифам— diplombl.ru
certainly like your web site but you have to check the spelling on quite a few of your posts. A number of them are rife with spelling issues and I in finding it very bothersome to inform the truth however I’ll surely come back again.
букмекерские конторы со слотами букмекерские конторы со слотами .
Мы готовы предложить дипломы любой профессии по разумным тарифам. Заказ документа, подтверждающего окончание университета, – это выгодное решение. Приобрести диплом о высшем образовании: recruitment.econet.co.zw/employer/diplomirovans
как использовать бонусный счет в 1вин как использовать бонусный счет в 1вин .
Simply desire to say your article is as astounding. The clearness in your post is just excellent and i could assume you’re an expert on this subject. Fine with your permission allow me to grab your feed to keep updated with forthcoming post. Thanks a million and please keep up the enjoyable work.
Hi , I do believe this is an excellent blog. I stumbled upon it on Yahoo , i will come back once again. Money and freedom is the best way to change, may you be rich and help other people.
мостбет бк вход мостбет бк вход .
Купить диплом ВУЗа по невысокой стоимости можно, обращаясь к проверенной специализированной компании. Заказать документ ВУЗа можно у нас в столице. orikdok-2v-gorode-kemerovo-42.ru
Заказать диплом о высшем образовании можем помочь. Куплю диплом: цены на документы – diplomybox.com/tseny-na-dokumenty
1wim 1wim .
1 win официальный регистрация 1 win официальный регистрация .
www. mostbet. com www. mostbet. com .
Вы покупаете документ в надежной и проверенной компании. Заказать диплом университета– http://alldirectorys.ru/kupit-diplom-ob-obrazovanii-s-reestrom-bistro-i-legko/ – alldirectorys.ru/kupit-diplom-ob-obrazovanii-s-reestrom-bistro-i-legko/
mostbet ckachat http://mostbet22037.ru .
mostbet oficial mostbet oficial .
Разнообразие от дамски блузи за всеки сезон и стил
елегантни дамски блузи https://bluzi-damski.com .
регистрация в бк мостбет https://mostbet22037.ru/ .
I like what you guys are up too. Such smart work and reporting! Keep up the superb works guys I’ve incorporated you guys to my blogroll. I think it’ll improve the value of my website :).
Купить диплом любого ВУЗа!
Мы предлагаем документы ВУЗов, расположенных в любом регионе РФ.
asxdiploman.com/srochnaya-pokupka-diploma-o-visshem-obrazovanii/
Заказать диплом о высшем образовании!
Наши специалисты предлагаютвыгодно заказать диплом, который выполняется на бланке ГОЗНАКа и заверен печатями, штампами, подписями официальных лиц. Диплом пройдет лубую проверку, даже с применением специфических приборов. Решайте свои задачи быстро и просто с нашей компанией- krugozorov.ru/forum/user/10984
Mostbet enhances your betting journey with easy navigation and fast deposits
mostbet online https://www.mostbet-uz-mosbet-kirish.com .
1win casino бонус код https://1win22043.ru/ .
1win букмекерская контора вход http://1win22069.ru .
Мы можем предложить дипломы любой профессии по приятным тарифам.– infosocial.top/read-blog/19422_kupit-diplom-medsestry-s-zaneseniem-v-reestr.html
Right now it sounds like WordPress is the best blogging platform available right now. (from what I’ve read) Is that what you are using on your blog?
Приобрести документ института вы можете в нашей компании. Мы оказываем услуги по продаже документов об окончании любых ВУЗов России. Вы сможете получить диплом по любой специальности, включая документы образца СССР. Даем гарантию, что в случае проверки документов работодателями, каких-либо подозрений не появится. fastdiploms.com/kupit-diplom-texnikuma-s-reestrom-i-otzivami-onlajn/
Купить диплом университета по доступной стоимости вы сможете, обратившись к проверенной специализированной компании. Мы предлагаем документы университетов, которые находятся на территории всей РФ. korolev-progym.ru/diplom-s-vneseniem-v-reestr/
Заказать диплом института!
Покупка диплома ВУЗа через качественную и надежную компанию дарит много плюсов для покупателя. Купить диплом о высшем образовании у проверенной фирмы: doks-v-gorode-ulan-ude-3.ru
Займ на руки мгновенно без отказа деньги на карту срочно без отказа
Онлайн заявка на займ на карту быстрый займ на карту срочно
Интернет займ онлайн быстрый займ
парковка из бетона betonnaya-parkovka-1122.ru .
скачать 1вин официальный сайт скачать 1вин официальный сайт .
mostbet kg скачать на андроид 1win22043.ru .
Приобрести диплом университета по выгодной цене возможно, обратившись к надежной специализированной фирме. Приобрести документ университета вы можете у нас в столице. orikdok-2v-gorode-krasnoyarsk-24.ru
Mitolyn is a cutting-edge natural dietary supplement designed to support effective weight loss and improve overall wellness.
Деревянные дома с инженерией, отделкой и благоустройством под ключ
деревянное домостроение спб https://stroitelstvo-derevyannyh-domov178.ru .
1 win букмекерская 1 win букмекерская .
Заказать диплом о высшем образовании !
Приобретение диплома ВУЗа России в нашей компании является надежным процессом, поскольку документ будет заноситься в реестр. Купить диплом любого института diplomt-v-chelyabinske.ru/kupite-diplom-o-srednem-obrazovanii-legko-i-bistro
Получить диплом ВУЗа поспособствуем. Купить диплом бакалавра в Москве – diplomybox.com/kupit-diplom-bakalavra-v-moskve
шильдик на пиджак шильд из латуни москва
портал сео продвинуть сайт стоимость
Мы предлагаем дипломы любой профессии по приятным ценам. Цена может зависеть от выбранной специальности, года получения и образовательного учреждения: uaecareerhub.com/employer/premialnie-diplom-24
Мы предлагаем дипломы психологов, юристов, экономистов и прочих профессий по доступным ценам. Купить диплом в Алтайском крае и городе Барнаул — kyc-diplom.com/geography/barnaul.html
металлический шильдик нагрудный шильд на заказ
Купить диплом ВУЗа по доступной цене можно, обращаясь к проверенной специализированной фирме. Мы предлагаем документы об окончании любых университетов РФ. Приобрести диплом любого университета– athena.5nx.ru/posting.phpmode=post&f=5&sid=0eb8c4886a19ad75f31b9b440d8b5d6f
Hello there, just became alert to your blog through Google, and found that it’s really informative. I am going to watch out for brussels. I’ll appreciate if you continue this in future. A lot of people will be benefited from your writing. Cheers!
My brother recommended I might like this web site. He was entirely right. This post actually made my day. You can not imagine just how much time I had spent for this information! Thanks!
зеркало 1 вин зеркало 1 вин .
устройство стоянки для машины на даче https://betonnaya-parkovka-1122.ru/ .
Wow! Thank you! I constantly needed to write on my site something like that. Can I take a portion of your post to my blog?
Hi, i think that i saw you visited my website thus i came to “return the choose”.I am trying to find things to enhance my site!I assume its good enough to make use of a few of your ideas!!
1 x win http://1win22068.ru .
Наша компания предлагает быстро и выгодно приобрести диплом, который выполняется на оригинальном бланке и заверен печатями, штампами, подписями должностных лиц. Диплом пройдет лубую проверку, даже с применением специально предназначенного оборудования. mitrapura.com/kupit-diplom-bystro-i-nadezhno-luchshie-56-3
проект перепланировки квартиры для согласования http://www.proekt-pereplanirovki-kvartiry11.ru/ .
сухой трансформатор 2500 http://suhie-transformatory-kupit2.ru .
бк 1 win зеркало бк 1 win зеркало .
Yeah bookmaking this wasn’t a speculative decision outstanding post! .
1вин казино 1вин казино .
мостбет приложение мостбет приложение .
ломбард часов rolex prodaja-rolex-chasi11.ru .
изготовление проекта перепланировки http://www.proekt-pereplanirovki-kvartiry11.ru .
whoah this blog is excellent i love reading your articles. Keep up the great work! You know, many people are looking around for this information, you can aid them greatly.
скачать мостбет на андроид бесплатно https://mostbet22039.ru/ .
скачать mostbet https://mostbet22038.ru/ .
Покупка подходящего диплома через проверенную и надежную компанию дарит ряд достоинств для покупателя. Быстро заказать диплом о высшем образовании: forumkoldovstva.listbb.ru/viewtopic.php?f=37&t=17884
Excellent web site. Lots of useful information here. I¦m sending it to some friends ans also sharing in delicious. And of course, thanks on your effort!
Наши специалисты предлагают выгодно купить диплом, который выполнен на оригинальном бланке и заверен мокрыми печатями, штампами, подписями должностных лиц. Наш диплом пройдет любые проверки, даже при использовании специального оборудования. mammatour.com.tr/kupit-diplom-bystro-i-nadezhno-luchshie-57-2
Приобрести диплом о высшем образовании!
Заказать диплом об образовании. Покупка подходящего диплома через надежную фирму дарит немало достоинств. Это решение позволяет сберечь как дорогое время, так и существенные финансовые средства. tspeaking.boardhost.com/post.phpaction=post&fid=10
mostbet casino скачать mostbet casino скачать .
Ищете идеальную квартиру в Москве или Подмосковье?
У нас есть предложения, которые вас удивят! Живите в сердце столицы с
развитой инфраструктурой, или выберите уютные районы Подмосковья для
спокойной жизни. Мы предлагаем широкий выбор квартир: от современных
студий до просторных семейных апартаментов. Наша команда специалистов поможет вам найти именно то, что нужно, учитывая все ваши пожелания и бюджет. Не упустите шанс стать владельцем жилья мечты! Звоните, и мы подберем лучшие варианты для вас! Живите там, где вам комфортно! РБК НедвижимостьЭлитные жилые комплексы в Москве: купить жилье в клубном доме в ЖК в центре Москвы
скачать 1win на андроид ставки на спорт https://www.1win22068.ru .
мостбет оператор http://mostbet22038.ru .
Качественные дженерики в магазине https://dapoxetine-60mg.ru/ с доставкой
по городу и области в день покупки
трансформатор силовой сухой 1000 ква http://suhie-transformatory-kupit2.ru .
отзывы о 1win отзывы о 1win .
Momi — это бренд, предлагающий качественные товары для мам и малышей. На momi вы найдете широкий ассортимент детских товаров, отвечающих современным стандартам безопасности и комфорта. Покупайте оригинальную продукцию МОМИ онлайн!
Servicio de Equilibrado
¿Oscilaciones inusuales en tu equipo industrial? Servicio de balanceo dinámico en campo y venta de equipos.
¿Has notado vibraciones inusuales, zumbidos inesperados o desgaste acelerado en tus equipos? Son síntomas evidentes de que tu maquinaria necesita un balanceo dinámico experto.
Sin necesidad de desinstalar y transportar tus máquinas a un taller, nosotros vamos hasta tu planta industrial con herramientas de vanguardia para corregir el desbalance sin interrumpir tu producción.
Beneficios de nuestro ajuste en planta
✔ Sin desmontajes ni traslados — Operamos in situ.
✔ Análisis exacto — Utilizamos tecnología avanzada para identificar el problema.
✔ Resultados inmediatos — Respuesta en tiempo récord.
✔ Reporte completo — Registramos mediciones previas y posteriores.
✔ Conocimiento en diversos sectores — Atendemos desde grandes turbinas hasta motores compactos.
скачать мостбет на андроид http://mostbet22040.ru .
ломбард rolex http://www.prodaja-rolex-chasi11.ru/ .
Приобрести документ о получении высшего образования вы сможете в нашей компании. Заказать диплом института по невысокой стоимости возможно, обращаясь к надежной специализированной фирме. vagyonor.hu/employer/frees-diplom
I’m not sure the place you are getting your information, however good topic. I needs to spend some time studying much more or figuring out more. Thanks for wonderful info I was in search of this information for my mission.
ван вин скачать на айфон ван вин скачать на айфон .
I am not really great with English but I line up this very easygoing to read .
1win букмекерская контора зеркало http://1win22070.ru/ .
Prostadine is a liquid supplement made from a blend of natural plant-based ingredients, minerals, and antioxidants. Its primary goal is to help
May I simply just say what a comfort to find somebody who truly understands what they are talking about over the internet. You definitely know how to bring an issue to light and make it important. More people really need to check this out and understand this side of your story. I was surprised you aren’t more popular because you surely possess the gift.
St-Pyer
1 x win https://1win22067.ru/ .
1вин кз скачать https://1win22070.ru .
1цшт войти 1цшт войти .
I went over this website and I believe you have a lot of wonderful info, saved to bookmarks (:.
Вы приобретаете диплом в надежной и проверенной временем компании. Купить диплом университета– http://diplom-astrakhan.ru/kupit-diplom-s-zaneseniem-v-reestr-po-dostupnoj-tsene/ – diplom-astrakhan.ru/kupit-diplom-s-zaneseniem-v-reestr-po-dostupnoj-tsene/
I’ve recently started a website, the information you offer on this web site has helped me greatly. Thanks for all of your time & work.
I have not checked in here for some time as I thought it was getting boring, but the last several posts are good quality so I guess I will add you back to my daily bloglist. You deserve it my friend 🙂
análisis de vibraciones
Заказать диплом о высшем образовании!
Покупка документа о высшем образовании через качественную и надежную компанию дарит ряд преимуществ. Быстро купить диплом университета у проверенной компании: doks-v-gorode-izhevsk-18.online
Equilibrio in situ
La Nivelación de Partes Móviles: Esencial para una Operación Sin Vibraciones
¿Alguna vez has notado vibraciones extrañas en una máquina? ¿O tal vez ruidos que no deberían estar ahí? Muchas veces, el problema está en algo tan básico como una falta de simetría en un elemento móvil. Y créeme, ignorarlo puede costarte bastante dinero .
El equilibrado de piezas es una tarea fundamental tanto en la fabricación como en el mantenimiento de maquinaria agrícola, ejes, volantes, rotores y componentes de motores eléctricos . Su objetivo es claro: impedir oscilaciones que, a la larga, puedan provocar desperfectos graves.
¿Por qué es tan importante equilibrar las piezas?
Imagina que tu coche tiene un neumático con peso desigual. Al acelerar, empiezan las vibraciones, el volante tiembla, e incluso puedes sentir incomodidad al conducir . En maquinaria industrial ocurre algo similar, pero con consecuencias mucho más graves :
Aumento del desgaste en cojinetes y rodamientos
Sobrecalentamiento de elementos sensibles
Riesgo de fallos mecánicos repentinos
Paradas no planificadas y costosas reparaciones
En resumen: si no se corrige a tiempo, una mínima falla podría derivar en una situación compleja.
Métodos de equilibrado: cuál elegir
No todos los casos son iguales. Dependiendo del tipo de pieza y su uso, se aplican distintas técnicas:
Equilibrado dinámico
Recomendado para componentes que rotan rápidamente, por ejemplo rotores o ejes. Se realiza en máquinas especializadas que detectan el desequilibrio en múltiples superficies . Es el método más exacto para asegurar un movimiento uniforme .
Equilibrado estático
Se usa principalmente en piezas como ruedas, discos o volantes . Aquí solo se corrige el peso excesivo en una única dirección. Es ágil, práctico y efectivo para determinados sistemas.
Corrección del desequilibrio: cómo se hace
Taladrado selectivo: se perfora la región con exceso de masa
Colocación de contrapesos: como en ruedas o anillos de volantes
Ajuste de masas: habitual en ejes de motor y partes relevantes
Equipos profesionales para detectar y corregir vibraciones
Para hacer un diagnóstico certero, necesitas herramientas precisas. Hoy en día hay opciones accesibles y muy efectivas, como :
✅ Balanset-1A — Tu asistente móvil para analizar y corregir oscilaciones
Бесплатная панель управления control panel 1Panel сервером с открытым исходным кодом. Удобный интерфейс, поддержка популярных ОС, автоматизация задач, резервное копирование, управление сайтами и базами. Оптимально для вебмастеров и системных администраторов.
услуги арбитражного юриста лучшие юристы
Купить дженерик сиалис 40мг с доставкой
по Санкт-Петербургу и Москве доступные цены высокое качество производства Индии
мостбет скачать приложение на андроид бесплатно http://mostbet22039.ru .
мостбет официальное приложение мостбет официальное приложение .
Enjoyed studying this, very good stuff, thankyou.
накрутка подписчиков в тг бесплатно накрутка подписчиков в тг бесплатно .
обустройство парковки на дачном участке обустройство парковки на дачном участке .
1 вин ставки на спорт онлайн https://1win22067.ru .
мастер натяжных потолков мастер натяжных потолков .
Hello.This post was extremely interesting, particularly because I was looking for thoughts on this topic last Thursday.
что такое мостбет что такое мостбет .
cloud headless headless browser
разработка программного обеспечения информационные системы для принятия решений
mostbet com android https://www.mostbet22038.ru .
сделать металлический бейджик в москве сделать бейджик на заказ
mostbet com официальный сайт mostbet com официальный сайт .
1win registration 1win registration .
накрутить подписчиков в телеграм бесплатно накрутить подписчиков в телеграм бесплатно
Мы изготавливаем дипломы любой профессии по доступным ценам. Стоимость зависит от выбранной специальности, года получения и образовательного учреждения: forexrassia.ru/kupit-diplom-byistro-i-nadezhno-luchshie-predlozheniya
Приобрести диплом института по выгодной цене можно, обращаясь к надежной специализированной компании. Мы готовы предложить документы ВУЗов, расположенных в любом регионе РФ. schooldj.ru/stoimost-diploma-s-zaneseniem-v-reestr-bez-xlopot/
Заказать диплом о высшем образовании. Изготовление документа занимает минимум времени, а стоимость при этом доступна каждому человеку. В результате вы сможете сберечь деньги и время и получить хорошую работу вашей мечты. Заказать диплом можно через сайт компании. – rsgroupofcompany.co.in/employer/russiany-diplomans
Вы покупаете документ в надежной и проверенной временем компании. Приобрести диплом академии– http://clubdir.ru/priobretenie-diploma-v-reestre-legalno-i-prosto/ – clubdir.ru/priobretenie-diploma-v-reestre-legalno-i-prosto/
Приобрести документ университета вы сможете в нашем сервисе. Мы предлагаем документы об окончании любых университетов РФ. Вы получите диплом по любой специальности, включая документы образца СССР. Даем 100% гарантию, что при проверке документа работодателями, подозрений не возникнет. freediplom.com/kupit-diplom-s-zaneseniem-v-reestr-bez-hassles/
Fantastic website. Plenty of useful info here. I?¦m sending it to a few pals ans additionally sharing in delicious. And naturally, thanks on your sweat!
Большой выбор дженериков на сайте https://dickfix.ru/ доступная цена
высокое качество производства Индии
1 вин вход http://1win22071.ru/ .
значки из металла на заказ москва корпоративные значки на заказ
мостбет зеркало скачать https://mostbet22037.ru .
бонус на спорт 1win 1win22072.ru .
1win официальный http://www.1win22074.ru .
изготовление значков из металла https://znachki-zakaz-moskva.ru
Hi there to every , as I am in fact eager of reading this blog’s post to be updated daily. It contains nice stuff.
https://melbet-affiliate-mongolia.com/
устройство стоянки для машины на даче https://betonnaya-parkovka-1122.ru .
lucky jet скачать приложение http://1win22072.ru .
вход 1вин https://1win22072.ru/ .
Equilibrado dinámico portátil:
Reparación ágil sin desensamblar
Imagina esto: tu rotor inicia con movimientos anormales, y cada minuto de inactividad cuesta dinero. ¿Desmontar la máquina y esperar días por un taller? Olvídalo. Con un equipo de equilibrado portátil, resuelves sobre el terreno en horas, sin mover la maquinaria.
¿Por qué un equilibrador móvil es como un “herramienta crítica” para máquinas rotativas?
Compacto, adaptable y potente, este dispositivo es una pieza clave en el arsenal del ingeniero. Con un poco de práctica, puedes:
✅ Evitar fallos secundarios por vibraciones excesivas.
✅ Minimizar tiempos muertos y mantener la operación.
✅ Trabajar en lugares remotos, desde plataformas petroleras hasta plantas eólicas.
¿Cuándo es ideal el equilibrado rápido?
Siempre que puedas:
– Acceder al rotor (eje, ventilador, turbina, etc.).
– Instalar medidores sin obstáculos.
– Modificar la distribución de masa (agregar o quitar contrapesos).
Casos típicos donde conviene usarlo:
La máquina presenta anomalías auditivas o cinéticas.
No hay tiempo para desmontajes (proceso vital).
El equipo es difícil de parar o caro de inmovilizar.
Trabajas en zonas remotas sin infraestructura técnica.
Ventajas clave vs. llamar a un técnico
| Equipo portátil | Servicio externo |
|—————-|——————|
| ✔ Rápida intervención (sin demoras) | ❌ Retrasos por programación y transporte |
| ✔ Monitoreo preventivo (evitas fallas mayores) | ❌ Solo se recurre ante fallos graves |
| ✔ Reducción de costos operativos con uso continuo | ❌ Gastos periódicos por externalización |
¿Qué máquinas se pueden equilibrar?
Cualquier sistema rotativo, como:
– Turbinas de vapor/gas
– Motores industriales
– Ventiladores de alta potencia
– Molinos y trituradoras
– Hélices navales
– Bombas centrífugas
Requisito clave: acceso suficiente para medir y corregir el balance.
Tecnología que simplifica el proceso
Los equipos modernos incluyen:
Apps intuitivas (guían paso a paso, sin cálculos manuales).
Evaluación continua (informes gráficos comprensibles).
Autonomía prolongada (ideales para trabajo en campo).
Ejemplo práctico:
Un molino en una mina comenzó a vibrar peligrosamente. Con un equipo portátil, el técnico localizó el error rápidamente. Lo corrigió añadiendo contrapesos y impidió una interrupción prolongada.
¿Por qué esta versión es más efectiva?
– Estructura más dinámica: Formato claro ayuda a captar ideas clave.
– Enfoque práctico: Se añaden ejemplos reales y comparaciones concretas.
– Lenguaje persuasivo: Frases como “kit de supervivencia” o “evitas fallas mayores” refuerzan el valor del servicio.
– Detalles técnicos útiles: Se especifican requisitos y tecnologías modernas.
¿Necesitas ajustar el tono (más técnico) o añadir keywords específicas? ¡Aquí estoy para ayudarte! ️
1 win. https://1win22069.ru .
Мы предлагаем дипломы любой профессии по приятным ценам. Мы готовы предложить документы техникумов, расположенных в любом регионе Российской Федерации. Документы делаются на “правильной” бумаге самого высокого качества. Это дает возможности делать государственные дипломы, не отличимые от оригинала. orikdok-4v-gorode-kaliningrad-39.ru
как использовать бонусы 1win казино как использовать бонусы 1win казино .
Где купить диплом по нужной специальности?
Мы изготавливаем дипломы любой профессии по разумным тарифам. Важно, чтобы дипломы были доступны для большого количества граждан. Быстро и просто купить диплом университета diplomus-spb.ru/vnesenie-diploma-v-reestr-tsena-10/
Приобрести диплом ВУЗа по невысокой цене можно, обращаясь к проверенной специализированной фирме. Заказать диплом: avtovladelez.ru/kupit-diplom-s-originalnyim-nomerom-i-zashhitoy-ot-poddelok
как потратить бонусы 1win http://www.1win22074.ru .
зеркало 1 win http://1win22071.ru/ .
Respect to author, some excellent entropy.
натяжной потолок со светильниками натяжной потолок со светильниками .
как зарегистрироваться в мостбет как зарегистрироваться в мостбет .
Мы предлагаем дипломы любой профессии по приятным тарифам.– linkmate.mn.co/posts/83461916
Заказать документ ВУЗа вы имеете возможность у нас в Москве. Приобрести диплом университета по невысокой стоимости возможно, обращаясь к надежной специализированной компании. krivr.com/profile/brittneye9341
Заказ диплома через проверенную и надежную компанию дарит ряд плюсов для покупателя. Заказать диплом о высшем образовании: ls.co-x.ru/2025/05/13/kupit-diplom-s-dostavkoy-v-lyuboy-gorod-rossii-udobno.html
Hi, I think your website might be having browser compatibility issues. When I look at your blog site in Chrome, it looks fine but when opening in Internet Explorer, it has some overlapping. I just wanted to give you a quick heads up! Other then that, superb blog!
card balance enquiry
Мы предлагаем дипломы любых профессий по приятным тарифам. Купить красный диплом — kyc-diplom.com/krasnyj-diplom.html
Купить диплом ВУЗа !
Приобретение диплома любого ВУЗа РФ у нас является надежным делом, поскольку документ заносится в реестр. Заказать диплом о высшем образовании kupit-diplom24.com/kupit-diplom-s-zaneseniem-bistro-i-bez-problem-2
Приобрести диплом ВУЗа!
Мы предлагаем документы любых учебных заведений, которые находятся на территории всей Российской Федерации.
fastdiploms.com/vnesti-diplom-v-reestr-2/
1вин промокоды 1вин промокоды .
парковка для машины на даче парковка для машины на даче .
1вин официальный вход http://www.1win22068.ru .
Useful info. Lucky me I discovered your site by accident, and I am stunned why this coincidence did not took place earlier! I bookmarked it.
накрутка просмотров тг канал бесплатно накрутка просмотров тг канал бесплатно
Купить диплом ВУЗа!
Наша компания предлагаетвыгодно и быстро заказать диплом, который выполняется на оригинальном бланке и заверен мокрыми печатями, водяными знаками, подписями официальных лиц. Наш документ пройдет любые проверки, даже с применением специфических приборов. Достигайте своих целей быстро и просто с нашей компанией- bazhenova.greatforum.ru/posting.phpmode=post&f=17&sid=ad96fcd7025a29c432e218f1423f3b3f
Great post, you have pointed out some excellent details , I also believe this s a very fantastic website.
Приобрести диплом института по выгодной стоимости возможно, обратившись к надежной специализированной компании. Купить документ о получении высшего образования вы сможете в нашей компании в столице. orikdok-4v-gorode-yaroslavl-76.online
Мы готовы предложить дипломы любой профессии по невысоким тарифам. Мы можем предложить документы ВУЗов, расположенных в любом регионе РФ. Документы выпускаются на “правильной” бумаге самого высшего качества. Это дает возможности делать государственные дипломы, которые не отличить от оригинала. orikdok-5v-gorode-tula-71.ru
как зарегистрироваться в мостбет https://mostbet22042.ru/ .
Заказать диплом о высшем образовании!
Мы можем предложить документы учебных заведений, которые находятся на территории всей Российской Федерации.
kupitediplom0027.ru/kupit-diplom-o-visshem-obrazovanii-bistro-i-prosto-3/
мостбет войти в личный кабинет мостбет войти в личный кабинет .
mostbet com android mostbet22040.ru .
Мы изготавливаем дипломы любых профессий по приятным тарифам. Заказ документа, который подтверждает окончание университета, – это рациональное решение. Приобрести диплом любого университета: adidassoccershoesfans.com/read-blog/7524_kupit-attestaty-za-11-klass-nedorogo.html
Купить диплом ВУЗа!
Наша компания предлагаетбыстро заказать диплом, который выполняется на оригинальном бланке и заверен печатями, штампами, подписями. Наш документ способен пройти любые проверки, даже при помощи специально предназначенного оборудования. Решите свои задачи быстро и просто с нашим сервисом- babygirls013.copiny.com/question/details/id/1087546
Thanks for the article https://l-spb.ru/
продвижение профессиональное сайтов заказать юзабилити сайта
1win приложение ios https://www.1win22072.ru .
изготовление эмблем из металла изготовление значков на заказ москва
Приобрести диплом университета по выгодной стоимости вы можете, обращаясь к надежной специализированной компании. Заказать документ о получении высшего образования можно у нас в столице. orikdok-3v-gorode-krasnodar-23.ru
мостбет андроид http://www.mostbet22041.ru .
1вин. 1вин. .
1вин сайт официальный 1вин сайт официальный .
Мы готовы предложить дипломы любых профессий по выгодным тарифам. Цена будет зависеть от той или иной специальности, года получения и ВУЗа: fatprawn.org/employer/premialnie-diplom-24
букмекерские ставки скачать официальные букмекерские ставки скачать официальные .
Купить диплом любого университета. Изготовление документа занимает минимум времени, а стоимость – невысокая. В результате вы получаете возможность сохранить деньги и время и получить работу мечты. Приобрести диплом под заказ вы имеете возможность через официальный сайт компании. – reeltalent.gr/employer/russiany-diplomans
Вы покупаете документ в надежной и проверенной временем компании. Заказать диплом о высшем образовании– http://univernovosib.ru/kupit-diplom-cherez-reestr-bistro-i-bezopasno/ – univernovosib.ru/kupit-diplom-cherez-reestr-bistro-i-bezopasno/
1 win. 1 win. .
Just a smiling visitor here to share the love (:, btw great style.
I conceive you have noted some very interesting details , thanks for the post.
mostbet скачать бесплатно mostbet скачать бесплатно .
Мы можем предложить дипломы любой профессии по приятным тарифам. Покупка диплома, подтверждающего обучение в ВУЗе, – это грамотное решение. Заказать диплом любого университета: babygirls013.copiny.com/question/details/id/1093107
как тратить бонусы спорт на 1win 1win22074.ru .
Как организовать строительство деревянного дома с нуля без лишних затрат
деревянный дом под ключ спб https://www.stroitelstvo-derevyannyh-domov78.ru .
Где купить диплом по нужной специальности?
Готовый диплом с приложением полностью отвечает требованиям и стандартам, неотличим от оригинала. Диплом о среднем специальном образовании – не проблема! collie.fatbb.ru/posting.phpmode=post&f=18&sid=7f574f279aa92611f7c9bcb146ad91d0
With havin so much content do you ever run into any problems of plagorism or copyright violation? My blog has a lot of exclusive content I’ve either authored myself or outsourced but it seems a lot of it is popping it up all over the web without my authorization. Do you know any methods to help prevent content from being ripped off? I’d truly appreciate it.
Мы предлагаем документы об окончании любых университетов России. Документы изготавливаются на фирменных бланках государственного образца. forestsnakes.teamforum.ru/viewtopic.phpf=28&t=6331
1 win ставки 1 win ставки .
Заказать диплом университета по невысокой стоимости вы можете, обращаясь к надежной специализированной компании. Заказать диплом о высшем образовании: goruss.ru/blogs/11357/Только-сегодня-купить-диплом-с-гарантией-подлинности
Где заказать диплом специалиста?
Мы готовы предложить дипломы любых профессий по приятным тарифам. Для нас очень важно, чтобы дипломы были доступны для подавляющей массы граждан. Приобрести диплом об образовании diplomk-v-krasnodare.ru/kak-zanesti-diplom-v-reestr-6/
Hi, i believe that i saw you visited my website thus i got here to “go back the desire”.I am attempting to find things to improve my web site!I guess its good enough to use some of your concepts!!
На нашем сайте https://doctorpills.ru представлен широкий выбор
дженериков производства Индии с доставкой во все регионы России
выкуп часов ролекс prodaja-rolex-chasi12.ru .
rolex trade in rolex trade in .
лига чемпионов футбол footballnews.store .
win ставки win ставки .
пластиковые окна studio5floor.ru .
Ищете идеальную квартиру в Москве или Подмосковье? У нас есть предложения, которые вас удивят! Живите в сердце столицы с развитой инфраструктурой, или выберите уютные районы Подмосковья для спокойной жизни. Мы предлагаем широкий выбор квартир: от современных студий до просторных семейных апартаментов. Наша команда специалистов поможет вам найти именно то, что нужно, учитывая все ваши пожелания и бюджет. Не упустите шанс стать владельцем жилья мечты! Звоните, и мы подберем лучшие варианты для вас! Живите там, где вам комфортно!
ЖК Богдановский Лес
онлайн займы http://www.investinq.ru .
Explore our exclusive collection featuring beautiful, legal young adult models aged 18+. Fresh, natural, and full of energy — our content showcases genuine passion and authenticity. All performers are fully verified and over 18 years old. Discover the perfect mix of youthful charm and legal clarity — no fakes, no risks, 100% compliant. kraken onion
.
1win кирүү http://1win22077.ru/ .
ван вин букмекерская ван вин букмекерская .
Роскошная аренда яхт на выходные и праздничные дни
арендовать яхту в сочи https://arenda-yahty-sochi323.ru/ .
fantastic post.Never knew this, regards for letting me know.
1 win официальный сайт регистрация 1 win официальный сайт регистрация .
часы ролекс ломбард купить https://www.prodaja-rolex-chasi12.ru .
mostbet. com https://www.mostbet22042.ru .
1win сайт 1win сайт .
приложение мостбет http://www.mostbet22041.ru .
типография санкт петербург https://tipografiya-spb7.ru
печатать в типографии типография срочно
выкуп часов ролекс http://prodaja-rolex-chasi13.ru/ .
типография недорого типография петербург
1win.kg 1win.kg .
Заказать диплом ВУЗа мы поможем. Купить диплом в Сургуте – diplomybox.com/kupit-diplom-surgut
Rattling excellent visual appeal on this website , I’d rate it 10 10.
1win xyz 1win xyz .
пластиковые окна https://studio5floor.ru/ .
онлайн займы https://investinq.ru/ .
Купить дженерики в магазине https://dzhenerik-dapoksetin.ru/ с доставкой
гарантированное качество от производителя из Индии
бетонный заезд на участок бетонный заезд на участок .
Купить документ о получении высшего образования можно у нас в столице. Купить диплом института по доступной цене возможно, обращаясь к надежной специализированной фирме. cafsistema.com.br/kak-bystro-i-bezopasno-kupit-diplom-v-rossii-204
1win кирүү https://www.1win14003.ru .
заезд на дачный участок и площадка для машины https://betonnyj-zaezd-na-uchastok-1122.ru .
Город любви признан одним из наиболее привлекательных городов мира. Постоянно миллионы туристов направляются сюда, чтобы полюбоваться его легендарными достопримечательностями.
Елисейские поля – это лишь малая доля того, что стоит посетить в этом восхитительном городе. Однако индивидуальное путешествие может оказаться довольно затруднительным без проверенного путеводителя.
В связи с этим мы рекомендуем воспользоваться услугами v-paris.ru, который предоставляет полную информацию о Париже.
Профессиональные гиды окажут помощь вам подготовить незабываемое путешествие. Экскурсии составлены с учетом всевозможных интересов и возможностей.
Вы получите возможность выбрать идеальный формат путешествия, что идеально соответствует вашим ожиданиям.
Частные прогулки предоставят шанс основательнее изучить с культурой города. Групповые экскурсии окажутся прекрасным вариантом встретиться с попутчиками.
Галереи Парижа требуют особого внимания. Музей Родена хранят редчайшие экспонаты международного искусства.
Кулинарные прогулки познакомят с вам секреты национальной кухни. Сможете отведать аутентичные французские деликатесы.
Вечерний Париж предстанет перед вами в кардинально ином свете. Освещение легендарных достопримечательностей рождает по-настоящему магическую атмосферу.
Семейные экскурсии созданы специально для гостей города с юными исследователями. Развивающие элементы сделают экскурсию интересной для всей семьи.
Используйте случай открыть для себя Париж глазами настоящих профессионалов!
скачать 1вин казино http://1win14002.ru/ .
скачать 1win официальный сайт бесплатно скачать 1win официальный сайт бесплатно .
на карту сбербанка” на карту сбербанка” .
What¦s Taking place i am new to this, I stumbled upon this I’ve found It absolutely helpful and it has aided me out loads. I hope to contribute & aid different users like its helped me. Great job.
Pretty nice post. I just stumbled upon your blog and wished to say that I have really enjoyed browsing your blog posts. After all I’ll be subscribing to your rss feed and I hope you write again very soon!
lucky jet скачать приложение http://1win14003.ru .
Заказать документ ВУЗа можно в нашей компании в столице. Приобрести диплом института по доступной стоимости возможно, обратившись к проверенной специализированной компании. zdshi-tula.ru/forum/PAGE_NAME=message&FID=1&TID=615&MID=60064&result=new#message60064
казино авиатор http://1win22078.ru .
I think this web site holds some really good info for everyone : D.
Мы предлагаем дипломы любой профессии по приятным ценам. Мы можем предложить документы техникумов, которые расположены на территории всей РФ. Дипломы и аттестаты выпускаются на “правильной” бумаге высшего качества. Это позволяет делать настоящие дипломы, не отличимые от оригиналов. orikdok-1v-gorode-orenburg-56.online
Купить дженерики с доставкой на сайте https://dzhenerik-dapoxetine-kupit.ru/
большой выбор доступные цены
Greetings! Very useful advice in this particular post!
It’s the little changes that will make the largest changes.
Many thanks for sharing!
Also visit my site :: real review
I really like your writing style, wonderful info , thanks for putting up : D.
Приобрести диплом института!
Мы изготавливаем дипломы любых профессий по приятным ценам. Вы заказываете диплом в надежной и проверенной компании. : burevestnik.listbb.ru/viewtopic.phpf=3&t=1229
как потратить бонусы в 1 win http://www.1win14001.ru .
Comercializamos máquinas para balanceo!
Producimos nosotros mismos, construyendo en tres ubicaciones al mismo tiempo: Portugal, Argentina y España.
✨Ofrecemos equipos altamente calificados y debido a que somos productores directos, nuestros costos superan en competitividad.
Disponemos de distribución global sin importar la ubicación, consulte los detalles técnicos en nuestro sitio web.
El equipo de equilibrio es móvil, de bajo peso, lo que le permite balancear cualquier eje rotativo en diversos entornos laborales.
mostbet скачать 2024 mostbet скачать 2024 .
Мы изготавливаем дипломы любой профессии по приятным тарифам. Мы предлагаем документы ВУЗов, расположенных в любом регионе РФ. Документы выпускаются на бумаге высшего качества. Это дает возможность делать настоящие дипломы, которые невозможно отличить от оригинала. orikdok-3v-gorode-vladivostok-25.online
1win.com официальный сайт 1win.com официальный сайт .
живые подписчики в тг [url=https://vc.ru/telegram/2003510-nakrutka-zhivykh-podpischikov-v-telegram]живые подписчики в тг[/url]
ван вин фрибет ван вин фрибет .
ставки на спорт бишкек онлайн ставки на спорт бишкек онлайн .
войти в мостбет http://mostbet22043.ru/ .
Купить диплом ВУЗа по невысокой цене возможно, обращаясь к проверенной специализированной компании. Приобрести документ университета можно в нашей компании. orikdok-4v-gorode-kaluga-40.ru
приложение мостбет приложение мостбет .
официальный сайт мостбет официальный сайт мостбет .
Дженерики для мужчин на сайте https://dzheneriki-viagra.ru быстрая доставка
широкий выбор по выгодным ценам
Ищете, где купить контрактный двигатель с гарантией и доставкой? Мы предлагаем проверенные агрегаты с пробегом до 100 тыс. км из Японии, Европы и Кореи. Подбор, установка, оформление документов — всё под ключ.
футбол лига чемпионов финал http://footballnews.store .
мостбет войти mostbet22041.ru .
срочная печать визиток печать дизайнерских визиток
казино мосбет http://mostbet22045.ru .
мостбет букмекерская контора http://www.mostbet22045.ru .
You completed a few nice points there. I did a search on the issue and found the majority of people will go along with with your blog.
1win регистрация 1win22079.ru .
ставки на мостбет https://www.mostbet22045.ru .
типография печать визиток печать визиток на пластике
This web site is really a walk-through for all of the info you wanted about this and didn’t know who to ask. Glimpse here, and you’ll definitely discover it.
I am glad to be one of several visitors on this great website (:, thanks for posting.
1 вин. 1 вин. .
Станки для производства вальцовочный станок купить металлообработка, резка, сварка, автоматизация. Продажа новых и восстановленных моделей от ведущих брендов. Гарантия, обучение персонала, техподдержка.
Мы предлагаем выгодно заказать диплом, который выполнен на бланке ГОЗНАКа и заверен печатями, водяными знаками, подписями. Данный диплом способен пройти лубую проверку, даже с использованием профессионального оборудования. soniamittal0000.copiny.com/question/details/id/1104330
Что входит в лечение алкоголизма: детокс, капельницы, кодирование
платная наркологическая клиника https://www.spb-lechenie-alkogolizma.ru/ .
1 win pro 1 win pro .
ваучер 1win сегодня ваучер 1win сегодня .
Приобрести диплом института по выгодной цене возможно, обращаясь к надежной специализированной фирме. Купить документ университета вы сможете в нашей компании в Москве. orikdok-3v-gorode-rostov-na-donu-61.online
кайт школа египет
скачать бк осталось только найти предпочтение подходящее https://mostbet22044.ru/ .
Диплом университета России!
Без присутствия диплома очень непросто было продвинуться по карьерной лестнице. Приобрести диплом под заказ вы имеете возможность через сайт компании: x70795vj.beget.tech/2025/04/23/diplomy-pokupat-ili-uchitsya.html
1win комиссия на вывод https://1win14003.ru .
Дженерики на сайте https://ed-apteka.ru/ с доставкой по городу и области
курьером в день заказа по низким ценам
mostbet kg скачать на андроид mostbet22044.ru .
mostbet. com https://mostbet22043.ru/ .
Онлайн сервис скачать изображения с сайта для получения картинок с любого сайта. Вставьте URL — и мгновенно получите изображения на своём устройстве. Поддержка всех форматов, никаких ограничений и лишних действий. Работает бесплатно и круглосуточно.
Pin Up Casino Mexico: Bonos que Cambian el Juego https://www.google.com.uy/url?q=https://suryucatan.tecnm.mx/pages/?pinup_casino_m_xico__la_mejor_experiencia_de_juego_en_l_nea.html – Pin Up
Магазин шин с постоянными распродажами и выгодными акциями
шины и диски шины и диски .
I love your blog.. very nice colors & theme. Did you create this website yourself? Plz reply back as I’m looking to create my own blog and would like to know wheere u got this from. thanks
id mostbet com id mostbet com .
Just a smiling visitant here to share the love (:, btw outstanding layout.
кайтсерфинг египет
Мы предлагаем максимально быстро купить диплом, который выполняется на оригинальной бумаге и заверен печатями, штампами, подписями официальных лиц. Наш документ пройдет лубую проверку, даже с применением специально предназначенного оборудования. minecraftcommand.science/forum/general/topics/1ccf31fd-80f9-4b75-a3d2-ed08b6e88888
1win партнерка вход https://www.1win22080.ru .
Pin Up Casino: Tu Puerta al Entretenimiento en Linea en Mexico https://www.google.by/url?sa=t&url=https://suryucatan.tecnm.mx/pages/?pinup_casino_m_xico__la_mejor_experiencia_de_juego_en_l_nea.html – Pin Up Mexico
Нужна https://pechat-nakleek1.ru? Закажите стикеры любых форм и размеров с доставкой. Яркие, прочные, влагостойкие наклейки на пленке и бумаге — для рекламы, декора, маркировки и упаковки.
1вин кз скачать 1win14002.ru .
Изготовление и печать наклейки на заказ спб. Стикеры для бизнеса, сувениров, интерьера и упаковки. Печатаем тиражами от 1 штуки, любые материалы и формы. Качественно, недорого, с доставкой по СПб.
Профессиональная https://tipografiya-spb33.ru. Изготовим любые печатные материалы — от визиток до каталогов. Качественно, быстро, с гарантией. Закажите онлайн или приезжайте в офис в СПб.
1 вин. https://1win14001.ru .
https://emmkkt.ru
Oh my goodness! an incredible article dude. Thank you Nonetheless I’m experiencing subject with ur rss . Don’t know why Unable to subscribe to it. Is there anyone getting identical rss drawback? Anybody who is aware of kindly respond. Thnkx
mostbet лицензия https://mostbet22045.ru/ .
cialis 5 mg confezione da 14 prezzo : a medication containing tadalafil, treats erectile dysfunction and benign prostatic hyperplasia. In Italy, a 28-tablet pack of Cialis 5 mg is priced at approximately €165.26, though prices vary by pharmacy and promotions. Generic options, like Tadalafil DOC Generici, range from €0.8–€2.6 per tablet, offering a cheaper choice. Always consult a doctor, as a prescription is required.
1vin зеркало http://www.1win14004.ru .
въезд на дачный участок въезд на дачный участок .
Где приобрести диплом специалиста?
Готовый диплом с приложением отвечает запросам и стандартам, неотличим от оригинала. Заказать диплом о высшем образовании – не проблема! forum.omnicomm.pro/index.php/topic,124141.0.html
Заказать документ о получении высшего образования можно у нас в Москве. Приобрести диплом ВУЗа по выгодной цене возможно, обратившись к надежной специализированной фирме. chillinghippo.com/kak-bystro-i-bezopasno-kupit-diplom-v-rossii-53
Мы оказываем услуги по производству и продаже документов об окончании любых ВУЗов РФ. Документы производят на настоящих бланках государственного образца. availablejobsza.co.za/employer/aurus-diploms
I’d have to test with you here. Which is not one thing I usually do! I enjoy studying a submit that can make people think. Additionally, thanks for permitting me to remark!
1win официальный сайт http://1win22079.ru .
seo продвижение сайта заказать http://prodvizhenie-sajtov-v-moskve.ru .
переезд через канаву на даче http://betonnyj-zaezd-na-uchastok-1122.ru .
Equilibrio in situ
La Nivelación de Partes Móviles: Esencial para una Operación Sin Vibraciones
¿ En algún momento te has dado cuenta de movimientos irregulares en una máquina? ¿O tal vez escuchaste ruidos anómalos? Muchas veces, el problema está en algo tan básico como una irregularidad en un componente giratorio . Y créeme, ignorarlo puede costarte caro .
El equilibrado de piezas es un paso esencial en la construcción y conservación de maquinaria agrícola, ejes, volantes y elementos de motores eléctricos. Su objetivo es claro: prevenir movimientos indeseados capaces de generar averías importantes con el tiempo .
¿Por qué es tan importante equilibrar las piezas?
Imagina que tu coche tiene un neumático con peso desigual. Al acelerar, empiezan los temblores, el manubrio se mueve y hasta puede aparecer cierta molestia al manejar . En maquinaria industrial ocurre algo similar, pero con consecuencias mucho más graves :
Aumento del desgaste en bearings y ejes giratorios
Sobrecalentamiento de elementos sensibles
Riesgo de fallos mecánicos repentinos
Paradas sin programar seguidas de gastos elevados
En resumen: si no se corrige a tiempo, una leve irregularidad puede transformarse en un problema grave .
Métodos de equilibrado: cuál elegir
No todos los casos son iguales. Dependiendo del tipo de pieza y su uso, se aplican distintas técnicas:
Equilibrado dinámico
Perfecto para elementos que operan a velocidades altas, tales como ejes o rotores . Se realiza en máquinas especializadas que detectan el desequilibrio en dos o más planos . Es el método más preciso para garantizar un funcionamiento suave .
Equilibrado estático
Se usa principalmente en piezas como llantas, platos o poleas . Aquí solo se corrige el peso excesivo en un plano . Es rápido, fácil y funcional para algunos equipos .
Corrección del desequilibrio: cómo se hace
Taladrado selectivo: se elimina material en la zona más pesada
Colocación de contrapesos: tal como en neumáticos o perfiles de poleas
Ajuste de masas: común en cigüeñales y otros componentes críticos
Equipos profesionales para detectar y corregir vibraciones
Para hacer un diagnóstico certero, necesitas herramientas precisas. Hoy en día hay opciones accesibles y muy efectivas, como :
✅ Balanset-1A — Tu aliado portátil para equilibrar y analizar vibraciones
https://expert-kaluga.ru
Приобрести диплом любого университета!
Мы можем предложить документы институтов, которые находятся на территории всей Российской Федерации.
diplomc-v-ufe.ru/kupite-diplom-visshego-obrazovaniya-s-zaneseniem-v-reestr-4/
Заказать диплом университета!
Наша компания предлагаетбыстро купить диплом, который выполняется на бланке ГОЗНАКа и заверен печатями, водяными знаками, подписями должностных лиц. Диплом пройдет лубую проверку, даже с применением специфических приборов. Достигайте свои цели быстро и просто с нашей компанией- citizen.odessoscolour.com/2025/04/13/kupit-diplom-prostoe-reshenie-dlja-slozhnyh-zadach-30
But a smiling visitant here to share the love (:, btw great style.
Мы предлагаем дипломы любой профессии по приятным тарифам. Мы готовы предложить документы техникумов, которые расположены на территории всей России. Дипломы и аттестаты выпускаются на бумаге самого высокого качества. Это позволяет делать настоящие дипломы, которые невозможно отличить от оригинала. orikdok-2v-gorode-vladivostok-25.online
продвижение сайта в топ цена http://www.prodvizhenie-sajtov-v-moskve.ru/ .
Заказать документ института можно у нас в столице. Купить диплом университета по невысокой стоимости вы можете, обращаясь к проверенной специализированной компании. jooble.az/employer/frees-diplom
Dragon Link delivers thrilling gameplay, stunning visuals, and huge jackpot potential— perfect for high-stakes action lovers! Dragon Link
analizador de vibrasiones
Solución rápida de equilibrio:
Soluciones rápidas sin desmontar máquinas
Imagina esto: tu rotor comienza a vibrar, y cada minuto de inactividad cuesta dinero. ¿Desmontar la máquina y esperar días por un taller? Ni pensarlo. Con un equipo de equilibrado portátil, corriges directamente en el lugar en horas, preservando su ubicación.
¿Por qué un equilibrador móvil es como un “paquete esencial” para máquinas rotativas?
Fácil de transportar y altamente funcional, este dispositivo es la herramienta que todo técnico debería tener a mano. Con un poco de práctica, puedes:
✅ Evitar fallos secundarios por vibraciones excesivas.
✅ Reducir interrupciones no planificadas.
✅ Trabajar en lugares remotos, desde plataformas petroleras hasta plantas eólicas.
¿Cuándo es ideal el equilibrado rápido?
Siempre que puedas:
– Contar con visibilidad al sistema giratorio.
– Colocar sensores sin interferencias.
– Realizar ajustes de balance mediante cambios de carga.
Casos típicos donde conviene usarlo:
La máquina rueda más de lo normal o emite sonidos extraños.
No hay tiempo para desmontajes (operación prioritaria).
El equipo es de alto valor o esencial en la línea de producción.
Trabajas en zonas remotas sin infraestructura técnica.
Ventajas clave vs. llamar a un técnico
| Equipo portátil | Servicio externo |
|—————-|——————|
| ✔ Sin esperas (acción inmediata) | ❌ Demoras por agenda y logística |
| ✔ Mantenimiento proactivo (previenes daños serios) | ❌ Solo se recurre ante fallos graves |
| ✔ Reducción de costos operativos con uso continuo | ❌ Costos recurrentes por servicios |
¿Qué máquinas se pueden equilibrar?
Cualquier sistema rotativo, como:
– Turbinas de vapor/gas
– Motores industriales
– Ventiladores de alta potencia
– Molinos y trituradoras
– Hélices navales
– Bombas centrífugas
Requisito clave: espacio para instalar sensores y realizar ajustes.
Tecnología que simplifica el proceso
Los equipos modernos incluyen:
Aplicaciones didácticas (para usuarios nuevos o técnicos en formación).
Diagnóstico instantáneo (visualización precisa de datos).
Autonomía prolongada (ideales para trabajo en campo).
Ejemplo práctico:
Un molino en una mina empezó a generar riesgos estructurales. Con un equipo portátil, el técnico localizó el error rápidamente. Lo corrigió añadiendo contrapesos y evitó una parada de 3 días.
¿Por qué esta versión es más efectiva?
– Estructura más dinámica: Organización visual facilita la comprensión.
– Enfoque práctico: Se añaden ejemplos reales y comparaciones concretas.
– Lenguaje persuasivo: Frases como “herramienta estratégica” o “previenes consecuencias críticas” refuerzan el valor del servicio.
– Detalles técnicos útiles: Se especifican requisitos y tecnologías modernas.
¿Necesitas ajustar el tono (más técnico) o añadir keywords específicas? ¡Aquí estoy para ayudarte! ️
mostbet azerbaycan rəsmisi http://mostbet3042.ru/ .
официальный сайт 1 вин официальный сайт 1 вин .
Безболезненная https://lazernaya-epilyaciya33.ru Удаление волос на любом участке тела. Работаем с чувствительной кожей, используем новейшие лазеры. Акции, абонементы, индивидуальный подход.
Профессиональная https://lazernaya-epilyaciya11.ru. Эффективное удаление волос на любом участке тела, подход к любому фототипу. Сертифицированные специалисты, стерильность, скидки. Запишитесь прямо сейчас!
Удаление волос сеансы лазерной эпиляции: гладкая кожа на долгое время. Аппараты последнего поколения, опытные мастера, комфортная обстановка. Эпиляция для женщин и мужчин. Онлайн-запись, гибкие цены, без лишнего стресса.
Купить диплом ВУЗа по доступной цене можно, обратившись к надежной специализированной фирме. Купить документ о получении высшего образования вы сможете у нас в столице. orikdok-3v-gorode-yoshkar-ola-12.ru
Great write-up, I?¦m regular visitor of one?¦s website, maintain up the nice operate, and It’s going to be a regular visitor for a lengthy time.
I am constantly searching online for posts that can help me. Thanks!
Ночная жизнь Парижа поражает своим многообразием. От роскошных шоу до атмосферных джазовых клубов – развлечения найдутся на любой вкус.
Архитектура Парижа представляет различные периоды. Начиная со старинных построек до ультрасовременных дизайнерских концепций – город поражает разнообразием.
Парки и сады предоставляют замечательную альтернативу расслабиться от активного осмотра. Булонский лес пользуются спросом среди гостей города.
Река Сена занимает важное место в ландшафте города. Прогулки по реке предлагают совершенно новый взгляд на знакомые достопримечательности.
Архитектурные переходы демонстрируют истинные шедевры. Каждый мост хранит свою уникальную историю.
Французские привычки и нюансы достойны понимания и почтения. Осведомленность элементарных принципов поведения поможет комфортнее чувствовать себя.
Фотографирование в Париже – это отдельный вид искусства. Каждый уголок города создает потрясающие ракурсы для создания прекрасных кадров.
Детальные сведения о всех аспектах поездки в Париж вы получите на сайте bonjourfrancia.ru. Данный портал станет вашим верным гидом в подготовке прекрасного парижского приключения.
Мы можем предложить дипломы любых профессий по выгодным ценам. Заказ диплома, подтверждающего окончание университета, – это выгодное решение. Заказать диплом любого ВУЗа: alconafft.iboards.ru/viewtopic.phpf=9&t=3574
Заказать диплом об образовании!
Мы можем предложить дипломы любой профессии по приятным ценам— sezamclub.ru
Продажа дженериков на сайте https://generic-dapoxetine.ru/ широкий выбор
по доступным ценам быстрая доставка по городу и области
I have recently started a website, the info you offer on this site has helped me greatly. Thanks for all of your time & work.
Производим и монтируем стеклянные душевые ограждения с учетом интерьера
душевые ограждения купить в спб https://www.steklo777777.ru/ .
Заказать диплом любого университета!
Мы готовы предложить документы любых учебных заведений, которые расположены в любом регионе России.
diplomservis.com/kupit-diplom-s-zaneseniem-v-reestr-bistro-i-nadezhno-24/
What’s up Dear, are you really visiting this web site regularly, if so after that you will absolutely get nice knowledge.
https://tehnoprice.in.ua/shokery-protiv-napadayushchikh-kak-zashchitit-sebya-v-opasnoy-situatsii
натяжной потолок с установкой в липецке http://potolkilipetsk.ru/ .
Мы изготавливаем дипломы любой профессии по приятным тарифам. Мы готовы предложить документы техникумов, которые находятся на территории всей России. Документы печатаются на “правильной” бумаге самого высшего качества. Это позволяет делать государственные дипломы, не отличимые от оригиналов. orikdok-v-gorode-nalchik-7.ru
I have been exploring for a little for any high quality articles or blog posts on this kind of area . Exploring in Yahoo I at last stumbled upon this site. Reading this information So i am happy to convey that I have a very good uncanny feeling I discovered exactly what I needed. I most certainly will make sure to don’t forget this web site and give it a glance regularly.
ProDentim is a revolutionary oral probiotic supplement formulated with billions of live, beneficial bacteria designed to improve the oral microbiome—the delicate ecosystem inside your mouth.
Pretty nice post. I simply stumbled upon your weblog and wanted to say that I have truly enjoyed browsing your weblog posts. In any case I’ll be subscribing on your rss feed and I’m hoping you write again very soon!